Sometimes it is best to get a rebuilt valve body but here are the shift solenoids locations so you can change them out and some notes on doing the job. Check the images below.
Clean
- Control valve assembly thoroughly in clean solvent.
- Move valves with a pick or a small screwdriver to dislodge any dirt or debris that may have accumulated.
- Air dry.
CAUTION: Some valves are under pressure. Cover the bores while removing the roll pins or personal injury could result.
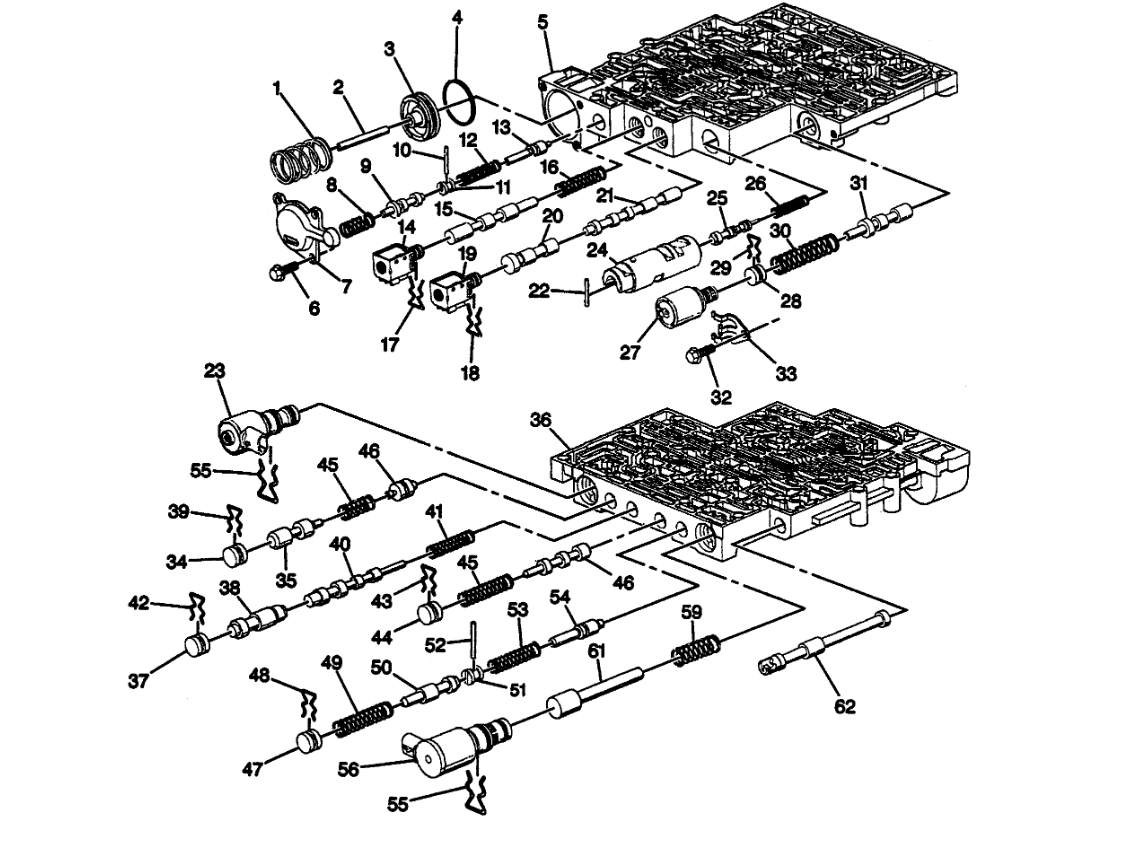
Important: Valves, springs, and bushings must be laid out on a clean surface in the exact sequence they were removed and as shown.
DISASSEMBLE
1. Pressure control solenoid retainer bolt, retainer, and the solenoid.
2. Bore plug retainer clip, bore plug, and the valve train.
3. 2-3 shift solenoid retainer, solenoid, and the valve train.
4. 1-2 shift solenoid retainer, solenoid, and the valve train.
5. Accumulator valve train retainer pin, bore plug, and the valve train.
6. Forward accumulator cover bolts and cover.
7. Forward accumulator spring, piston, and the pin.
8. Low overrun valve spring and the valve.
9. Retainer pin, bore plug, and forward abuse valve train.
10. Manual valve.
11. 3-2 control solenoid retainer clip and the solenoid.
12. Bore plug retainer, bore plug, and the 3-2 control valve train.
13. 3-2 downshift bore plug retainer, bore plug, and the valve train.
14. Reverse abuse bore plug retainer pin, bore plug, and the valve train.
15. 3-4 shift valve bore plug retainer, bore plug, and the valve train.
16. Torque converter clutch signal valve bore plug retainer, bore plug, and the valve.
Clean
- All valves, springs, bushings, and control valve body in clean solvent.
- Dry using compressed air.
Inspect
- All valves and bushings for:
- Porosity.
- Scoring.
- Nicks.
- Scratches.
- Springs for damaged or distorted coils.
- Valve body casting for:
- Porosity.
- Cracks.
- Interconnected oil passages.
- Damaged machined surfaces.
ASSEMBLE
- Control valve assembly exactly as shown.
- Notice the position of the valve lands and the bushing passages.
- Position the pressure control solenoid so the connector tabs face outward.
Check out the images (below). Please let us know if you need anything else to get the problem fixed.
Images (Click to make bigger)
SPONSORED LINKS
Thursday, January 5th, 2023 AT 11:18 AM