Hello - Dave
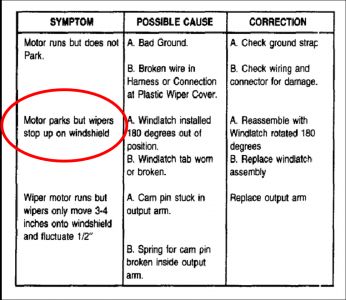
There are a couple of TSBs out on the wipers...........I have attached them for your review. It looks like the troubleshooting for the first one I attached states your problem....a wind latch tab worn or broken.
I would first removed the blades............let the wiper motor run for a few minutes......then turn off and install the blades in the correct position. Then turn on and see if the problem remains.
If it does, then look at these TSBs, especially the wind latch tab........that is probably your problem.
Wipers/Washers - Wiper Motor Transfer Tips
Notes
Article No.
03-7-2
04/14/03
ELECTRICAL - FRONT WIPER MOTOR - MOUNTING
BRACKET AND DEPRESSED PARK OUT ARM -
TRANSFER SERVICE TIPS
FORD:
1987-1995 TAURUS
1987-2002 CROWN VICTORIA
LINCOLN:
1987-1997 TOWN CAR
1988-1997 CONTINENTAL
1993-1998 MARK VIII
MERCURY:
1987-1995 SABLE
1987-2002 GRAND MARQUIS
Article 02-10-1 is being republished in its entirety to update the Service Procedure.
ISSUE
Motorcraft remanufactured front wiper motors do not include the mounting bracket or depressed park output arm. The mounting bracket and depressed park output arm must be transferred from the old wiper motor to the replacement wiper motor. Care must be taken to ensure proper orientation of the windlatch assembly and depressed park output arm.
ACTION
The front wiper motor mounting bracket and output arm must be removed from the old front wiper motor and installed on the remanufactured wiper motor if wiper motor replacement is required. Refer to the following service information for details.
SERVICE PROCEDURE
Disassembly:
1. Using a small flat bladed screwdriver, carefully remove the plastic output arm dust cover from the old wiper motor output arm to expose the output arm hold down bolt.
NOTE THE DUST COVER WILL BE REINSTALLED DURING ASSEMBLY.
2. Remove the output arm attaching bolt.
3. Using a small light hammer, gently tap the backside of the output arm to remove the output arm from the wiper motor output shaft.
Carefully observe the orientation of the plastic windlatch slide.
NOTE TAKE CARE NOT TO DAMAGE THE PLASTIC WINDLATCH SLIDE OR BRACKET. IT IS NOT NECESSARY TO REMOVE THE PLASTIC WINDLATCH SLIDE OR METAL GUIDE FROM THE WIPER MOTOR MOUNTING BRACKET.
4. Remove the three (3) 8 mm wiper motor mounting bracket attaching bolts.
5. Remove the wiper motor bracket.
Assembly:
1. Position and align the old wiper motor mounting bracket onto the new wiper motor.
2. Reinstall the three wiper motor mounting bracket bolts and torque to 108-156 Lb-in. (13-17 N.m).
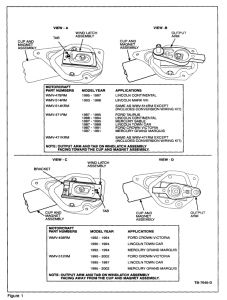
3. Verify that the plastic windlatch slide is positioned so that it can move an equal distance beyond both ends of the depressed park windlatch guide bracket. Make sure the tab on the windlatch is oriented in the proper direction for the specific application (Figure 1, views A and C).
4. Apply a thin film of Silicone Brake Caliper Grease (Motorcraft Part XG-3-A) to the mating surfaces of the plastic windlatch slide and the output arm.
5. Install the output arm onto the wiper motor output shaft according to the specific application (Figure 1, views B and D).
NOTE THE OUTPUT SHAFT AND ARM ARE KEYED FOR PROPER ORIENTATION.
6. Reinstall the output arm bolt and torque to 132-180 Lb-in. (15-20 N.m).
7. Reinstall the plastic output arm dust cover.
8. Rotate the output arm slowly clockwise one full turn by hand, then turn the output arm by hand counter-clockwise to seat the detent in the output arm against the stop on the plastic windlatch slide.
9. Position the vehicle wiper arm linkage so that the wiper blades are at the bottom of the windshield, just above the parked position.
10. Install the wiper motor in the vehicle and connect the wiper arm linkage per the procedures outlined in Section 01-16 or Section 501-16 Wiper and Washer Systems - Removal and Installation, of the appropriate model year Workshop Manual.
Next One

Front Wiper Motor - Erratic Operation
Service Procedure
Notes
NOTE THIS TSB IS INTENDED TO HELP IDENTIFY AND DIAGNOSE ERRATIC WIPER CONDITIONS. IF THE WIPER SYSTEM IS COMPLETELY INOPERATIVE, PLEASE REFER TO SECTION 01-16 OF THE APPROPRIATE MODEL YEAR WORKSHOP MANUAL FOR DIAGNOSIS AND REPAIR.
NOTE OVERALL WIPER SYSTEM INTEGRITY SHOULD BE CHECKED, BOTH MECHANICAL AND ELECTRICAL, BEFORE PERFORMING THIS ARTICLE. INSPECT ALL WIPER RELATED WIRING HARNESS CONNECTORS FOR CORROSION AND FULLY SEATED INSTALLATION. INSPECT MECHANICAL LINKAGE FOR DAMAGE OR BINDING. SERVICE AS NEEDED.
NOTE IF WIPER MOTOR AND WIPER MOTOR WIRING KIT WERE INSTALLED PER TSB 95-8-2, CHECK THAT THESE REPAIRS WERE PERFORMED CORRECTLY.
1. Perform Cold System Test.
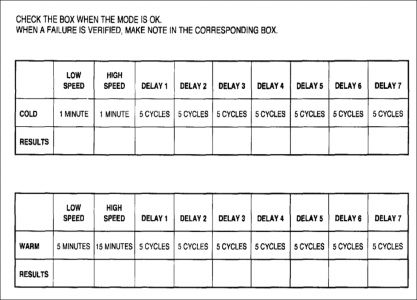
NOTE COMPLETE ALL STEPS OF THIS TEST EVEN IF A FAILURE IS VERIFIED AT ANY POINT OF THIS EXERCISE. USE THE TABLE IN FIGURE 1 TO RECORD WIPER OPERATION IN STEPS C, D AND E.
a. Engine must be running with the hood closed.
b. IMPORTANT : Wet windshield with water to prevent wiper blades from wearing prematurely.
c. Run wipers on Low speed for 1 minute.
d. Run wipers on High speed for 1 minute.
e. Run wipers on Interval, allowing wipers to cycle 5 times in each of the 7 modes of delay.
f. If BOTH wiper system failures are verified during this test (as defined in Step 3), proceed to Step 3.
g. If ONE or NO wiper system failures are verified (as defined in Step 3), proceed to Step 2 and perform the Warm System Test.
2. Perform Warm System Test.
NOTE COMPLETE ALL STEPS OF THIS TEST EVEN IF A FAILURE IS VERIFIED AT ANY POINT OF THIS EXERCISE. USE THE TABLE IN FIGURE 1 TO RECORD WIPER OPERATION IN STEPS C, D AND E.
a. Engine must be running with hood closed.
b. IMPORTANT : Wet windshield with water to prevent wiper blades from wearing prematurely.
c. Run wipers on Low speed for 5 minutes.
d. Run wipers on High speed for 15 minutes.
e. Run wipers on Interval, allowing wipers to cycle 5 times in each of the 7 modes of delay.
f. If a wiper system failure is verified during this test (as defined in Step 3), proceed to Step 3.
g. If no wiper system failures are verified, recheck procedures Step 1 through 2.
3. Repair the wiper system by evaluating its operation and comparing to the following symptoms.
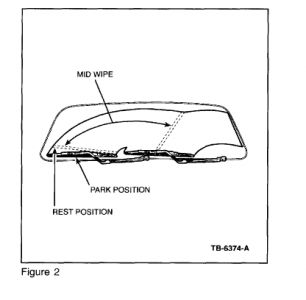
NOTE REFER TO FIGURE 2 FOR WIPER BLADE LOCATION TERMINOLOGY.
^ SYMPTOM # 1. If wiper blades go to the park position or stay in the rest position - replace the multi-function switch (wiper switch). Refer to parts list at the end of this article.
^ SYMPTOM # 2. If wiper blades stop movement anywhere in mid-wipe travel during Low, High or Interval modes - replace the wiper motor. Refer to parts list at the end of this article.
a. If both symptoms are observed during the System Tests, replace both the multi-function switch and the wiper motor. Refer to parts list at the end of this article.
b. If only one of the symptoms are observed after completing both the Cold and Warm system tests, replace the component which corresponds with the observed symptom.
c. Continue to Step 4 after repairs are completed.
4. Repair Verification.
a. Engine must be running with hood closed.
b. IMPORTANT : Wet windshield with water to prevent wiper blades from wearing prematurely.
c. Run wipers on Interval, allowing wipers to cycle 3 times in each of the 7 modes of delay.
d. Run wipers in Low and High speeds for 5 cycles.
5. If wiper system problems continue, verify all preliminary checks were performed completely. Refer to section 01-16 of the appropriate model year Workshop Manual for further diagnosis and repair. Verify system has good power and ground as illustrated in Electrical & Vacuum Troubleshooting Manual (EVITM) Section 80-1.
NOTE SOME VEHICLES MAY REQUIRE A WIPER MOTOR WIRING KIT TO BE USED IN CONJUNCTION WITH A NEW WIPER MOTOR. REFER TO TSB 95-8-2 FOR YOUR SPECIFIC APPLICATION AND ORDER THE CORRESPONDING WIPER MOTOR WIRING KIT AS NEEDED.
Dec 29, 2008 at 8:22 AM