After removing top access heater cover cut both heater core pipes and slide out from under firewall to make quick disconnects more accessible.
Disconnect negative battery cable. Drain radiator. Remove instrument panel. See INSTRUMENT PANEL . On 5.4L engines, remove junction block splash shield. Disconnect cable ends from starter relay. Remove junction block bracket. On all engines, compress heater core hose holding tabs. Disconnect heater hoses at heater core. Remove A/C plenum demister adapter screw. Remove A/C plenum demister adapter. Disconnect vacuum line. 1. Remove 2 heater core bracket screws. Remove heater core bracket. Remove 14 screws from plenum assembly top. Remove plenum assembly top. Remove blend door assembly from case. Remove heater core. To install, reverse removal procedure. Tighten bolts to specification. See TORQUE SPECIFICATIONS . 2.
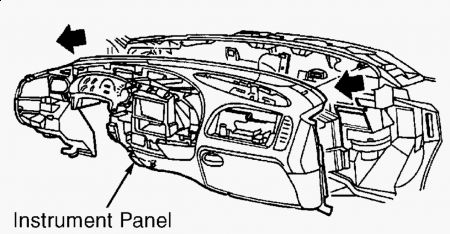
INSTRUMENT PANEL Removal & Installation Disable air bag system. See AIR BAG SYSTEM SAFETY article in GENERAL SERVICING. Move power seats rearward (if equipped). Move adjustable pedal to full rearward position (if equipped). Release mounting tabs and position power distribution box aside. Remove 3 bolts and remove bulkhead electrical connectors in engine compartment. 1. From inside vehicle, remove bulkhead electrical connector insulator and unclip bulkhead electrical connectors from dash panel. Remove front floor console (if equipped). Remove steering column cover. Remove valance panel. Disconnect blend door electrical connector. Disconnect climate control panel vacuum harness. Remove left and right sill plates. Remove left and right kick panels. Remove right side assist handle. Remove left and right windshield garnish moldings. Disconnect brakelight switch electrical connector. 2. Disconnect adjustable pedal motor electrical connector (if equipped). Remove radio and generic electronic module ground bolts. Disconnect left side main wiring harness and bulkhead connectors Remove steering column opening cover reinforcement. Disconnect air bag sliding contact and anti-theft electrical connectors. Disconnect remaining electrical connectors from steering column. 3. Disconnect transmission range indicator from steering column (if equipped). Remove steering column support nuts. Lower steering column. Remove instrument panel attaching bolts through steering column opening. Remove instrument panel reinforcement bolt below left corner of cigarette lighter. Disconnect fuel inertia fuel shut-off switch connector. Remove right side ground bolt. Disconnect air suspension switch electrical connector (if equipped). 4. Disconnect right side main wiring harness connectors. Disconnect blower motor electrical connectors. Release locking tab and disconnect restraint control module electrical connector. Remove hose from evaporator case. Remove right fender splash shield away from dash panel. Disconnect antenna lead from antenna base and feed cable through cowl side panel (loosen grommet). Remove instrument panel relay cover. Remove glove box. 5. Wearing safety glasses, disconnect passenger side air bag module connector. Remove passenger side air bag module screws. Remove passenger side air bag module. Remove instrument panel reinforcement bolt below and to left of glove box. Remove instrument panel bolts behind passenger side air bag module opening. 6. Remove instrument panel bolt on relay bracket. Loosen instrument floor brace bolts and nuts. Remove left and right instrument panel cowl nuts. Remove defroster grille assembly and instrument panel cowl top bolts. With an assistant, remove instrument panel. To install, reverse removal procedure. 7.
Sep 6, 2009 at 7:16 AM