1983 Lincoln Mark VI V8-302 5.0L
Fig. 9 Plenum & air inlet duct assembly. Mark VI & 1982---88 Town Car
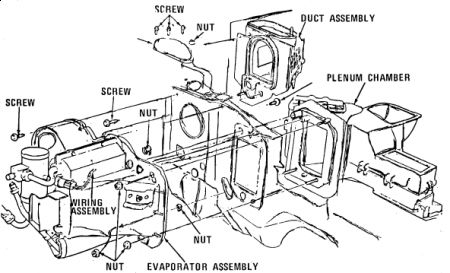
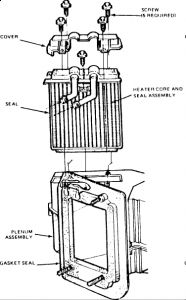
Fig. 5 Typical heater core removal. 1982---88
1982---83 MARK VI & 1982---88 TOWN CAR
1.Disconnect battery ground cable.
2.Disconnect heater hoses from core. Plug hoses and heater core tubes to prevent coolant loss during core removal.
3.Remove one bolt located below the windshield wiper motor retaining left end of plenum to dash panel.
4.Remove one nut retaining the upper left corner of evaporator case to dash panel.
5.Disconnect vacuum supply hose from vacuum source, then push grommet and hose into passenger compartment.
6.Remove glove compartment, then loosen door sill plates and remove side cowl trim panels. On some models, it may be necessary to lower the steering column to remove the instrument panel. On these models, disconnect harnesses from multiple connectors and transmission shift indicator from column, then remove steering column to instrument panel brace attaching nuts and lower steering column to seat.
7.Disconnect speedometer cable from speedometer and antenna lead from radio.
8.Remove bolt retaining lower right end of instrument panel to side cowl, then remove instrument panel pad as follows:
a.Remove screws retaining instrument panel pad to instrument panel at each defroster opening.
b.Remove the one screw retaining each outboard end of pad to instrument panel.
c.Remove the five screws retaining lower edge of instrument panel pad, then pull instrument panel pad rearward and remove it.
9.Disconnect temperature control cable housing from bracket at top of plenum, then disconnect cable from temperature blend door crank arm.
10.Remove push clip retaining the center register duct bracket to the plenum and rotate bracket to the right.
11.Disconnect vacuum jumper harness at multiple vacuum connector near the floor air distribution duct, then disconnect white vacuum hose from the outside-recirculating door vacuum motor.
12.Remove screws retaining the passenger side of floor air distribution duct to the plenum. It may be necessary to remove the two screws retaining the partial (lower) panel door vacuum motor to mounting bracket to gain access to right screw.
13.Remove the plastic push fastener retaining floor air distribution duct to left end of plenum and remove floor air distribution duct.
14.Remove nuts from the two studs along lower edge of plenum.
15.Carefully move plenum rearward to allow heater core tubes and stud at top of plenum to clear holes in dash panel. Remove plenum by rotating top of plenum forward, down and out from under instrument panel. Carefully pull lower edge of instrument panel rearward as necessary while rolling the plenum from behind the instrument panel, Fig. 9.
16.Remove the four retaining screws from heater core cover and remove cover from plenum, Fig. 10.
17.Remove heater core retaining screw then pull core and seal assembly from plenum assembly.
18.Reverse procedure to install.
Feb 3, 2010 at 1:13 AM