You may need to use a ratcheting box end wrench, but if you think thats tough, you aint seen nuthin yet! Here's the proceedure., Before you start, check the hose at the drier, wiggles and see if air bags fill.
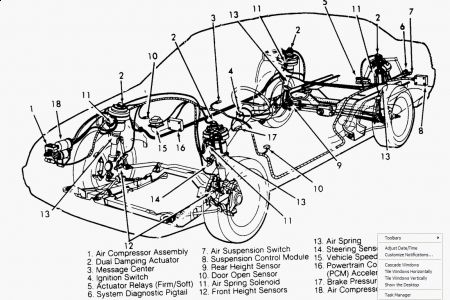
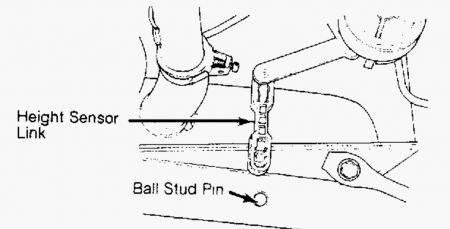
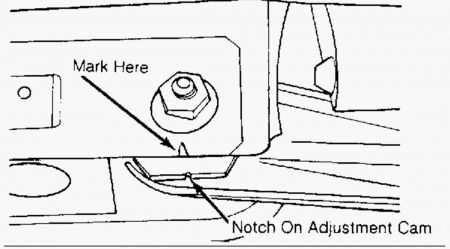
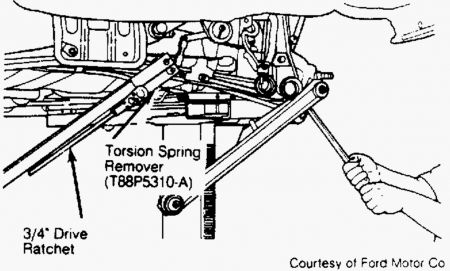
1. Turn air suspension off. Air suspension switch is located behind trim panel in left side of trunk. See Fig. 1 . From inside trunk, disconnect dampening actuator electrical connector. Loosen, but DO NOT remove, strut-to-body nuts. Disconnect electrical connector from dampening actuator. 2. Using body hoist, raise vehicle. Remove wheel. Disconnect air line at air spring solenoid. See AIR LINES and AIR LINE QUICK-CONNECT FITTINGS under REMOVAL & INSTALLATION (AIR SYSTEM & ELECTRICAL). 3. Disconnect electrical connector at air spring solenoid. Remove brake hose retainer at strut bracket. Disconnect parking brake cable from brake caliper. 4. Remove wire retainers and parking brake cable retainers from lower control arm. Disconnect rear height sensor link from ball stud pin on lower control arm (right front only). See Fig. 47 . Remove brake caliper, and secure it aside. 5. Remove air spring solenoid. See AIR SPRING SOLENOID under REMOVAL & INSTALLATION (AIR SYSTEM & ELECTRICAL). Mark position of notch on adjustment cam. See Fig. 48 . Remove torsion spring retaining clamp at spindle. 6. Remove nut from inner pivot bolt on inboard bushing on lower control arm. Install Torsion Spring Remover (T88P-5310-A) on lower control arm. See Fig. 49 . Pry upward on spring remover using a 3/4" drive ratchet to relieve pressure on inner pivot bolt. 7. Pull out on spindle to relieve pressure on inner pivot bolt. Remove inner pivot bolt. Remove lower control arm. Repeat procedure and remove remaining control arm. 8. Remove tension spring from lower control arms. Remove and discard stabilizer bar bracket bolts. Disconnect stabilizer bar link from stabilizer bar. Remove tension strut-to-strut nut, washer and insulator. 9. Move spindle rearward, and separate it from tension strut. Remove and discard strut-to-spindle pinch bolt. Separate spindle from strut. 10. From inside trunk, remove and discard strut-to-body nuts. Remove strut while guiding electric wiring through body opening. Installation 1. To install, reverse removal procedure. Tighten NEW strut-to-body nuts to specification. See TORQUE SPECIFICATIONS. Install NEW strut-to-spindle bolt, but DO NOT tighten until all components are installed and vehicle is at curb height. 2. Ensure reference mark is aligned on adjustment cam notch. Lower vehicle, and turn air suspension on. 3. Replace stabilizer bar bolts. Tighten all fasteners to specification with vehicle at curb height. See TORQUE SPECIFICATIONS. Check and adjust toe. CAUTION: DO NOT fully release air spring solenoid until air spring has been vented. CAUTION: DO NOT turn air suspension on until vehicle is lowered and vehicle weight exists on all wheels.
11/22/2009 ...

Nov 22, 2009 at 8:26 AM