Hello .. thanks for the donation .. much appreciated
Install crankshaft sprocket "B" onto crankshaft. Ensure flange is properly positioned. Lightly oil outer surface of spacer, and then install spacer to right counterbalance shaft, with rounded edge of spacer inward.
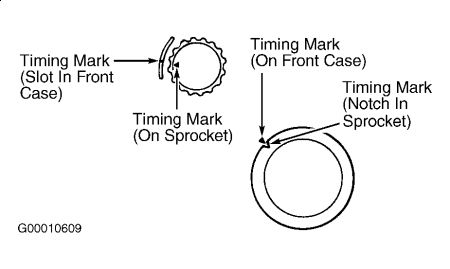
Install right counterbalance shaft sprocket. Tighten flange bolt tightly by hand. Align timing marks on each sprocket and on front case. See Fig. 4 .
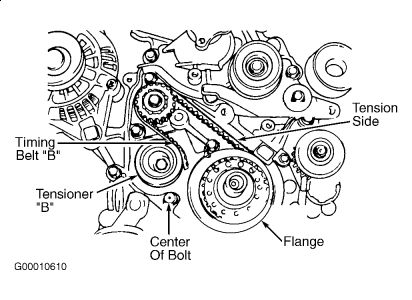
When installing timing belt "B", ensure there is no slack in tension side. Install tensioner "B" in center of pulley on left side of mounting bolt, and in pulley flange toward front of engine. See Fig. 5 . Align timing mark of right counterbalance shaft sprocket with timing mark on front case.
To tighten timing belt "B", lift tensioner "B" so tension side is pulled tight. Tighten bolt to secure tensioner "B". DO NOT turn shaft, or belt will be over-tightened.
Ensure timing marks are aligned. Ensure center of span on tension side of timing belt "B" can be depressed by hand. Ensure belt deflection is .20-.30" (5-7 mm).
Install crankshaft sprocket flange and sprocket. Ensure flange is mounted in proper direction, with chamfered side toward block. Install special washer and sprocket bolt to crankshaft. Tighten sprocket bolt to specification. See TORQUE SPECIFICATIONS .
Insert long screwdriver through plug hole in left side of cylinder block to hold counterbalance shaft in position. Install oil pump sprocket, and tighten nut to specification. See TORQUE SPECIFICATIONS . Install camshaft sprockets, and tighten bolts.
If auto tensioner rod is fully extended, place it in soft-jawed vise, and compress rod until hole in rod lines up with hole in auto tensioner housing. Insert stiff wire to hold rod in this position. Install auto tensioner, leaving wire in place.
CAUTION:If timing marks on camshaft sprockets do not line up properly, DO NOT rotate sprocket more than 2 teeth in either direction, or valve and piston will touch. If necessary, remove and reposition camshaft sprocket.
Install crankshaft sensor. Set timing marks of camshaft sprockets with notches on upper side of rocker cover and dowel pins straight up. Align crankshaft sprocket timing marks. Align oil pump sprocket timing marks.
Install timing belt in order around crankshaft sprocket, oil pump sprocket, idler pulley, exhaust camshaft sprocket, intake camshaft sprocket and tensioner pulley.
Gently raise tensioner pulley so belt will not sag, and then temporarily tighten center bolt. Ensure timing mark of each sprocket is still aligned. Remove wire from auto tensioner.
Rotate crankshaft 2 complete turns clockwise. Leave in this position for about 5 minutes. Measure auto tensioner protrusion "A" (distance between tensioner arm and auto tensioner body). Ensure auto tensioner protrusion is .22-.35" (6-9 mm).
hope this helps

SPONSORED LINKS
Wednesday, January 27th, 2010 AT 5:15 AM


