Hello -
First, great info on your vehicle. Thanks............it makes it easier to look things up.
There is a TSB on the rear seal leaking.........if you just replaced it and it is leaking, I haven't seen it, but I don't feel it is the bearing, it is the seal......
It must be very clean and as you review the TSB (though it covers other things) you will see it also talks about burrs etc.
Did you use the OEM, dealer seal? On some parts like this.....I go right to the OEM part.....to much of a chance to be just a fraction off.
My suggestion.............redo the seal per the TSB......clean really good.....etc.
For the slipping..........I don't feel that would cause the seal to leak......if you have lost a considerable amount of trans fluid.........then that would cause the trans to slip or another problem with the trans.
I don't see any TSBs on trans slip between 1st and 2nd.
For the trans slip...........you can try going to Auto Zone (AZ) or O'Reilly's (OR) and for FREE they can pull the codes to the car. Most important: Once they check your codes, if they find something and you don't get it fixed and need to get back with us, please make sure you tell us exactly what the code was, number and all. Example, if the code was E0568 O2 Sensor bad. Then make sure you give us all of that. Since it is winter, you might also while there for FREE also they can bring their tester out and check your battery and alternator.
If it does throw a code, I can look that up for you to compare.............
Also, many transmissions places with provide you a diagnostic check for a small fee. Some may for free. I would do this.
You do have some miles on the vehicle.........means it has been good to you. It may just be time to "over hall" a few things to bring it back up to shape for another 200k miles.
Let me know if I can assist in any other way.
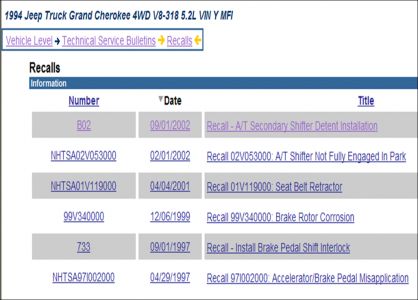
Looks like you may have some recalls on your vehicle. The dealer may fix these for free. Please contact the dealer service department, give them the VIN number of your car and have them check on these to see if they apply to you.
Engine Rear Main Bearing Seal - Oil Leak Diagnosis
Notes
NO: 09-09-94 Rev. B
GROUP: Engine
DATE: Jan. 20, 1995
SUBJECT:
Oil Leak Diagnosis - Rear Main Bearing Area
THIS BULLETIN SUPERSEDES TECHNICAL SERVICE BULLETIN NUMBER 09-09-94 Rev. A, DATED NOV. 25, 1994 WHICH SHOULD BE REMOVED FROM YOUR FILES. THE CHANGES HAVE BEEN HIGHLIGHTED WITH **ASTERISKS** AND INVOLVE THE ADDITION OF A BEARING CLEARANCE CHECK WHICH MUST BE PERFORMED AFTER ANY MODIFICATIONS ARE MADE TO THE MAIN BEARING CAP.
MODELS:
1989 - 1995 (AB) Ram Van/Wagon
1989 - 1993 (AD) Ram Pickup/Ram Cab & Chassis
1989 - 1995 (AN) Dakota/Dakota Cab & Chassis
1994 (BR)Ram Pickup
1993 - 1995 (ZJ) Grand Cherokee/Grand Wagoneer
NOTE: THIS BULLETIN APPLIES TO VEHICLES EQUIPPED WITH A 3.9L/5.2L GASOLINE OR 5.2L CNG ENGINE.
DISCUSSION:
Various conditions may cause an engine oil leak. Some conditions may be found easily by the technician, while other conditions are not readily apparent. This Technical Service Bulletin is a summary of conditions that may generate an engine oil leak complaint in the area of the rear main bearing.
NOTE: A THOROUGH ENGINE OIL LEAK TEST MUST BE PERFORMED IF THE CONDITION CAUSING THE OIL LEAK IS NOT EASILY IDENTIFIABLE.
ENGINE OIL LEAK TEST:
Begin with a thorough visual inspection of the engine, particularly at the area of the suspected leak. If an oil leak source is not readily identifiable, the following test procedure may assist in your diagnosis.
DYE TEST
1. Do not clean or degrease the engine at this time because some solvents may cause rubber to swell and temporarily stop the leak.
2. Add an oil soluble dye (use as recommended by the manufacturer). Start the engine and let idle for approximately 15 minutes. Check the oil dipstick to make sure the dye is thoroughly mixed as indicated with a bright yellow color under a black light.
3. Using a black light, inspect the entire engine for florescent dye, particularly at the rear main bearing area. If the oil leak is found and identified, repair per the Service Manual instructions or per procedures in this TSB.
4. If dye is not observed, drive the vehicle at various speeds for approximately 1 5 miles (24 km) and repeat step # 2. If an oil leak is not detected, proceed to the air pressure oil leak test.
AIR PRESSURE TEST
1. Disconnect the battery.
2. Raise the vehicle.
3. Inspect the rear of the block for evidence of oil. Use a black light to check for the oil leak.
NOTE: TO PERFORM A THOROUGH INSPECTION OF THE REAR MAIN BEARING AREA, REMOVAL OF THE FLYWHEEL MAY BE REQUIRED.
4. Attach an air hose with a pressure gauge and regulator to the dipstick tube.
5. Disconnect the breather cap-to-air cleaner hose at the breather cap end. Cap or plug the breather cap nipple.
6. Remove the PCV valve from the cylinder head cover. Cap or plug the PCV valve grommet.
7. After the engine is sealed, set the air pressure regulator NO HIGHER than 3 psi (27 kpa).
8. Gradually apply air pressure from 1 to 2.5 psi maximum. Using a liquid soap solution or stethoscope, inspect all suspected oil leak areas. Repair per the Service Manual instructions or per procedures found in this TSB.
9. If the leak is not detected, very slowly turn the crankshaft and watch for leakage.
If a leak is detected between the crankshaft and seal (while slowly turning the crankshaft), it is possible that the crankshaft seal surface is damaged.
10. For bubbles that remain steady with the shaft rotation, no further inspection can be done until additional disassembly of the seal is made.
11. If no other leaks are detected, turn off the air supply. Remove the air hose and all plugs previously installed. Install the PCV valve and breather cap hose.
OIL LEAK CONDITIONS:
NOTE: THE FOLLOWING OIL LEAK CONDITIONS INCLUDE ABBREVIATED CORRECTIONS. REFER TO THE APPROPRIATE SERVICE MANUAL FOR ADDITIONAL DETAILED REPAIR INSTRUCTIONS.
REAR MAIN CAP-TO-OIL PAN
Possible causal conditions may be:
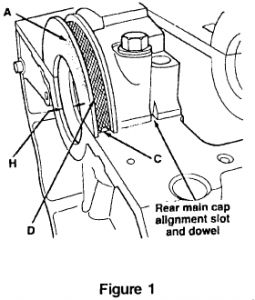
1. A cracked or missing piece of metal from the rear main bearing cap in the area of the oil pan seal groove (this applies to MPI engines only). The cap may have been struck sometime during engine handling. Replace the short block to correct this condition (Refer to Figure 1, Item A).
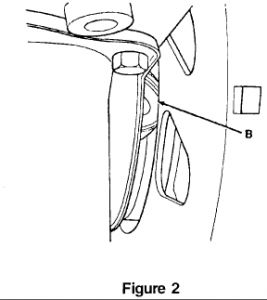
2. A push-in or push-out of the oil pan seal. Replace the oil pan seal (Refer to Figure 2, Item B).
NOTE: IT IS IMPERATIVE THAT THE OIL PAN SEAL BE ATTACHED TO THE ENGINE BLOCK (AND NOT TO THE OIL PAN) USING DOWELS AS OUTLINED IN THE RESPECTIVE 1992 THROUGH 1994 SERVICE MANUAL (MPI ENGINES ONLY). FOR MPI ENGINES, DO NOT ATTACH THE OIL PAN SEAL TO THE OIL PAN AND THEN ATTEMPT TO ASSEMBLE BOTH TO THE ENGINE BLOCK.
3. Insufficient RTV sealant at the corner joint of the rear main bearing cap-to-engine block oil pan surface. Remove any old RTV from the bearing cap, engine block and oil pan seal. The oil pan seal is reusable if it has not been damaged. Apply a small amount of RTV sealant to each corner joint including the main cap RTV sealant slots (Refer to Figure 1, Item C).
Install the oil pan seal. Wait no longer than three (3) minutes maximum to install the oil pan. The RTV must not be allowed to cure prior to oil pan seal and oil pan installation.
4. A machined step in the oil pan seal groove of the rear main bearing cap. Oil may leak from between the groove and the back of the oil seal. This may be caused by incomplete machining or insufficient material in the groove area. Replace the short block to correct this condition (Refer to Figure 1, Item D).
REAR MAIN CAP-TO-ENGINE BLOCK
Possible causal conditions may be:
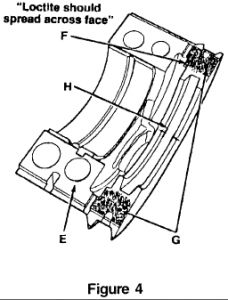
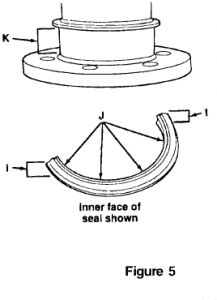
1. Rear main bearing cap not fully seated to the engine block. This may be due to a burr (raised metal) around the oil feed hole on the block surface. The burr may cause a .003" to .009" separation of the cap from the engine block. Remove the burr by stoning or chamfering. Be careful to dress the burr ONLY. Do not affect the surrounding area (Refer to Figures 4 and 5, Item E).
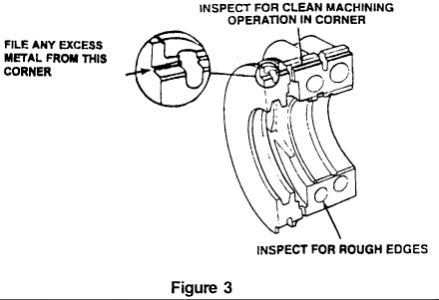
2. Inspect the rear main cap for incomplete machining in the corner as shown in Figure 3. The corner should be a sharp 90 degree angle. If a step is present, remove the excess metal with a file. This will assure that the main cap is properly seated on the block.
**NOTE: REMOVAL OF ANY METAL FROM THIS AREA ON THE MAIN BEARING CAP CAN EFFECT BEARING CLEARANCE. ALWAYS CHECK BEARING CLEARANCE WITH PLASTIC GAGE AFTER PERFORMING THIS REPAIR. IF THE CLEARANCE SPECIFIED IN THE SERVICE MANUAL CANNOT BE OBTAINED, SHORTBLOCK REPLACEMENT IS REQUIRED.**
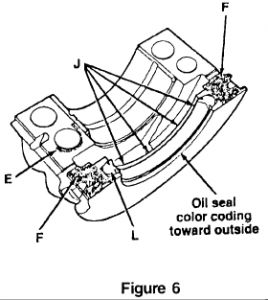
3. Insufficient sealant between the rear main cap-to-engine block mating surfaces. The sealant should extend across the mating surface. This condition may be caused by a burr on the block at the oil feed hole or by insufficient sealant application during engine assembly (Refer to Figures 4 and 6, Item F).
To correct, thoroughly clean both surfaces of any old sealant. Allow surfaces to dry. Apply a 5 mm (0.20 inch) drop of MOPAR P/N 4318083 or equivalent, on each side of the rear main bearing cap. DO NOT over apply sealant or allow the sealant to contact the rubber seal. Assemble the bearing cap to the cylinder block immediately after sealant application (Refer to Figure 4, Item G).
REAR MAIN BEARING CAP-TO-REAR MAIN CRANKSHAFT OIL SEAL
Possible causal conditions may be:
1. Loose fit of the crankshaft oil seal to its groove in the rear main cap. This condition may be caused by excessive machining of the oil seal grove. The crankshaft oil seal-to-oil seal groove should be a snug fit. Replace the engine short block to correct the condition. Do not attempt to correct this condition by using RTV sealant (Refer to Figures 1 and 4, Item H).
2. Poor bonding of the crankshaft oil seal rubber to its internal core support. This will cause the end(s) of the rubber oil seal to separate from its internal core support during oil seal installation. Repair by replacing the crankshaft oil seal (Refer to Figure 5, Item 1).
REAR MAIN CRANKSHAFT OIL SEAL TO CRANKSHAFT
Possible causal conditions may be:
1. Crankshaft oil seal cut or torn. This condition may be due to nicks or scratches on the crankshaft sealing surface or simply due to a previously damaged oil seal. Determine which part may be at fault. Repair by replacing the oil seal, or if required, replace the crankshaft and oil seal (Refer to Figures 5 and 6, Items J and K).
2. The crankshaft oil seal is installed backwards. This may occur during engine assembly. The outside face of the seal will be color coded (yellow or white). Replace the oil seal to correct this condition. Replace only with a seal that has the same color code. Make certain that the color coded side of the seal is facing toward the outside of the engine (Refer to Figure 6, Item L).
OIL GALLEY AND CAMSHAFT PLUGS
Possible causal conditions may be:
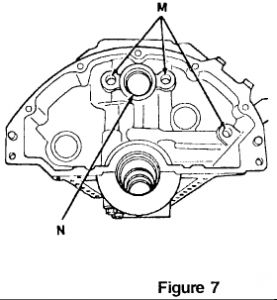
1. The oil galley plug(s) may be loose or missing thread sealant. This condition may occur during engine assembly. Perform an engine oil leak test to detect this condition. To correct, remove threaded plugs, clean surfaces, and install using thread sealant. Torque to proper specifications (Refer to Figure 7, Item M).
2. Camshaft plug not seated properly. Perform an engine oil leak test to detect this condition. Replace the camshaft plug. Add a small amount of sealant to ensure a good seal before installing the plug (Refer to Figure 7, Item N).
INTAKE MANIFOLD
Possible causal conditions may be:
1. Push-in or push-out of the rear intake manifold gasket. This condition may be detected by visual inspection and by performing an engine oil leak test. The condition is corrected by replacing the intake manifold gasket.
2. Insufficient RTV sealant applied to the corner (ends) of the rear intake manifold gasket. This condition may be detected by visual inspection and by performing an engine oil leak test. Correct this condition by replacing the intake manifold gasket and applying sealant in the corners of the gasket.
NOTE: THE TECHNICIAN SHOULD PERFORM AN ENGINE OIL LEAK TEST TO VERIFY THAT THE OIL LEAK COMPLAINT HAS BEEN CORRECTED. ALLOW ADEQUATE TIME FOR SEALANT TO CURE BEFORE RETEST.
POLICY: Information Only
Recalls
Dec 16, 2008 at 8:31 PM