See Figures 1, 2, 3, 4 and 5
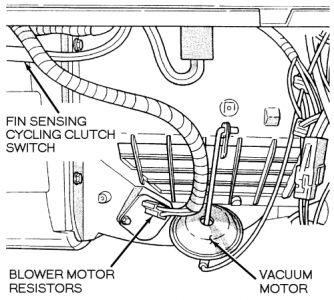
Fig. 1: View of the evaporator/blower housing components
Disconnect the negative battery cable.
If equipped with air conditioning, have the system discharged by a qualified professional mechanic using an approved recovery/recycling machine.
Drain the coolant.
CAUTION
When draining coolant, keep in mind that cats and dogs are attracted by ethylene glycol antifreeze, and are quite likely to drink any that is left in an uncovered container or in puddles on the ground. This will prove fatal in sufficient quantity. Always drain the coolant into a sealable container. Coolant should be reused unless it is contaminated or several years old.
Disconnect the heater hoses at the core tubes.
Disconnect the blower motor wires and vent tube.
If equipped, remove the center console.
Remove the lower half of the instrument panel.
Disconnect the wiring at the A/C relay, blower motor resistors and A/C thermostat. Disconnect the vacuum hoses at the vacuum motor.
Cut the plastic retaining strap that retains the evaporator housing to the heater core housing.
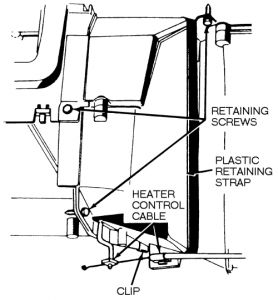
Fig. 2: View of the evaporator/blower housing control cable and retainers
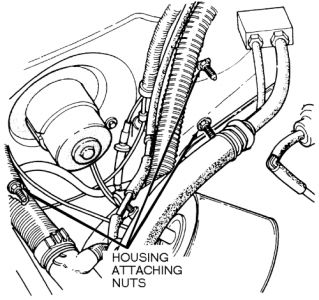
Fig. 3: View of the evaporator/blower housing retaining fasteners

Fig. 4: View of the evaporator housing tabs
Disconnect and remove the heater control cable.
Remove the clips at the rear blower housing flange and remove the retaining screws.
Remove the housing attaching nuts from the studs on the engine compartment side of the firewall.
Remove the evaporator drain tube.
Remove the right kick panel and the instrument panel support bolt.
Gently pull out on the right side of the dash and rotate the housing down and toward the rear to disengage the mounting studs from the firewall. Remove the housing.
Unbolt and remove the core from the housing.
To install:
Install the core in the housing. Ensure that the housing is positioned on the mounting studs on the firewall.
When installing the housing, care must be taken not to trap wires between the housing fresh air inlet and the dash panel on the right side of the housing.
Install the housing retaining screws and the rear housing clips.
Install the housing attaching nuts from the studs on the engine compartment side of the firewall.
Connect the blower motor wires and vent tube.
Connect the air conditioning hose at the expansion valve. Always use a back-up wrench!
Connect the wiring at the A/C relay, blower motor resistors and A/C thermostat.
Connect the heater control cable. Connect the vacuum hoses at the vacuum motor.
Install the right kick panel and the instrument panel support bolt.
Install the evaporator drain tube.
Install the lower half of the instrument panel.
Install the center console, if equipped.
Connect the heater hoses at the core tubes.
Fill the cooling system.
Connect the negative battery cable.
Have the system evacuated and recharged by a qualified professional mechanic, utilizing the proper equipment.
Start the vehicle and check for proper operation of system.
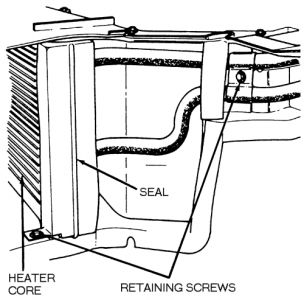
Fig. 5: When installing the heater core make sure the seal is properly installed
Dec 4, 2008 at 7:38 PM