P1111 refers to OBD system monitor checks not completed since last check !
HISSING NOISE/DRIVEABILITY ISSUES - DTC P0171/P0174 - LEAKING IMT O-RING - IMT O-RING AVAILABLE SEPARATELY
TECHNICAL SERVICE BULLETIN
Reference Number(s): XT303-13, Date of Issue: June, 2004
JAGUAR:2002 MY-ON X-TYPE
VIN:C00001-ON
Related Ref Number(s): SECTION XT303, NO. 13, XT303-13
ARTICLE BEGINNING
Issue
Some 2002 MY-ON X-TYPE vehicles may exhibit driveability/hesitation concerns. Customers may also complain about a hissing noise from under the hood.
The concern may be caused by a vacuum leak from the O-ring seal on the Intake Manifold Tuning (IMT) valve.
The O-ring is now available separately to avoid the need to replace the entire valve.
Action
In case of a customer complaint of the above condition check whether the Intake Manifold Tuning (IMT) valve O-ring seal has failed. If so, DO NOT replace the IMT valve since the O-ring seal is now a serviceable item. Follow the workshop procedure outlined below.
Workshop Procedure
Installing a new upper IMT valve O-ring seal.
Open hood and install fender protection covers.
Disconnect the IMT valve electrical connector and reposition harness.
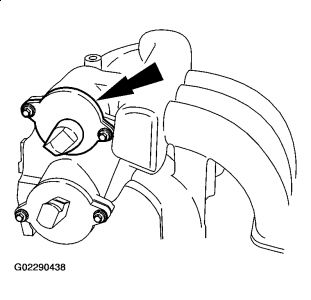
Remove the IMT valve securing bolts and displace and remove the IMT valve from the intake manifold. Remove and discard the O-ring seal (Fig. 1 ).
Fig. 1: IMT O-Ring Upper Seal
Using suitable lubricant, lubricate a new O-ring seal.
Install the new O-ring seal to the IMT valve.
Install and align the IMT valve to the intake manifold.
Install and tighten the IMT valve securing bolts.
Reposition harness and connect the IMT valve electrical connector.
Remove fender protection covers and close hood.
Install a new lower IMT valve O-ring seal
Open hood and install fender protection covers.
Disconnect battery (see Workshop Manual, section: 414-01).
Remove intake manifold (see Workshop Manual, section: 303-01, SRO 30.15.01).
Remove the lower IMT valve securing bolts and displace and remove the lower IMT valve from the intake manifold. Remove and discard the O-ring seal
Using suitable lubricant, lubricate a new O-ring seal.
Install the new O-ring seal to the lower IMT valve.
Install and align the lower IMT valve to the intake manifold.
Install and tighten the lower IMT valve securing bolts.
Install the intake manifold (see Workshop Manual, section: 303-01, SRO 30.15.01).
Connect battery (see Workshop Manual, section: 414-01).
Remove fender protection covers and close hood.
Mar 28, 2010 at 6:38 AM
