Hi and thanks for using 2carpros. Com.
Here are the directions for your vehicle. Note that I believe you have a 1.9L engine. There are no listings for a 2.0L. All attached pictures correlate with these directions.
_____________________
REPLACING TIMING BELT
Replacing toothed (timing) belt
Special tools:
951 2661 Replaced by 9512834 See: Vehicle > Electrical / Mechanical Repair > 951 2661 Replaced by 9512834
999 5433 COUNTERHOLD See: Vehicle > Electrical / Mechanical Repair > 999 5433 Counterhold
999 5006 LIFTING BAR See: Vehicle > Electrical / Mechanical Repair > 999 5006 Lifting Bar
999 5383 LIFT ARM See: Vehicle > Electrical / Mechanical Repair > 999 5383 Lift Arm
999 5460 Lifting hook See: Vehicle > Electrical / Mechanical Repair > 999 5460 Lifting Hook
General
Note! Service interval for timing belt and tensioner pulley: 165 000 km / 105 000 miles.
Remove auxiliaries belt
Remove the right engine compartment cover and the cover above the right headlight unit
- Release the auxiliaries belt by turning the pulley screw clockwise
- Remove the auxiliaries belt
- Release the belt tensioner (counterclockwise).
Remove upper timing gear covers
- Remove two screws and remove upper cover by undoing the two clips at the side
- Remove the screw and take the cover off.
Install lifting beam and lifting lug
Note! Remove the nut from the body support.
Position the lifting beam 999 5006 LIFTING BAR See: Vehicle > Electrical / Mechanical Repair > 999 5006 Lifting Bar centrally above the engine and install the lifting lugs 999 5460 Lifting hook See: Vehicle > Electrical / Mechanical Repair > 999 5460 Lifting Hook in the lifting eyes.
Install the extra support 999 5383 LIFT ARM See: Vehicle > Electrical / Mechanical Repair > 999 5383 Lift Arm (if necessary).
Lift the engine up a few mm at the front.
Remove engine mounting on timing gear side
- Remove three bolts and the screw from the mounting at body side and pull out the mounting with the rubber.
Remove lower timing gear cover
- Undo bottom cover and move backwards.
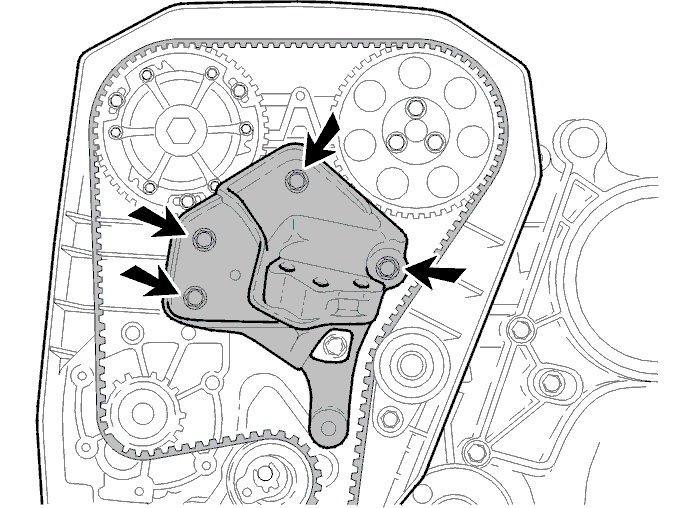
Remove engine bracket
Remove the four bolts and pull bracket from engine.
Lift engine if necessary.
Turn wheel to the right.
Open lid in side cover.
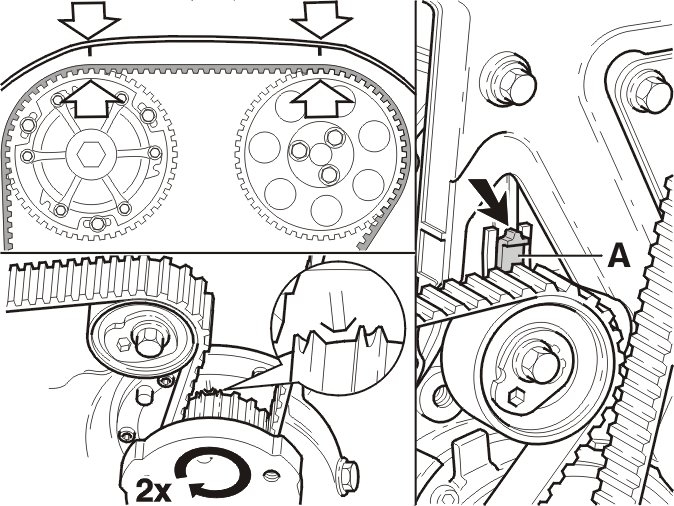
Align timing gear and crankshaft according to the markings
Place the upper cover in position.
Turn the crankshaft clockwise until the markings, camshaft gear, inner timing gear cover and the crankshaft/gear wheel align with the oil pump housing.
Remove upper rear timing cover.
Remove timing belt at the top side
Remove bolt (A) and take tensioner off
- Remove timing belt and move it downwards
- Clean and check the gears.
Check idler pulley
Rotate the pulley rapidly and listen for abnormal noise from the bearing.
When replacing: torque setting idler pulley 25 Nm.
Check that all pulley contact surfaces for the belt are clean and smooth.
Remove the engine splash-guards
Remove:
- rear
- front.
Remove timing belt at lower side
- Remove the two bolts from the snow cap
- Remove the timing belt and take it out with a turning movement
- Clean surrounding.
Install timing belt at lower side
Place the timing belt between damper and engine block.
Route belt upwards.
Install cover plates
- Place the lower snow cover and fit the two bolts
- Place the front and rear engine splash-guards.
Install new timing belt and tensioner pulley
image - Check timing marks
- Position the new tensioner, and finger tighten bolt (A)
- Turn excenter from tensioner in lowest position, see picture
- Route the belt around the crankshaft (1) and the idler pulley (2)
- Route the belt over both timing gears (3.4)
- Route the belt over the water pump (5) and around the tension pulley (6)
- Install upper rear timing cover on engine (do not tighten)
- Check alignment.
Adjusting timing belt tension
- Tighten bolt (B) to 3 Nm
- Place a 6 mm hex tool in the tensioner and turn tensioner anti clockwise until the toothed belt is tensioned
- Move the adjuster until the indicator pin is in the middle (A)
- Tighten the bolt (B) to 20 Nm without moving the tensioner
- Re-adjust if necessary
- Press pin (A) clockwise and anti-clockwise to check.
Check timing belt tension
Rotate the crankshaft two revolutions and check that the markings on the crankshaft pulley and timing gears align with the marks on the timing gear cover
- Check the adjustment of the tensioner (indicator pin (A) in the middle)
- Adjust again if necessary, see Adjusting timing belt tension
Note! After adjustment always turn crankshaft twice.
- Remove upper timing cover.
Install engine bracket
Clean mounting pin, position bracket and install bolts. Tightening torque 35 Nm + 75°.
Install timing gear covers
Install:
- lower timing gear cover. Check lower cover and water hose fittings
- the top cover (1x screw) (B), torque setting 10 Nm
- the top timing cover and tighten.
Note! Close lid in side cover move front wheels straight.
Install auxiliaries belt
- Clean the pulley grooves
- Turn the tensioning device clockwise
- Install the auxiliaries belt as illustrated
- Release the belt tensioner (counterclockwise)
- Tighten the bracket. Torque to 10 Nm
- Install power steering hose. Torque 10 Nm.
Install engine suspension on timing gear side
- Position the support on the engine and tighten the bolts (A) to 67 Nm
- Loosely install the bolts in the body support
- Remove the lifting beam 999 5006 LIFTING BAR See: Vehicle > Electrical / Mechanical Repair > 999 5006 Lifting Bar
- Tighten the body support (B) nut to 98 Nm.
Test drive engine
Start the engine and check function.
- Install the right engine compartment cover and headlight unit cover.
__________________________________
:Let me know if this helps or if you have other questions.
Take care,
Joe
Images (Click to make bigger)
SPONSORED LINKS
Friday, December 14th, 2018 AT 3:52 PM