This is how you check your own cel (Check Engine Light), at home, without driving to a mechanic, auto store, dealer. Numbers for the light are listed farther below.
5 Easy to Follow Steps:
1) Get a CEL
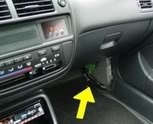
2) On the passener side, remove the kick panel at the floor.
Behind it, is your ecu and a jumper plug.

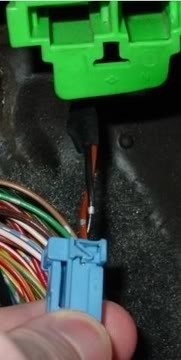
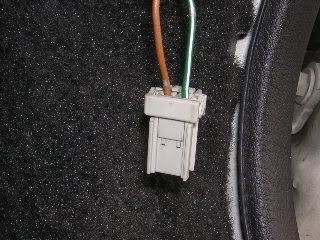
3) Locate the jumper plug (Civic 92-95 is grey, 96-00 its blue). Its a 2 pin plug.
(I am not sure if the connector is in the same location for all hondas..I assume so - I dont know all the connector colors...)
For EK, there is 1 brown wire and 1 black wire

For EG, there is 1 tan wire and 1 green

4) WITH THE CAR OFF, insert either a 2pin connector clip, or loop a thin enough piece of wire into both holes on the connector.
5) Back in the driver's seat, turn the key to the 'ON' position. The CEL light will come on at startup, like normal, but it will then begin to flash.
**By counting the number of flashes, you can decipher the CEL #.
SHORT flashes are single digits (1/2 second)
LONG flashes are 10's (1 second)
CEL # List
1 O2A - Oxygen sensor #1
2 O2B - Oxygen sensor #2
3 MAP - manifold absolute pressure sensor
4 CKP - crank position sensor
5 MAP - manifold absolute pressure sensor
6 ECT - water temperature sensor
7 TPS - throttle position sensor
8 TDC - top dead centre sensor
9 CYP - cylinder sensor
10 IAT - intake air temperature sensor
12 EGR - exhaust gas recirculation lift valve
13 BARO - atmospheric pressure sensor
14 IAC (EACV) - idle air control valve
15 Ignition output signal
16 Fuel injectors
17 VSS - speed sensor
19 Automatic transmission lockup control valve
20 Electrical load detector
21 VTEC spool solenoid valve
22 VTEC pressure valve
23 Knock sensor
30 Automatic transmission A signal
31 Automatic transmission B signal
36 traction control found on JDM ecu's
41 Primary oxygen sensor heater
43 Fuel supply system
45 Fuel system too rich or lean
48 LAF - lean air fuel sensor
54 CKF - crank fluctuation sensor
58 TDC sensor #2
61 Primary oxygen sensor
63 Secondary oxygen sensor circuit
65 Secondary oxygen sensor heater wire (black wires)
67 Cat Converter
71 random misfire cylinder 1
72 random misfire cylinder 2
73 random misfire cylinder 3
74 random misfire cylinder 4
80 EGR Valve/Line
86 ECT sensor - Cooling System
91 Fuel Tank pressure sensor
92 EVAP Solenoid/Valve/Vacuum Lines
Images (Click to enlarge)
Feb 12, 2009 at 8:26 PM