Rear alignment toe eccentric adjustment

Tiny
MHJ
  • MEMBER
  • 2002 FORD TAURUS
Six cylinder two wheel drive automatic 130,000 miles.

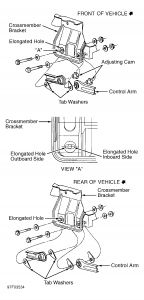
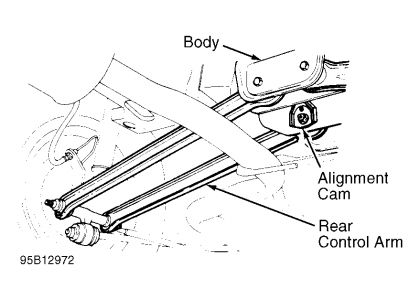
I cannot get straight answers on why they still cannot align the car. I replaced the rear suspension assembly bars and bushings, then I replaced the front lower tie rod ends, then I replaced the front lower ball joints. Now they say I need front struts to get the camber/caster in spec, and two rear eccentric bolts ($530.00) to get the rear toe in spec. It is the rear eccentric bolts that have me baffled. They are just bolts. I do not see how they could possible effect the rear toe. They are bolted through the new rear suspension assembly bars with new bushings. I see the large adjusting nut, but I cannot see how turning that nut would move anything related to rear toe. Nor can I see how paying someone $530.00 to replace two bolts would align the car. I think the part I am looking for is an "alignment cam bolt kit" but I am not sure. Can someone explain how a bolt goes bad?
Tuesday, November 9th, 2010 AT 11:47 PM

1 Reply

Tiny
BMRFIXIT
  • MECHANIC
  • 19,053 POSTS
Camber adjustment (front):
For minor adjustments to camber and caster, loosen sub-frame mount bolts, and shift sub-frame. If this does not allow enough adjustment, loosen three upper strut mounting bracket-to-strut tower attaching nuts. Drill out four or five spot welds at upper strut alignment plate. See Fig. 1 .
Do not drill deeper than necessary to move alignment plate. Remove three upper strut mounting bracket-to-strut tower attaching nuts and alignment plate. Clean burrs from strut tower and alignment plate. Paint exposed metal surfaces.
Position strut and alignment plate. Loosely install attaching nuts. Adjust camber/caster by moving top of strut. Tighten attaching nuts to specification. Drill three holes for rivets in perimeter of alignment plate. See Fig. 2 . Install three rivets.

Camber adjustment (rear):
Raise vehicle, allowing suspension to hang free. Remove stabilizer bar bracket from outboard ends of lower control arm and bushing. Remove parking brake cable retaining bracket.
Place floor jack with wood block under lower control arm and bushing stamping (midway between lower control arm inner pivot bushing and rear spring). Remove and discard lower control arm and bushing inner pivot retaining nut.
Using floor jack, pre-load underside of lower control arm. Remove and discard lower control arm inner pivot bolt. Slowly lower control arm and bushing out of crossmember bracket until spring is completely relaxed.
Using a half inch diameter rotary file, elongate both cross-member bracket holes. See Fig. 3 . If camber measured out of specification in the positive direction, go to next step. If camber measured out of specification in the negative direction, elongate cross-member bracket hole horizontally on inboard side, until slot length measures 0.94" (24 mm). Go to step 6).
If camber measured out of specification in the positive direction, elongate crossmember bracket hole horizontally on outboard side, until slot length measures 0.63" (16 mm). Go to next step.
Using floor jack, raise lower rear control arm and bushing back up into crossmember bracket. Using Rear Camber Adjustment Kit (E7DZ-5K751-A), install new inner pivot cam bolt from front side of crossmember.
Install cam bolt with two new tab washers between cross-member bracket and control arm inner pivot bushing. Install new cam washer and nut. Tighten cam bolt nut to 40-55 ft. lbs. (54-74 N.m). Repeat procedure for opposite side.
Reinstall stabilizer bar brackets and parking brake cable bracket. Tighten stabilizer bar bracket-to-lower control arm bolts to 14-19 ft. lbs. (19-26 N.m)

Caster is not adjustable. If caster is not within specification, check for damaged suspension components, deteriorated bushings or distorted body mounting points.

Toe-in adjustment (front):
Ensure steering wheel is centered. Loosen tie rod end adjusting sleeve clamp bolts or lock nuts. Turn adjusting sleeve or tie rod to adjust toe-in. Tighten tie rod end adjusting sleeve clamp bolt or lock nut.
Toe-in adjustment (rear):
Loosen front lower control arm-to-body retaining bolt. Rotate adjusting cam to obtain correct toe-in. While holding adjusting cam, tighten rear adjusting cam attaching nut.


https://www.2carpros.com/forum/automotive_pictures/99387_1_52.jpg


https://www.2carpros.com/forum/automotive_pictures/99387_2_33.jpg


https://www.2carpros.com/forum/automotive_pictures/99387_3_18.jpg


https://www.2carpros.com/forum/automotive_pictures/99387_4_12.jpg


https://www.2carpros.com/forum/automotive_pictures/99387_5_7.jpg

Was this
answer
helpful?
Yes
No
+8
Wednesday, November 10th, 2010 AT 7:18 PM

Please login or register to post a reply.

Sponsored links