Externally Mounted Slave Cylinder
Remove slave cylinder from transmission bellhousing. Using a 3/32" diameter punch, remove pin that holds hydraulic line in slave cylinder. Remove hydraulic line from slave cylinder. Place end of hydraulic line into container for wastefluid.
Hold slave cylinder so hydraulic line port is at highest point. Fill slave cylinder through hydraulic line port with DOT 3 brake fluid. Gently push on slave cylinder push rod to expel all air.
When all air has been expelled, install slave cylinder. Remove clutch master cylinder reservoir cap and diaphragm. While maintaining fluid level in reservoir, observe hydraulic line until all air has been expelled, a steady stream of fluid is flowing, and fluid is level with step in clutch master cylinder reservoir.
Install reservoir cap and diaphragm. Install hydraulic line and retaining pin. Remove slave cylinder. Ensure reservoir is full. Hold slave cylinder so hydraulic line port is at highest point. Slowly push push rod into cylinder and let it return. Repeat 2 more times. Install slave cylinder.
Rapidly depress clutch pedal 10 times. Top off brake fluid. With transmission in Neutral and parking brake set, start vehicle. Shift vehicle into Reverse. If gears grind, check for air in system. Repeat bleeding procedure if necessary. If no air is found and gears grind, clutch components may be defective or worn out.
Internally Mounted Slave Cylinder
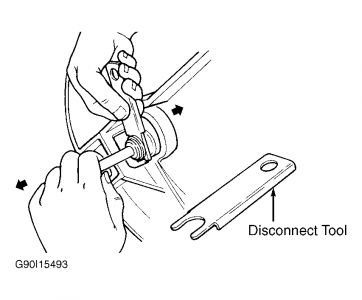
Using Disconnect Tool (T88T-70522-A), disconnect coupling at transmission by lightly tugging on clutch tube while sliding White plastic sleeve toward slave cylinder. See Fig. 5 . Clean area around reservoir cap. Fill reservoir with DOT 3 brake fluid. Using hand pressure, apply 10-15 pounds to clutch pedal. If pedal is hard, go to step 3). If pedal is spongy, go to next step.
Using a screwdriver, open valve of male coupling. Slowly depress clutch pedal to floor and hold. Remove screwdriver to close valve, and release clutch pedal. Ensuring reservoir is full, repeat step.
Close reservoir and reconnect coupling. Rapidly depress clutch pedal 5-10 times, wait 1-3 minutes, then repeat procedure 3 more times. Place hose on bleeder screw to prevent brake fluid from entering bell housing. Loosen bleeder screw and maintain fluid level in reservoir.
Fluid and bubbles will flow from hose attached to slave cylinder bleeder screw. Close bleeder screw when fluid stream is free of air bubbles. Ensure fluid level is correct and install reservoir cap.
Place light pressure on clutch pedal and open bleeder screw. Maintain pressure until pedal contacts floor. Close bleeder screw while pedal is fully depressed. DO NOT allow pedal to return before bleeder screw is fully closed. Recheck fluid level.
Test system operation by starting vehicle, depressing clutch and placing gearshift in Reverse. No grinding should be heard or felt when clutch pedal is within 1/2" (13 mm) of floor. If noise is heard, check for air in system. Repeat bleeding procedure if necessary. You may need to lubricate the line with brake fluid when installing it back into the slave cylinder to get it to go in
May 4, 2021 at 9:44 AM
