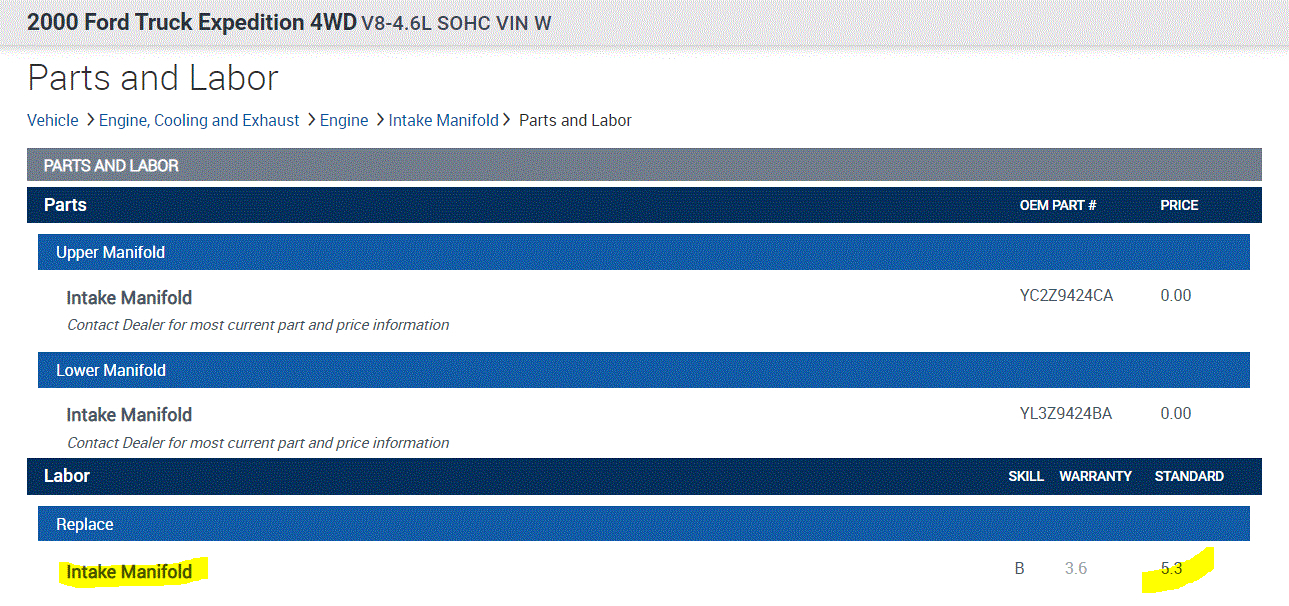
Intake manifold gasket?

Tiny
HEATHER OSTAPCHUK
  • MEMBER
  • 2001 FORD EXPEDITION
  • 4.6L
  • V8
  • 2WD
  • AUTOMATIC
  • 140,789 MILES
The wire that comes out the back of the intake manifold came off my truck. I need to know what it does and do I have to have it.
Tuesday, May 12th, 2020 AT 7:03 PM

16 Replies

Tiny
DANNY L
  • MECHANIC
  • 5,648 POSTS
Hello, I'm Danny.

Can you take a picture of the location and wire with your cell phone and upload it here? That will help us determine what we are looking for. Hope this helps and thanks for using 2CarPros.
Was this
answer
helpful?
Yes
No
Tuesday, May 12th, 2020 AT 7:46 PM
Tiny
HEATHER OSTAPCHUK
  • MEMBER
  • 5 POSTS
I sent through pictures. While we wait I'll give you the details off the plug the words and numbers and letters on the plug beads Bosch Germany 0261231137. Xl3f12a699aa
Was this
answer
helpful?
Yes
No
Tuesday, May 12th, 2020 AT 8:03 PM
Tiny
HEATHER OSTAPCHUK
  • MEMBER
  • 5 POSTS
This is where it came off of.
Was this
answer
helpful?
Yes
No
+1
Tuesday, May 12th, 2020 AT 8:07 PM
Tiny
HEATHER OSTAPCHUK
  • MEMBER
  • 5 POSTS
This is the wire that came off. I just want to know what it does and does the truck have to have it to work?
Was this
answer
helpful?
Yes
No
Tuesday, May 12th, 2020 AT 8:10 PM
Tiny
DANNY L
  • MECHANIC
  • 5,648 POSTS
Hello again.

Do you have an idea of where the other end originates from? Can you take a picture of the entire wire as well? I've re attached your picture below and circled in red. Is this the wire you speak of? Thanks again.

Danny-
Was this
answer
helpful?
Yes
No
Wednesday, May 13th, 2020 AT 11:12 AM
Tiny
HEATHER OSTAPCHUK
  • MEMBER
  • 5 POSTS
I already talked to issue myself in case you're wondering it was the knock sensor.
Was this
answer
helpful?
Yes
No
Wednesday, May 13th, 2020 AT 11:19 AM
Tiny
DANNY L
  • MECHANIC
  • 5,648 POSTS
Hello again.

Yes, I was going to mention that in my next post. Glad you found the problem. Hope reassembly goes well. I've attached a picture below. Thanks again for using 2CarPros.

Danny-
Was this
answer
helpful?
Yes
No
Wednesday, May 13th, 2020 AT 11:29 AM
Tiny
JAMESP
  • MEMBER
  • 1 POST
  • 2000 FORD EXPEDITION
  • 4.6L
  • V8
  • 4WD
  • AUTOMATIC
  • 111,000 MILES
How long does it take to remove the intake manifold gasket? I need to do the job can you show me how?
Was this
answer
helpful?
Yes
No
Saturday, December 26th, 2020 AT 9:29 AM (Merged)
Tiny
KASEKENNY
  • MECHANIC
  • 18,907 POSTS
This is a pretty lengthy process. I am attaching the complete process below for your review. The manual says it will take about 5 and a half hours so if you have not done this before, I would plan on about 8 hours.

Run through this process below and let me know what questions you have. Thanks
Was this
answer
helpful?
Yes
No
Saturday, December 26th, 2020 AT 9:29 AM (Merged)
Tiny
JACOBANDNICKOLAS
  • MECHANIC
  • 108,179 POSTS
Hi:
If you look at the last pic below. It shows the labor hours. As far as replacement, here are the directions. The attached pics correlate with the directions.

________________________________

2000 Ford Truck Expedition 4WD V8-4.6L SOHC VIN W
Procedures
Vehicle Engine, Cooling and Exhaust Engine Intake Manifold Service and Repair Procedures
PROCEDURES
Removal

WARNING: Do not smoke or carry lighted tobacco or open flame of any type when working on or near any fuel-related components. Highly flammable mixtures are always present and can be ignited. Failure to follow these instructions may result in personal injury.

1. Disconnect the battery ground cable.
2. Relieve the fuel system pressure.
3. Drain the engine cooling system.
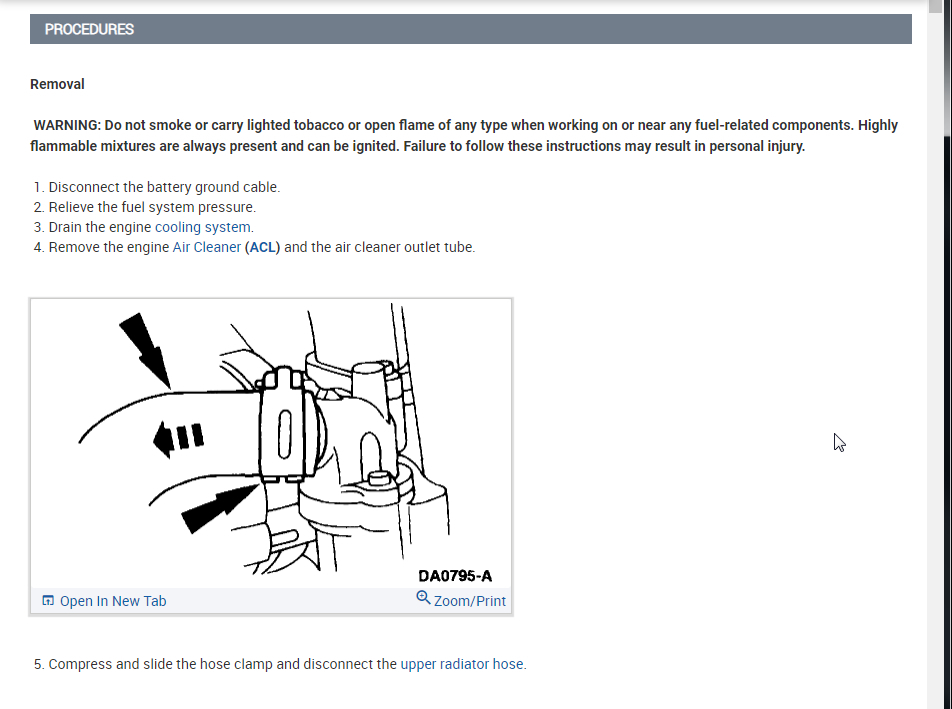
4. Remove the engine Air Cleaner (ACL) and the air cleaner outlet tube.

Pic 1

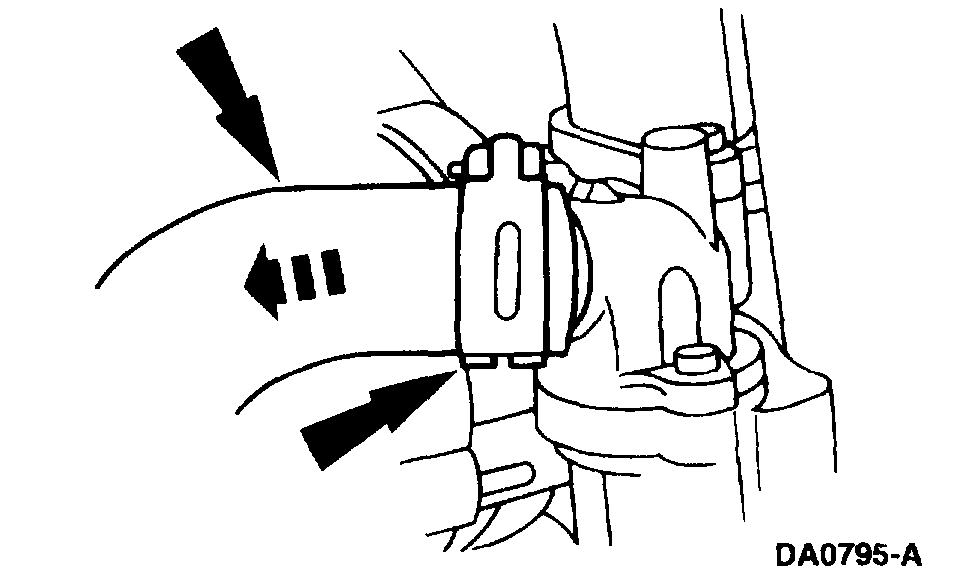
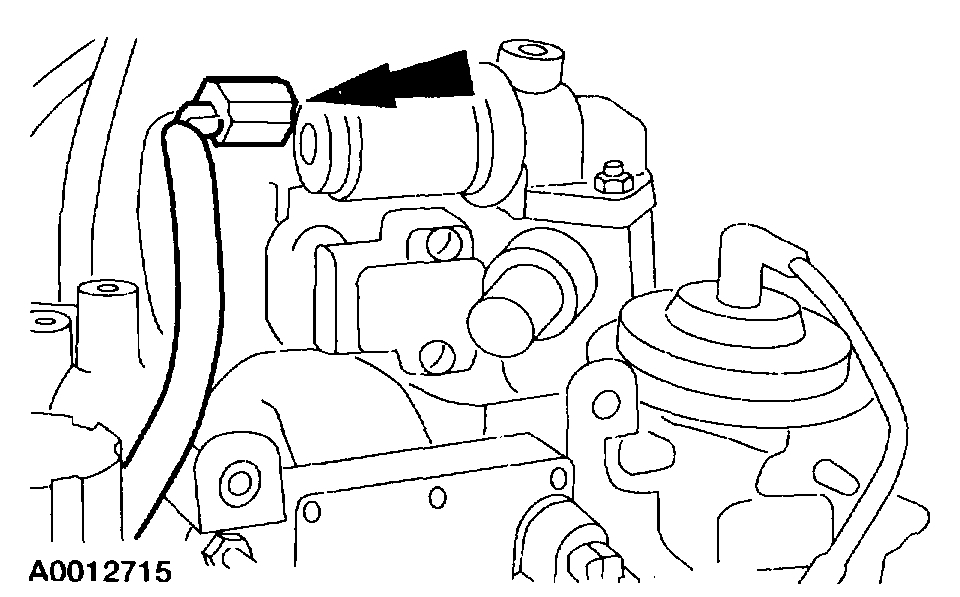
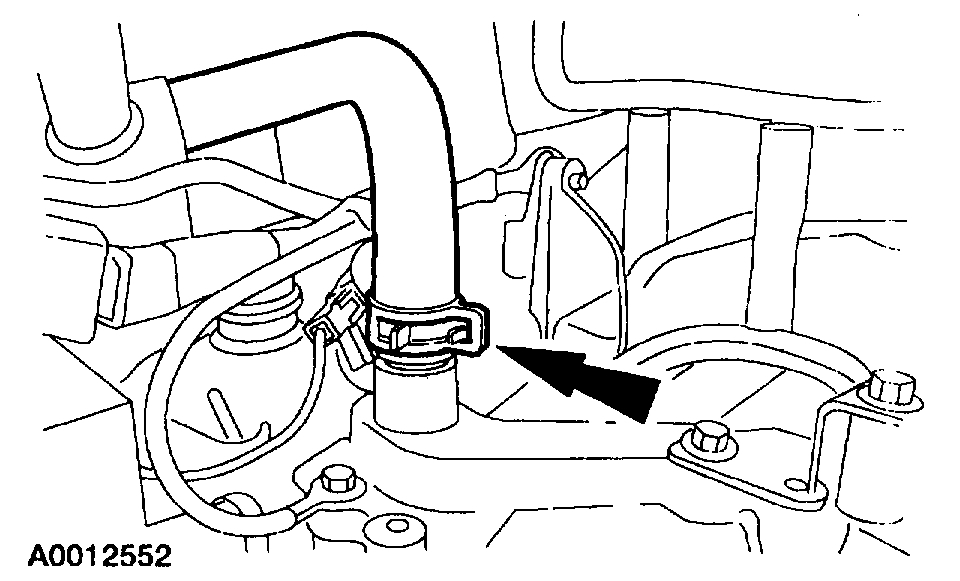
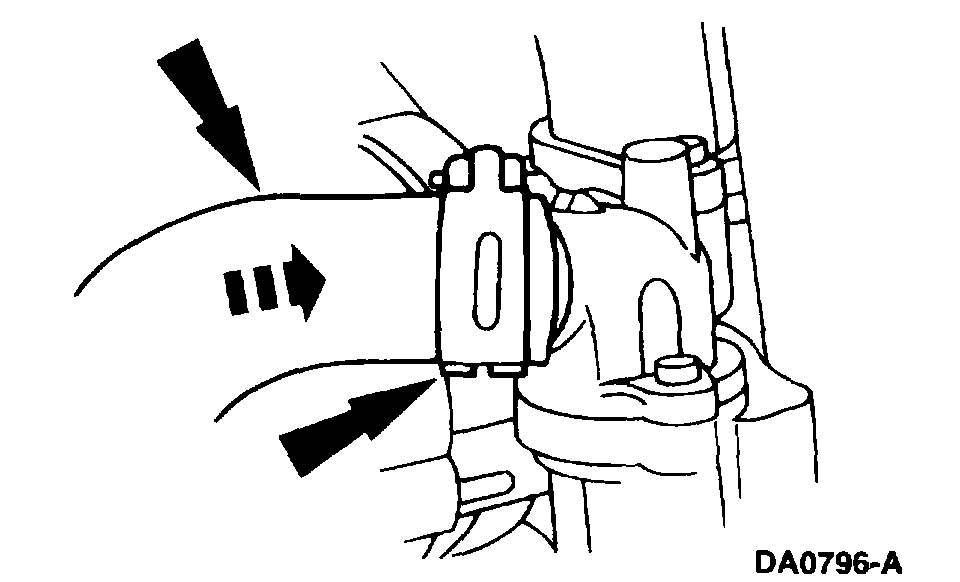
5. Compress and slide the hose clamp and disconnect the upper radiator hose.

Pic 2

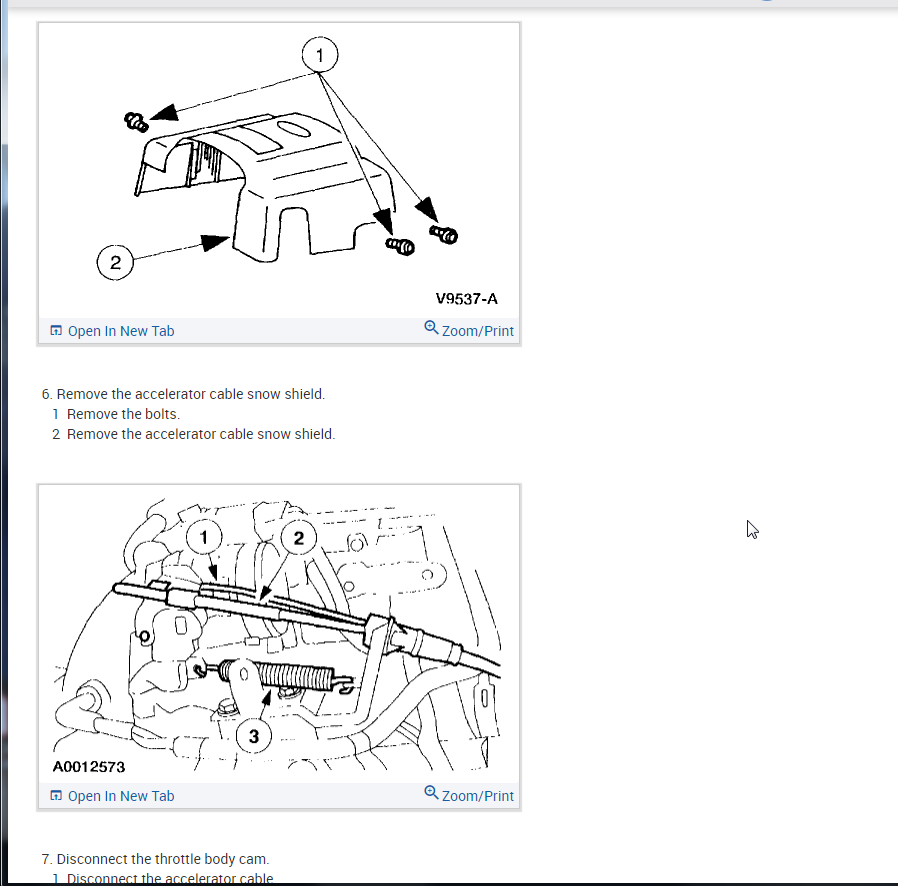
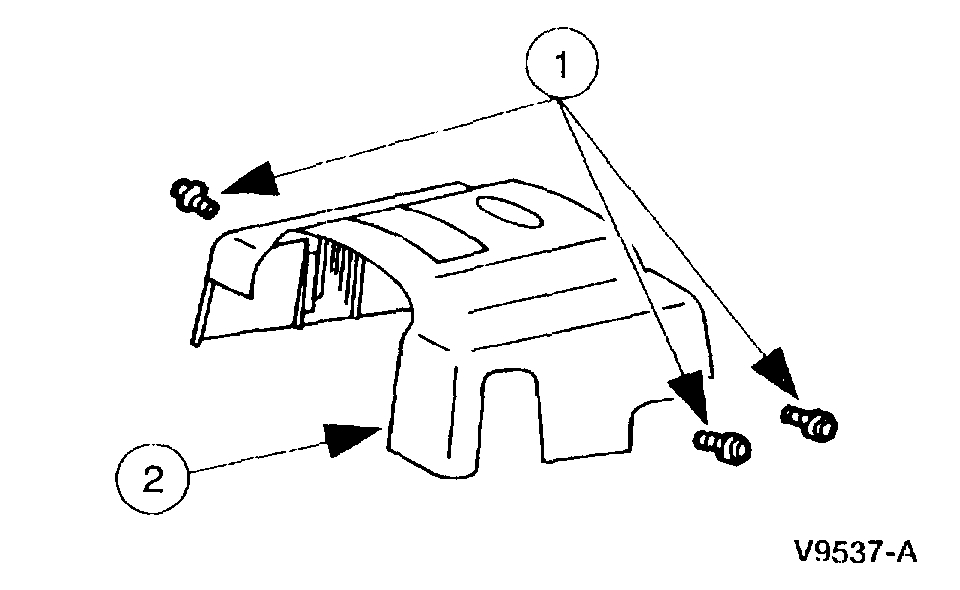
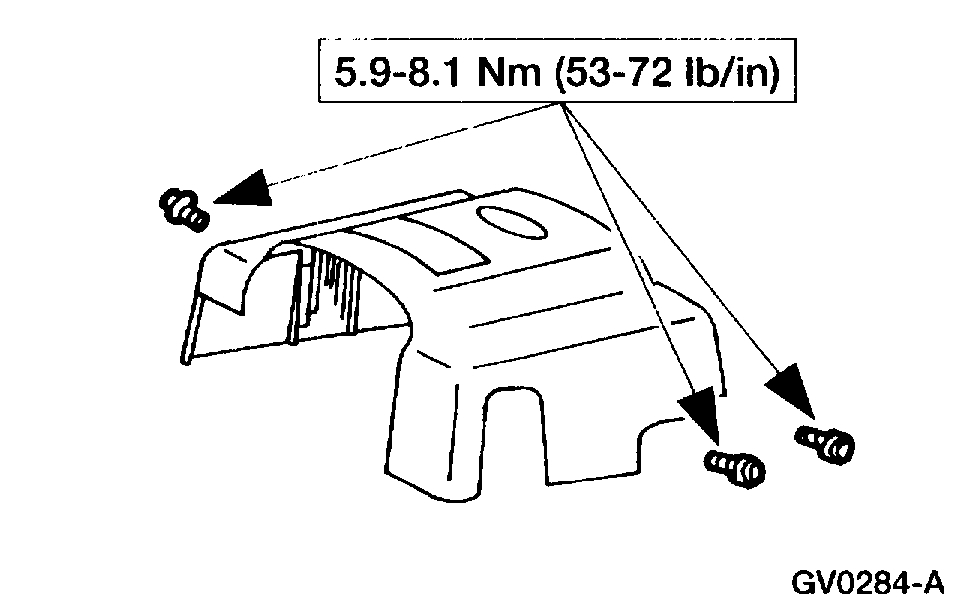
6. Remove the accelerator cable snow shield.
1 Remove the bolts.
2 Remove the accelerator cable snow shield.

Pic 3

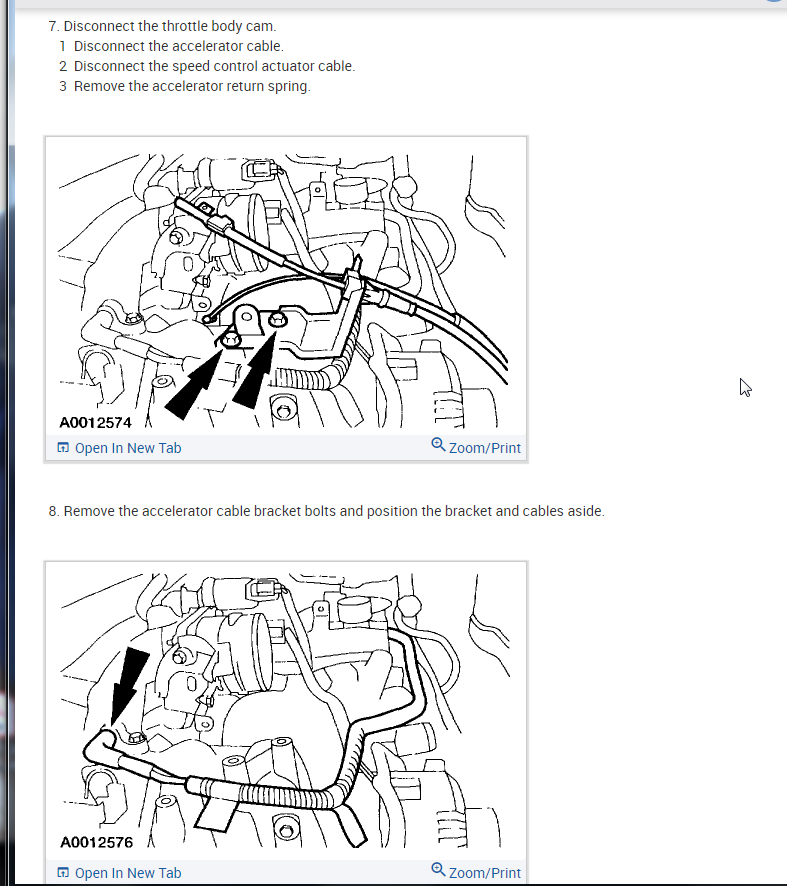
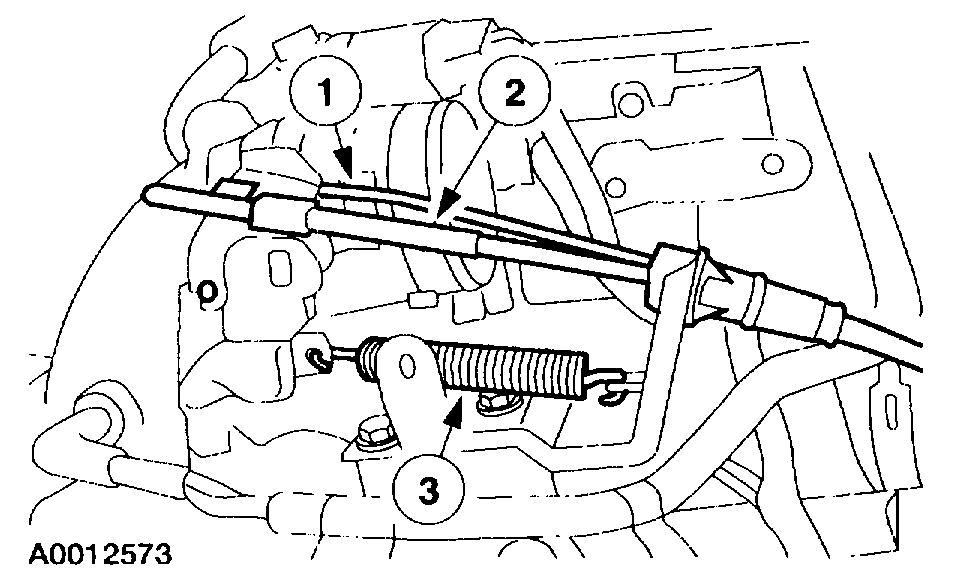
7. Disconnect the throttle body cam.
1 Disconnect the accelerator cable.
2 Disconnect the speed control actuator cable.
3 Remove the accelerator return spring.

Pic 4

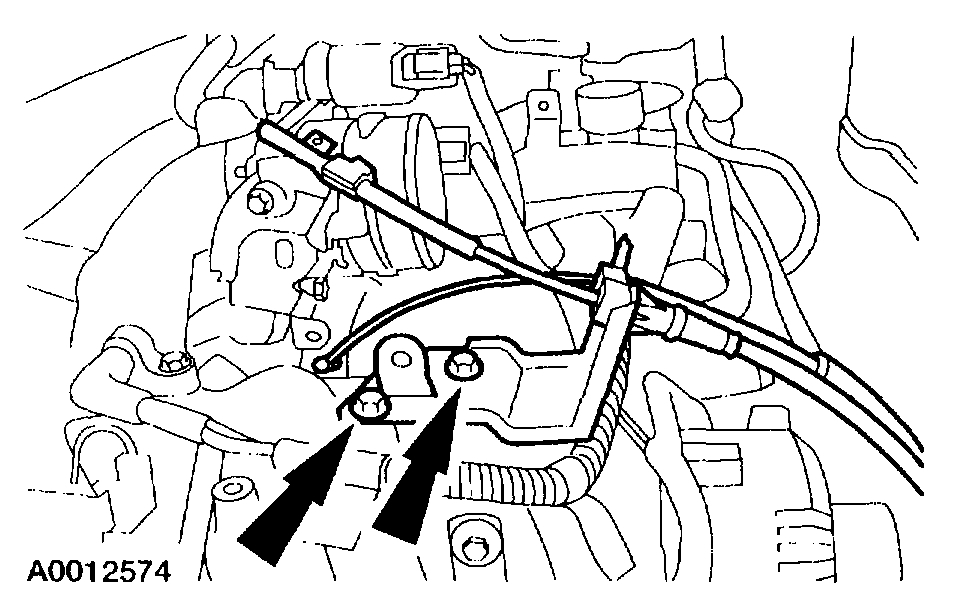
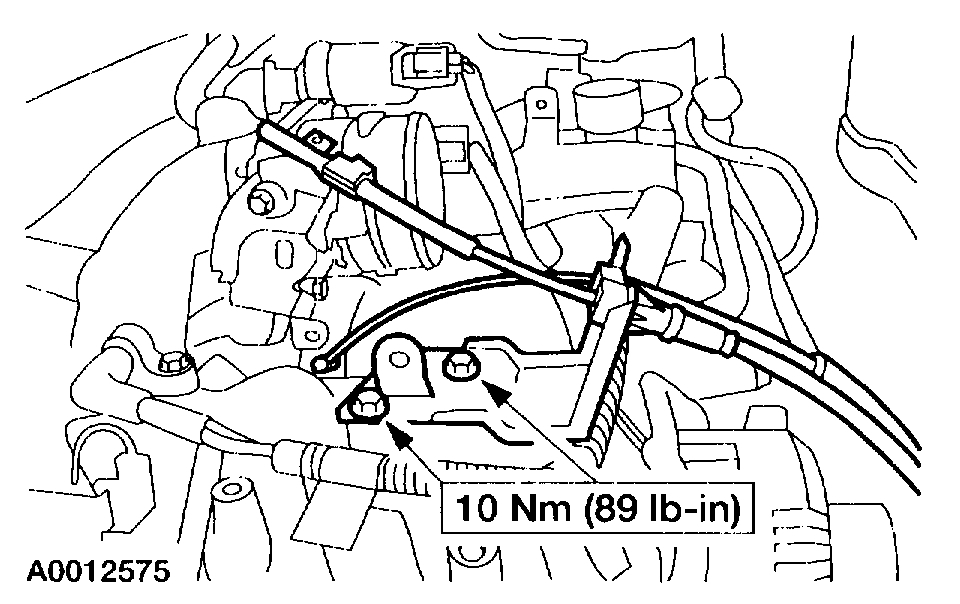
8. Remove the accelerator cable bracket bolts and position the bracket and cables aside.

Pic 5

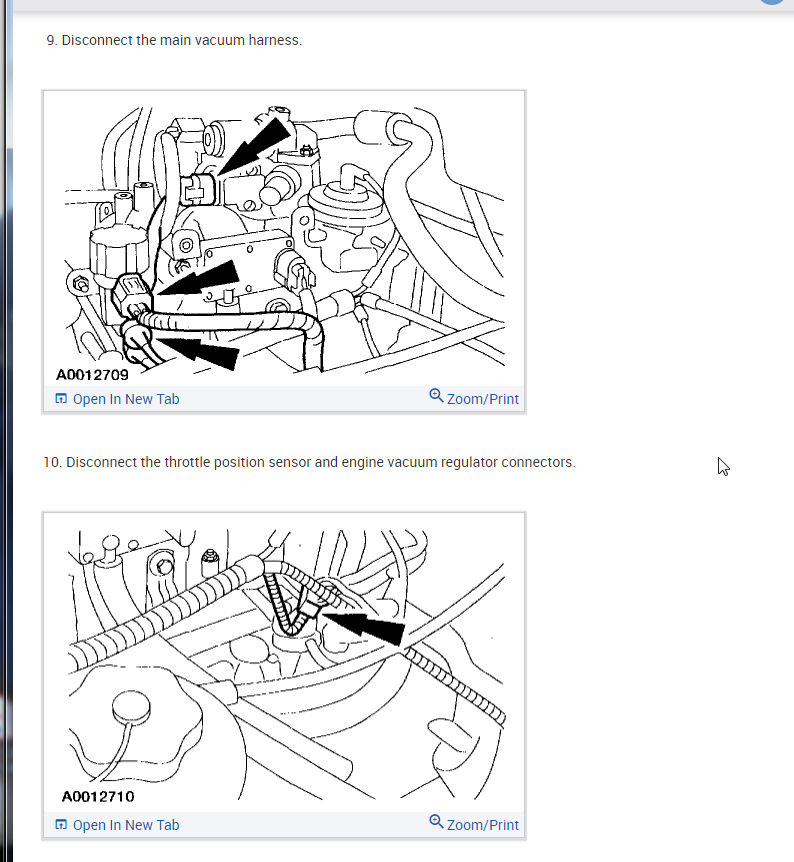
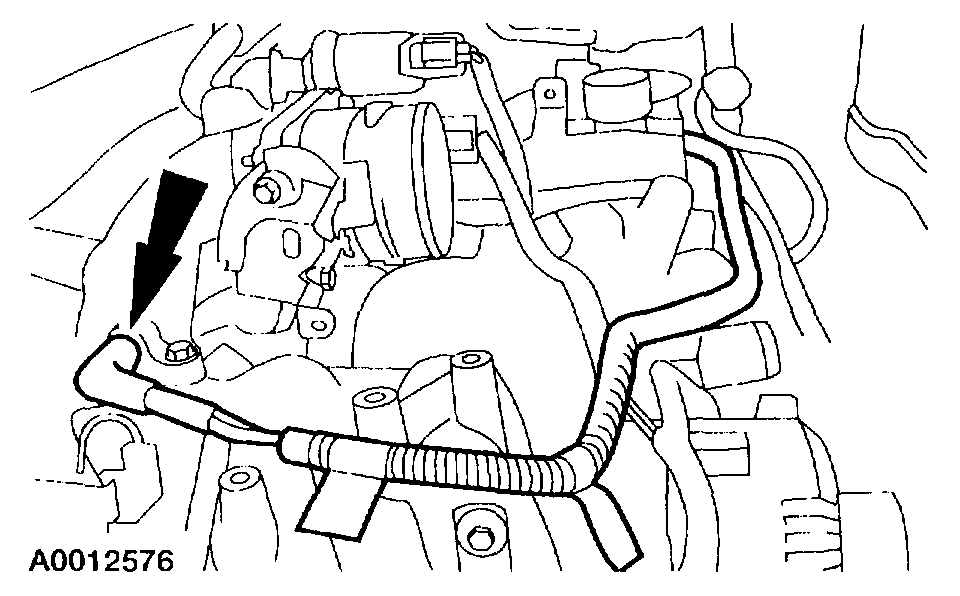
9. Disconnect the main vacuum harness.

Pic 6

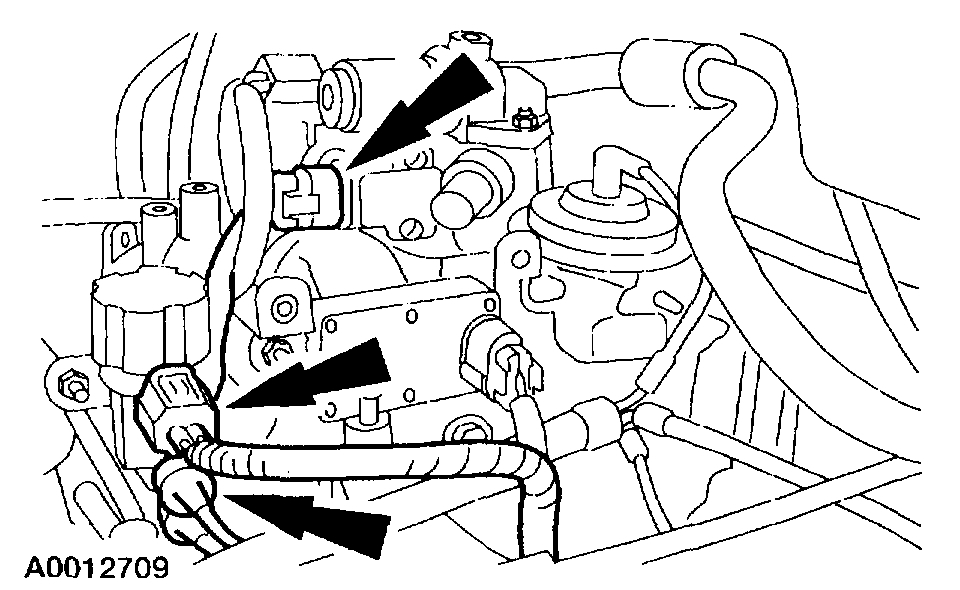
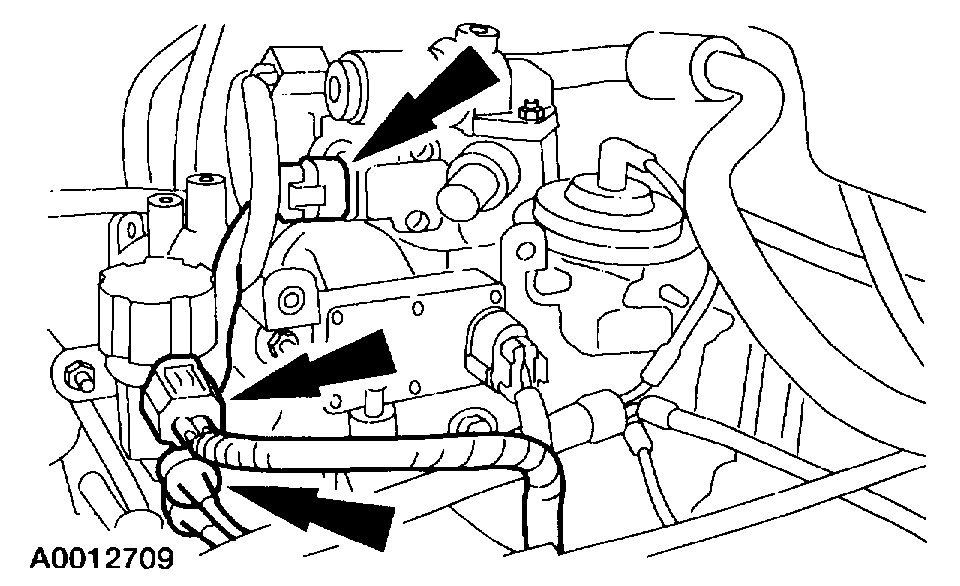
10. Disconnect the throttle position sensor and engine vacuum regulator connectors.

Pic 7

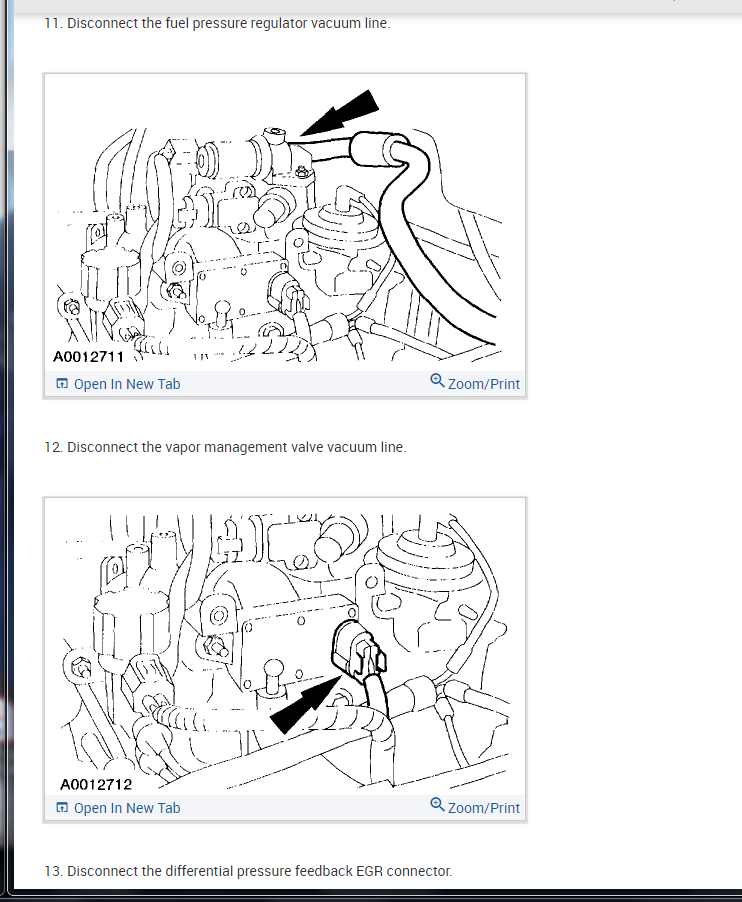
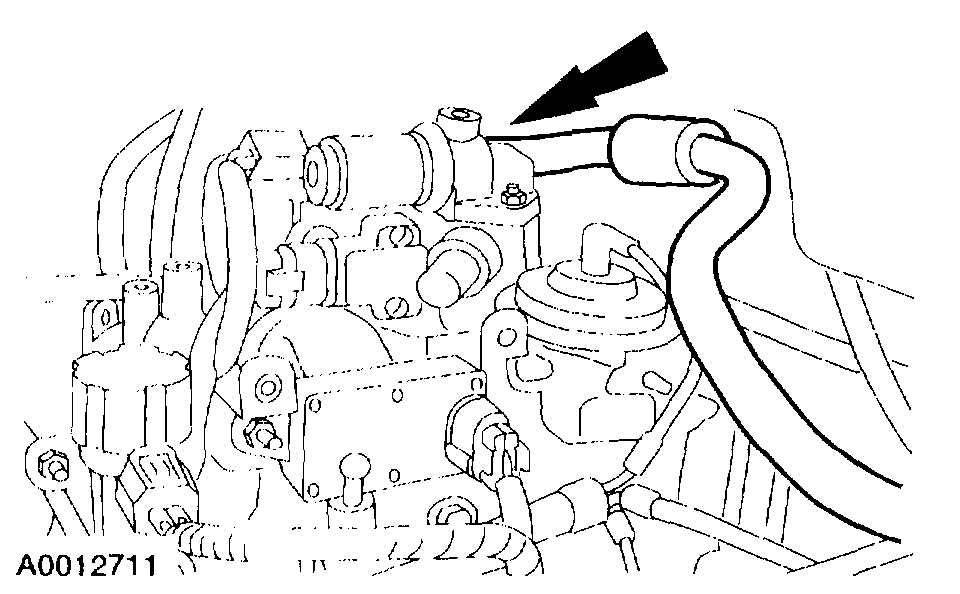
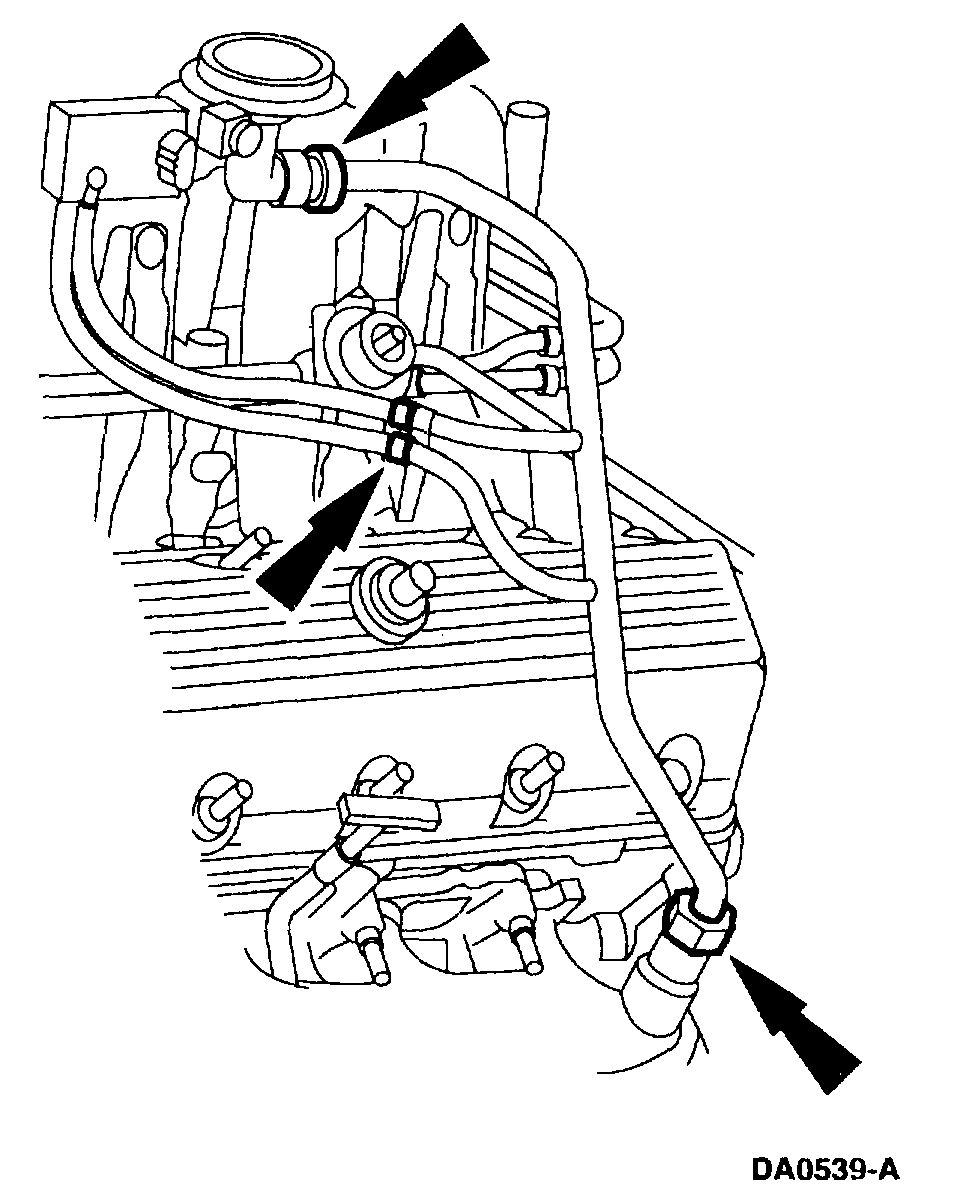
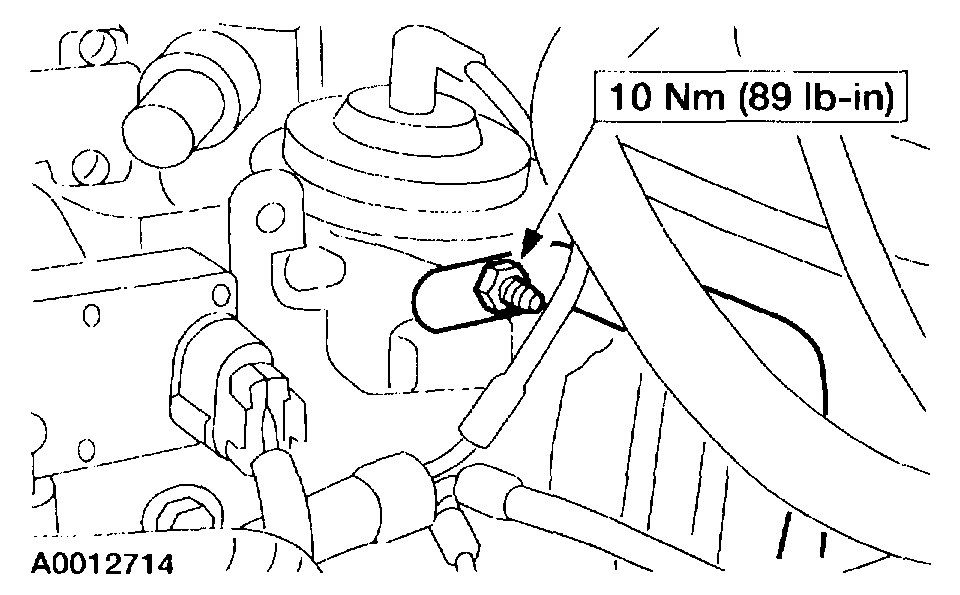
11. Disconnect the fuel pressure regulator vacuum line.

Pic 8

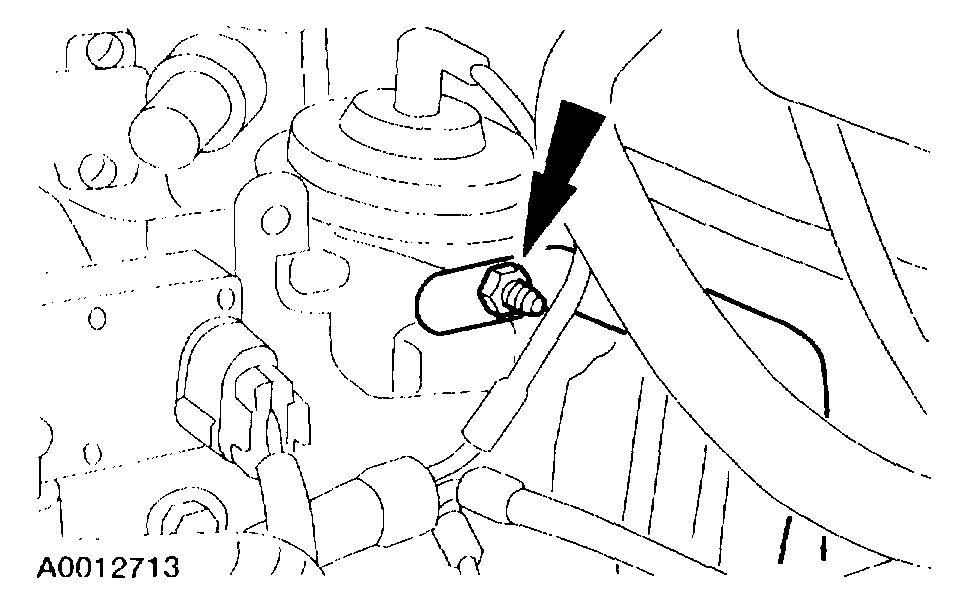
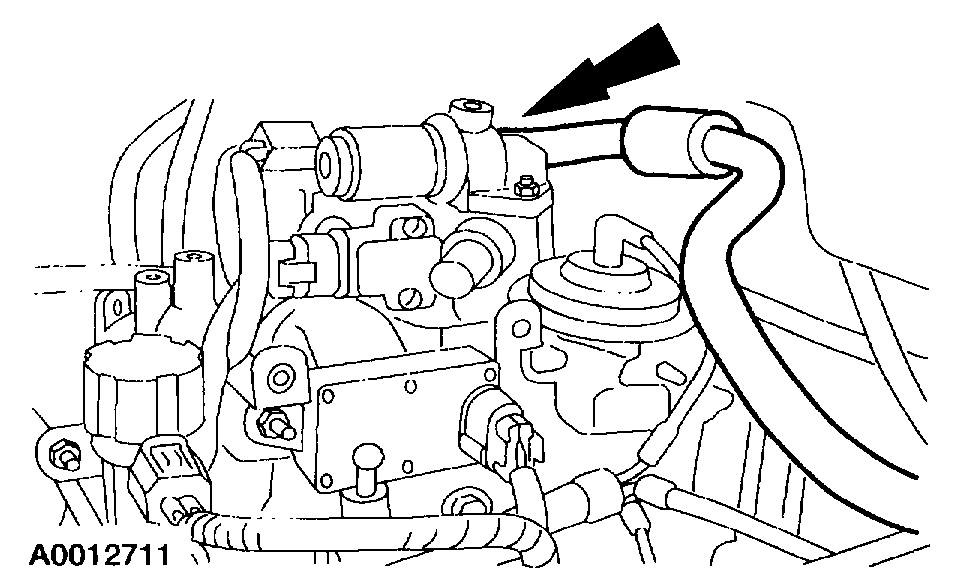
12. Disconnect the vapor management valve vacuum line.

Pic 9

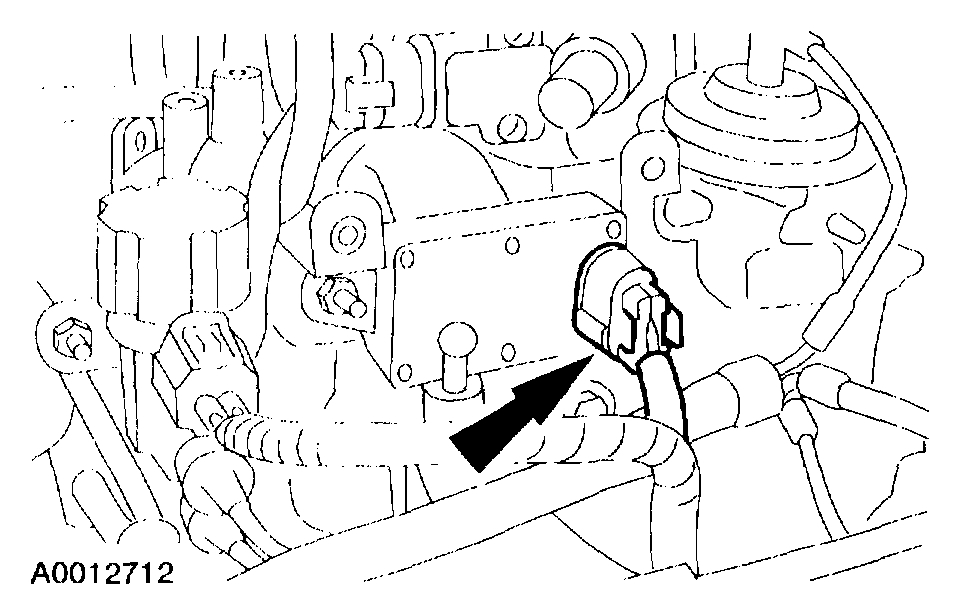
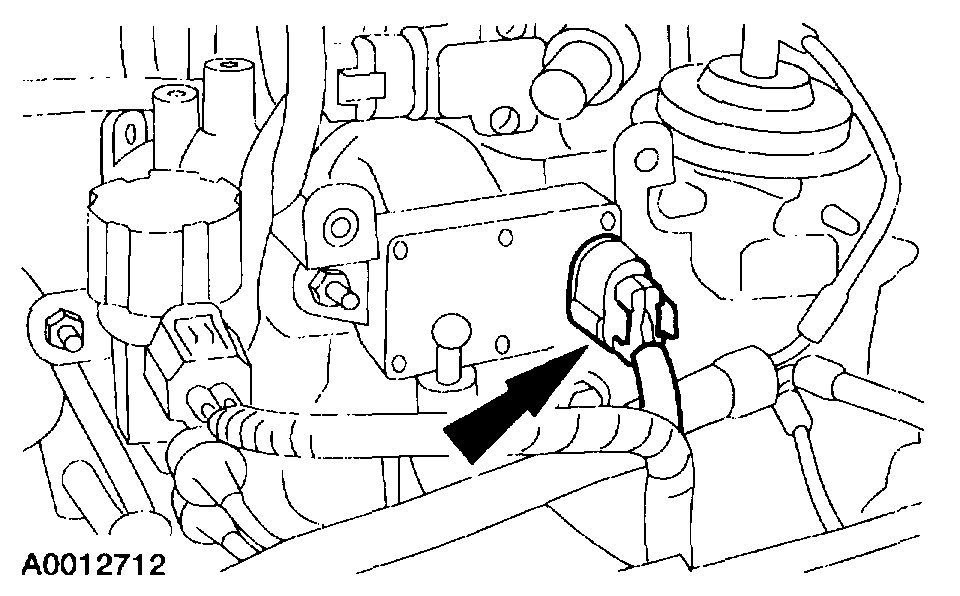
13. Disconnect the differential pressure feedback EGR connector.

Pic 10

14. Remove the nut and disconnect the brake booster vacuum line and bracket.

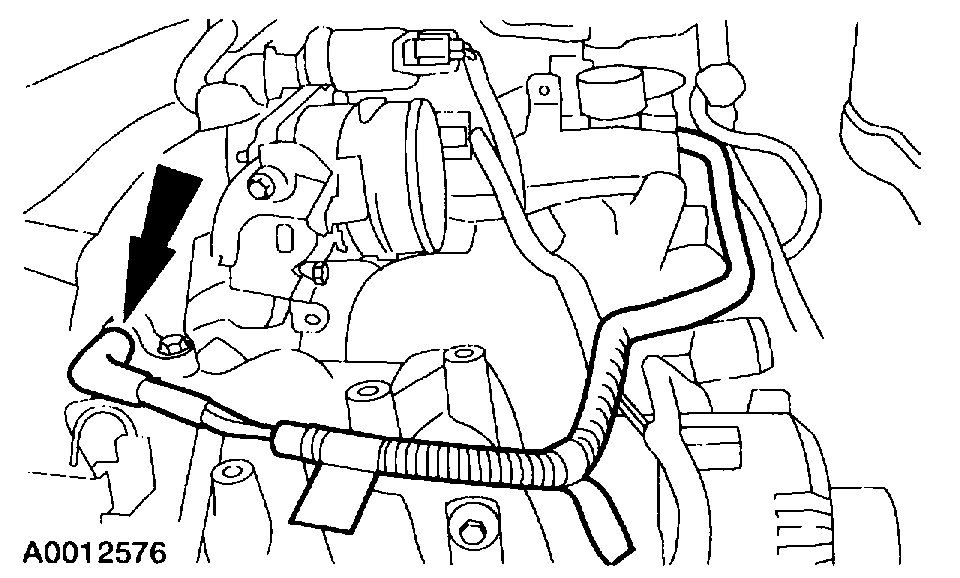
15. Disconnect the fuel lines.

Pic 11

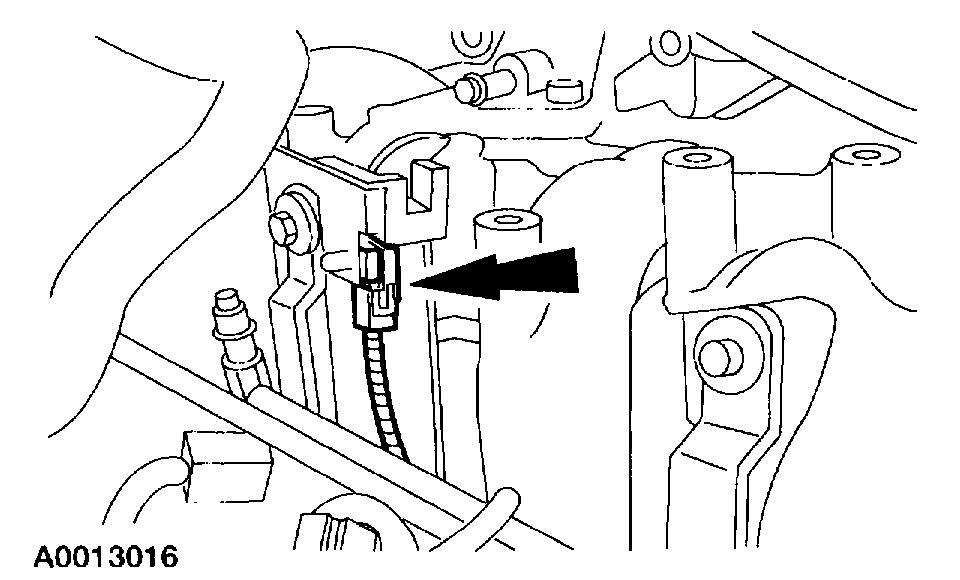
16. Disconnect the idle air control motor electrical connector.

Pic 12

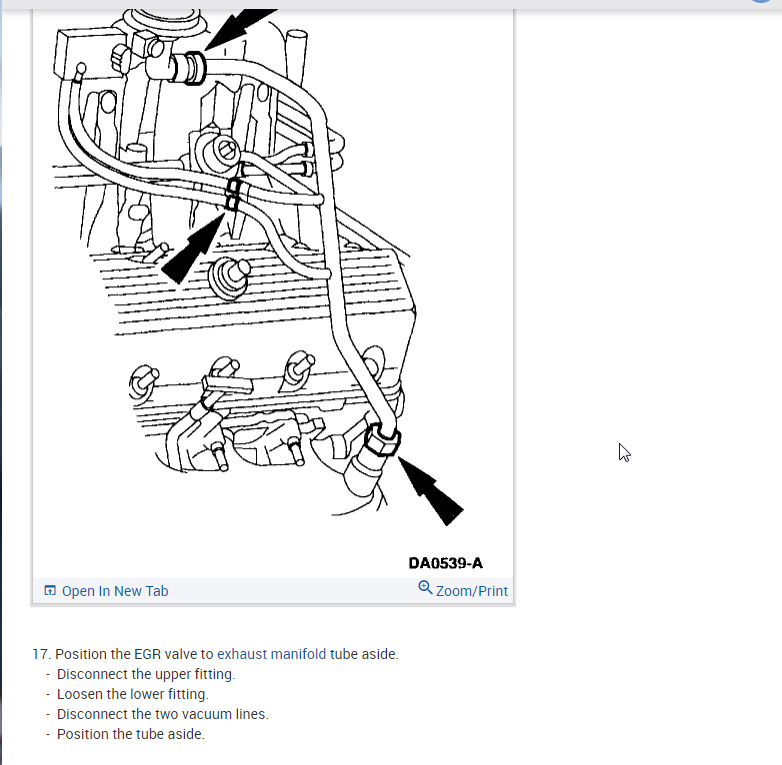
17. Position the EGR valve to exhaust manifold tube aside.
- Disconnect the upper fitting.
- Loosen the lower fitting.
- Disconnect the two vacuum lines.
- Position the tube aside.

Pic 13

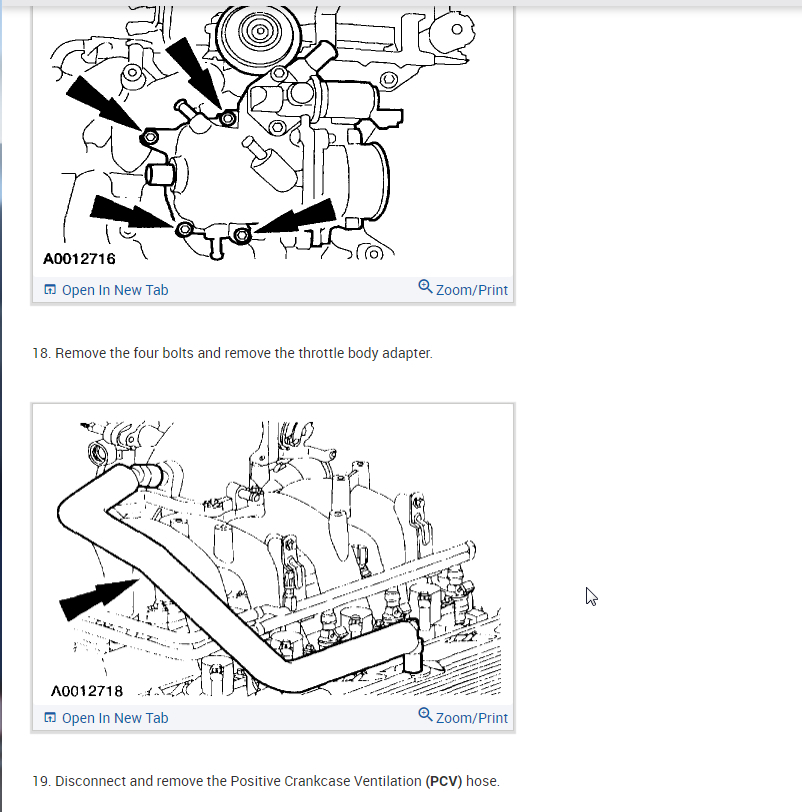
18. Remove the four bolts and remove the throttle body adapter.

Pic 14

19. Disconnect and remove the Positive Crankcase Ventilation (PCV) hose.

Pic 15

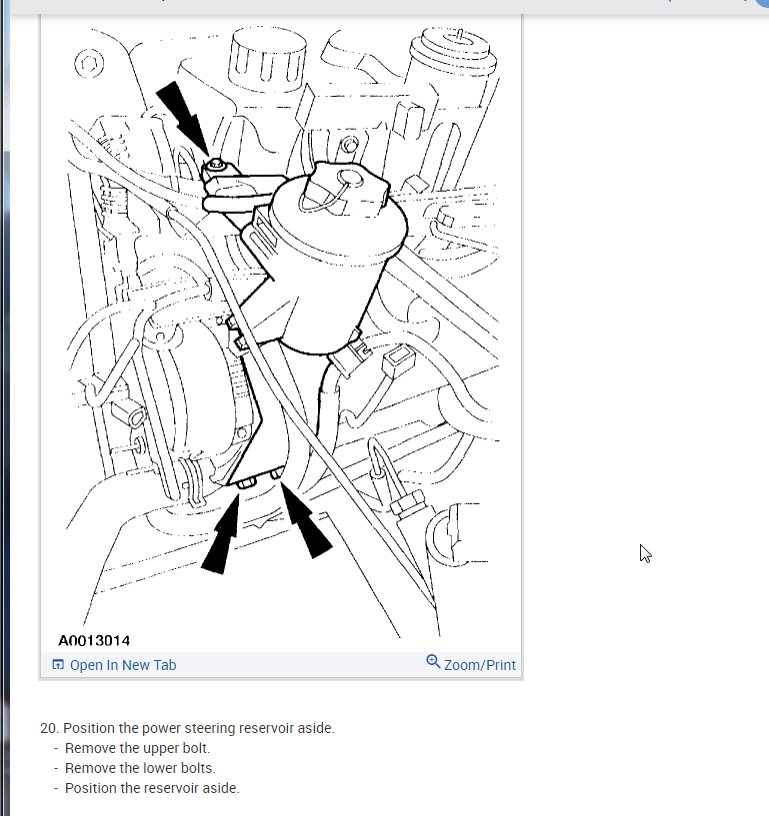
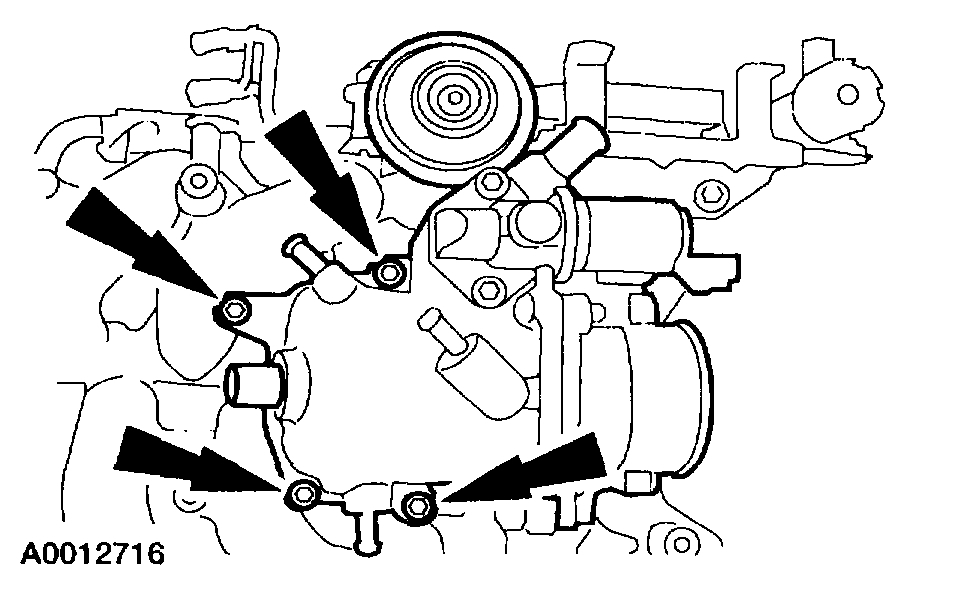
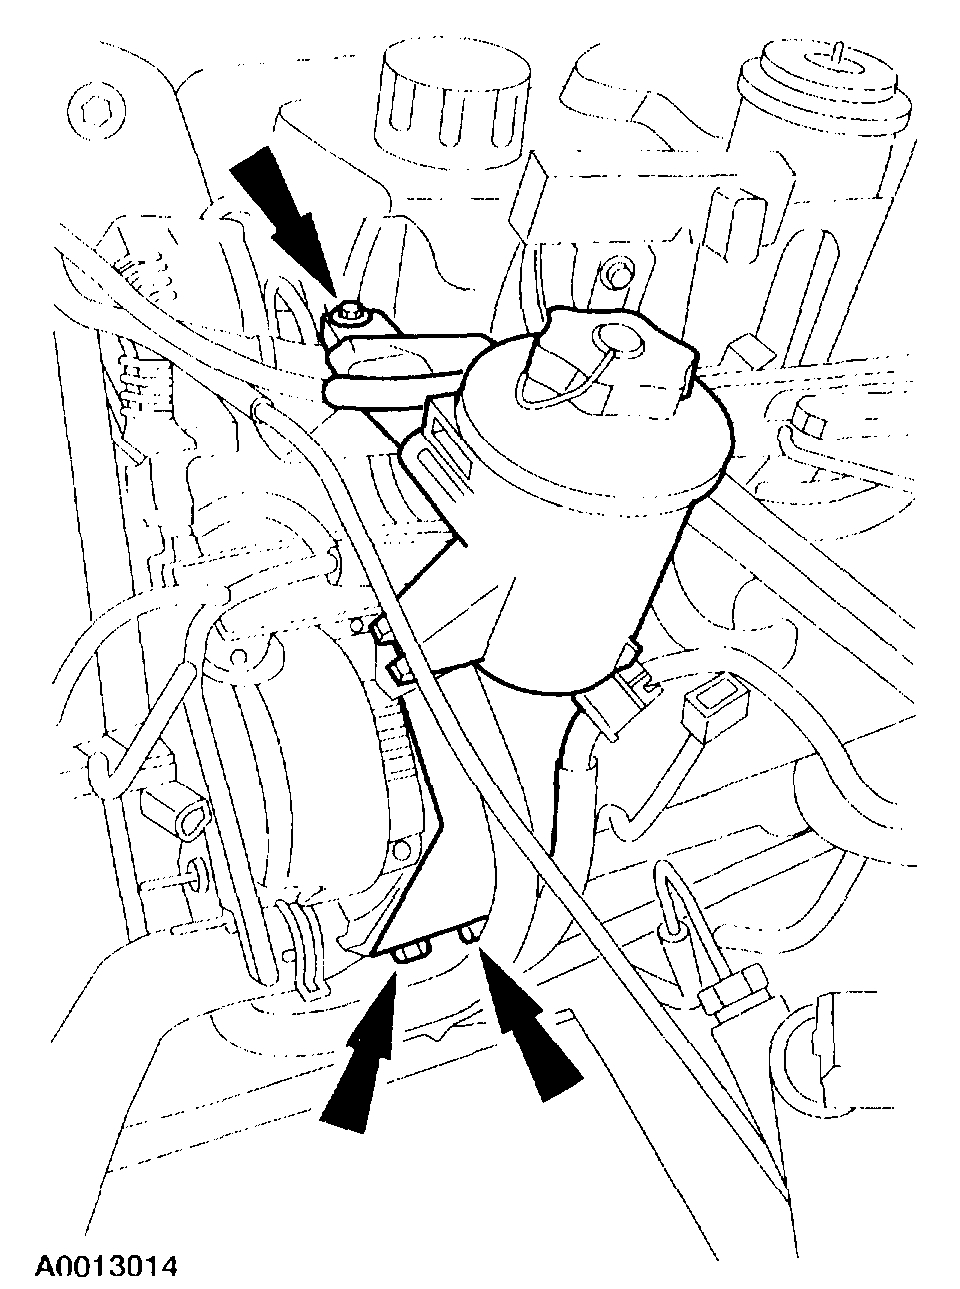
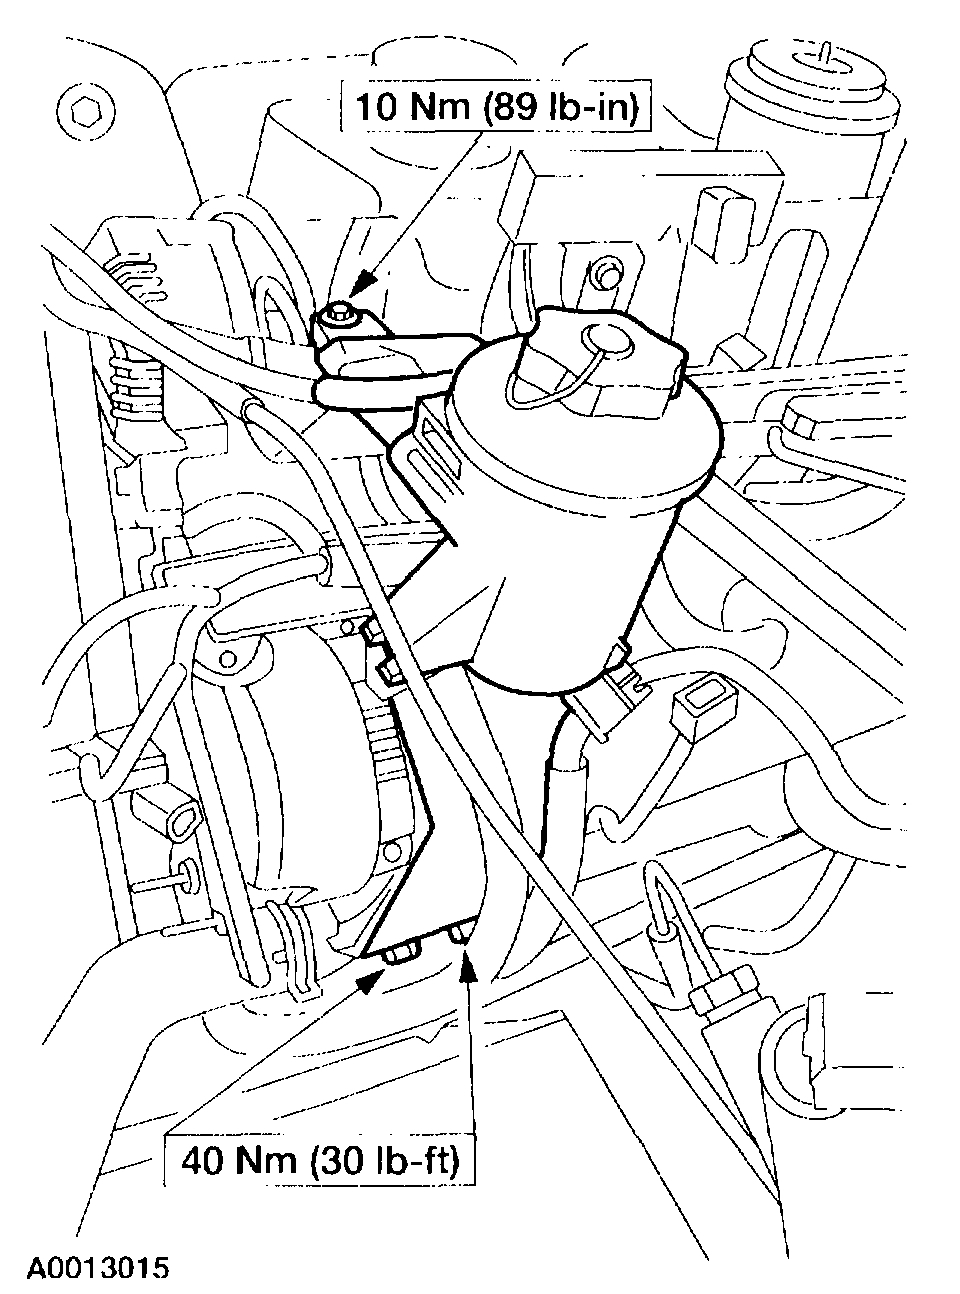
20. Position the power steering reservoir aside.
- Remove the upper bolt.
- Remove the lower bolts.
- Position the reservoir aside.

Pic 16

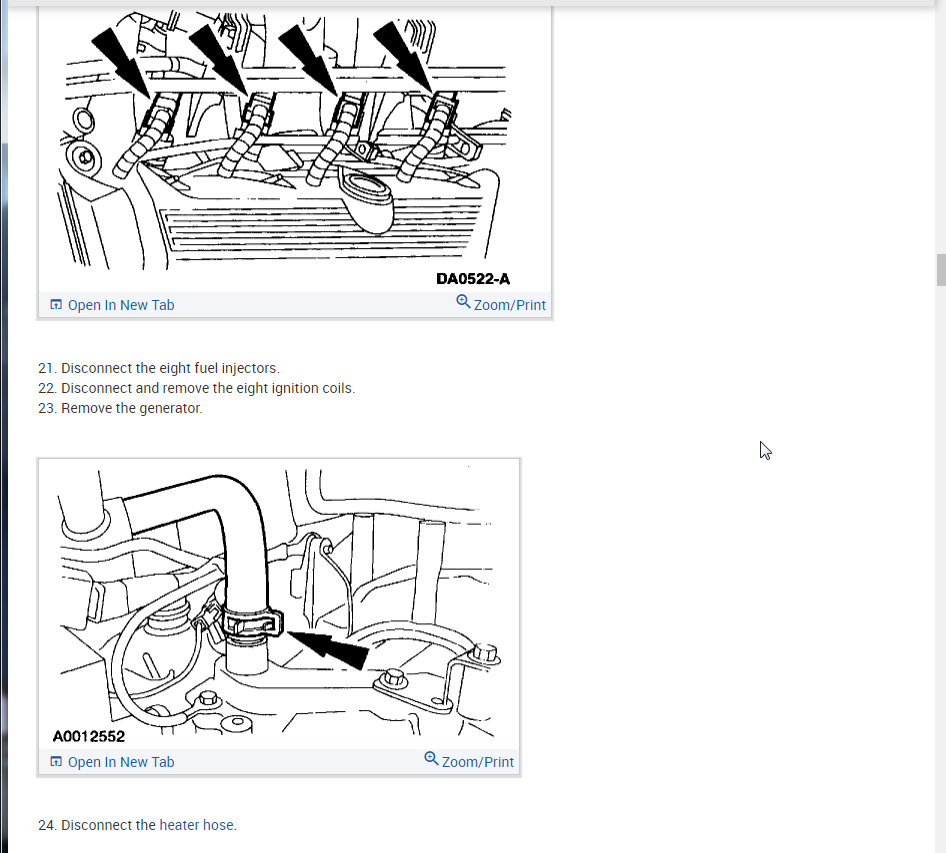
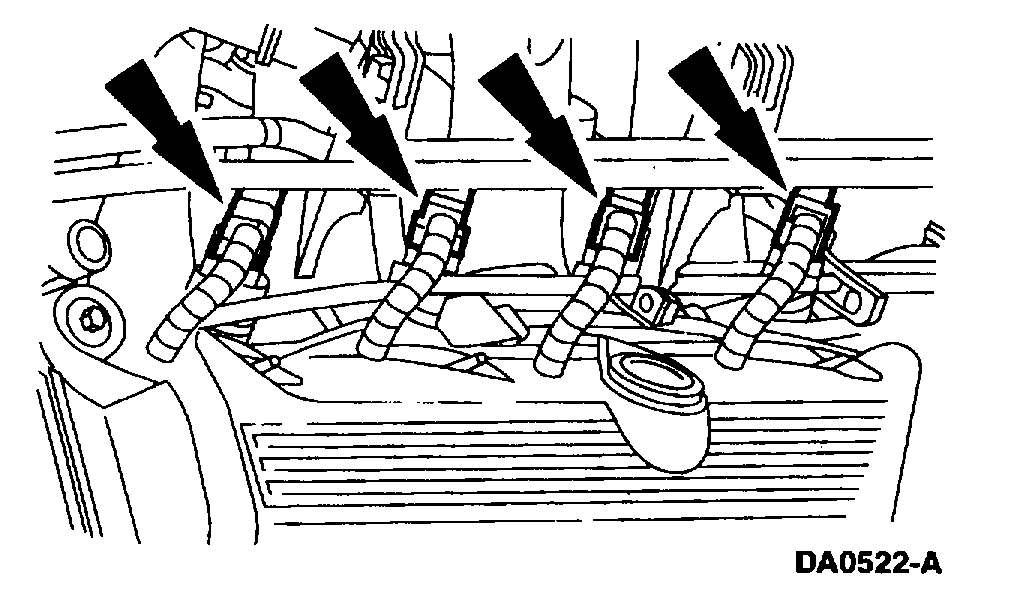
21. Disconnect the eight fuel injectors.
22. Disconnect and remove the eight ignition coils.
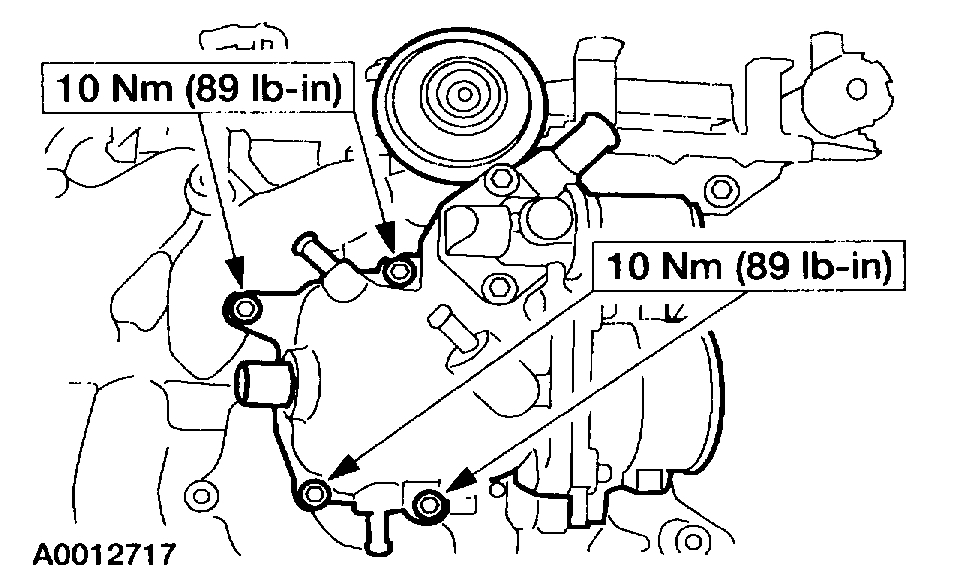
23. Remove the generator.

Pic 17

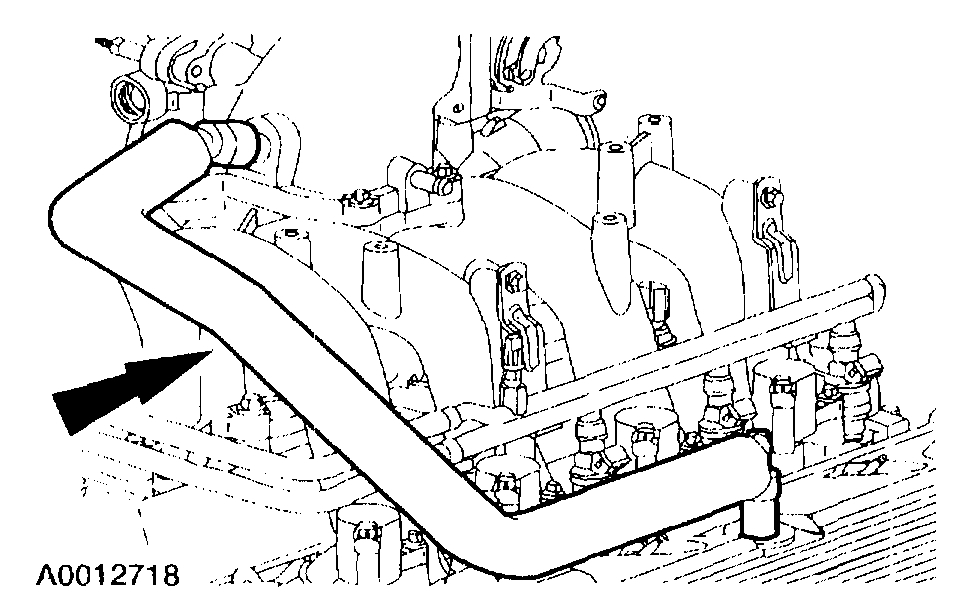
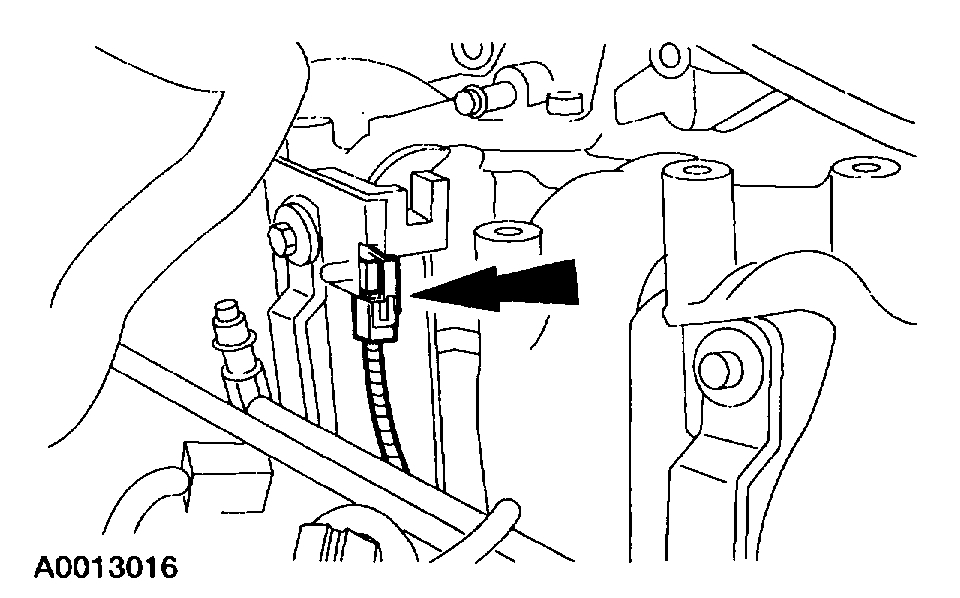
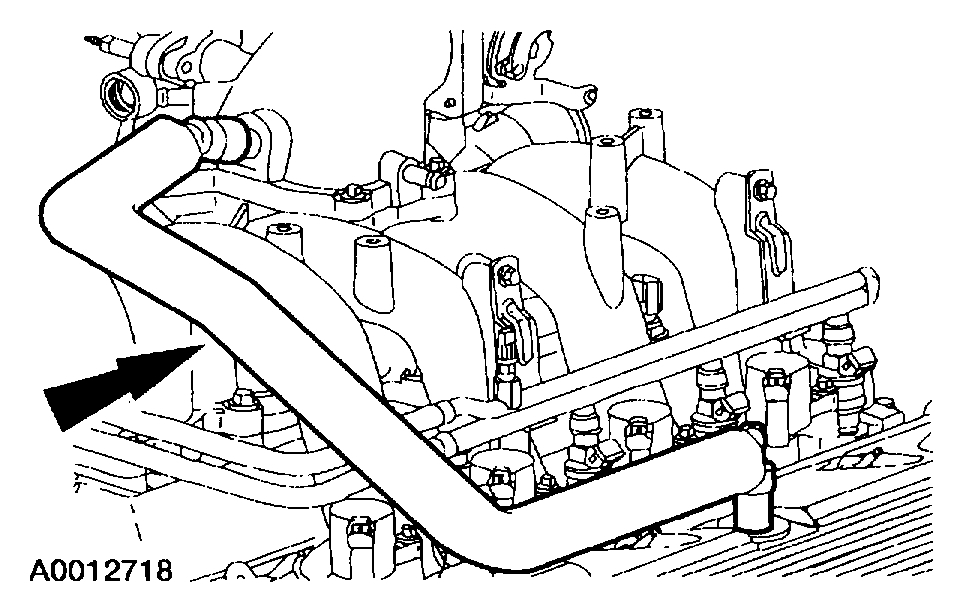
24. Disconnect the heater hose.

Pic 18

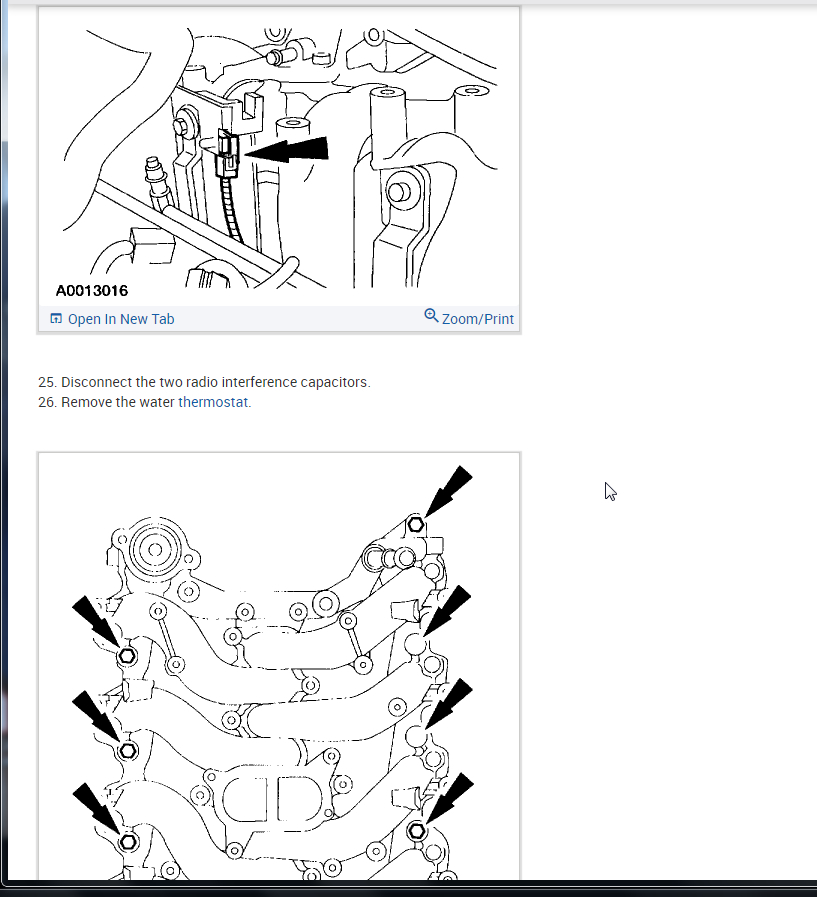
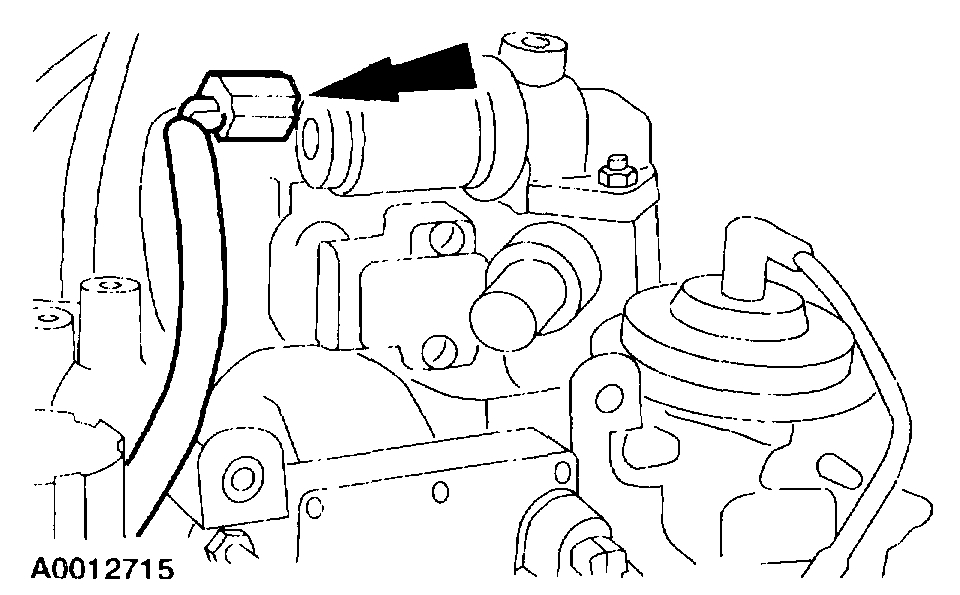
25. Disconnect the two radio interference capacitors.
26. Remove the water thermostat.

Pic 19

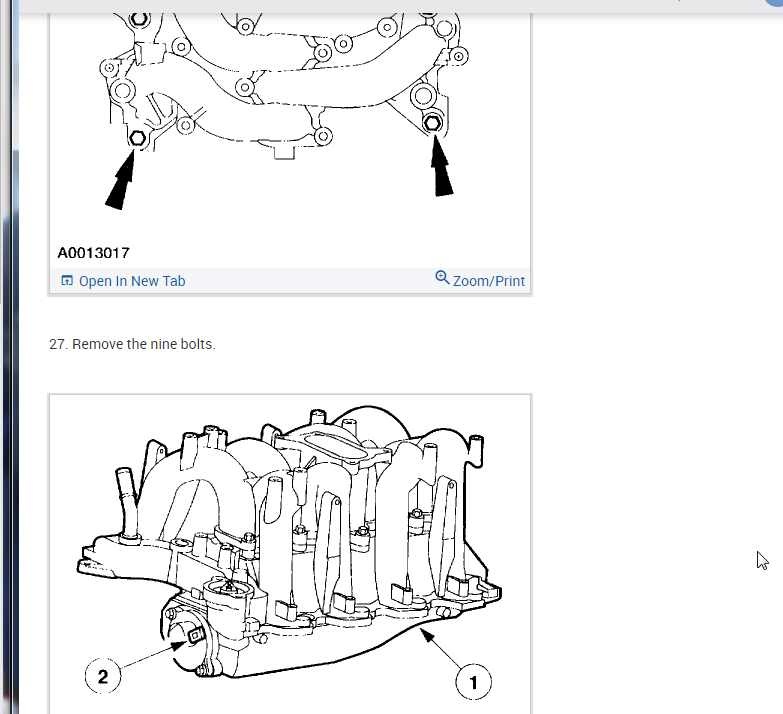
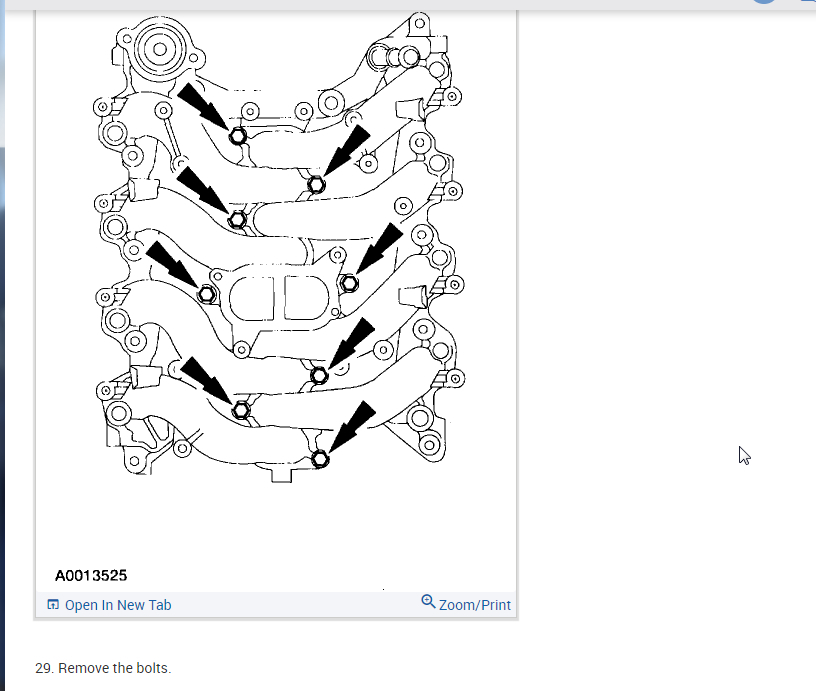
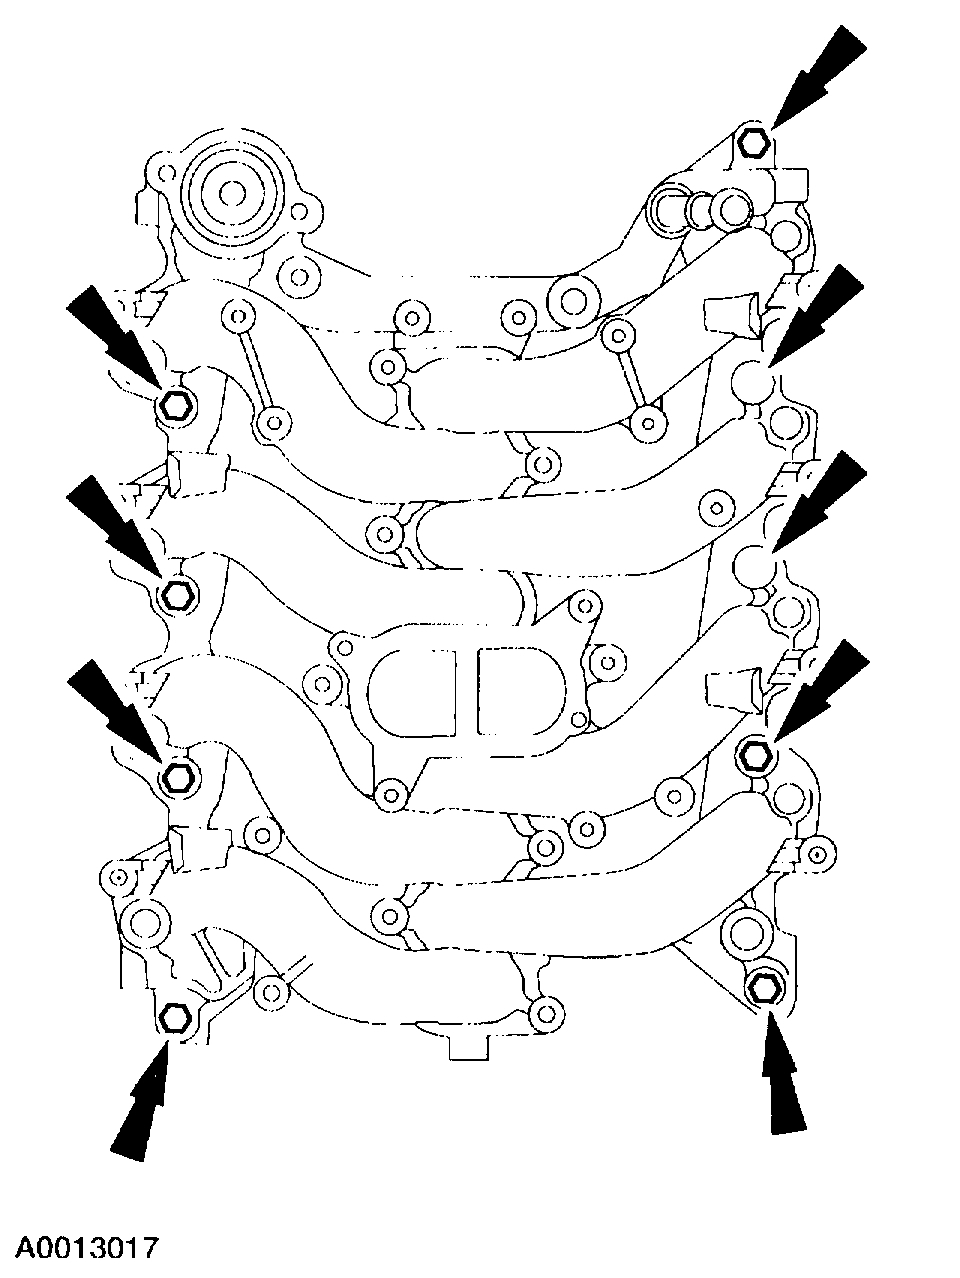
27. Remove the nine bolts.

Pic 20

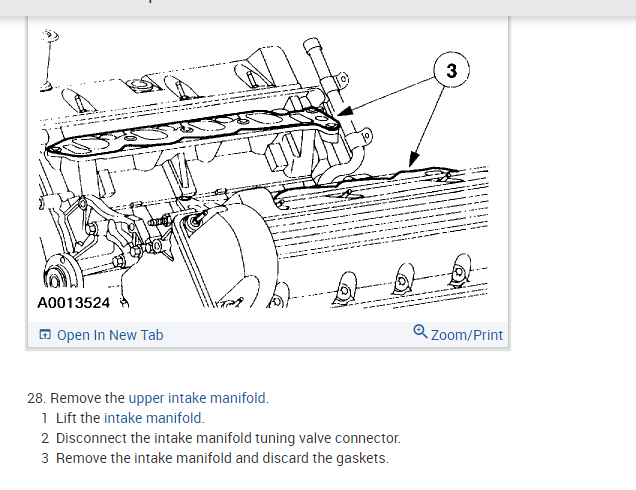
28. Remove the upper intake manifold.
1 Lift the intake manifold.
2 Disconnect the intake manifold tuning valve connector.
3 Remove the intake manifold and discard the gaskets.

Pic 21

29. Remove the bolts.

Pic 22

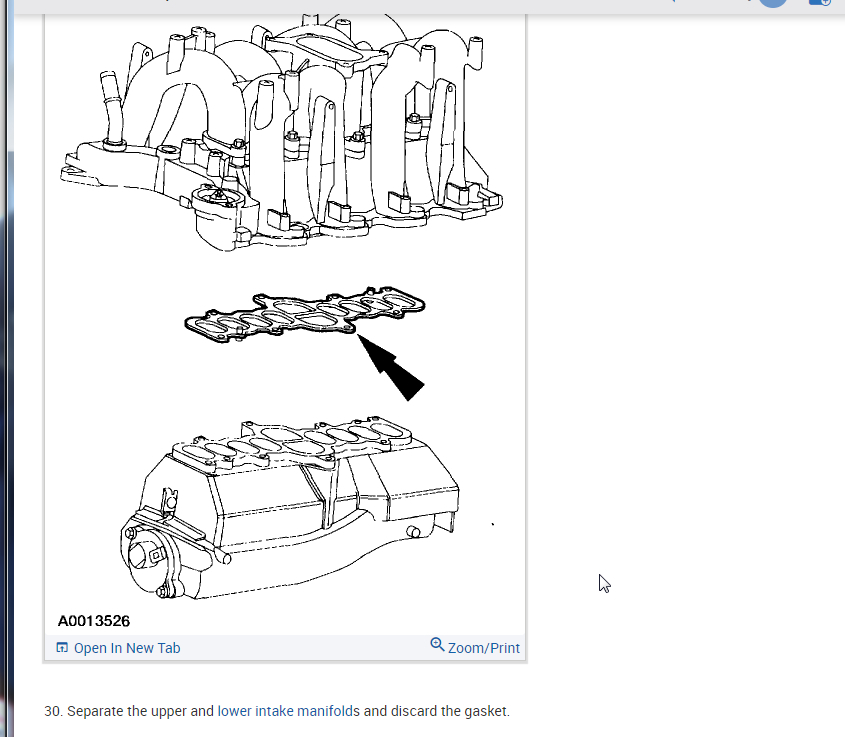
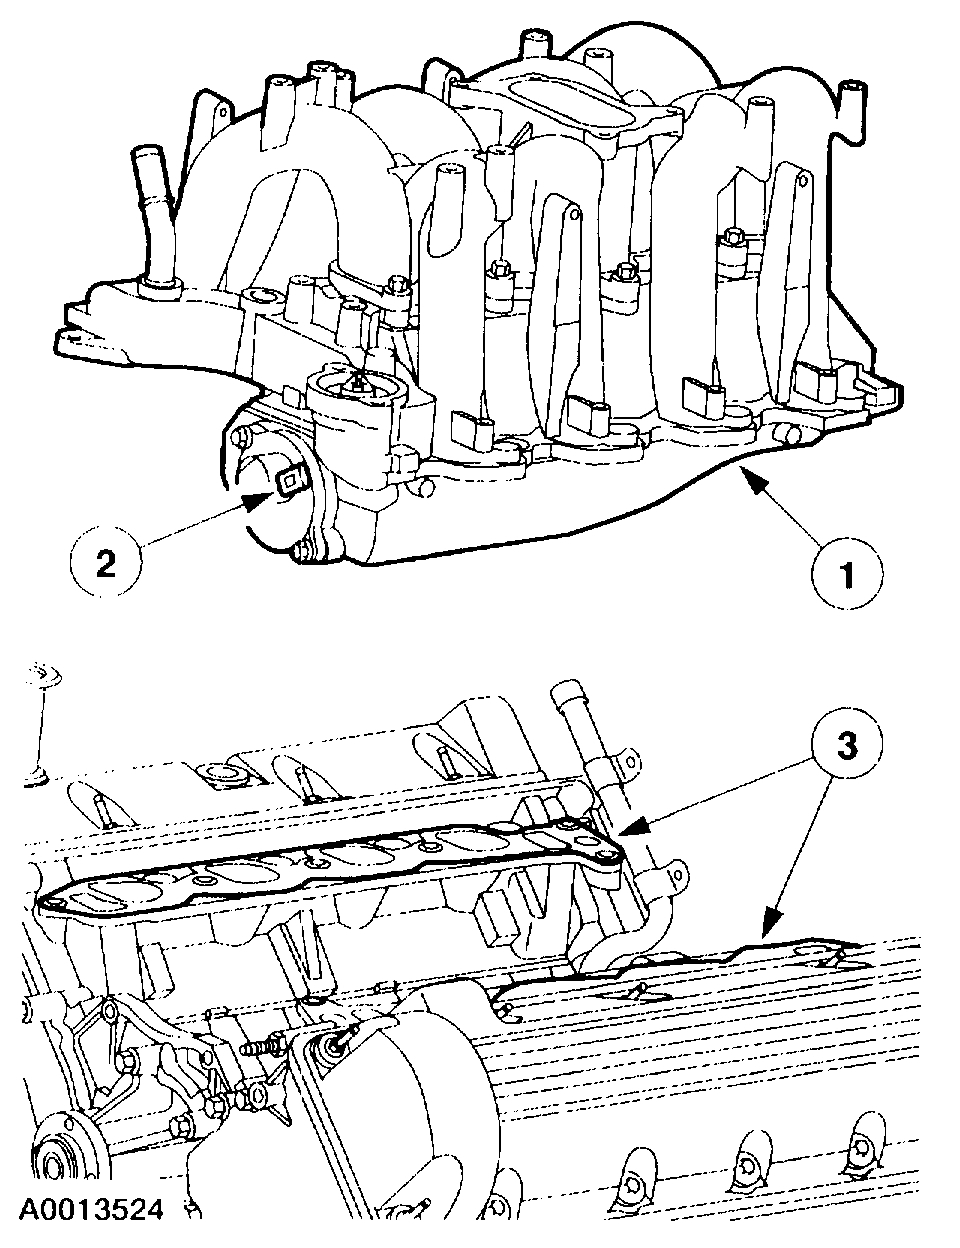
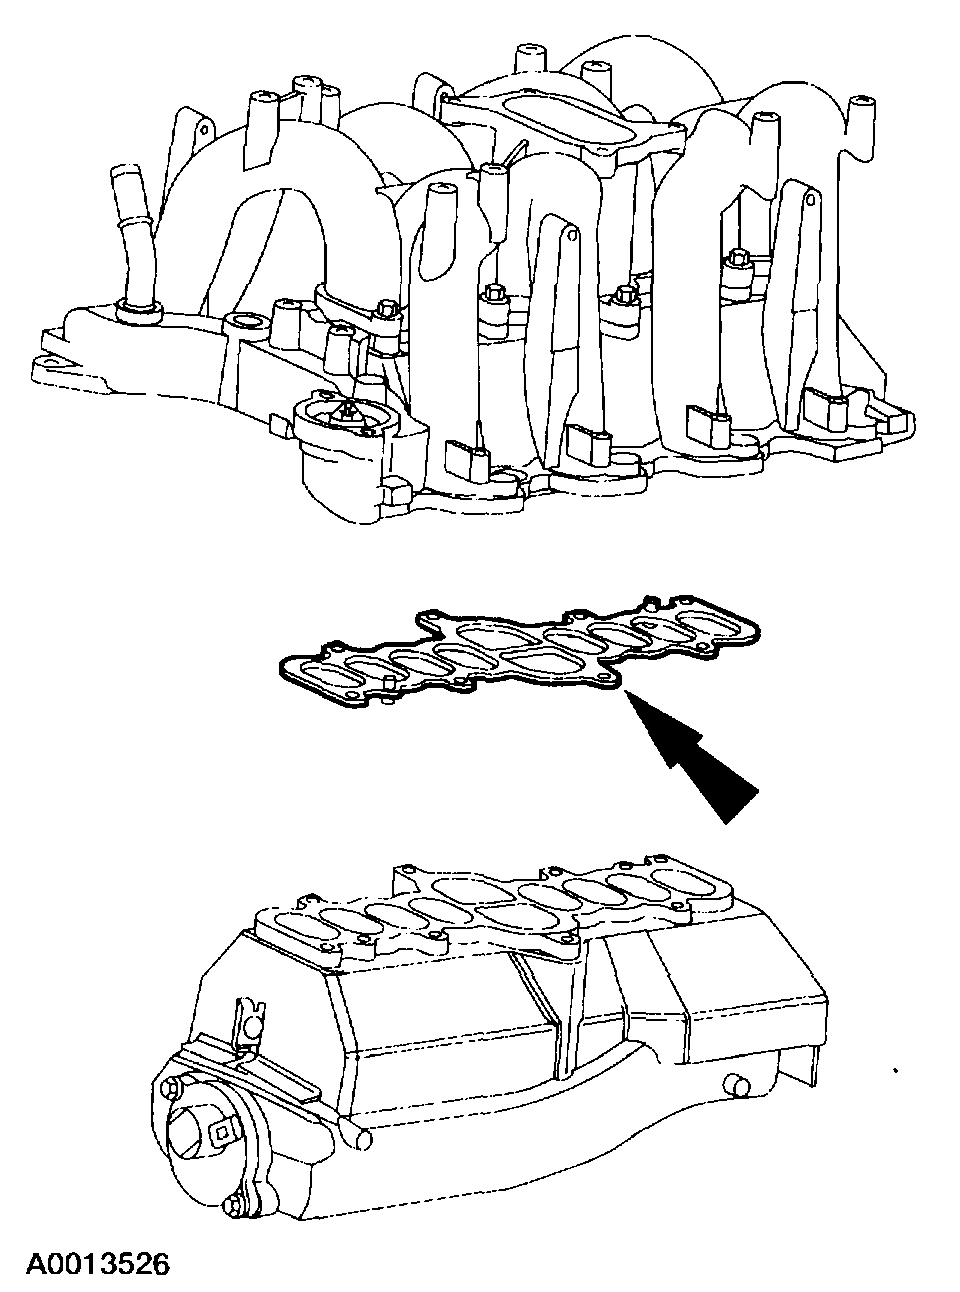
30. Separate the upper and lower intake manifolds and discard the gasket.

Pic 23

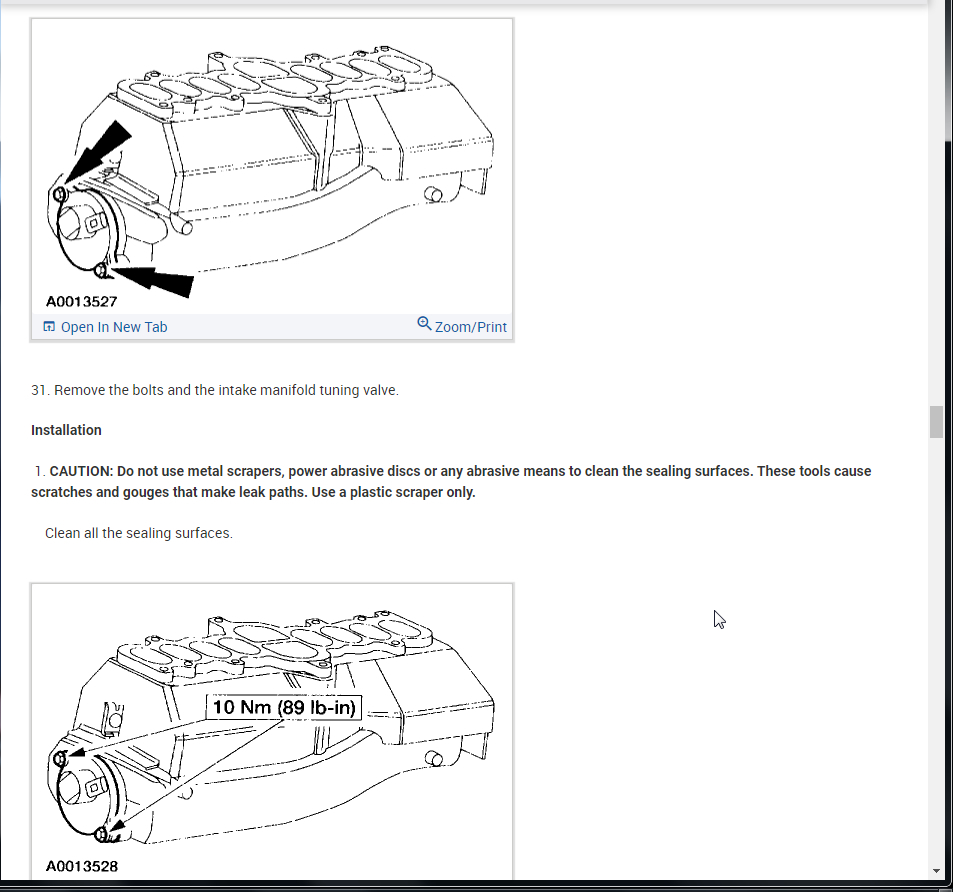
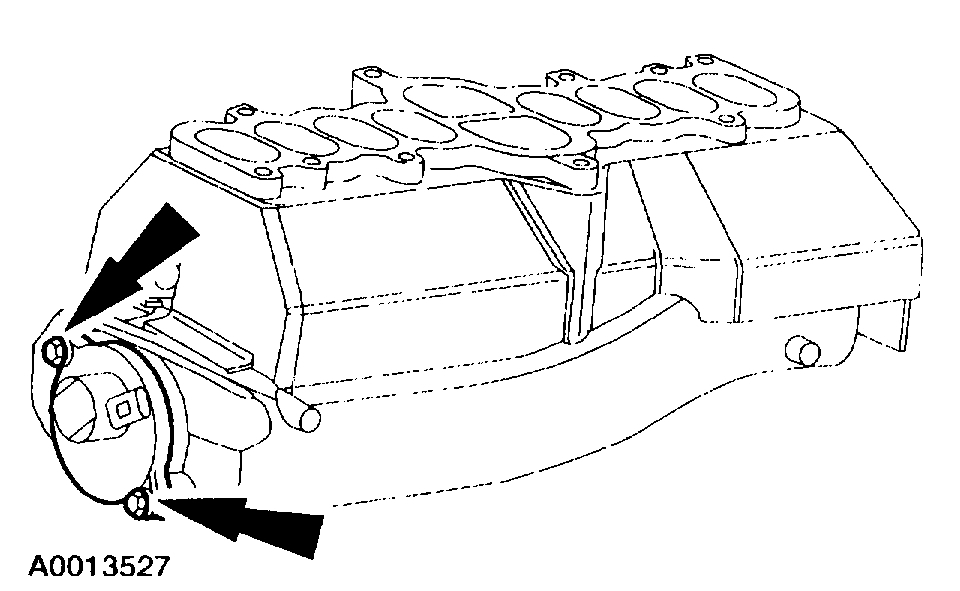
31. Remove the bolts and the intake manifold tuning valve.

Installation

1. CAUTION: Do not use metal scrapers, power abrasive discs or any abrasive means to clean the sealing surfaces. These tools cause scratches and gouges that make leak paths. Use a plastic scraper only.

Clean all the sealing surfaces.

Pic 24

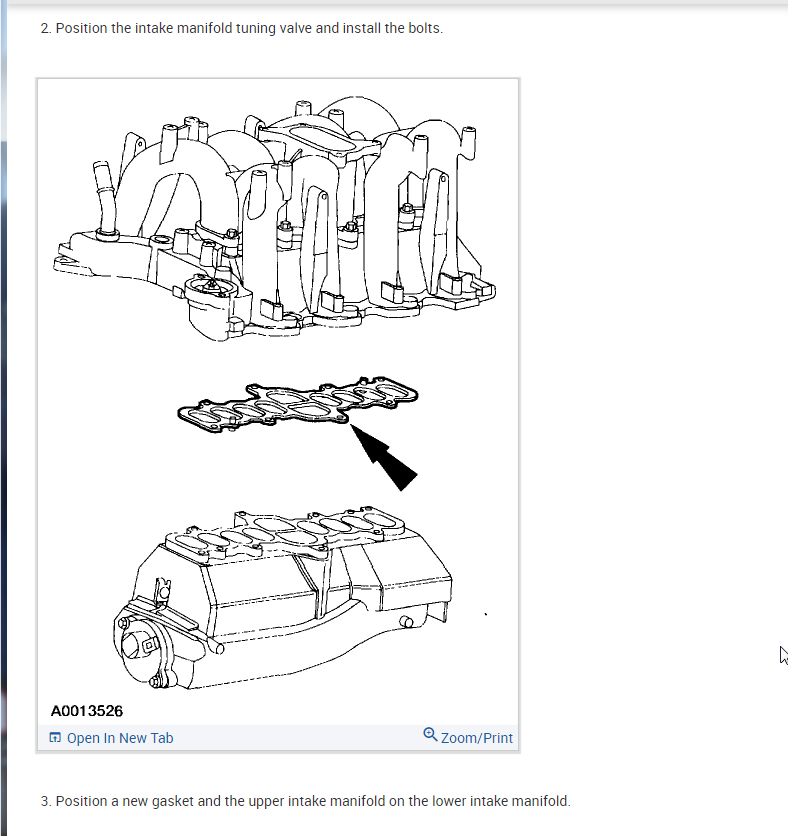
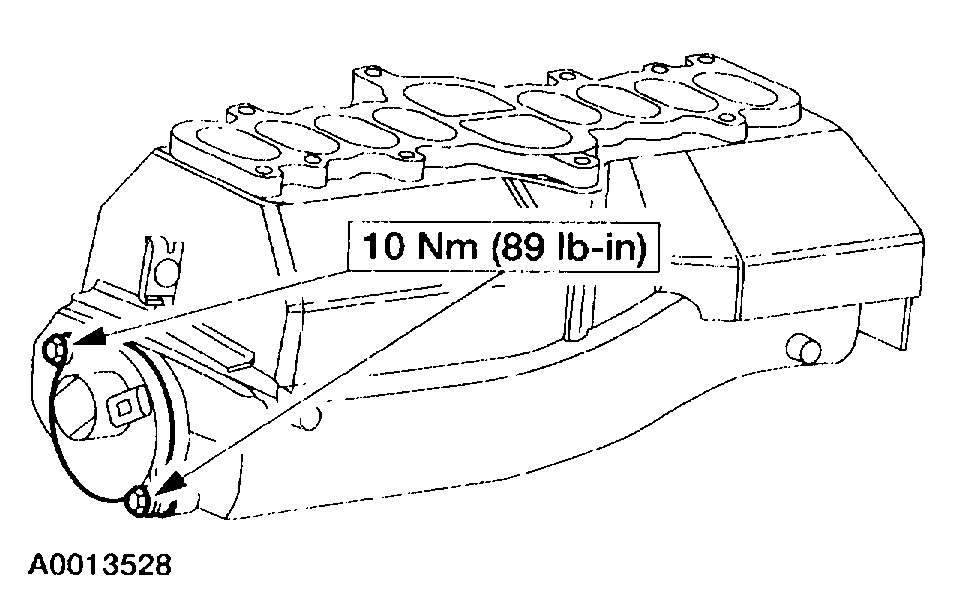
2. Position the intake manifold tuning valve and install the bolts.

IPic 25

3. Position a new gasket and the upper intake manifold on the lower intake manifold.

Pic 26

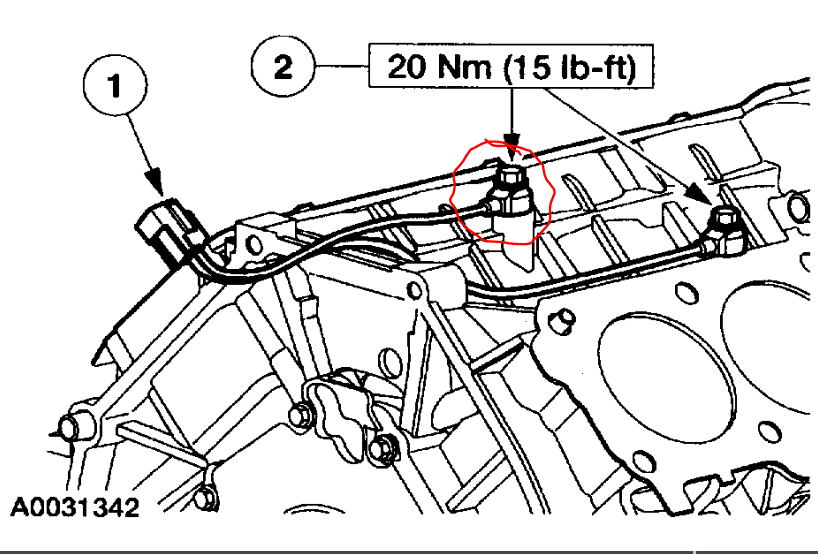
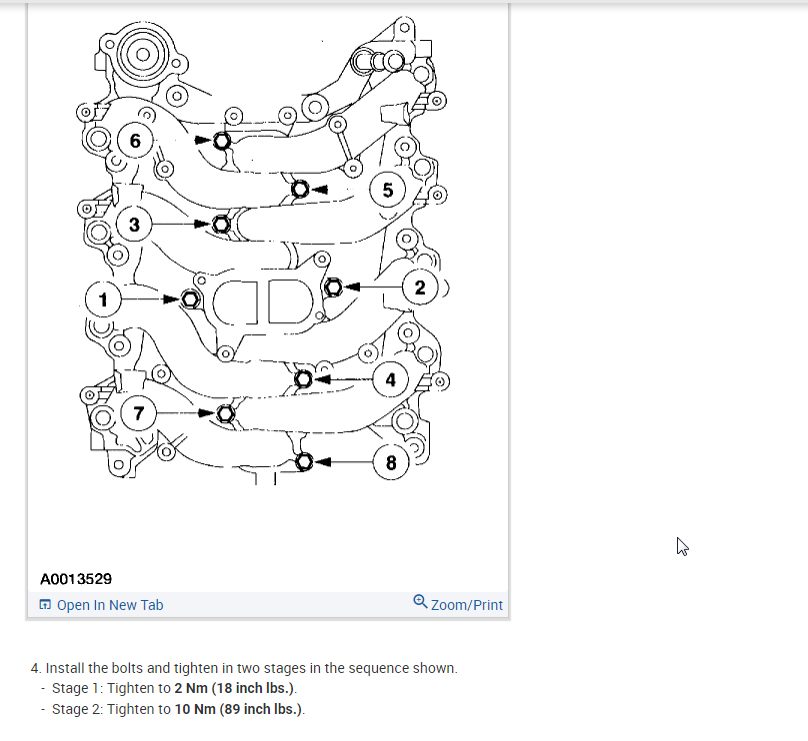
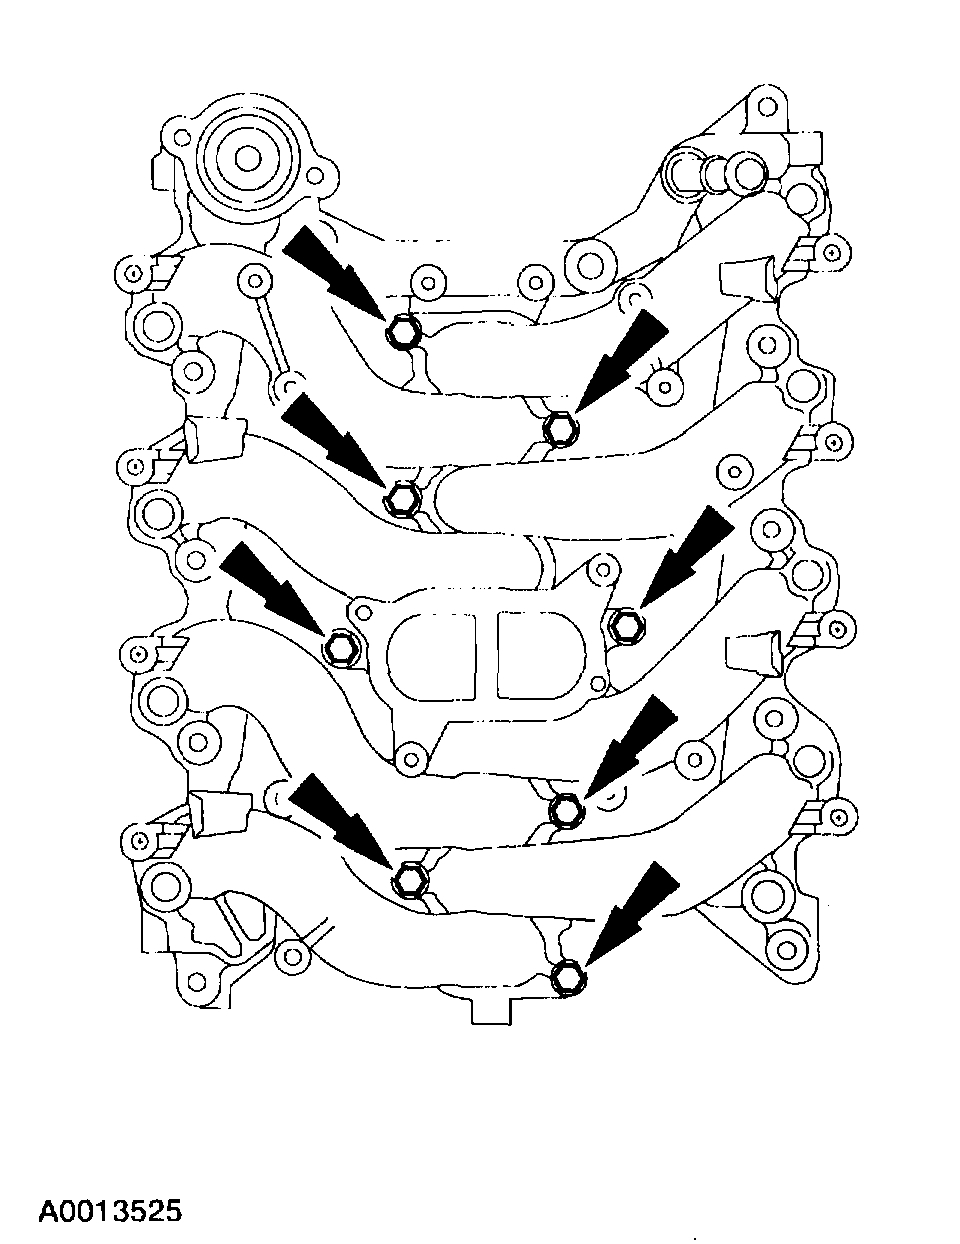
4. Install the bolts and tighten in two stages in the sequence shown.
- Stage 1: Tighten to 2 Nm (18 inch lbs.).
- Stage 2: Tighten to 10 Nm (89 inch lbs.).

Pic 27

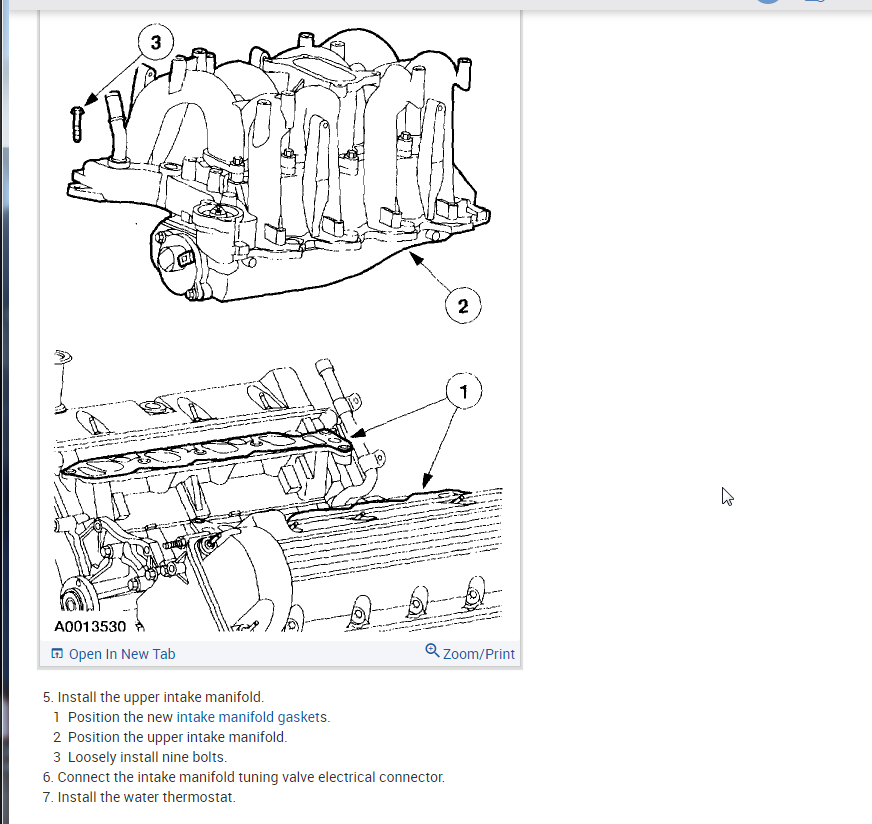
5. Install the upper intake manifold.
1 Position the new intake manifold gaskets.
2 Position the upper intake manifold.
3 Loosely install nine bolts.
6. Connect the intake manifold tuning valve electrical connector.
7. Install the water thermostat.

Pic 28

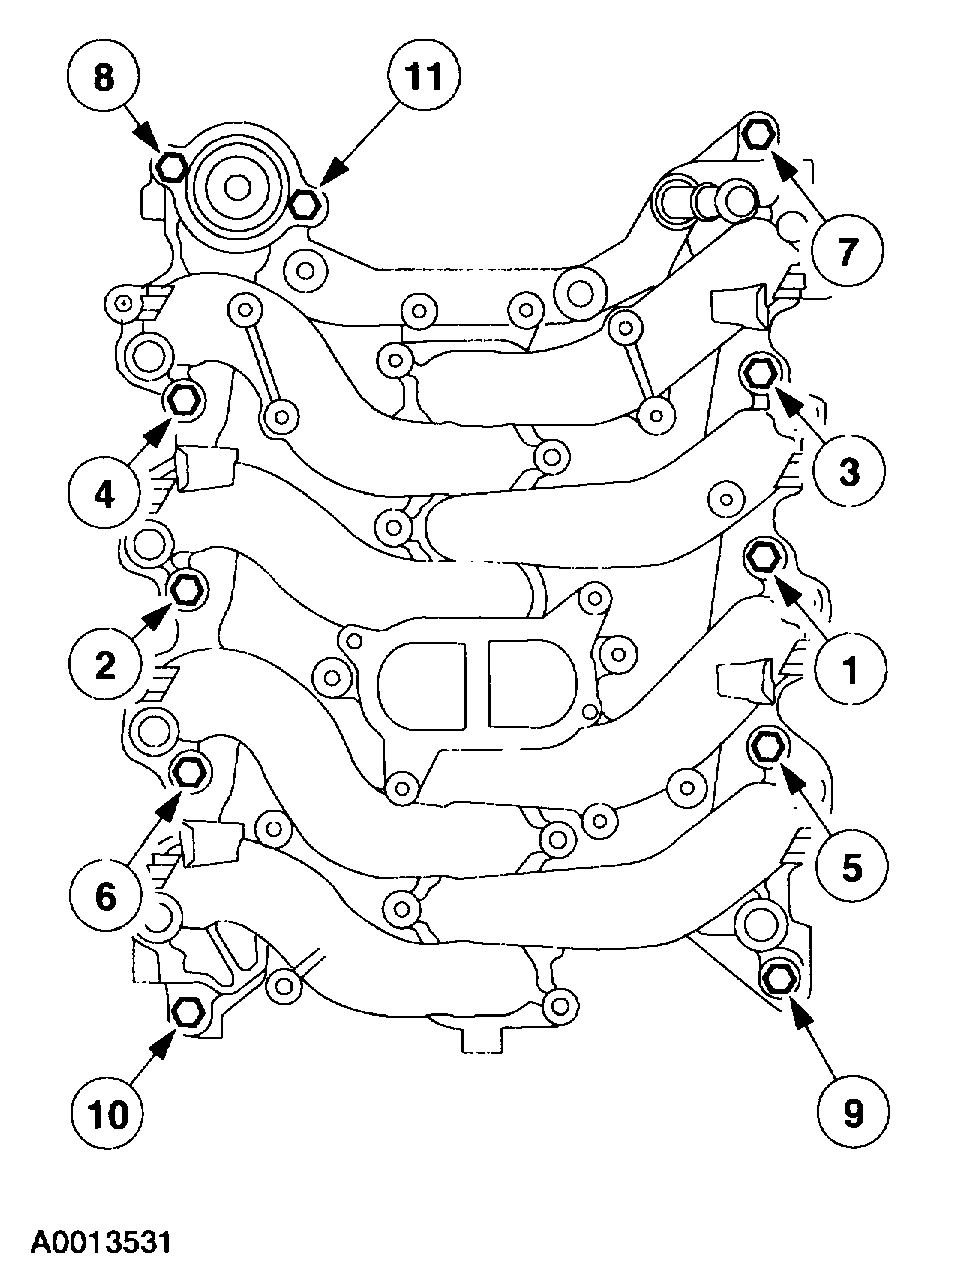
8. Tighten the 11 bolts in two stages in the sequence shown.
- Stage 1: Tighten to 2 Nm (18 inch lbs.).
- Stage 2: Tighten to 10 Nm (89 inch lbs.).

Pic 29

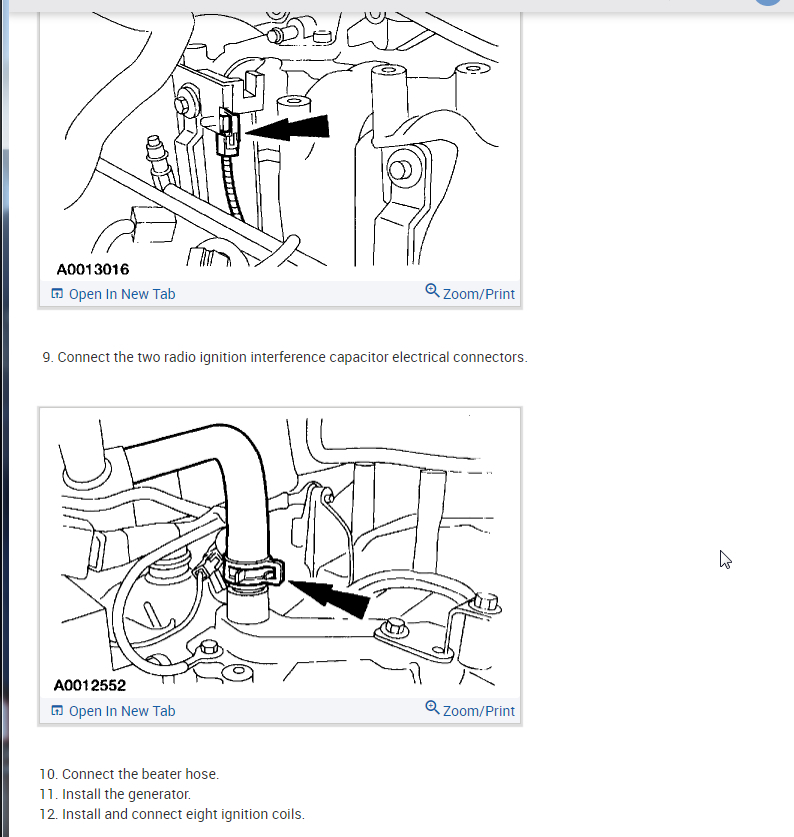
9. Connect the two radio ignition interference capacitor electrical connectors.

Pic 30

10. Connect the beater hose.
11. Install the generator.
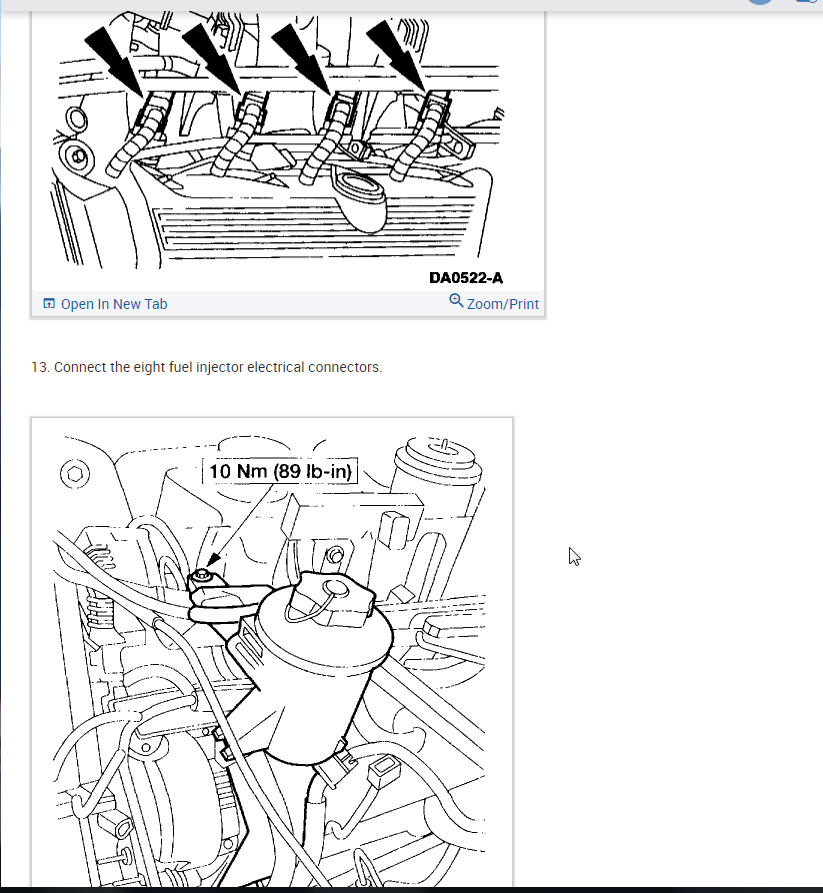
12. Install and connect eight ignition coils.

Pic 31

13. Connect the eight fuel injector electrical connectors.

Pic 32

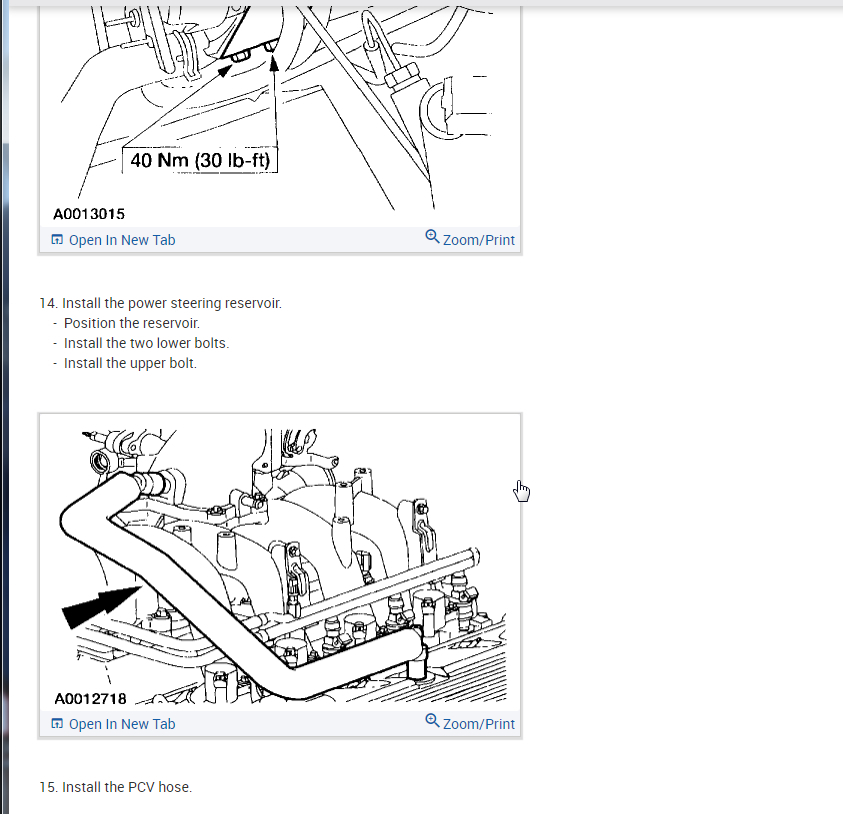
14. Install the power steering reservoir.
- Position the reservoir.
- Install the two lower bolts.
- Install the upper bolt.

Pic 33

15. Install the PCV hose.

Pic 34

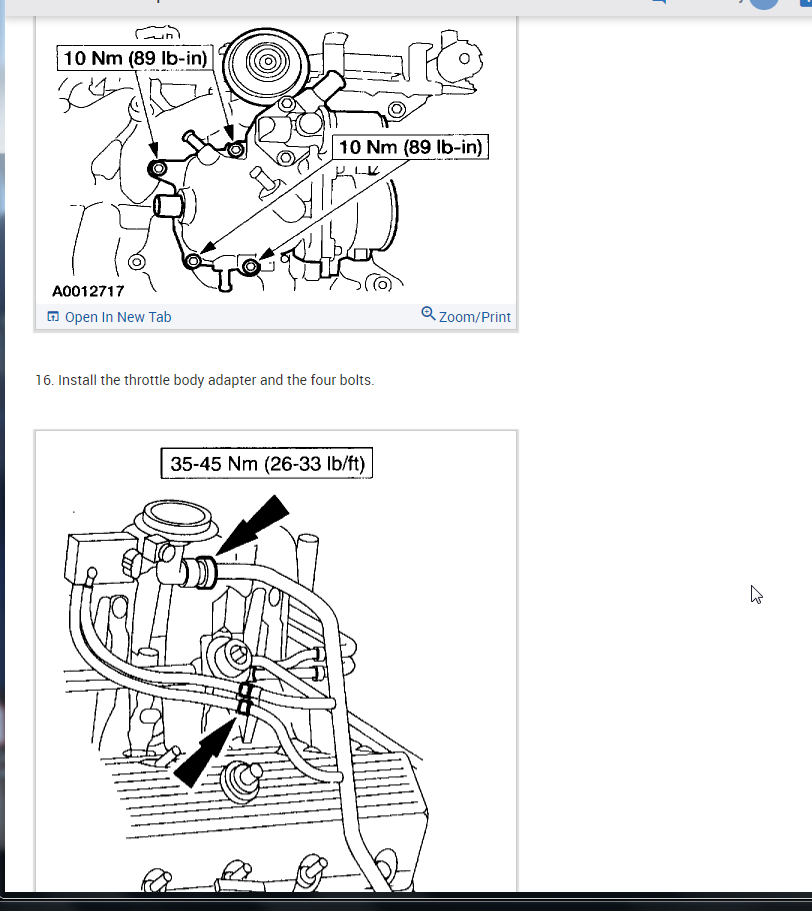
16. Install the throttle body adapter and the four bolts.

Pic 35

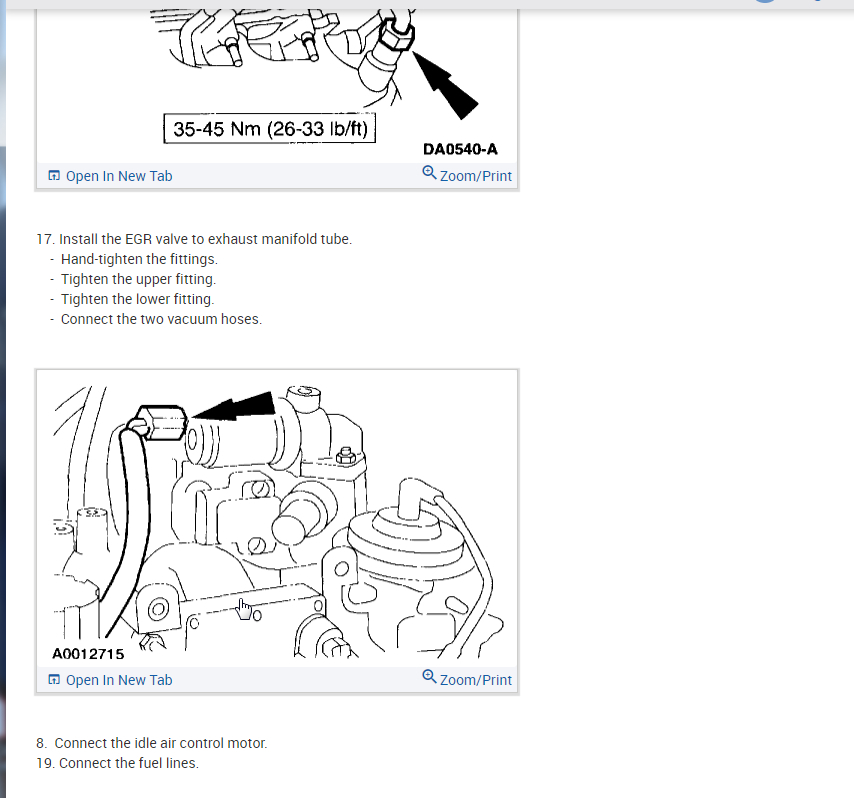
17. Install the EGR valve to exhaust manifold tube.
- Hand-tighten the fittings.
- Tighten the upper fitting.
- Tighten the lower fitting.
- Connect the two vacuum hoses.

Pic 36

8. Connect the idle air control motor.
19. Connect the fuel lines.

Pic 37

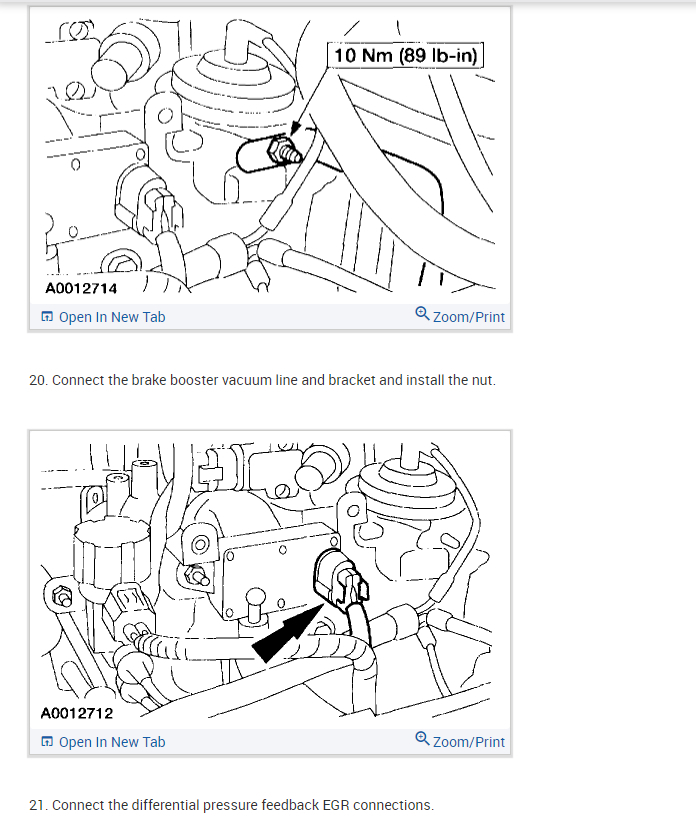
20. Connect the brake booster vacuum line and bracket and install the nut.

Pic 38

21. Connect the differential pressure feedback EGR connections.

Pic 39

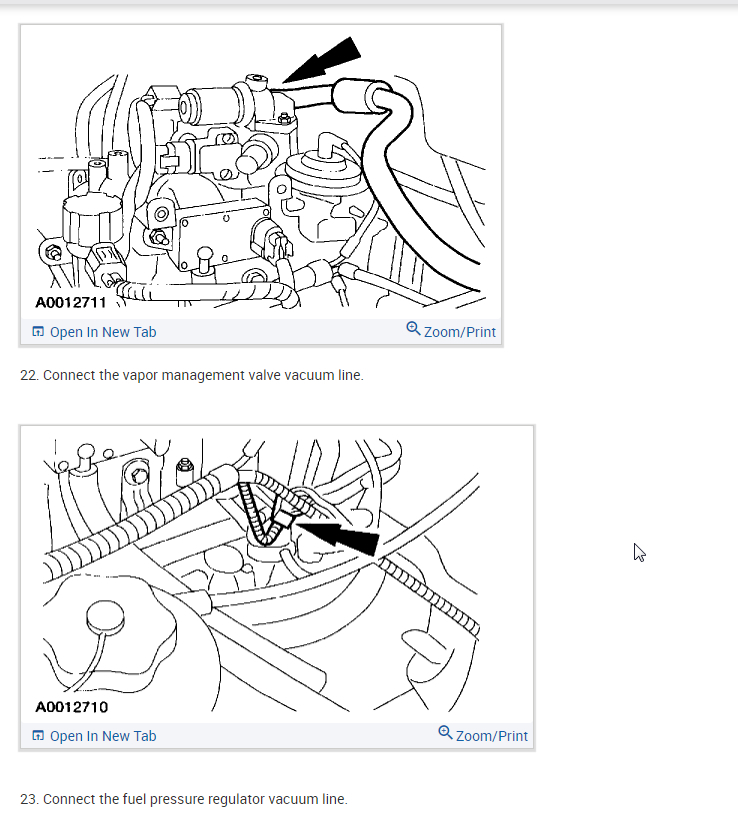
22. Connect the vapor management valve vacuum line.

Pic 40

23. Connect the fuel pressure regulator vacuum line.

Pic 41

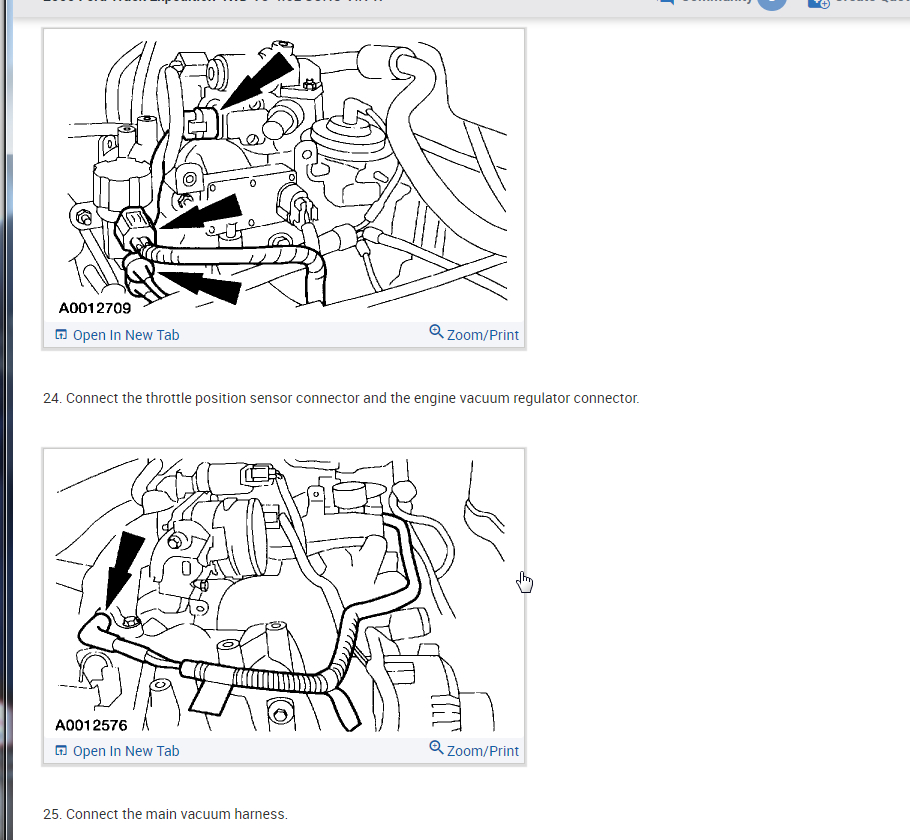
24. Connect the throttle position sensor connector and the engine vacuum regulator connector.

Pic 42

25. Connect the main vacuum harness.

Pic 43

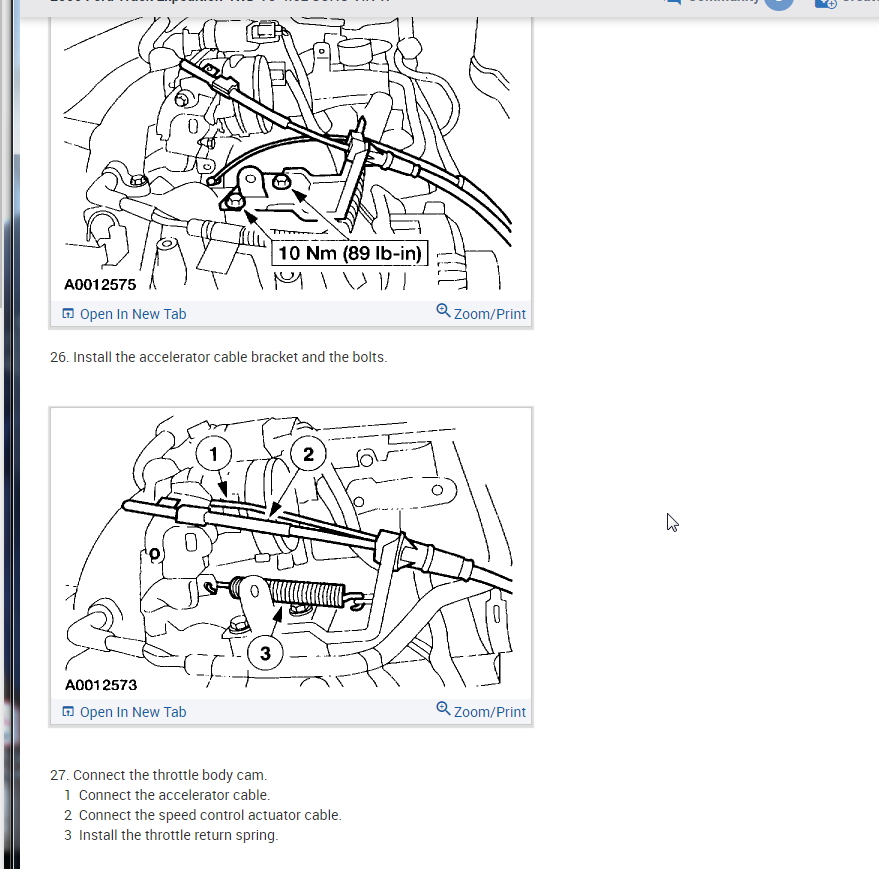
26. Install the accelerator cable bracket and the bolts.

Pic 44

27. Connect the throttle body cam.
1 Connect the accelerator cable.
2 Connect the speed control actuator cable.
3 Install the throttle return spring.

Pic 45

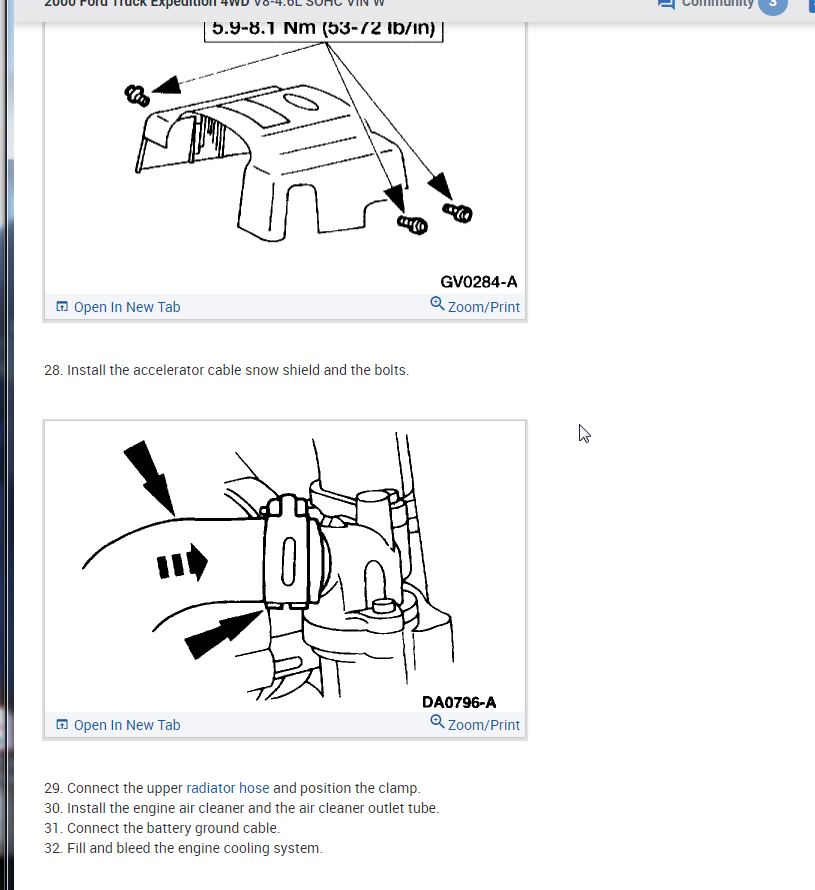
28. Install the accelerator cable snow shield and the bolts.
29. Connect the upper radiator hose and position the clamp.
30. Install the engine air cleaner and the air cleaner outlet tube.
31. Connect the battery ground cable.
32. Fill and bleed the engine cooling system.

___________________________

Let me know if this helps or if you have other questions.

Take care,
Joe
Was this
answer
helpful?
Yes
No
Saturday, December 26th, 2020 AT 9:29 AM (Merged)
Tiny
DHALLRUBBADUBDUB
  • MEMBER
  • 2 POSTS
  • 1997 FORD EXPEDITION
  • V8
  • 2WD
  • AUTOMATIC
  • 158,000 MILES
Just put new plugs and wires on vehicle. Mechanic says the intake manifold is leaking. What problems will this cause me with engine and /or performance? What should a set of new gaskets cost to install? How do I know if its truly leaking? What signs should I be looking for on the engine? Will it cause engine damage if the leak continues and what kind of damage?
Was this
answer
helpful?
Yes
No
Saturday, December 26th, 2020 AT 9:30 AM (Merged)
Tiny
MERLIN2021
  • MECHANIC
  • 17,250 POSTS
It depends on if it's leaking coolant, or vacuum? Is this a 4.6? Coolant leaks should be fixed immediatly, vacuum leaks will cause poor driveability.
Was this
answer
helpful?
Yes
No
+1
Saturday, December 26th, 2020 AT 9:30 AM (Merged)
Tiny
DHALLRUBBADUBDUB
  • MEMBER
  • 2 POSTS
Does it make a difference in which engine size and the symptoms common to that size? It is a 4.6.
Was this
answer
helpful?
Yes
No
Saturday, December 26th, 2020 AT 9:30 AM (Merged)
Tiny
MERLIN2021
  • MECHANIC
  • 17,250 POSTS
4.6 had a bad habbit of leaking antifreeze at the front seam of the upper intake. If have a vacuum leak, get a can of spray gumout, spray the vac lines and maniflod area, when the idle changes, youve found the leak! You want the engine running and spray on the outside but do direct the stream onto the hoses, if it is a vacuum leak, the engine idle will change speed, then you have detected a leak, repair the vacuum leak and see how it runs! If that doesnt do it, you may need a new idle air control valve, it's bloted to the throttlebodyit's a vacuum leak.
Was this
answer
helpful?
Yes
No
Saturday, December 26th, 2020 AT 9:30 AM (Merged)
Tiny
97EXPEDITIONBLUE
  • MEMBER
  • 1 POST
  • 1997 FORD EXPEDITION
  • V8
  • 4WD
  • AUTOMATIC
  • 167,000 MILES
My 97 expedition has high miles, 167,000, and I have not had any real problems with it, but I noticed a while back that I was developing a whistle when I accelerated, and just recently I have been noticing a little moisture in my oil, and also have a little miss at an idol run. Not really any noticeable white smoke from the exhaust, no oil in engine coolant but a little bit in oil. Oil also smells like gas really bad! Whats my problem. Intake gasket, head gasket, something else?
Was this
answer
helpful?
Yes
No
Saturday, December 26th, 2020 AT 9:30 AM (Merged)
Tiny
JACOBANDNICKOLAS
  • MECHANIC
  • 108,179 POSTS
If you are getting coolant into the oil, chances are it is a head gasket. The only way to be sure is to do a compression test on the engine to see if there is low compression from one of the cylenders.

As far as the fuel smell in the oil, has the check engine light come on? When was the last tune up?
Was this
answer
helpful?
Yes
No
Saturday, December 26th, 2020 AT 9:30 AM (Merged)

Please login or register to post a reply.

Sponsored links