HEATER CORE
Removal & Installation
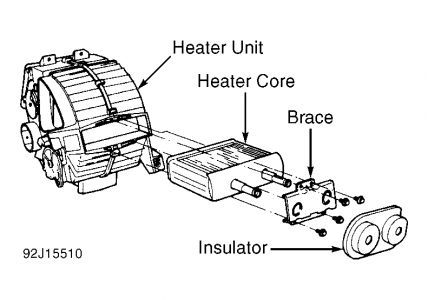
Remove instrument panel. See INSTRUMENT PANEL under REMOVAL & INSTALLATION. Remove heater hoses from bulkhead. Remove defroster ducts as necessary. Loosen cap screws retaining heater assembly to blower motor housing. Remove 3 heater mounting nuts. Disconnect antenna lead from clip on heater assembly. Remove heater assembly. Remove heater core from heater assembly. See Fig. 7 . To install, reverse removal procedure.
Fig. 7: Exploded View of Heater Assembly
Courtesy of FORD MOTOR CO.
INSTRUMENT PANEL
Removal & Installation
Disconnect battery ground. Drain cooling system. Disconnect heater hoses from heater core, and plug openings. Remove left and right lower dash trim panel. Remove 4 bolts securing steering column to instrument panel. Lower steering column. Remove bolts securing instrument panel bezel to instrument panel. Remove instrument panel bezel.
Disconnect speedometer cable at transaxle (pull cable out of speed sensor). Remove screws and bolts retaining instrument cluster to instrument panel. Pull instrument cluster out slightly and disconnect electrical connectors. Disconnect speedometer cable from instrument cluster. Remove instrument cluster.
Detach hood release cable. Remove both dash side panels. Remove 4 retaining screws and left lower dash trim panels. Disconnect all electrical connectors. Remove parking brake console. Remove shift console. Remove glove box.
Disconnect recirculation/fresh air control cable and clip from door cam. Disconnect mode selector cable and clip from door cam. Disconnect temperature control cable and clip from door cam. Remove control panel trim bezel. Remove 4 retaining screws from control panel.
Pull out control panel and disconnect electrical connectors. Remove control panel. Remove ashtray assembly. Remove 7 screws retaining center accessory console. Remove radio and cigarette lighter electrical connectors.
Remove 4 bolts retaining lower instrument panel to frame. Remove lower instrument panel mounting bolts. Remove upper instrument panel mounting bolts. Remove defrost bezel retaining screws and bezel. Remove 3 upper instrument panel mounting bolts. Remove instrument panel. To install, reverse removal procedure.
Jan 30, 2009 at 5:44 PM
