Both pieces of kit will hold crank and cam in place
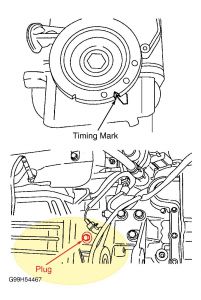
Rotate the crankshaft clockwise to TDC cylinder No. 1. Remove the blanking plug, completely screw in the Crankshaft TDC Timing Peg (303-574, T97-P6000-A), and auto-align the crankshaft to TDC. See Fig. 10.
Hold camshafts with open end wrench. Turn the camshafts to ignition position on cylinder No. 4 and insert the Camshaft Alignment Plate (303-465, T94P-6256-CH) onto the ends of both camshafts. See Fig. 11.
NOTE:DO NOT kink or bend the timing belt less than a diameter of 1.38" (35 mm). DO NOT rotate the crankshaft, and check that it is still resting against the timing pin. The lug of the belt tensioner must not be hooked into the sheet metal cover during timing belt installation.
Starting from the crankshaft timing belt pulley and working counterclockwise, position a NEW timing belt in place while keeping it under tension. See Fig. 12.
Apply tension to the timing belt. Incorrect timing belt tension will cause incorrect valve timing. Rotate the tensioner locating tab counterclockwise and insert the locating tab into the slot in the rear timing cover. See Fig. 13.
Position the hex key slot in the tensioner adjusting washer to the 4 o'clock position. Tighten the attaching bolt (3) enough to seat the tensioner firmly against the rear timing cover, but still allow the tensioner adjusting washer to be rotated using a 0.24" (6 mm) hex key.
Tension the timing belt, working counterclockwise. Using the hex key, rotate the adjusting washer counterclockwise until the notch in the pointer is centered over the index line on the locating tab (the pointer will move clockwise during adjustment). See Fig. 14.
While holding the adjusting washer in position, tighten the bolt to specification. See TORQUE SPECIFICATIONS. DO NOT tighten the camshaft timing pulley bolts against the camshaft alignment plate. Use the camshaft sprocket holding tool to prevent movement. See Fig. 9. The crankshaft must remain at TDC on cylinder No. 1. Tighten the bolts of the intake camshaft timing pulley to specification. Hold the exhaust camshaft by the hexagon with an open end wrench to stop it from turning. Tighten the exhaust camshaft timing belt pulley bolt.
Unscrew and remove crankshaft timing peg. Remove camshaft alignment plate from the camshafts. Turn the crankshaft 2 revolutions in the normal direction of rotation. Check the valve timing by inserting the crankshaft timing peg. Correct it if necessary.
Screw in crankshaft timing peg and make sure that the crankshaft is touching it. Insert camshaft alignment plate into the camshafts. If necessary, loosen the timing pulleys and correct the camshaft alignment. Remove the crankshaft timing peg and camshaft alignment plate. Screw in and tighten the blanking plug on the exhaust camshaft pulley.
NOTE:Coat the inside of the spark plug connectors with silicone grease to a depth of 0.20-0.39" (5-10 mm). Use a blunt object (such as a plastic cable tie) to apply the silicone grease, to avoid damaging the spark plug connectors.
SPONSORED LINKS
Friday, December 19th, 2008 AT 9:08 PM