Hi,
If you find it stops when you place it in neutral, then we know it is most likely something with the CV joints, a bad wheel bearing, or even a motor mount.
Is there any noise associated with this when it happens? Does it happen always when you hit that speed?
I ask because one would think a bad CV joint wouldn't care what the speed is. I have dealt with tire balance that is noticeable only at specific speeds, and yes it may be less noticeable when you place it in neutral. Have you had the tire balance checked? Since it was sitting, are you sure there are no flat spots on the tires? Also, check for a possible bent wheel.
As far as the CV axle, if you decide that is the issue, here are directions for replacement. It is broken down into left and right sides. I will start with the right side. The attached pics will correlate with the directions. Also, note that there are specific variations between automatic and manual transmissions.
_______________________________
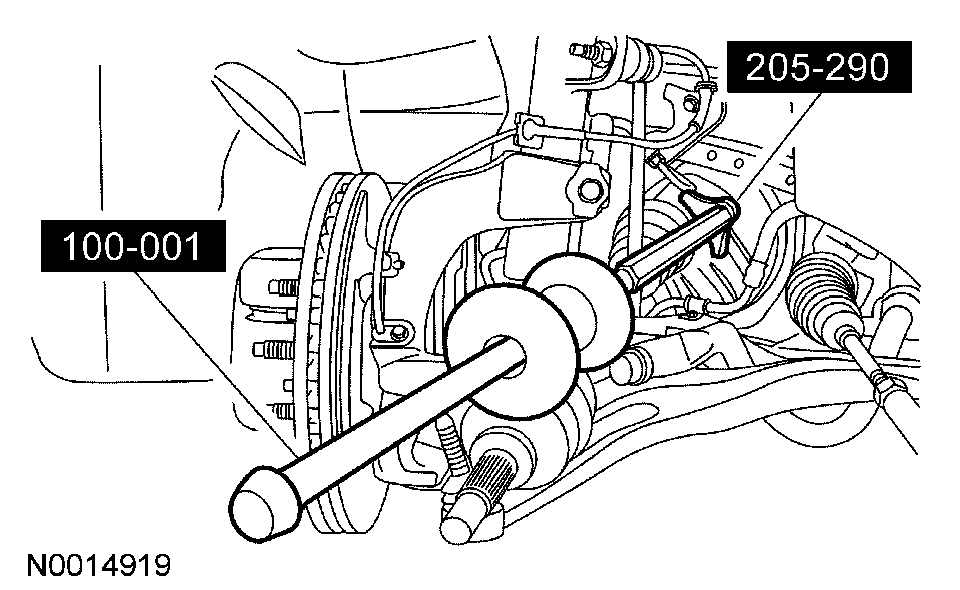
2005 Ford Focus L4-2.0L VIN N
Halfshaft - RH
Vehicle Transmission and Drivetrain Drive Axles, Bearings and Joints Axle Shaft Assembly Service and Repair Removal and Replacement Front Drive Halfshafts Halfshaft - RH
HALFSHAFT - RH
Halfshaft - RH
pic 1
Material
pic 2
pic 3
pic 4
Removal
1. With the vehicle in neutral, position it on a hoist.
2. Remove the RH wheel and tire.
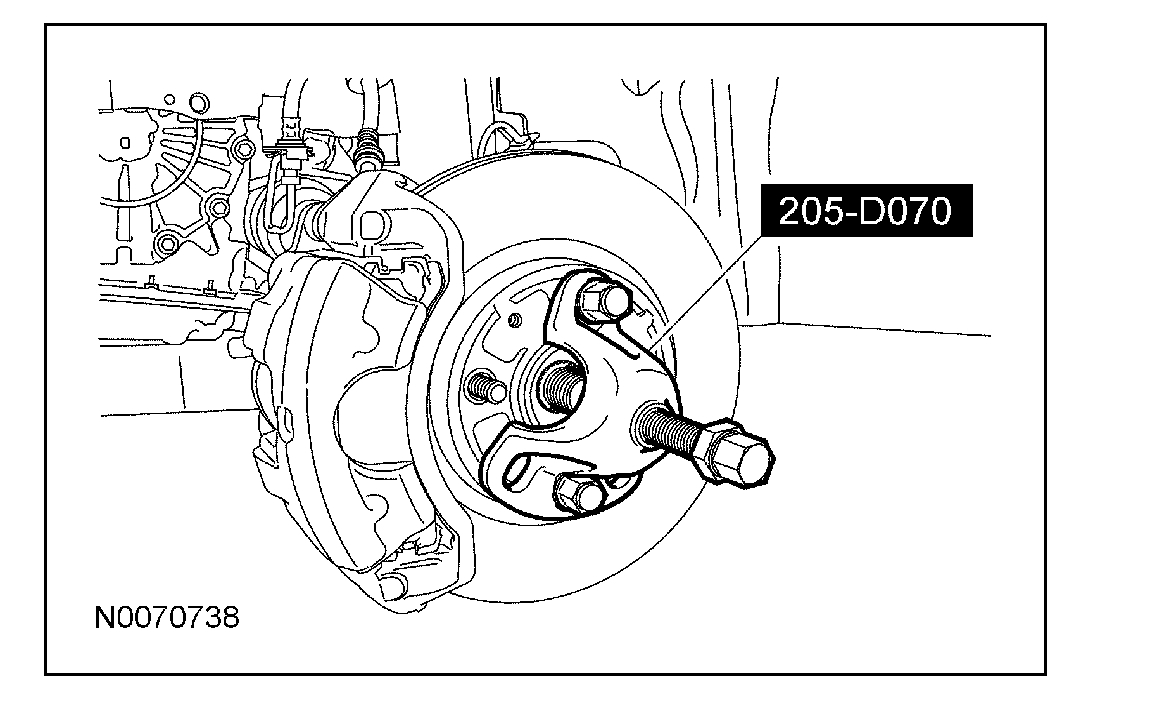
3. Remove and discard the wheel hub nut.
4. NOTICE: Do not use a prying device or separator fork between the hall joint and the wheel knuckle. Damage to the hall joint or hall joint seal may result. Only use the pry bar by inserting it into the lower arm body opening.
NOTICE: Use care when releasing the lower arm and wheel knuckle into the resting position or damage to the hall joint seal may occur.
Remove and discard the ball joint nut and bolt.
- Insert a pry bar in the lower arm body opening and separate the ball joint from the wheel knuckle.
Pic 5
5. NOTICE: The inner joint must not be bent more than 18 degrees. The outer joint must not he bent more than 45 degrees. Damage to the half shaft will occur.
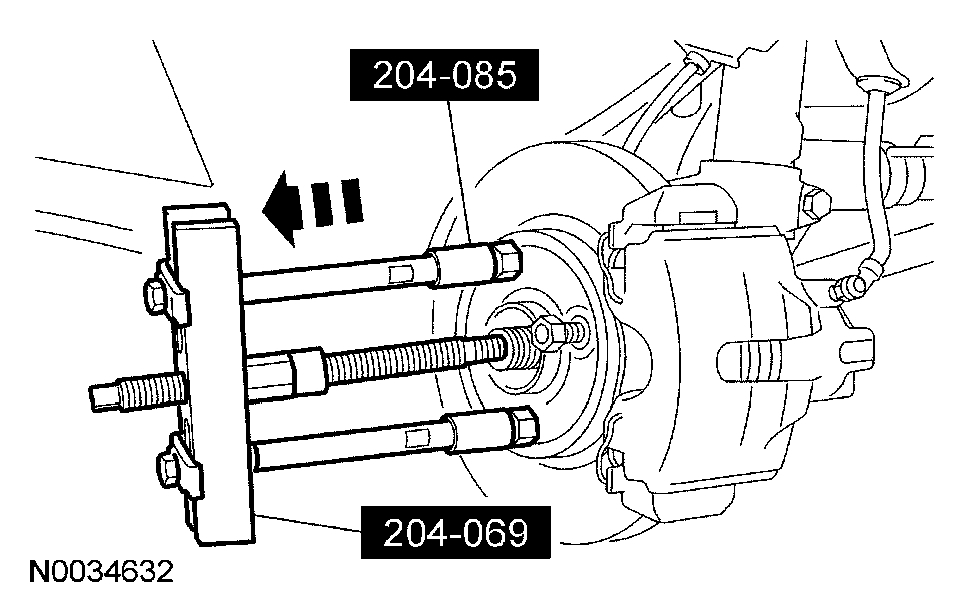
Using the Front Wheel Hub Remover, press out the half shaft from the wheel hub and detach the RH half shaft from the wheel hub.
- Support the half shaft assembly.
6. Remove the brake hose retainer.
Automatic transmission vehicles
7. Remove and discard the retaining strap and 2 nuts.
Pic 7
Manual transmission vehicles
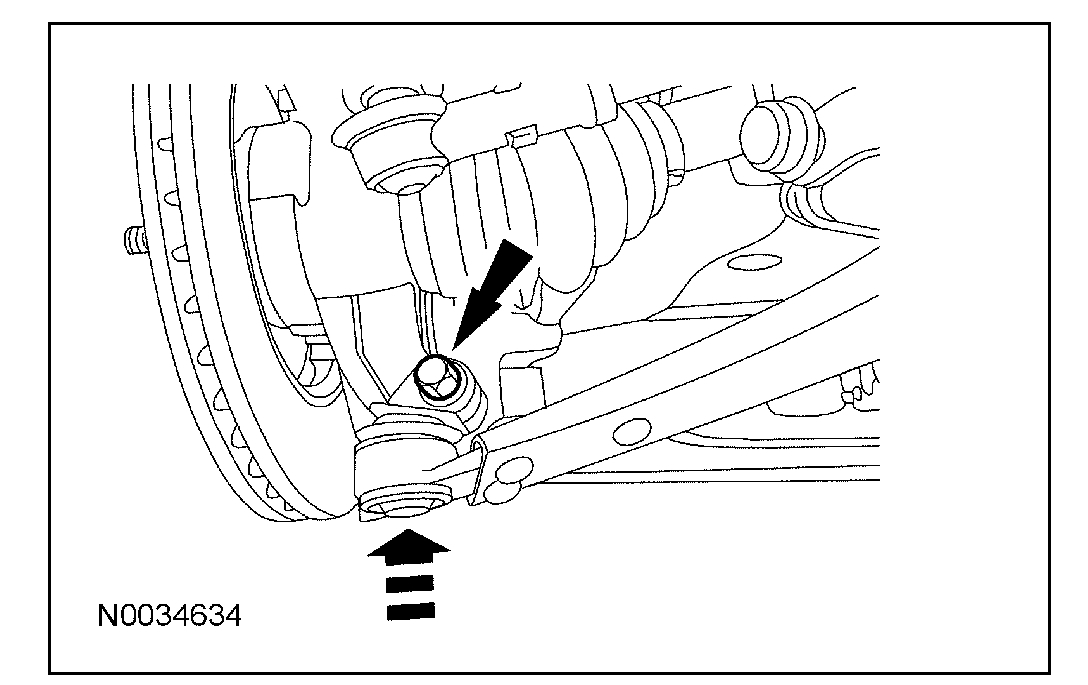
8. Remove and discard the 3 bracket-to-block bolts.
Pic 8
All vehicles
9. Remove the RH halfshaft.
Installation
All vehicles
1. Install the RH halfshaft with the intermediate shaft into the transmission.
Automatic transmission vehicles
pic 9
2. NOTE: Install a new retaining strap and 2 nuts on the intermediate shaft bearing.
Install the front halfshaft with intermediate shaft into the transmission.
Tighten the lower nut to 5 Nm (44 inch lbs.).
Tighten the upper nut to 25 Nm (18 ft. Lbs.).
Tighten the lower nut to 25 Nm (18 ft. Lbs.).
Manual transmission vehicles
NOTE: Insert the intermediate shaft into the transmission until the intermediate shaft bearing contacts the rib of the intermediate shaft bracket.
3. Install the front halfshaft with the intermediate shaft into the transmission.
4. Install the 3 bracket bolts to the engine block.
Tighten to 48 Nm (35 ft. Lbs.).
Pic 10
All vehicles
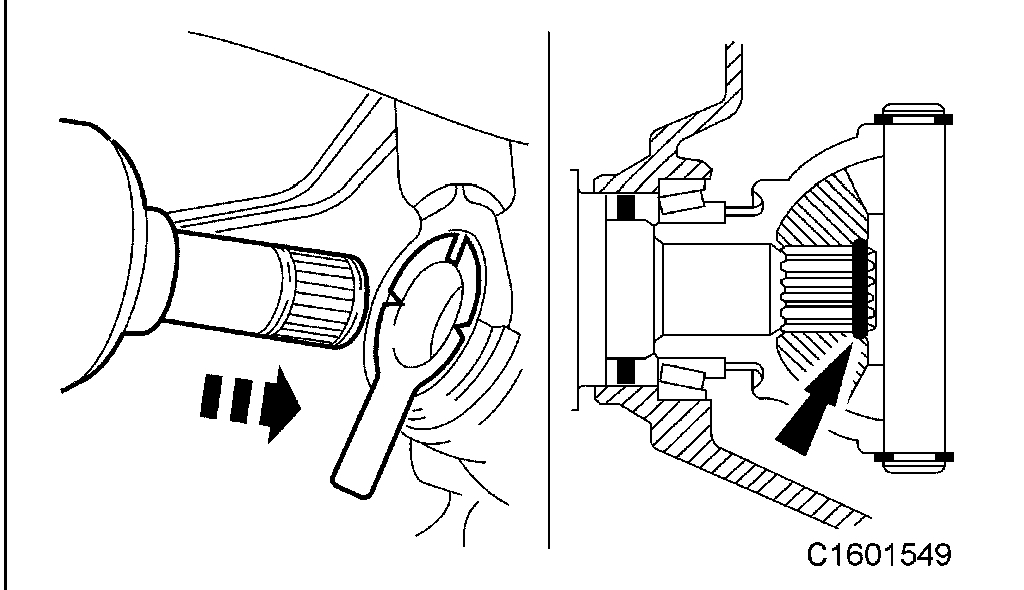
5. Using the special tool, install the RH halfshaft stub into the wheel hub.
Pic 11
6. NOTICE: Make sure the hall joint heat shield is installed on the hall joint stud or damage to the hall joint may occur.
Insert the ball joint stud into the wheel knuckle and install a new bolt and nut.
- Tighten to 63 Nm (46 lb-ft).
Pic 12
7. CAUTION: Do not tighten the front wheel hub nut with the vehicle on the ground. The nut must be tightened to specification before the vehicle is lowered onto the wheels. Wheel bearing damage will occur if the wheel bearing is loaded with the weight of the vehicle applied.
NOTE: Install and tighten the new wheel hub retaining nut to specification in a continuous rotation. Always install a new wheel hub retaining nut after loosening or when not tightened to specifications in a continuous rotation.
NOTE: Apply the brake to keep the halfshaft from rotating.
Install a new wheel hub retaining nut.
- Tighten to 270 Nm (199 ft. Lbs.).
8. Install the brake hose retainer.
Pic 13
9. Install the wheel and tire.
10. Check the transmission fluid level.
______________________________________________________________________________________
2005 Ford Focus L4-2.0L VIN N
Halfshaft - LH
Vehicle Transmission and Drivetrain Drive Axles, Bearings and Joints Axle Shaft Assembly Service and Repair Removal and Replacement Front Drive Halfshafts Halfshaft - LH
HALFSHAFT - LH
Halfshaft - LH
Special Tool(s)
pic 14
Material
pic 15
pic 16
pic 17
Removal
1. Loosen the LH strut and spring assembly top mount nuts by 4 turns.
Pic 18
2. CAUTION: Do not use power tools to remove the nut. Use a socket to loosen the wheel hub retaining nut to prevent damage.
Loosen the nuts.
Loosen the wheel nuts.
Loosen the wheel hub retaining nut.
Pic 19
3. With the vehicle in NEUTRAL, position it on a hoist. For additional information, refer to Maintenance/Service and Repair.
4. Remove the LH wheel and tire assembly.
5. CAUTION: Do not use a prying device or separator fork between the lower arm ball joint and the knuckle. Damage to the ball joint or ball joint dust boot can result. Only use the pry bar by inserting it into the lower control arm body opening.
Detach the lower arm ball joint.
1. Remove the lower arm ball joint nut and bolt.
2. Detach the ball joint.
Insert a pry bar in the lower control arm body opening to separate the ball joint.
Pic 20
pic 21
6. After separating the lower control arm from the wheel knuckle, immediately install the special tool over the ball stud before releasing the lower control arm and knuckle into rest positions.
Leave the special tool in place during service and only remove prior to reassembly.
Pic 22
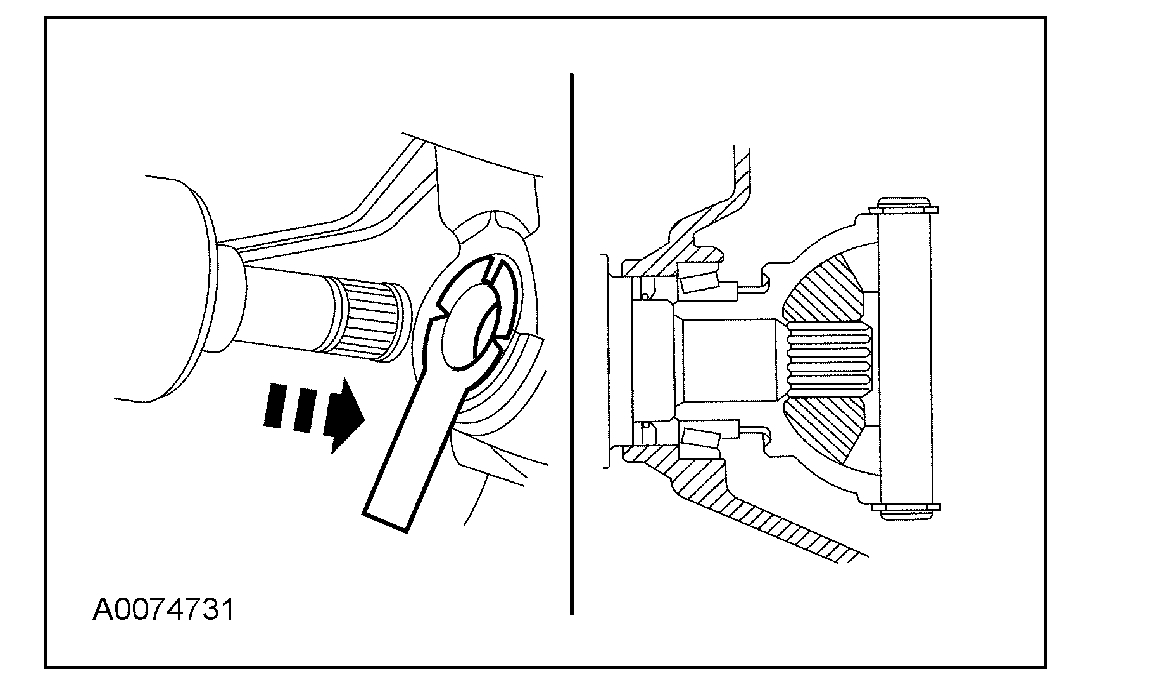
7. Detach the LH drive halfshaft from the wheel hub.
Using a commercially available puller, unscrew and remove the hub retaining nut and press out the halfshaft stub from the wheel hub.
Pic 23
8. CAUTION: Support the halfshaft. The inner joint must not be bent at more than 18 degrees.
NOTE: Check for escaping oil.
Remove the LH drive halfshaft from the transaxle.
Close off the transaxle opening with an auxiliary plug.
Pic 24
Installation
1. Install new self-locking nuts and a snap ring.
CAUTION: Support the halfshaft. The inner halfshaft joint must not be bent by more than 18 degrees.
CAUTION: Do not damage the oil seal when inserting the front drive halfshaft.
2. NOTE: Make sure the snap ring is fully engaged, by pulling on the joint housing.
NOTE: Remove the auxiliary plug from the transaxle opening.
Install the LH drive halfshaft and snap ring into the transaxle.
Pic 25
3. Using the special tool, install the LH halfshaft stub into the wheel hub.
Pic 26
4. Check the transmission fluid level.
5. Attach the LH lower arm.
Remove the special tool and attach the lower arm ball joint.
Install the lower arm bolt and nut.
Tighten to 48 Nm (35 ft. Lbs.).
Pic 27
6. CAUTION: Do not tighten the front wheel hub nut with the vehicle on the ground. The nut must be tightened to specification before the vehicle is lowered onto the wheels. Wheel bearing damage will occur if the wheel bearing is loaded with the weight of the vehicle applied.
CAUTION: Install and tighten the new wheel hub retaining nut to specification in a continuous rotation. Always install a new wheel hub retaining nut after loosening or when not tightened to specifications in a continuous rotation.
CAUTION: Always tighten a new wheel hub retaining nut with a torque wrench. Never use power tools to tighten the wheel hub retaining nut. Power tools may damage the nut or the halfshaft.
NOTE: Use a 32 mm socket wrench.
NOTE: Apply the brake to keep the halfshaft from rotating.
Install a new wheel hub retaining nut.
Tighten to 270 Nm (199 ft. Lbs.).
Pic 28
7. Install the LH wheel and tire assembly.
8. Tighten the LH strut and spring assembly-to-mount nuts.
Tighten to 30 Nm (22 ft. Lbs.).
Pic 29
___________________________________
Let me know if this helps or if you have other questions.
Take care,
Joe
Images (Click to make bigger)
Saturday, December 5th, 2020 AT 7:34 PM