CHECK THIS AND LET ME KNOW
A/C-HEATER SYSTEM - MANUAL -1989 Dodge Spirit ES
(All Models Except Horizon, LeBaron Convertible & Omni)
1.Discharge A/C system using approved refrigerant recovery/recycling equipment. Drain engine coolant. Disconnect battery fusible link. Disconnect heater hoses at heater core. Plug heater core tube openings.
2.Disconnect vacuum lines at engine intake manifold and heater control valve. Remove right scuff plate and cowl side trim panel. Remove condensate drain tube.
3.On "C" and "J" body, remove right upper and lower underpanel silencers. On "E" body and LeBaron with passive restraint, remove right underpanel lower trim. On "A", "C", "H" and "P" body, remove steering wheel column cover.
4.On "G" body and LeBaron with passive restraint, remove outer steering column cover as well as hood release and parking brake release handles from inner steering column cover. Remove inner steering column cover and position right front seat to the full back position.
5.On LeBaron with passive restraint and "C" body, remove left underpanel silencer. On "A" & "P" body, remove right A-pillar trim and right cowl side trim. On "J" body, pull back right A-pillar trim to remove right side cowl trim.
6.On all models, remove glove box. On "G" body, LeBaron with passive restraint, "H" and "C" body, remove instrument panel reinforcement. On "A", "E", "K" and "P" body, remove right instrument panel roll-up screw.
7.On "G" and "J" body, remove forward console bezel, side trim and lower carpet panels. Loosen floor console and move rearward. Remove forward console. On LeBaron with passive restraint only, remove instrument panel to floor reinforcement.
8.On "A" and "P" body, remove center bezel and lower center module cover. Remove floor console. Remove instrument panel support brace between steering column opening and right lower side of instrument panel. Remove instrument panel support panel below glove box. Remove ashtray and radio. Remove instrument panel top cover. Remove 3 right side (below windshield) panel attaching screws.
9.On "E" body, remove forward console and mounting bracket. On "K" body, remove floor console. On "H" body, remove front and rear consoles. On "C" body, remove ashtray.
10.On "A", "E", "K" and "P" body, pull right lower side of instrument panel rearward. Remove center distribution and defroster adapter duct. On "A", "C", "H" and "P" body, disconnect relay module. On "A" and "P" body, remove instrument panel to A/C unit bracket. Remove lower air distribution duct.
11.On "E" and "K" body, remove audible message center and right side cowl to plenum brace. Disconnect blower motor wire connector and demister hose from top of unit. On "K" and "E" body, with Automatic Climate Control (ATC), remove temperature control cable from control unit and move out of way. Disconnect vacuum lines at control unit.
12.On "K" and "E" body with ATC, disconnect instrument panel wiring from rear face of ATC unit. On "C" and "H" body, disconnect 25-pin connector bracket and fuse block from instrument panel. On "H" body, remove cable from retaining clip on top of unit. On "G" and "J" body, remove cable from retaining clip on rear face of unit.
13.On all body except "C" and "H", fold back right side carpet and remove 4 unit mounting nuts. Remove unit strap lower mounting screw and rotate strap out of way. Move A/C-heater unit rearward to clear studs and lower unit.
14.On "A" and "P" body, remove demister adapter from top of unit. While pulling back on lower right side of instrument panel, slide unit upright and out from under instrument panel. On all bodies except "A" and "P", rotate unit while pulling out from under dash.
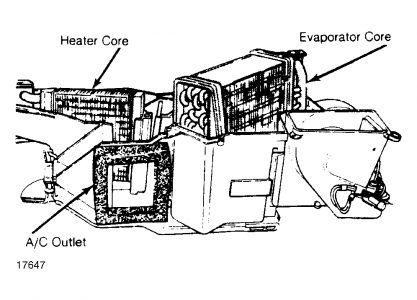
15.To remove heater and evaporator cores, remove unit top cover. Remove heater core to dash panel seal from heater core tubes, and remove heater core. Remove expansion valve sealing plate seal retaining screw. Remove evaporator core. To install, reverse removal procedure.
Jan 21, 2009 at 6:15 PM
