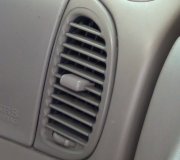
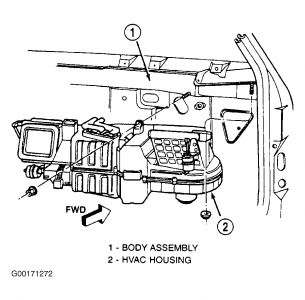
Here is what I was able to find. The directions explaine how to replace the heater core which requires the dash removal. I hope it helps and you can read it. And I agree, one of the vent doors is the problem. Infact, I feel the blend door is the problem. The last pictures are from Chrysler. #2 on the first picture is the blend door for the passanger side if you have dual climate control. The last picture on the page is removal of the HVAC housing.
1.Disconnect the negative battery cable.
CAUTION
After disconnecting the negative battery cable, wait 2 minutes for the driver-s/passenger-s air bag system capacitor to discharge before attempting to do any work around the steering column or instrument
2.On diesel models, remove the passenger side battery and battery tray.
3.Remove the instrument panel by performing the following procedures:
A.Remove the air bag control module (ACM) and bracket from the floor panel tunnel.
B.Remove the trim from both cowl side inner panels.
C.Remove the steering column-to-instrument panel opening cover.
D.Remove the 2 hood latch release handle-to-instrument panel lower reinforcement screws and lower the handle to the floor.
E.Disconnect the driver-s side air bag module wiring harness connector from the lower instrument panel reinforcement.
F.Place the wheels in the straight-ahead position and lock the steering wheel. Remove the steering column without disassembling it.
G.From under the driver-s side of the instrument, disconnect or remove the following items:
Parking brake release handle linkage rod from the parking brake mechanism located on the left cowl side inner panel.
Instrument panel wiring harness connector from the parking brake switch located on the parking brake mechanism.
Three wiring harness connectors (body wiring harness, headlight, dash) from the 3 junction block connector receptacles located closest to the dash panel.
Head light/dash-to-instrument panel bulkhead wiring harness connector screw and disconnect the connector.
Instrument panel-to-door wiring harness connector located directly below the bulkhead wiring harness connector.
Infinity sound system wiring harness connector (if equipped), located at the outboard side of the instrument panel bulkhead connector.
Stop light switch electrical connector.
Vacuum harness connector located near the left side of the heater/air conditioning housing.
H.Under the passenger-s side of the instrument panel, disconnect the radio antenna coaxial cable connector.
I.Loosen both sides of the instrument panel cowl side roll-down bracket screws about 1 / 2 inch (13mm).
J.Remove the 5 upper instrument panel-to-upper dash panel screws; remove the center screw last.
K.Roll down the instrument panel and install a temporary hook in the center hole on top of the panel. Attach the other end to the center hole in the top of the dash panel. The opening should be approximately 18 inches (46cm).
L.Disconnect the instrument panel-to-heater/air conditioning housing assembly wiring harness connectors.
M.Using an assistant, remove the instrument panel from the vehicle.
4.If equipped with air conditioning, perform the following procedure:
A.Discharge and recover the air conditioning system refrigerant.
B.Disconnect the refrigerant lines from the evaporator. Plug the openings to prevent contamination.
C.Disconnect the refrigerant lines from the accumulator. Plug the openings to prevent contamination.
D.Remove the accumulator.
5.Drain the cooling system into a clean container for reuse.
6.Disconnect the heater hoses from the heater core tubes.
7.Remove the PCM from the dash panel and move it aside. Do not disconnect the PCM harness connector.
8.In the engine compartment, remove the heater/air conditioning housing assembly-to-chassis nuts.
9.In the passenger-s compartment, remove the heater/air conditioning housing-to-dash panel nuts.
10.Pull the heater/air conditioning housing assembly rearward far enough to clear the studs and air conditioning drain tube holes.
11.Remove the heater/air conditioning housing assembly from the vehicle.
12.Remove the upper-to-lower heater/air conditioning housing screws and remove the upper housing.
13.Remove the heater core from the lower housing.
Fig. Exploded view of refrigerant line
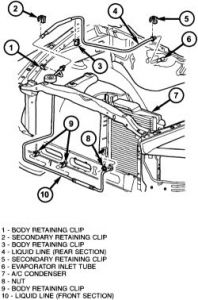
Fig. View of the instrument panel
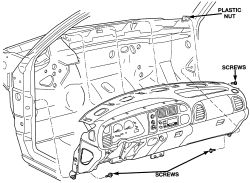
Fig. View of the heater/air conditioning housing assembly
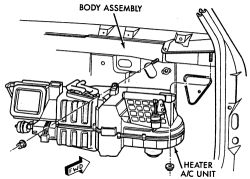
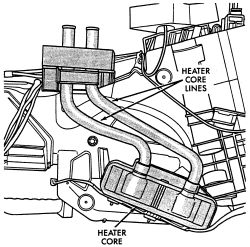
Fig. View of the heater core
To install:
1.Install the heater core in the lower housing.
2.Install the upper housing and the upper-to-lower heater/air conditioning housing screws.
3.Install the heater/air conditioning housing assembly to the vehicle.
4.Push the heater/air conditioning housing assembly forward far enough to engage the studs and air conditioning drain tube holes.
5.In the passenger-s compartment, install the heater/air conditioning housing-to-dash panel nuts.
6.In the engine compartment, install the heater/air conditioning housing assembly-to-chassis nuts.
7.Install the PCM to the dash panel.
8.Connect the heater hoses to the heater core tubes.
9.Refill the cooling system.
10.If equipped with air conditioning, perform the following procedure:
A.Install the accumulator.
B.Connect the refrigerant lines to the accumulator.
C.Connect the refrigerant lines from the evaporator.
D.Evacuate and charge the air conditioning system refrigerant.
11.Install the instrument panel by performing the following procedures:
A.Using an assistant, install the instrument panel to the vehicle.
B.Connect the instrument panel-to-heater/air conditioning housing assembly wiring harness connectors.
C.Roll-up the instrument panel and install a temporary hook in the center hole on top of the panel and the top of the dash panel. The opening should be approximately 18 inches (46cm).
D.Install the 5 upper instrument panel-to-upper dash panel screws; install the center screw first.
E.Install both sides of the instrument panel cowl side roll-down bracket screws to about 1 / 2 inch (13mm).
F.Under the passenger-s side of the instrument panel, connect the radio antenna coaxial cable connector.
G.Under the driver-s side of the instrument, connect or install the following items:
Vacuum harness connector located near the left side of the heater/air conditioning housing.
Stoplight switch electrical connector.
Infinity sound system wiring harness connector (if equipped), located at the outboard side of the instrument panel bulkhead connector.
Infinity sound system wiring harness connector (if equipped), located at the outboard side of the instrument panel bulkhead connector.
Instrument panel-to-door wiring harness connector located directly below the bulkhead wiring harness connector.
Headlight/dash-to-instrument panel bulkhead wiring harness connector and install the screw.
Three wiring harness connectors (body wiring harness, headlight, dash) from the 3 junction block connector receptacles located closest to the dash panel.
Instrument panel wiring harness connector to the parking brake switch located on the parking brake mechanism.
Parking brake release handle linkage rod to the parking brake mechanism located on the left cowl side inner panel.
H.Install the steering column.
I.Connect the driver-s side air bag module wiring harness connector to the lower instrument panel reinforcement.
J.Install the 2 hood latch release handle and the handle-to-instrument panel lower reinforcement screws.
K.Install the steering column-to-instrument panel opening cover.
L.Install the trim to both cowl side inner panels.
M.Install the air bag control module (ACM) and bracket to the floor panel tunnel.
12.On diesel models, install the battery tray and battery.
13.Connect the negative battery cable.
14.Run the engine to normal operating temperatures; then, check the climate control operation and check for leaks.

Let me know if this helps.
Joe
SPONSORED LINKS
Monday, July 26th, 2010 AT 11:25 PM