Hi supermosca65, Welcome to 2carpros and TY for the donation
Its gonna be a long list take your time and do it correctly
INSTALLATION
Apply Mopar Door Ease, or equivalent, stick lubricant to outside surface of bearing cup.
Fig. 33

Install the pinion rear bearing cup (Fig. 33) with:
Installer C-4308 and Driver Handle C-4171 for the 8 1/4 axle.
Installer C-4310 and Driver Handle C-4171 for the 9 1/4 axle.
Ensure cup is correctly seated.
Apply Mopar Door Ease, or equivalent, stick lubricant to outside surface of bearing cup.
Fig. 34
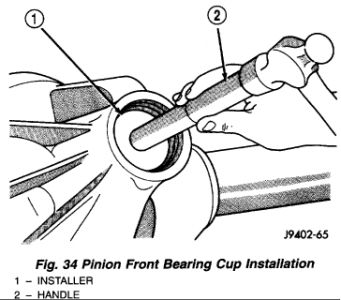
Install the pinion front bearing cup (Fig. 34) with:
Installer D-130 and Handle C-4171 for the 8 1/4 axle.
Installer D-129 and Handle C-4171 for the 9 1/4 axle.
Install pinion front bearing, and oil slinger, if equipped.
Apply a light coating of gear lubricant on the lip of pinion seal. Install seal with:
Fig. 35
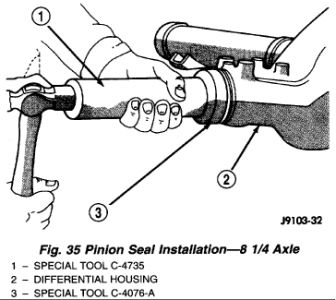
Installer C-4076-B and Handle C-4735-1 for the 8 1/4 axle (Fig. 35).
Installer C-3860-A and Handle C-4171 for the 9 1/4 axle.
NOTE: Pinion depth shims are placed between the rear pinion bearing cone and pinion head to achieve proper ring gear and pinion mesh. If the factory installed ring gear and pinion are reused, the pinion depth shim should not require replacement. If required, refer to Pinion Gear Depth to select the proper thickness shim before installing rear pinion bearing.
Place the proper thickness depth shim on the pinion shaft.
Fig. 36
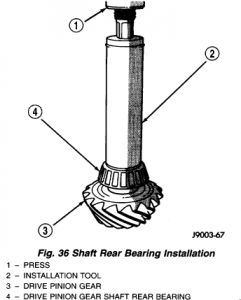
Install the rear bearing and slinger, if equipped, on the pinion (Fig. 36) with:
Installer 6448 for the 8 1/4 axle.
Installer C-3095 for the 9 1/4 axle.
Fig. 37
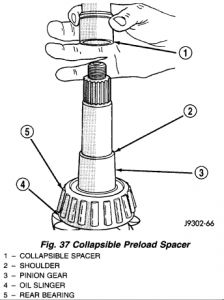
Install a new collapsible preload spacer on pinion shaft and install the pinion in the housing (Fig. 37).
Install the companion flange with Installer C-3718 and Holder 6719.
Install socket head bolts into two of the threaded holes in the companion flange, 180 °apart.
Position Holder 6719 against the companion flange and install a hex head bolt and washer into one of the remaining threaded holes. Tighten the bolt and washer so that the Holder 6719 is held to the flange.
Install the companion flange washer and a new nut on the pinion and tighten the pinion nut until there is zero bearing end-play. It will not be possible at this point to achieve zero bearing endplay if a new collapsible spacer was installed.
Fig. 38
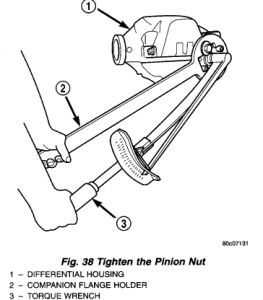
Tighten the nut to 285 Nm (210 ft. lbs.) (Fig. 38). CAUTION: Never loosen pinion nut to decrease pinion bearing rotating torque and never exceed specified preload torque. If preload torque or rotating torque is exceeded a new collapsible spacer must be installed. The torque sequence will then have to be repeated.
Using Holder 6719, crush collapsible spacer until bearing end play is taken up.
Fig. 39
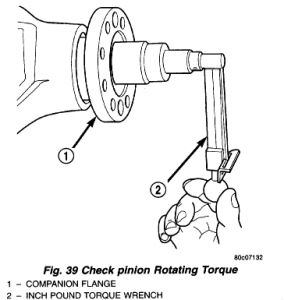
Slowly tighten the nut in 6.8 Nm (5 ft. lbs.) increments until the desired rotating torque is achieved. Measure the rotating torque frequently to avoid over crushing the collapsible spacer (Fig. 39).
Check bearing rotating torque with an inch pound torque wrench (Fig. 39). The torque necessary to rotate the pinion should be:
Original Bearings - 1 to 3 Nm (10 to 20 inch lbs.) .
New Bearings - 2 to 5 Nm (15 to 35 inch lbs.) .
Install propeller shaft.
Install differential in housing.
Jul 16, 2010 at 5:33 PM