Hi Alan Huggins,Welcome to 2carpros and TY for the donation.
WARNING: THE REFRIGERATION SYSTEM MUST BE COMPLETELY EMPTY BEFORE PROCEEDING WITH THIS OPERATION.
REMOVAL
1.Disconnect the battery negative cable.
2.Recover A/C system refrigerant.
3.Remove the accessory drive belt.
4.Remove upper generator bracket.
5.Disconnect generator field wire connector.
6.Push generator forward.
7.Remove ground wire at dash panel.
A/C Refrigerant Line Plate
8.Remove the nut retaining the refrigerant line sealing plate to the expansion valve.
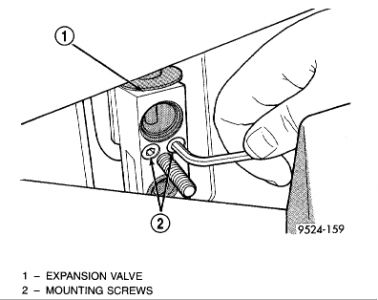
Expansion Valve Stud and Mounting Screws
9.Remove the stud from the expansion valve.
10.Carefully pull the refrigerant line Sealing plate assembly from expansion valve towards the front of the vehicle. Use care not to scratch the expansion valve sealing surfaces with pilot tubes.
11.Cover the openings to prevent contamination
12.Remove two screws securing the expansion valve to the evaporator sealing plate.
Expansion Valve Removal
13.Carefully remove expansion valve.
14.Remove the old O-rings.
INSTALLATION
1.Ensure old O-rings are removed. Install new O-rings on the refrigerant lines and evaporator sealing plate.
2.Hand-start the stud into the expansion valve and torque to 7 - 11 Nm (64 - 96 in. lbs.) .
3.Carefully install the expansion valve to the sealing plate. Install the two screws and tighten 8 to 14 Nm (70 to 130 in. lbs.) torque.
4.Carefully install the refrigerant lines and sealing plate to the expansion valve. Install the nut and tighten 20 to 26 Nm (170 to 230 in. lbs.) torque.
5.Install the ground wire at dash panel.
6.Pull generator back into the proper position for bracket mounting.
7.Install generator field wire connector.
8.Install the upper generator bracket.
9.Install accessory drive belt.
10.Evacuate and recharge system.
11.After expansion valve is installed, the system is charged, and leaks have checked repeat the A/C performance check.
https://www.2carpros.com/kpages/auto_repair_manuals_alldata.htm
SPONSORED LINKS
Monday, June 21st, 2010 AT 6:32 PM