Convertible top replacement

Tiny
NASER NASER
  • MEMBER
  • 2008 VOLKSWAGEN BEETLE
  • 4 CYL
  • 2WD
  • AUTOMATIC
  • 82,000 MILES
I am replacing the outer shell of the convertible top which has the window in it. Is there any way you can find me instructions on how to remove it?
Wednesday, November 13th, 2019 AT 1:00 PM

20 Replies

Tiny
JACOBANDNICKOLAS
  • MECHANIC
  • 108,254 POSTS
Hi:

I have directions that will help, but I need to know if this is a manual top or electric. The directions are quite extensive and I will end up with an hour's worth of reading for you if I don't know.

If you could, let me know.

Take care,
Joe
Was this
answer
helpful?
Yes
No
+1
Wednesday, November 13th, 2019 AT 7:38 PM
Tiny
NASER NASER
  • MEMBER
  • 836 POSTS
Power top.
Was this
answer
helpful?
Yes
No
Thursday, November 14th, 2019 AT 5:04 AM
Tiny
JACOBANDNICKOLAS
  • MECHANIC
  • 108,254 POSTS
Hi:

Here are the directions. The attached pics correlate with the directions.

__________________________

2008 Volkswagen New Beetle Convertible (1Y7) L5-2.5L (BPR)
Convertible Top Cover, Electric/Hydraulic Convertible Top
Vehicle Body and Frame Roof and Associated Components Convertible Top Convertible Top Canvas Service and Repair Removal and Replacement Convertible Top Cover, Electric/Hydraulic Convertible Top
CONVERTIBLE TOP COVER, ELECTRIC/HYDRAULIC CONVERTIBLE TOP
Convertible Top

Convertible Top Cover, Electric/Hydraulic Convertible Top

Protect chrome moldings and side trim against paint damage using suitable protective covers and fabric reinforced adhesive tape.

Removing

- Remove seatbench and headrest cover.

- Cover edges of automatic anti-roll supports using tape or fabric.

- Slide window completely open.

- Open convertible top half way.

- Observe safety precautions. Refer to=> [ Convertible Top Safety Precautions ] See: Convertible Top > Technician Safety Information > Convertible Top Safety Precautions.

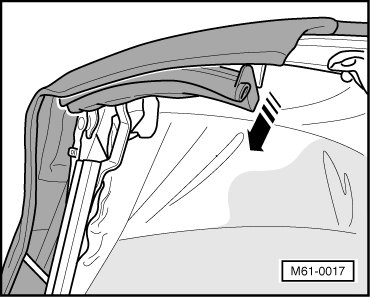
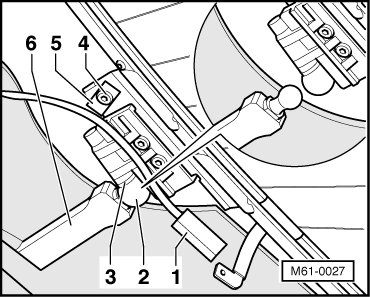
- Using plastic wedge, remove clips - 11 - from front side of roof edge trim - 13 -, then remove clips - 12 - from rear side of roof front edge trim.

- Turn handle - 10 - 90o and loosen roof edge trim - 13 -.

Pic 1

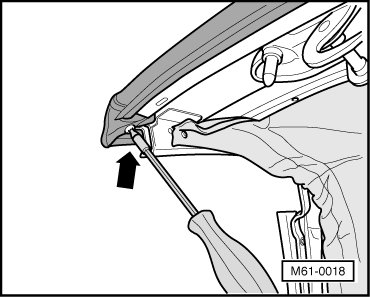
- Pull front roof frame seal off roof frame - arrow -.

Pic 2

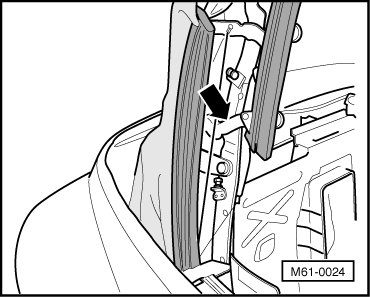
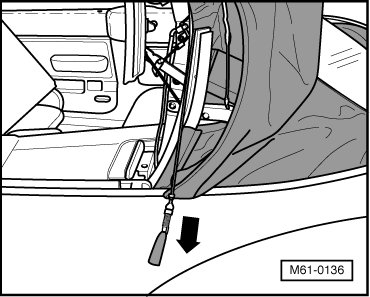
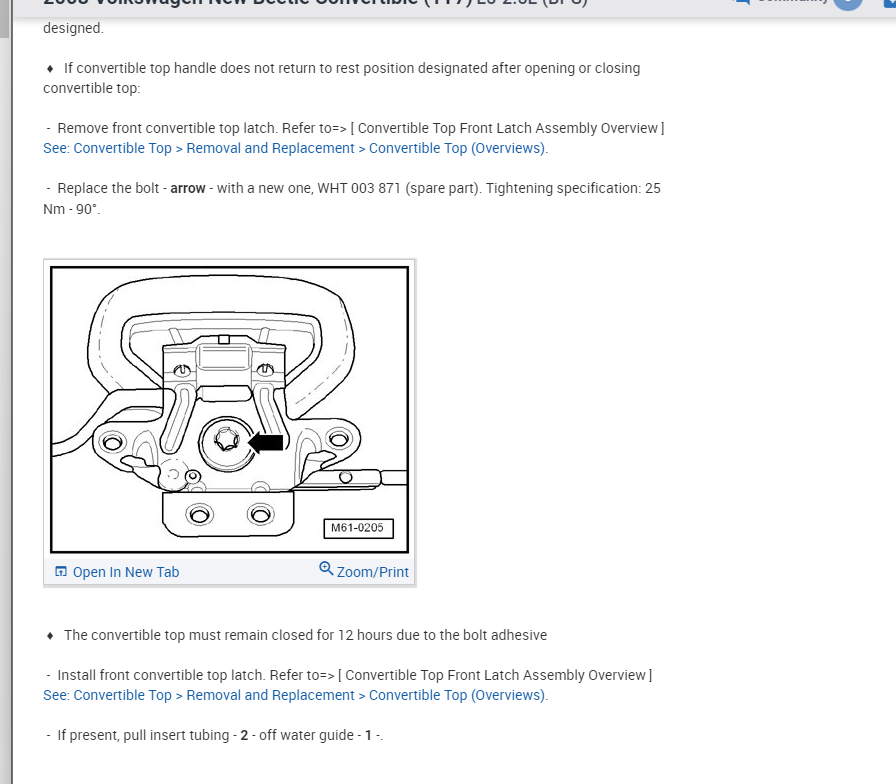
- Remove mounting bolt for convertible top cover - arrow -.

Pic 3

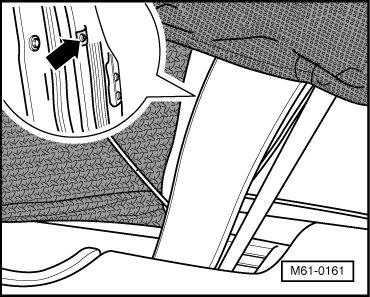
- Pull clamping strip out of front roof edge channel - arrow -.

Pic 4

- Pull convertible top cover of sealing tubing out of side roof edge sealing channel - arrow -.

Pic 5

A pliers helps ease this work step.

- Unhook cable with ball - 1 -.

Pic 6

- Remove C-pillar roof frame gaskets off side convertible top frame. First remove inner edge, then pull in - direction of arrow -.

Pic 7

Carefully pull roof frame gasket off. There are some internal edges that may damage the gasket.

- Pull tubing out of C-pillar channel in - direction of arrow -.

Pic 8

A pliers helps ease this work step.

- Drill out pop rivet on frame - arrow - and remove using drift and hammer.

Pic 9

Observe routing and position of fabric and cable.

- Drill out pop rivet on inner C-pillar - arrow - and remove using drift and hammer.

Pic 10

This rivet also holds C-pillar convertible top frame trim.

Observe routing and position of plastic cable

- Remove bolt - 1 - for convertible top cover tension cable.

Pic 11

- Pull tension cable downward in - direction of arrow -.

Pic 12

- Close convertible top but do not lock.

- Fold convertible top cover rearward.

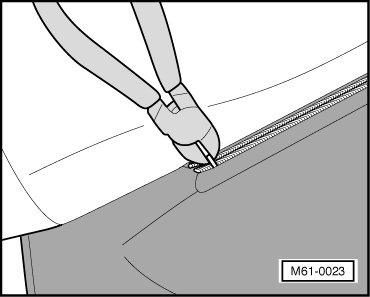
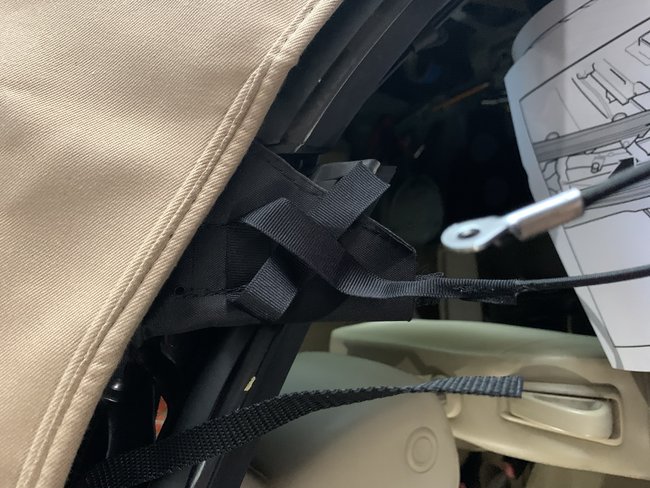
- Cut through clip using side cutter and open zip fastening.

Pic 13

- Repeat this procedure for other two zip fasteners.

- Pull convertible top cover forward and place it as it was before opening zip fasteners.

- Pull convertible top headliner - 2 - from convertible top fabric retaining frame - 1 - out in - direction of arrow -.

Pic 14

- Remove side water deflector (silver fabric).

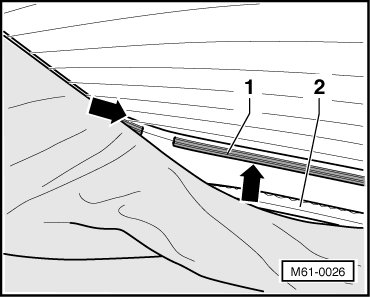
- Pull tubing - 2 - out of rear window channel - 1 - - arrows -.

Pic 15

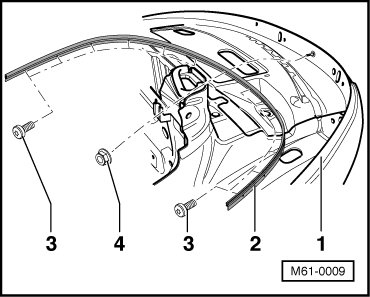
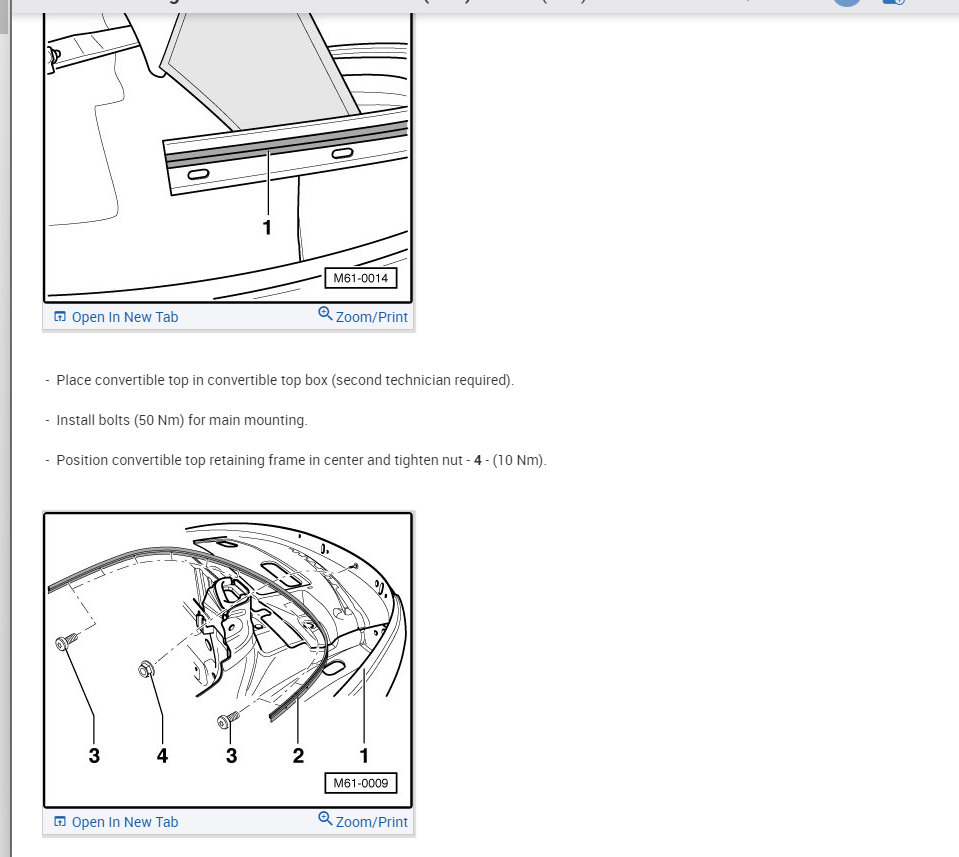
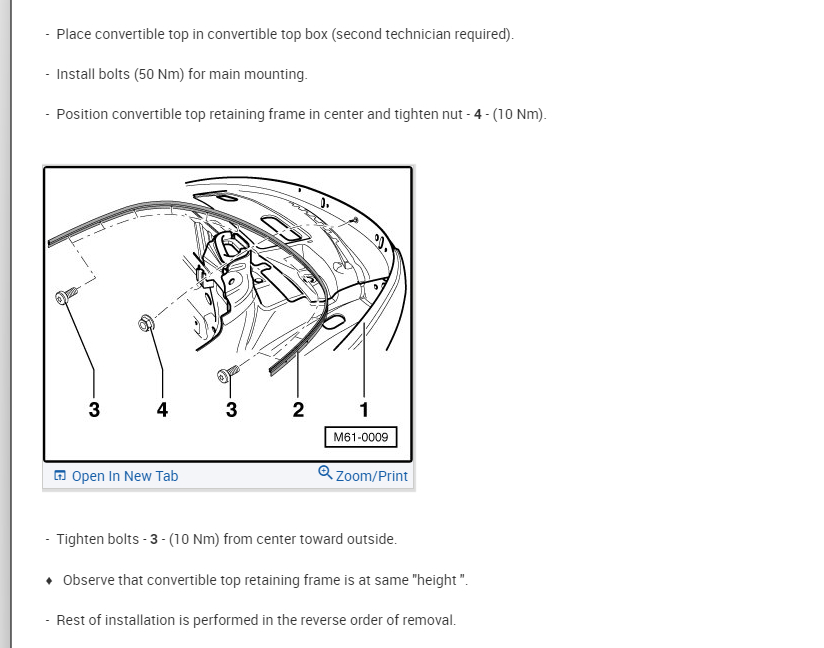
- Remove bolts - 3 - (Qty. 12, 10 Nm) and nut - 4 - (10 Nm) from body - 1 -.

Pic 16

- Remove convertible top retaining frame - 2 - from body - 1 -.

Sealing band between convertible top retaining frame and body can lead to light sticking of convertible top retaining frame.

- Protect ending corners of aluminum frame - 2 - to avoid paint damage when getting into contact with body.

- Lift aluminum frame - 2 - on outside of vehicle so that work on window frame components is made possible.

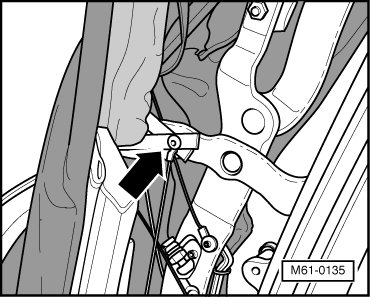
- Disconnect harness connector - 1 - for Heated Rear Window (Z1).

Pic 17

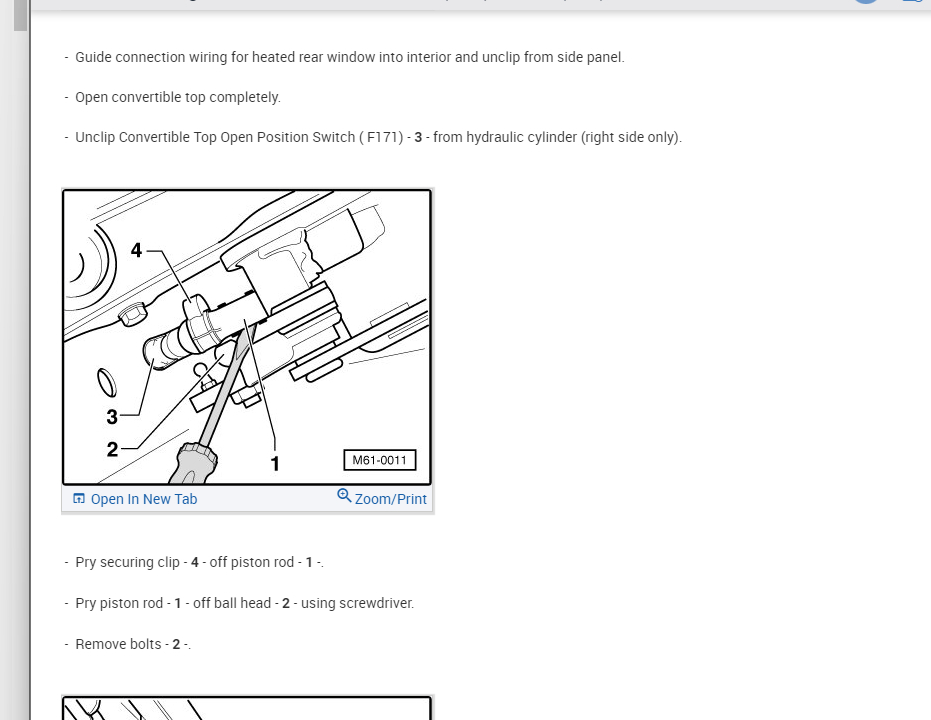
- Carefully drill out pop rivet - 4 - from retaining clip - 5 -.

- Remove securing clip - 3 - from ball socket - 2 -.

- Pull hinge - 6 - out of ball socket.

Observe routing of rear window wiring harness.

- Carefully lower convertible top fabric retaining frame.

- Secure aluminum retaining frame to body using fitting bracket ( V.A.G 1887).

Pic 18

- Remove convertible top cover - 1 - to side out of convertible top retaining rail - 2 - in - direction of arrow - (second technician required).

Pic 19

Convertible top fabric must slide smoothly. If fabric gets stuck during removal, check whether fabric got jammed in rear window frame.

Be careful when holding rear window.

Installing

Installation is the reverse of removal. Observe the following notes:

- Install convertible top headliner in rear window channel, starting from lower center upward leading to the sides. It is recommended to let engage convertible top headliner into rear window channel according to illustration, using plastic wedge and plastic hammer.

Pic 20

Make sure that both markings on headliner (upper and lower) align with notches on rear window channel. Make sure that headliner is distributed evenly along window channel.

- Before closing each zip fastener, align marking on padding with marking on convertible top cover.

Pic 21

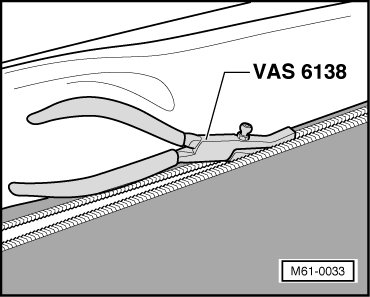
- Using closing pliers (VAS 6138), close zip fastener beginning from center.

Pic 22

- Secure ends of zip fastener using staple gun ( VAS 6148 ) (3 to 5 mm from end of zip fastener). Make sure staple is closed correctly.

Pic 23

- Pull tension cable into side convertible top cover using assisting wire.

Pic 24

- Bring convertible top cover and tension cable back to original position again.

Pic 25

- Before installing roof edge strip into roof edge channel, align marking (strip) - 1 - of convertible top cover with center line of hole - 2 - of roof edge. It is recommended to ease pressing in roof edge strip using glass cleaner.

Pic 26

______________________________

Let me know if this helps or if you have other questions.

Take care,
Joe
Was this
answer
helpful?
Yes
No
+4
Thursday, November 14th, 2019 AT 9:25 PM
Tiny
GCOOTS
  • MEMBER
  • 3 POSTS
Someone else took the outer shell off. Having trouble locating where these straps go that are pictured. Can anyone help?
Was this
answer
helpful?
Yes
No
Saturday, October 10th, 2020 AT 1:15 PM
Tiny
NASER NASER
  • MEMBER
  • 836 POSTS
I have done 3 of these and I always take pictures of where they strap to as it is very confusing. The one with the cable is obvious, the one that is loose straps to the inside frame, they should see a hole, but there is another little strap that has a banjo like hole which also straps to the same hole, hard without pictures. The other one that isn't showing in their picture goes underneath the inside headliner, so it depends on which one they have already attached.
Was this
answer
helpful?
Yes
No
Saturday, October 10th, 2020 AT 1:24 PM
Tiny
GCOOTS
  • MEMBER
  • 3 POSTS
Thanks for the pics. I tried to make out where things went. Guess I was wrong! Top won’t close all the way. Back to the drawing board. There are no good instructions out there.
Was this
answer
helpful?
Yes
No
Saturday, October 10th, 2020 AT 4:31 PM
Tiny
NASER NASER
  • MEMBER
  • 836 POSTS
Here is some instructions I found in an old email. This is assuming you have an 03-09 with power top.
Was this
answer
helpful?
Yes
No
Saturday, October 10th, 2020 AT 4:42 PM
Tiny
NASER NASER
  • MEMBER
  • 836 POSTS
Sorry, it would not let me attach the file.
Was this
answer
helpful?
Yes
No
Saturday, October 10th, 2020 AT 4:43 PM
Tiny
GCOOTS
  • MEMBER
  • 3 POSTS
Can you please send it to my email? It would be appreciated. Gcoots@icloud. Com
Thank you for your help!
Was this
answer
helpful?
Yes
No
Saturday, October 10th, 2020 AT 4:47 PM
Tiny
NASER NASER
  • MEMBER
  • 836 POSTS
I did but it says not valid address for some reason.
Was this
answer
helpful?
Yes
No
Saturday, October 10th, 2020 AT 4:50 PM
Tiny
JACOBANDNICKOLAS
  • MECHANIC
  • 108,254 POSTS
Hi,

Naser, thanks for jumping in. Are you able to attach the pics?

Joe
Was this
answer
helpful?
Yes
No
Saturday, October 10th, 2020 AT 5:07 PM
Tiny
NASER NASER
  • MEMBER
  • 836 POSTS
It's a PDF file that I had from one of the companies who sell these tops. They sent it to me once a while ago but when I try to attach it it wont let me a d when I sent it by email it says email not valid. Not sure if its a file issue
Was this
answer
helpful?
Yes
No
Saturday, October 10th, 2020 AT 5:20 PM
Tiny
NASER NASER
  • MEMBER
  • 836 POSTS
Says file type not allowed. It's a pdf file
Was this
answer
helpful?
Yes
No
Saturday, October 10th, 2020 AT 5:23 PM
Tiny
JACOBANDNICKOLAS
  • MECHANIC
  • 108,254 POSTS
If possible, copy it and save it as a jpeg. What are the pictures of and is it something that I attached above in the removal and replacement procedure?

Joe
Was this
answer
helpful?
Yes
No
Saturday, October 10th, 2020 AT 5:31 PM
Tiny
NASER NASER
  • MEMBER
  • 836 POSTS
Similar to what you have but real photos and its 14 pages doubt can convert it to jpeg, its description with pics.
Was this
answer
helpful?
Yes
No
Saturday, October 10th, 2020 AT 5:34 PM
Tiny
JACOBANDNICKOLAS
  • MECHANIC
  • 108,254 POSTS
I understand. Thanks none the less.
Was this
answer
helpful?
Yes
No
Saturday, October 10th, 2020 AT 5:36 PM
Tiny
ODMCMAHON
  • MEMBER
  • 1 POST
I anyone could email me the pdf instructions I will be forever on your debt!
Was this
answer
helpful?
Yes
No
Friday, May 13th, 2022 AT 5:46 PM
Tiny
KASEKENNY
  • MECHANIC
  • 18,907 POSTS
Thanks for the request. Unfortunately, we are not able to upload these as a PDF as that format is not supported by the site.

So, we have to rely on the attachments below. I attached them slightly different than what was above.

Please run through this and let us know if you need something different. Thanks
Was this
answer
helpful?
Yes
No
+1
Friday, May 13th, 2022 AT 7:06 PM
Tiny
BUGGYBOYSHANE
  • MEMBER
  • 1 POST
I am having the same issue here, I’ve followed all the steps I believe, but the roof is just too tight to pull the handle down to lock the roof in place. Can you provide any help on how to adjust the tension or how to move the roof forward? It’s sitting about 10mm too high at windscreen and I just get it to pull down enough. I only did the outer skin and used a used part from another beetle, so a genuine item. Any help greatly appreciated.
Was this
answer
helpful?
Yes
No
Thursday, August 10th, 2023 AT 1:37 AM
Tiny
KEN L
  • MASTER CERTIFIED MECHANIC
  • 42,940 POSTS
I would make sure the hydraulic fluid is full and then bleed the system, here is how. Check out the images (below). Let us know what happens and please upload pictures or videos of the problem so we can see what's going on.
Was this
answer
helpful?
Yes
No
Thursday, August 10th, 2023 AT 11:01 AM

Please login or register to post a reply.

Sponsored links