Welcome to 2CarPros.
Honestly, it is hard for me to answer if it is okay to drive. Without being there to inspect it myself, I don't know. And, the control arm bushing is a rubber mount seated in the control arm. What is leaking?
The control arm is an important structural component of the steering and suspension. As far as a cost, the parts price will be determine on where they are purchased and if an aftermarket part is available. I can, however, provide you the flat rate time for the repairs. If you look at picture 1, I attached the labor rates based on if one or both are done. The number on the right indicates hours.
_______________________________________________
Here are the directions specific to your vehicle for replacement. I'm adding them so you can see what needs done. The remaining pictures correlate with these directions.
_______________________________________________
Replacing Bracket (with Rubber Mount) for Left or Right Control Arm
Vehicle Steering and Suspension Suspension Control Arm Control Arm Bushing Service and 31 12 046 REPLACING BRACKET (WITH RUBBER MOUNT) FOR LEFT OR RIGHT CONTROL ARM
31 12 046 Replacing Bracket (With Rubber Mount) For Left Or Right Control Arm
pic 2
WARNING:
Risk of burning.
Wear gloves.
Pic 3
IMPORTANT: Rubber mounts must always be replaced in pairs (JOHN COOPER WORKS).
Pic 4
Necessary preliminary work:
- Remove control arm.
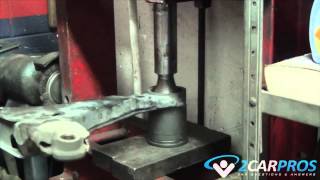
Pic 5
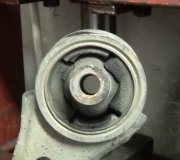
Mount control arm as pictured on press. Heat rubber mount with hot air blower.
NOTE: When pressing out the wishbone, ensure that the inner sleeve of the rubber mount does not remain on the wishbone pin.
Pic 6
Force control arm with press and a suitable tool out of rubber mount.
Replace rubber mount
pic 7
IMPORTANT:
Bolt bracket and control arm to front axle carrier immediately.
Leave car for at least 30 minutes in unladen position and avoid spring deflections.
The lubricant takes 30 minutes to evaporate. The wishbone is fixed in the correct position in the rubber mount.
Non-conformance with these procedures could lead to serious impairment of handling.
Pic 8
Apply a generous coating of Circo Light (sourcing reference: BMW Parts Service) to control arm pin and inner sleeve of rubber mount.
Lay bracket on work surface of press.
Align control arm to bracket and press from above into rubber mount (up to stop).
NOTE: Gap between control arm and rubber mount is 6 ± 2 mm after installation.
___________________
Let me know if this helps or if you have other questions.
Take care,
Joe
Images (Click to make bigger)
SPONSORED LINKS
Friday, July 12th, 2019 AT 9:08 PM