Code P0452

Tiny
BCMULLEN95
  • MEMBER
  • 1999 CHEVROLET TAHOE
  • 5.7L
  • V8
  • 2WD
  • AUTOMATIC
  • 235,000 MILES
I replaced the fuel pump and shortly after I have been having issues with the DTC code P0452. I have replaced the fuel pressure sensor and still have the code P0452. Would like to know what else could be causing this code electrical or other wise? What should I be testing in next?
Sunday, January 21st, 2018 AT 6:34 AM

18 Replies

Tiny
PATENTED_REPAIR_PRO
  • MECHANIC
  • 1,853 POSTS
Did you clear the code after replacing the fuel tank pressure sensor?
If not, do so and if you did follow this test procedure.

P0452

Diagnostic Procedures

1. Perform On-Board Diagnostic (OBD) system check. See ON-BOARD DIAGNOSTIC (OBD) SYSTEM CHECK under SELF-DIAGNOSTIC SYSTEM in SELF-DIAGNOSTICS INTRODUCTION article. After performing OBD system check, go to next step.
2. Turn ignition on, engine off. Using scan tool, monitor fuel tank pressure sensor reading. If fuel tank pressure sensor value is within -1.0 to 1.0 in. H2O, go to next step. If fuel tank pressure sensor value is not within -1.0 to 1.0 in. H2O, go to step 4.
3. DTC is intermittent. Check for additional DTCs set. If additional DTCs are set, diagnose affected DTCs. If no additional DTCs are set, see DIAGNOSTIC AIDS.
4. Turn ignition off. Disconnect fuel tank pressure sensor harness connector. Turn ignition on, engine off. Using DVOM, check voltage between fuel tank pressure sensor harness connector 5-volt reference voltage and ground circuit. If voltage reading is about 5 volts, go to next step. If voltage reading is not about 5 volts, go to step 6.
5. Turn ignition off. Using jumper wires, connect jumper between fuel tank pressure sensor 5-volt reference circuit at harness connector to sensor terminal. Connect jumper between sensor ground circuit at harness connector to sensor terminal. Turn ignition on, engine off. Using DVOM, check voltage between ground and sensor signal circuit. If voltage reading is 1.3-2.0 volts, go to step 13. If voltage reading is not 1.3-2.0 volts, go to step 11.
6. Check for open in fuel tank pressure sensor 5-volt reference circuit. If circuit is open, go to step 15. If circuit is okay, go to next step.
7. Check for short to ground in 5-volt reference circuit. If circuit is shorted, go to step 15. If circuit is okay, go to next step.
8. Check 5-volt reference circuit for poor terminal contact at VCM. If problem is found, go to step 15. If terminal connection is okay, go to next step.
9. Check for open in fuel tank pressure sensor ground circuit. If circuit is open, go to step 15. If circuit is okay, go to next step.
10. Check sensor ground circuit for poor terminal connection at VCM. If problem is found, go to step 15. If terminal connection is okay, go to step 16.
11. Check fuel pressure sensor signal for short to ground. If circuit is shorted, go to step 15. If circuit is okay, go to next step.
12. Check fuel pressure sensor signal terminal connection at VCM. If problem is found, go to step 15. If terminal connection is okay, go to step 16.
13. Check fuel tank pressure sensor for water intrusion, backed out terminal, improper terminal mating or poor terminal-to-wire connections. If problem is found, go to step 15. If sensor connections are okay, go to next step.
14. Replace fuel tank pressure sensor. After replacing sensor, go to step 17.
15. Repair circuit as necessary. After repairs, go to step 17.
16. Replace VCM. Program replacement VCM using required equipment. After replacing VCM, go to next step.
17. Using scan tool, select DTC, CLEAR INFO function. Start and warm engine to normal operating temperature. Select DTC, SPECIFIC, then enter this DTC. Operate vehicle within conditions for setting this DTC. If scan tool indicates that this test ran and passed, go to next step. If scan tool does not indicate that this test ran and passed, repeat step 2.
18. Check for additional DTCs. If additional DTCs are set, diagnose affected DTCs. If no additional DTCs are set, system is okay.
Was this
answer
helpful?
Yes
No
Monday, January 22nd, 2018 AT 5:44 AM
Tiny
BCMULLEN95
  • MEMBER
  • 249 POSTS
I did clear the code, I started the processes of running the diagnostic, however I don't own a scan tool that allows me to do some of the test, so I am using a DMM. I am not sure how to test a short to ground. On step 5 I have the 5V reference. As I tested the jumper wires I got a 4.98V reference. I went to step 11 and it states to test short to ground. Not quit sure how to do that.
Was this
answer
helpful?
Yes
No
Monday, January 22nd, 2018 AT 12:05 PM
Tiny
PATENTED_REPAIR_PRO
  • MECHANIC
  • 1,853 POSTS
Place one test lead of the ohmmeter on the fuel pressure sensor signal wire and the other test lead on a metal ground and check if that wire is grounded or showing continuity to ground. It should read infinite.
Was this
answer
helpful?
Yes
No
+1
Monday, January 22nd, 2018 AT 12:10 PM
Tiny
BCMULLEN95
  • MEMBER
  • 249 POSTS
It is showing infinate. What next?
Was this
answer
helpful?
Yes
No
Monday, January 22nd, 2018 AT 1:13 PM
Tiny
PATENTED_REPAIR_PRO
  • MECHANIC
  • 1,853 POSTS
Continue on to step 12.
Was this
answer
helpful?
Yes
No
Monday, January 22nd, 2018 AT 1:44 PM
Tiny
BCMULLEN95
  • MEMBER
  • 249 POSTS
Do you know which wire will be the wire for this circuit at the VCM?
Was this
answer
helpful?
Yes
No
Thursday, January 25th, 2018 AT 2:53 PM
Tiny
PATENTED_REPAIR_PRO
  • MECHANIC
  • 1,853 POSTS
It should be a dark green wire at connector 2/pin 25.
Here is the wiring diagram.
Was this
answer
helpful?
Yes
No
+1
Thursday, January 25th, 2018 AT 3:06 PM
Tiny
BCMULLEN95
  • MEMBER
  • 249 POSTS
I went through the troubleshooting guide you provided. In step 4 it states I should have almost 5.0 volts for the reference line. I have 5.0 volts if I use the ground on the wire harness and 5.2 volts if I use the ground at the frame. Do I have a problem with to much of a reference voltage or is this normal for this type of vehicle?
Was this
answer
helpful?
Yes
No
Monday, January 29th, 2018 AT 11:28 AM
Tiny
PATENTED_REPAIR_PRO
  • MECHANIC
  • 1,853 POSTS
5.2 volts is about 5 volts so, If voltage reading is about 5 volts, go to next step.
Was this
answer
helpful?
Yes
No
Monday, January 29th, 2018 AT 11:32 AM
Tiny
BCMULLEN95
  • MEMBER
  • 249 POSTS
So in retracing my steps the signal wire in step 5 has 2.22V, I then went to step 11 and it shows OL. Now I move to the VCM, 12. Check fuel pressure sensor signal terminal connection at VCM. If problem is found, go to step 15. If terminal connection is okay, go to step 16. In this step am I only looking for the connectors, to make sure they are not loose or do I need to check voltage?
Was this
answer
helpful?
Yes
No
Monday, January 29th, 2018 AT 11:58 AM
Tiny
PATENTED_REPAIR_PRO
  • MECHANIC
  • 1,853 POSTS
If the result for step 11 is ol, or in other words infinity that is ok, meaning that wire isn't shorted to ground. So, go to the next step 12.
Was this
answer
helpful?
Yes
No
Monday, January 29th, 2018 AT 2:07 PM
Tiny
BCMULLEN95
  • MEMBER
  • 249 POSTS
Just ordered a new ECM for the Tahoe. They programed it to my vin, do I still need it programed to my Tahoe? Don't want to damage anything else.
Was this
answer
helpful?
Yes
No
Wednesday, March 28th, 2018 AT 2:52 PM
Tiny
PATENTED_REPAIR_PRO
  • MECHANIC
  • 1,853 POSTS
This is what the manual says, so I would just try it, if the engine starts just ride it around for awhile.
If you need to program any of those items, here are the procedures.
Vehicle Driveability Computer Relearn Procedure (4.3L, 5.0L, 5.7L & 7.4L)
Manufacturer does not provide a specified computer relearn procedure for obtaining proper driveability. If vehicle battery was disconnected or Vehicle Control Module (VCM) was replaced, driving the vehicle will enable the VCM to perform a computer relearn procedure for obtaining proper driveability. Inform customer that driveability may differ from what they are accustomed to until the VCM completes the computer relearn procedure.
Password Learn Procedure For Anti-Theft System (5.0L, 5.7L & 7.4L)
Password learn procedure must be performed if Vehicle Control Module (VCM), passlock module or passlock sensor is replaced. A password is communicated between VCM and passlock module to provide engine operation. If VCM is replaced, the VCM must learn the password from the passlock module.
Attempt to start engine. Engine will start and then stall. After engine stalls, leave ignition on for 10 minutes. After engine stalls, the SECURITY indicator light will come on for 10 minutes and then go off. The SECURITY indicator light is located on upper right corner of instrument panel, just above battery charge indicator.
NOTE: Ensure battery is fully charged before proceeding. Performing this procedure will cause a Diagnostic Trouble Code (DTC) P1630 to be set in the VCM. It will be necessary to use scan tool to check for DTC P1630 when performing this procedure. Ensure steps are followed in correct order or procedure may need to be repeated.
After SECURITY indicator light goes off, turn ignition off for 30 seconds. Attempt to start engine and then leave ignition on. After engine has stalled, leave ignition on for 10 minutes. SECURITY indicator light will come on for 10 minutes and then go off. After SECURITY indicator light goes off, turn ignition off for 30 seconds.
Attempt to start engine and then leave ignition on. After engine has stalled, leave ignition on for 10 minutes. SECURITY indicator light will come on for 10 minutes and then go off or until DTC 1630 is set in VCM.
Turn ignition off for 30 seconds. Turn ignition on and wait 30 seconds. Attempt to start engine. If engine starts, password learn procedure is complete. Ensure DTC 1630 is cleared from VCM by turning ignition off for 30 seconds and then turning ignition on again. If DTC 1630 is not cleared from VCM, perform test procedures for DTC 1630 and repair as necessary. See appropriate SELF-DIAGNOSTICS article in ENGINE PERFORMANCE.
NOTE: DTC 1630 will be set in VCM as result of this procedure. DTC P1630 may be cleared from VCM by turning ignition off for 30 seconds and then turning ignition on again.
If engine does not start, ensure procedure was properly followed. If procedure was properly followed, check for any DTCs. If any DTCs exist, perform test procedures for specified DTC and repair as necessary. See appropriate SELF-DIAGNOSTICS article in ENGINE PERFORMANCE.
Electronically Erasable Programmable Read Only Memory (EEPROM) Programming (4.3L, 5.0L & 5.7L)
If Vehicle Control Module (VCM) was replaced, the EEPROM in the VCM must be programmed. If EEPROM is not programmed, a Diagnostic Trouble Code (DTC) will be set in the VCM.
Ensure battery is fully charged. Ensure cable is properly connected on Data Link Connector (DLC). Turn ignition on. Perform EEPROM programming using the Techline equipment manufacturer's instructions and latest software applicable for the vehicle model.
Once EEPROM is reprogrammed, Crankshaft Position (CKP) sensor variation learn procedure and password learn procedure for anti-theft system must be performed using proper procedure.
NOTE: If EEPROM programming fails, ensure all electrical connections on VCM are okay. Check Techline for latest software. If EEPROM programming still fails, replace VCM.
Once Crankshaft Position (CKP) sensor variation learn procedure and password learn procedure for anti-theft system are performed, perform powertrain On-Board Diagnostic (OBD) system check. See POWERTRAIN ON-BOARD DIAGNOSTIC (OBD) SYSTEM CHECK in appropriate SELF-DIAGNOSTICS article in ENGINE PERFORMANCE.
Crankshaft Position (CKP) Sensor Variation Learn Procedure (4.3L, 4.8L, 5.0L, 5.3L, 5.7L, 6.0L & 7.4L)
Procedure must be performed if any of the following have been done:
EEPROM was reprogrammed.
If crankshaft position sensor was removed or replaced.
Vehicle Control Module (VCM) was replaced.
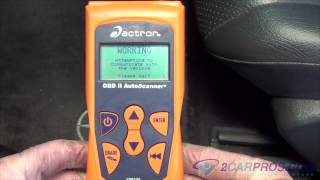
Install scan tool on Data Link Connector (DLC). Apply parking brake. Block rear wheels. Ensure hood is closed.
Place transmission in Park (A/T models) or Neutral (M/T models). Start engine and warm engine until engine coolant temperature is at least 150°F (65°C). Ensure all accessories are off.
Apply service brakes. With engine idling, use scan tool to select and enable CKP sensor variation learn procedure.
Gradually accelerate engine to 4000 RPM. Quickly release throttle to idle position once CKP sensor variation learn procedure is obtained and engine starts to decelerate. Once CKP sensor variation values are learned, the VCM will return engine control to the operator and engine will respond to throttle position.
CAUTION: Ensure throttle is quickly released to idle position once CKP sensor variation learn procedure fuel cut off is obtained and engine starts to decelerate.
If CKP sensor variation learn procedure was completed, turn ignition off for at least 15 seconds and remove scan tool. If CKP sensor variation learn procedure was not completed, a DTC P1336 should be stored in the VCM. Perform test procedures for DTC P1336 and repair as necessary. See appropriate SELF-DIAGNOSTICS article in ENGINE PERFORMANCE.
Was this
answer
helpful?
Yes
No
Wednesday, March 28th, 2018 AT 3:32 PM
Tiny
BCMULLEN95
  • MEMBER
  • 249 POSTS
Replaced the VCM and still have the same issue. I acquired a short finder tool and will be looking for the short this week. Is it possible to get a wire diagram for the fuel pump, I replace the pigtail and no longer have the wiring instructions. I need to make sure I have it wired properly? I know the fuel pump and the fuel tank pressure sensor are on the same circuit. Need to narrow down my search parameter. Thanks
Was this
answer
helpful?
Yes
No
Sunday, April 8th, 2018 AT 7:37 PM
Tiny
PATENTED_REPAIR_PRO
  • MECHANIC
  • 1,853 POSTS
I think you should repeat the steps again and let me know the results of all them steps beginning with the result from step 12, cause I assume you went to step 16 right after 12.
Was this
answer
helpful?
Yes
No
Monday, April 9th, 2018 AT 7:38 AM
Tiny
BCMULLEN95
  • MEMBER
  • 249 POSTS
Repeated all the steps, found out that where the wire harness bunches up under the hood the green wire coming from the VCM to the 4 pin connector the wire was shorted. Ran a new wire from the computer to the sensor and have no returning code. Thank you for your help.
Was this
answer
helpful?
Yes
No
Thursday, May 10th, 2018 AT 10:06 AM
Tiny
KEN L
  • MASTER CERTIFIED MECHANIC
  • 43,072 POSTS
Glad you could get it fixed, that kind of problem can be tough. Please use 2CarPros anytime we are here to help. Good work PATENTED_REPAIR_PRO

Cheers, Ken
Was this
answer
helpful?
Yes
No
Thursday, May 10th, 2018 AT 4:39 PM
Tiny
PATENTED_REPAIR_PRO
  • MECHANIC
  • 1,853 POSTS
Glad to hear it is fixed, good work.
Was this
answer
helpful?
Yes
No
Friday, May 11th, 2018 AT 8:12 AM

Please login or register to post a reply.

Sponsored links