Climate Control switch illumination problem

Tiny
KENNYASH
  • MEMBER
  • 2011 FORD E-SERIES VAN
  • 5.4L
  • V8
  • 2WD
  • AUTOMATIC
  • 146,000 MILES
E-350 passenger van.

Wife put jumper cables on backwards 3 years ago, and blew a couple of fuses. I replaced the fuses and all was well except the illumination behind my climate control knobs. (And also the illumination behind the blower speed knobs, and headlight switch/knob and dimmer switch) All instrument cluster lights work, radio lights work, power outlets work, all switches work. Dimmer control works for the radio lights and cluster lights. But I get no illumination behind these switches/knobs no matter what I do.

I’ve checked every fuse in the passenger compartment fuse-panel, (#10 was blown, but replaced), and I’ve visually checked every one of the fuses in the fuse-box under the hood. All good.

This has plagued me for 3 years, and it’s high time I figure out what’s keeping it from working! I pulled the bezel off the dash, and checked the 2 bulbs behind the climate control knobs. Both looked good.
the only other thought I had was if those bulbs were in series with the bulbs behind blower switches, and headlight switch illumination!

But beyond this, I’m stumped.

​​​​​​​any suggestions on things to try?

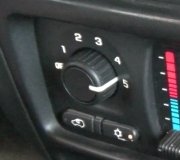
(Photo shows controls, with headlights on, dimmer at max. No lights behind the switches/knobs)
Wednesday, January 20th, 2021 AT 4:19 PM

1 Reply

Tiny
STEVE W.
  • MECHANIC
  • 12,998 POSTS
Do you have any steering wheel controls and do those light up? From the wiring it looks like it could be a failed FET backlight driver inside the smart junction box (aka fuse and body control box). It powers the LEDs in all of those locations. That isn't a serviceable part in that replacing it requires replacement of the smart box itself. To do that you need a scan tool that would allow you to transfer the information in the current unit into a file, then once the replacement is installed you upload that, then do a few relearn procedures on the TPMS system and reboot it. The physical replacement is the easy part. Remove the three nuts and 7 wiring connectors after disconnecting the negative battery terminal. Remove the unit, install the replacement and upload the files to make it work. In this instance you cannot use a used part without erasing it's files first and that isn't possible with most scan tools or programming options.
Was this
answer
helpful?
Yes
No
Wednesday, January 20th, 2021 AT 5:56 PM

Please login or register to post a reply.

Sponsored links