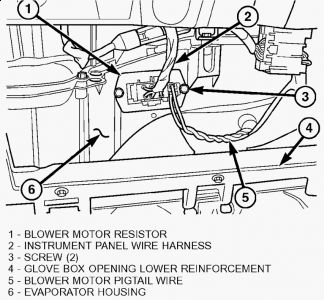
BLOWER MOTOR RESISTOR DESCRIPTION A blower motor resistor is used on this model when it is equipped with the manual heater-A/C control ( Fig. 10 ). Models equipped with the optional Automatic Temperature Control (ATC) use a blower power module, instead of the blower motor resistor. The blower motor resistor is installed in a mounting hole in the heater/AC housing, directly behind the glove box opening of the instrument panel. The resistor consists of a molded plastic mounting plate with two integral connector receptacles. Concealed behind the mounting plate within the heater/AC housing are four coiled resistor wires contained within a protective stamped steel cage. The resistor mounting plate is secured with two screws to the heater/AC housing and is accessed for service by rolling down the glove box from the instrument panel. Fig. 10: Identifying Blower Motor Resistor Courtesy of DAIMLERCHRYSLER CORP. The blower motor resistor wires will get hot when in use. Do not touch the resistor wires or the protective cage if the blower motor has been running. The blower motor resistor cannot be adjusted or repaired and, if faulty or damaged, it must be replaced. OPERATION The blower motor resistor is connected to the vehicle electrical system through a dedicated take out and connector of the instrument panel wire harness. A second connector receptacle receives the pigtail wire connector from the blower motor. The blower motor resistor has multiple resistor wires, each of which will reduce the current flow through the blower motor to change the blower motor speed. The blower motor switch in the manual heater-A/C control directs the ground path for the blower motor through the correct resistor wire to obtain the selected speed. With the blower motor switch in the lowest speed position, the ground path for the motor is applied through all of the resistor wires. Each higher speed selected with the blower motor switch applies the blower motor ground path through fewer of the resistor wires, increasing the blower motor speed. When the blower motor switch is in the highest speed position, the blower motor resistor wires are bypassed and the blower motor receives a direct path to ground through the blower motor switch. The blower motor resistor may be diagnosed using conventional diagnostic tools and methods. DIAGNOSIS AND TESTING - BLOWER MOTOR RESISTOR Refer to the appropriate wiring information. The wiring information includes wiring diagrams, proper wire and connector repair procedures, details of wire harness routing and retention, connector pin-out information and location views for the various wire harness connectors, splices and grounds. WARNING: ON VEHICLES EQUIPPED WITH AIR-BAGS, DISABLE THE AIRBAG SYSTEM BEFORE ATTEMPTING ANY STEERING WHEEL, STEERING COLUMN, OR INSTRUMENT PANEL COMPONENT DIAGNOSIS OR SERVICE. DISCONNECT AND ISOLATE THE BATTERY NEGATIVE (GROUND) CABLE, THEN 1. Disconnect and isolate the battery negative cable. 2. Disconnect the instrument panel wire harness connector for the blower motor resistor and the blower motor pigtail wire connector from the resistor connector receptacles. 3. Check for continuity between each of the blower motor switch input terminals of the blower motor resistor and the resistor output terminal. In each case there should be continuity. If OK, repair the instrument panel wire harness circuits between the blower motor switch and the blower motor resistor or the blower motor pigtail wires as required. If not OK, replace the faulty blower motor resistor. REMOVAL 1. Disconnect and isolate the battery negative cable. 2. Open the glove box. 3. Flex both sides of the glove box bin inward near the top far enough for the rubber glove box stop bumpers to clear the sides of the glove box opening, then roll the glove box downward. 4. Reach through the glove box opening to access and disconnect the instrument panel wire harness connector for the blower motor resistor from the resistor connector receptacle ( Fig. WAIT TWO MINUTES FOR THE AIRBAG SYSTEM CAPACITOR TO DISCHARGE BEFORE PERFORMING FURTHER DIAGNOSIS OR SERVICE. THIS IS THE ONLY SURE WAY TO DISABLE THE AIRBAG SYSTEM. FAILURE TO TAKE THE PROPER PRECAUTIONS COULD RESULT IN ACCIDENTAL AIR-BAG DEPLOYMENT AND POSSIBLE PERSONAL INJURY. WARNING: ON VEHICLES EQUIPPED WITH AIR-BAGS, DISABLE THE AIRBAG SYSTEM BEFORE ATTEMPTING ANY STEERING WHEEL, STEERING COLUMN, OR INSTRUMENT PANEL COMPONENT DIAGNOSIS OR SERVICE. DISCONNECT AND ISOLATE THE BATTERY NEGATIVE (GROUND) CABLE, THEN WAIT TWO MINUTES FOR THE AIRBAG SYSTEM CAPACITOR TO DISCHARGE BEFORE PERFORMING FURTHER DIAGNOSIS OR SERVICE. THIS IS THE ONLY SURE WAY TO DISABLE THE AIRBAG SYSTEM. FAILURE TO TAKE THE PROPER PRECAUTIONS COULD RESULT IN ACCIDENTAL AIR-BAG DEPLOYMENT AND POSSIBLE PERSONAL INJURY. WARNING: THE BLOWER MOTOR RESISTOR MAY GET VERY HOT DURING NORMAL OPERATION. IF THE BLOWER MOTOR WAS TURNED ON, WAIT FIVE MINUTES TO ALLOW THE BLOWER MOTOR RESISTOR TO COOL BEFORE PERFORMING DIAGNOSIS OR SERVICE. FAILURE TO TAKE THIS PRECAUTION CAN RESULT IN PERSONAL INJURY. CAUTION: Do not operate the blower motor with the blower motor resistor removed from the circuit. Failure to take this precaution can result in vehicle damage. 11 ). Fig. 11: Identifying Blower Motor Resistor Courtesy of DAIMLERCHRYSLER CORP. 5. Reach through the glove box opening to access and disconnect the blower motor pigtail wire connector from the resistor connector receptacle. 6. Remove the two screws that secure the blower motor resistor to the evaporator housing. 7. Remove the blower motor resistor from the evaporator housing. INSTALLATION 1. Position the blower motor resistor into the evaporator housing. 2. Install and tighten the two screws that secure the blower motor resistor to the evaporator housing. Tighten the screws to 2 N.m (17 in. lbs.). 3. Reconnect the blower motor pigtail wire connector to the blower motor resistor connector receptacle. 4. Reconnect the instrument panel wire harness connector for the blower motor resistor to the resistor connector receptacle. 5. Flex both sides of the glove box bin inward near the top far enough for the rubber glove box stop bumpers to clear the sides of the glove box opening, then roll the glove box upward. 6. Close and latch the glove box. 7. Reconnect the battery negative cable. CAUTION: Do not operate the blower motor with the blower motor resistor removed from the circuit. Failure to take this precaution can result in vehicle damage.
Tetsing the resistor:
1. Disconnect and isolate the battery negative cable. 2. Disconnect the instrument panel wire harness connector for the blower motor resistor and the blower motor pigtail wire connector from the resistor connector receptacles. 3. Check for continuity between each of the blower motor switch input terminals of the blower motor resistor and the resistor output terminal. In each case there should be continuity. If OK, repair the instrument panel wire harness circuits between the blower motor switch and the blower motor resistor or the blower motor pigtail wires as required. If not OK, replace the faulty blower motor resistor. WARNING: ON VEHICLES EQUIPPED WITH AIR-BAGS, DISABLE THE AIRBAG SYSTEM BEFORE ATTEMPTING ANY STEERING WHEEL, STEERING COLUMN, OR INSTRUMENT PANEL COMPONENT DIAGNOSIS OR SERVICE. DISCONNECT AND ISOLATE THE BATTERY NEGATIVE (GROUND) CABLE, THEN WAIT TWO MINUTES FOR THE AIRBAG SYSTEM CAPACITOR TO DISCHARGE BEFORE PERFORMING FURTHER DIAGNOSIS OR SERVICE. THIS IS THE ONLY SURE WAY TO DISABLE THE AIRBAG SYSTEM. FAILURE TO TAKE THE PROPER PRECAUTIONS COULD RESULT IN ACCIDENTAL AIR-BAG DEPLOYMENT AND POSSIBLE PERSONAL INJURY.
Air bag: disable by removing neg(-) battery cable for several minutes(2-5)
Sep 5, 2009 at 10:42 AM