thermostat change

2004 CHRYSLER SEBRING
Avatar
ENFORCERS
  • MEMBER
  • 1 POST
Process in which it takes to change the thermostat. Pics?
Oct 9, 2009 at 7:17 PM
Advertisement
Avatar
JACOBANDNICKOLAS
  • CAR REPAIR CONTRIBUTOR
  • 110,190 POSTS
2.0L & 2.4L Engines 1.Before servicing the vehicle, refer to the Precautions section. 2.Disconnect battery negative cable from remote negative terminal on shock tower and properly isolate to prevent accidental reconnection. CAUTION This operation must only be performed on a cold engine. 3.Drain cooling system to the thermostat level or below. 4.Remove or disconnect the following: Coolant recovery system hose Thermostat/engine outlet connector bolts Inlet hose and coolant elbow from thermostat housing 5.Remove thermostat assembly and clean sealing surfaces. Fig. Thermostat and housing-2.0L and 2.4L engines To install: 1.Place the new thermostat assembly into the engine outlet connector. Align air bleed with notch on the cylinder head. 2.Install engine outlet connector onto cylinder head and tighten bolts to 110 inch lbs. (12.5 Nm) 3.Connect the coolant recovery system hose. 4.Fill cooling system. 1.Drain cooling system to the thermostat level or below. 2.Remove the Coolant Recovery System (CRS) hose and thermostat/engine outlet connector bolts. 3.Remove the thermostat assembly, and clean sealing surfaces. Fig. Thermostat assembly-2.0L engine Fig. Thermostat assembly-2.4L engine To install: 1.Place the new thermostat assembly into the engine outlet connector. A.Align air vent upward with notch on the cylinder head (2.0L engine). B.Make sure spring side of thermostat faces cylinder head. 2.Install the engine outlet connector onto cylinder head and tighten bolts to 110 inch lbs. (12.5 Nm) 3.Connect the Coolant Recovery System (CRS) hose. 4.Fill cooling system. 2.4L Engine 1.Before servicing the vehicle, refer to the Precautions Section. 2.Drain the cooling system to the thermostat level or below. 3.Remove the Coolant Recovery System (CRS) hose and thermostat/engine outlet connector bolts. 4.Remove the thermostat assembly, and clean sealing surfaces. Fig. Thermostat assembly-2.4L engine To install: 1.Place the new thermostat assembly into the engine outlet connector. 2.Make sure the spring side of the thermostat faces the cylinder head. 3.Install the engine outlet connector onto cylinder head and tighten bolts to 110 inch lbs. (12.5 Nm) 4.Connect the CRS hose. 5.Fill the cooling system to the proper level. Here are pictures of the 2.0L and the 2.4L If you have a different size engine, let me know.


https://images.2carpros.com/forum/automotive_pictures/249084_tstat_2.jpg


https://images.2carpros.com/forum/automotive_pictures/249084_ttstat_1.jpg

Joe
Sep 24, 2020 at 10:06 AM
Avatar
DUBES
  • MEMBER
  • 1 POST
Can you please post the procedure with pics for the 2.7 liter

- Thanks
Sep 24, 2020 at 10:06 AM
Avatar
JACOBANDNICKOLAS
  • CAR REPAIR CONTRIBUTOR
  • 110,190 POSTS
This is what I was able to find for you. I hope it help. 2.7L Engine 1.Disconnect negative cable from remote jumper terminal. 2.Drain cooling system. 3.Raise and safely support the vehicle. 4.Remove the right front wheel and belt splash shield. 5.Remove the accessory drive belts. 6.Remove the lower alternator mounting bolt. 7.Lower vehicle. 8.Disconnect alternator electrical connectors. 9.Disconnect AC clutch and AC pressure sensor electrical connectors. Reposition wiring harness. 10.Remove the oil dipstick and tube. Plug hole in oil pan where dipstick tube mounts with water tight stopper. NOTE If hole for dipstick tube in oil pan is not plugged, coolant will enter oil pan. Serious engine damage can occur. 11.Remove the remaining alternator mounting bolts. Remove alternator. 
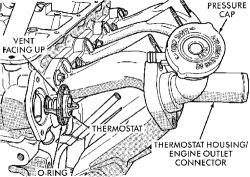
12.Disconnect hoses at thermostat housing. 13.Remove the thermostat housing bolts. 14.Remove the thermostat and housing. 
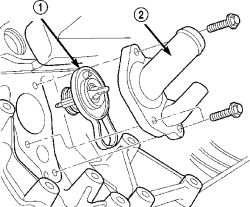
Fig. Air bleed valve (1) and thermostat housing (2) 2.7L-engine


https://images.2carpros.com/forum/automotive_pictures/249084_2_2.jpg

To install: 1.Clean gasket sealing surfaces. 2.Install the thermostat and gasket into the thermostat housing. A.Make sure spring side of thermostat faces the engine side. B.Install the thermostat with the air bleed valve located at the 12 o'clock position. 3.Install the thermostat and housing to cylinder block. Tighten attaching bolts to 105 inch lbs. (12 Nm). 4.Connect hoses at thermostat housing. 5.Install the alternator and attaching bolts. 6.Clean residual coolant from area around hole for dipstick. 7.Remove the plug in oil pan and install the engine oil dipstick tube. 8.Reconnect AC clutch and AC pressure sensor connectors. 9.Reconnect alternator connectors. 10.Raise and safely support the vehicle. 11.Install the accessory drive belts. 12.Install the belt splash shield and right front wheel. 13.Lower vehicle. 14.Reconnect negative battery cable. 15.Fill cooling system.
Sep 24, 2020 at 10:06 AM
Repair Safety Notice: This information is for general instructional purposes only. Vehicle repair can be dangerous. Verify all information, follow manufacturer service procedures, use proper tools and safety equipment, and consult a qualified repair shop when needed.