1999 Chevy Venture Intake manifold gasket replace direction

Tiny
KUSKI
  • MEMBER
  • 1999 CHEVROLET VENTURE
Engine Cooling problem
1999 Chevy Venture 6 cyl Two Wheel Drive Automatic

Could someone give me pictures or a link to them to help me change the lower intake manifold gasket?

Coolant is leaking out and I see that the leak comes from that gasket. Coolant is not leaking to oil yet.

What else should I change while doing the job. The car is driven 205 000km.
Tuesday, September 8th, 2009 AT 3:17 AM

8 Replies

Tiny
2CARPRO JACK
  • MECHANIC
  • 11,533 POSTS
May I ask what mechaical experience you may have? This is a pretty involved job, and isnt really a DIY kind of thing. It will require a few special tools and alot of patience. Since itis a 60-degree engine both valve covers have to come off to remove the pushrods and rocker arms since the gasket is mounted behind them.
Was this
answer
helpful?
Yes
No
+2
Tuesday, September 8th, 2009 AT 7:54 AM
Tiny
KUSKI
  • MEMBER
  • 5 POSTS
I have some experience of working with engines, but newer with this little space!

Pushrod engines I haven't worked with, but I figured they must be easier since I don't have to touch the camshafts and timing chaing. I hope you can understant what I am trying to write, I know engines better than english language.

What are the special tools I need? I already have the gasket kit (FEL PRO). I have a good range of tools, but mainly metric. Is there any other parts I should change at the same time?
Was this
answer
helpful?
Yes
No
+2
Tuesday, September 8th, 2009 AT 8:07 AM
Tiny
BMRFIXIT
  • MECHANIC
  • 19,053 POSTS
Disconnect negative battery cable.
Remove fuel injector sight shield.
Drain cooling system.
Remove air cleaner ducts.
Remove accelerator and cruise control cables with bracket from throttle body.
Remove front spark plug wires.
Disconnect harness connectors, vacuum hoses and coolant hoses from throttle body.
Remove ignition coil bracket with coils and canister purge solenoid.
Remove manifold air pressure (MAP) sensor. Disconnect and remove emission control vacuum harness.
Remove EGR valve and generator front and side brackets.
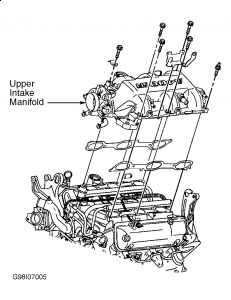
Remove upper intake manifold retaining bolts. Remove upper intake manifold.
VALVE COVERS
Removal (Left)
Remove front spark plug wires.
Remove A/T vacuum modulator pipe (if equipped). Remove right engine strut at engine.
Remove PCV valve.
Remove valve cover retaining bolts.
Remove valve cover and gasket.
Removal (Right)
Remove accessory drive belt.
Remove generator braces.
Remove generator and bracket.
Remove rear spark plug wires.
Remove ignition coil bracket with coils and canister purge solenoid attached.
Remove vacuum hose from air duct at right valve cover.
Remove valve cover retaining bolts.
Remove valve cover and gasket.
LOWER INTAKE MANIFOLD
Disconnect harness connectors from intake manifold components.
Release fuel pressure.
Disconnect fuel lines from rail.
Remove fuel rail.
Unbolt power steering pump from front cover and position aside.
Disconnect upper radiator hose, heater hoses and thermostat bypass hose from lower intake manifold. Remove lower intake manifold retaining bolts. Remove lower intake manifold.
Loosen rocker arms and remove push rods to remove lower intake manifold gaskets
When replacing intake manifold gasket, a revised intake manifold gasket has been introduced by manufacturer. This new design gasket helps resolve issues related to intake manifold oil/coolant leaks. The gasket requires a revised torque specification and procedure in addition to the use of NEW revised intake manifold bolts. Please review TSB ENGINE OIL OR COOLANT LEAK (INSTALL NEW INTAKE MANIFOLD GASKET) for complete information.

NOTE:All gasket-mating surfaces need to be free of oil, and foreign material.

Clean all gasket mating surfaces.
Install lower intake manifold gaskets.
With the gaskets in place, apply a 0.31-0.39" (8-10 mm) drop of GM Â RTV sealer (12346286 US; 10953472 Canada) or equivalent to the 4 corners of the intake manifold-to-block joint. Connect the drops at both ends on the ridge where the front and rear of lower intake manifold contacts the block with a bead of RTV sealer that is 0.31-0.39" (8-10 mm) wide and 0.12-0.20" (3.0-5.0 mm) thick.
Install push rods in original position and tighten rocker arms to specification.
Install lower intake manifold.
Apply sealant (12345282) to bolt threads if reusing original bolts.
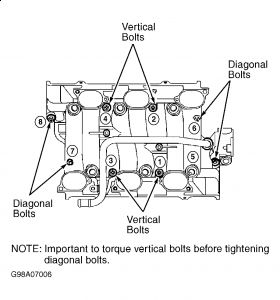
Tighten bolts to specification.
To complete installation, reverse removal procedure.
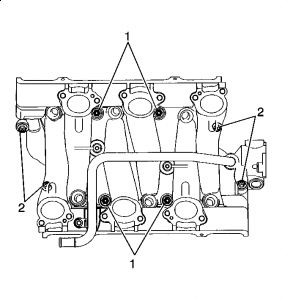
NOTE:An oil leak may result if vertical bolts are not tightened before diagonal bolts.


https://www.2carpros.com/forum/automotive_pictures/99387_Graphic1_492.jpg


https://www.2carpros.com/forum/automotive_pictures/99387_Graphic2_241.jpg

Was this
answer
helpful?
Yes
No
+10
Tuesday, September 8th, 2009 AT 9:24 PM
Tiny
KUSKI
  • MEMBER
  • 5 POSTS
Exellent!

Thank you very much!

Were there any special tools needed?

Anything else that would be smart to change while doing the job? Head gaskets maby?
Was this
answer
helpful?
Yes
No
+1
Wednesday, September 9th, 2009 AT 3:14 AM
Tiny
BMRFIXIT
  • MECHANIC
  • 19,053 POSTS
Pay a close attention to the push rods and keep them in the order they came out also
I would replace thermostat and gasket a lot easier to do when manifold off
good luck
Was this
answer
helpful?
Yes
No
+2
Wednesday, September 9th, 2009 AT 5:59 AM
Tiny
KUSKI
  • MEMBER
  • 5 POSTS
The job is goin well, thank you for the information. I am now starting to install the engine with new gaskets, but I need the torque specifications for the rocker arms, intake manifolds, lower and upper and also for the valve covers.

Also, someone adviced me to change the oil pumps upper O-ring while having the engine open. Anyone knows where to find this?
Was this
answer
helpful?
Yes
No
+2
Monday, September 21st, 2009 AT 4:12 AM
Tiny
BMRFIXIT
  • MECHANIC
  • 19,053 POSTS
Oil pump driver is located under the thermostat housing in the engine below

NOTE: An oil leak may result if the vertical bolts are not tightened before the diagonal bolts.
Diagonal bolts may require a crows foot to tighten.
Tighten:
1.Tighten the vertical lower intake manifold bolts (1) to 7N.m (62 lb in).

2.Tighten the diagonal lower intake manifold bolts (2) to 7N.m(62 lb in).

3. Tighten the vertical lower intake manifold bolts (1) to 13N.m(115 lb in).

4. Tighten the diagonal lower intake manifold bolts (2) to 25N.m(18 lb ft).


https://www.2carpros.com/forum/automotive_pictures/99387_Graphic1_512.jpg


https://www.2carpros.com/forum/automotive_pictures/99387_Graphic2_252.jpg


https://www.2carpros.com/forum/automotive_pictures/99387_Graphic3_113.jpg

Was this
answer
helpful?
Yes
No
+5
Monday, September 21st, 2009 AT 6:23 AM
Tiny
BMRFIXIT
  • MECHANIC
  • 19,053 POSTS
Intake manifold bolts upper 18ft lb

valve cover bolts 89 Inch Ib

rocker arm bolt two steps
1st step 10 ft lb
2nd step additional 30 degrees
Was this
answer
helpful?
Yes
No
+1
Monday, September 21st, 2009 AT 9:27 PM

Please login or register to post a reply.

Sponsored links