Tire Pressure Monitor and Remote Entry

Tiny
HOGDRIVER
  • MEMBER
  • 2007 CHEVROLET TAHOE
  • V8
  • 2WD
  • AUTOMATIC
  • 76,000 MILES
My tire pressure monitoring system and the remote lock/unlock is not working. I get a message on the information panel stating "SERVICE TIRE MONITOR SYSTEM". The 10A DSM fuse in the instrument panel fuse block (located on the driver side panel) is blown. When I replace it, it blows again as soon as it is inserted. Any suggestions?
Thursday, July 29th, 2010 AT 7:27 PM

6 Replies

Tiny
FACTORYJACK
  • MECHANIC
  • 4,159 POSTS
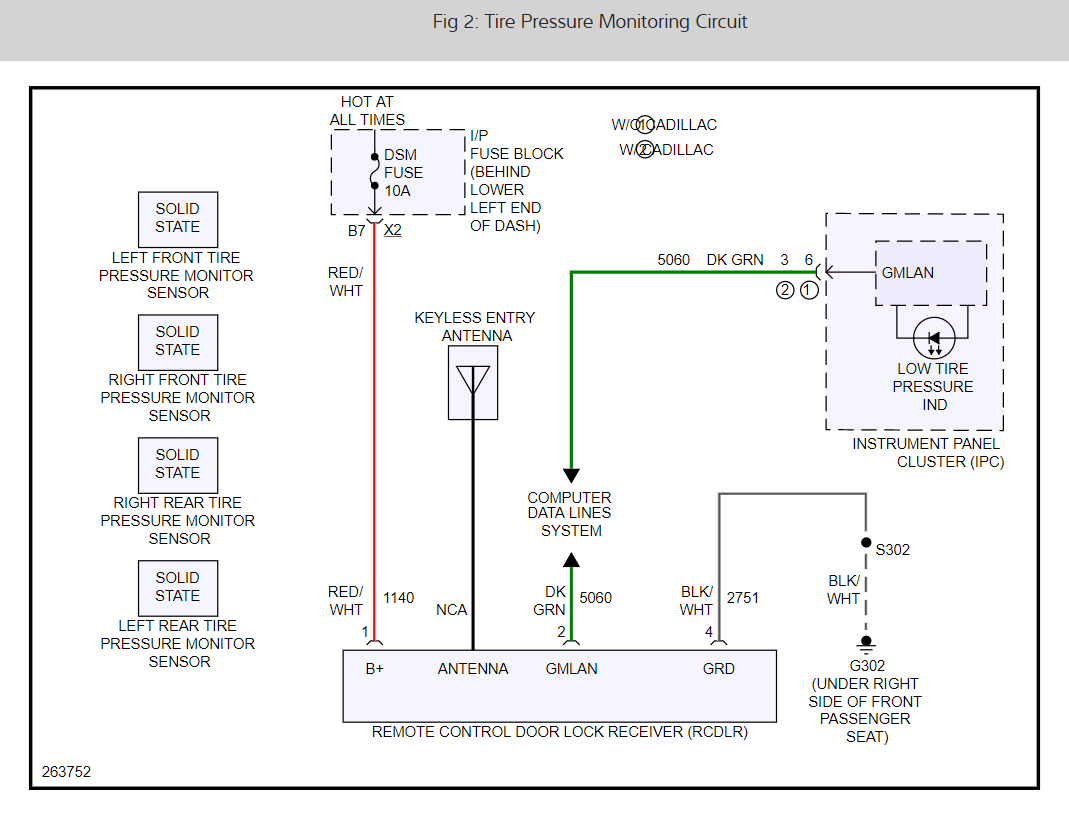
You should also have no memory seat functions as well. There is a couple bulletins that may apply, although one is just for RKE failure. Here is the one that applies and illustrates a possible blown DSM fuse.

#07-08-49-018: Various Electrical Concerns-Intermittently Functioning or Inoperative Component, IP Warning Light On, DIC Message Displayed, DTC Set, No Crank/Start (Repair IP Wiring Harness) - (Sep 7, 2007)

Subject: Various Electrical Concerns -- Intermittently Functioning or Inoperative Component, IP Warning Light On, DIC Message Displayed, DTC Set, No Crank/Start (Repair IP Wiring Harness)

Models: 2007-2008 Cadillac Escalade, Escalade ESV, Escalade EXT

2007-2008 Chevrolet Avalanche, Silverado, Suburban, Tahoe

2007-2008 GMC Sierra, Yukon, Yukon Denali, Yukon XL, Yukon Denali XL

Condition
Some customers may comment on one of the following driver notifications and/or effects:

Driver Notification
Effect of the Condition

Airbag Readiness Light On

SERVICE AIRBAG Warning Message Displayed on DIC
Airbag System Disabled

Radio Intermittently Functioning or Inoperative

Power Window Intermittently Functioning or Inoperative

Front Power Seat Adjustments Intermittently Functioning or Inoperative

Low Tire Pressure Light On

CHECK TIRE PRESSURE Warning Message Displayed on DIC
Tire Pressure Monitoring Intermittently Functioning or Inoperative

Rear Stop Lamp Intermittently Functioning or Inoperative

Center High Mount Stop Lamp Intermittently Functioning or Inoperative

Rear Window Defogger Intermittently Functioning or Inoperative

Cargo Lamp Intermittently Functioning or Inoperative

Adjustable Pedals Intermittently Functioning or Inoperative

Remote Keyless Entry/Remote Start Intermittently Functioning or Inoperative

Check Engine Light On
No Crank or Start

Check Engine Light On
Module Communication Error

Not all of the effects or driver notifications listed above have been experienced. However, the different effects and driver notifications may be caused by one of the wires in the IP harness being chafed or cut. Components on different lines in the list above are in different circuits. Due to the cause of the condition, and the positions of the wires in the IP harness, it is unlikely that more than one circuit will be affected by the condition.

Upon investigation, the technician may find several DTCs set as current or in history. The technician may also find one or more blown fuses in the IP and underhood fuse blocks. The potential fuses are listed below:

"Â 60 amp MBEC1 (#72) (Underhood)

"Â 30 amp AMP (#40) (Underhood)

"Â 15 amp RDO (#41) (Underhood)

"Â 10 amp IPC (#46) (Underhood)

"Â 15 amp AIRBAG BATT (#51) (Underhood)

"Â 10 amp DSM (Left side of IP)

Cause
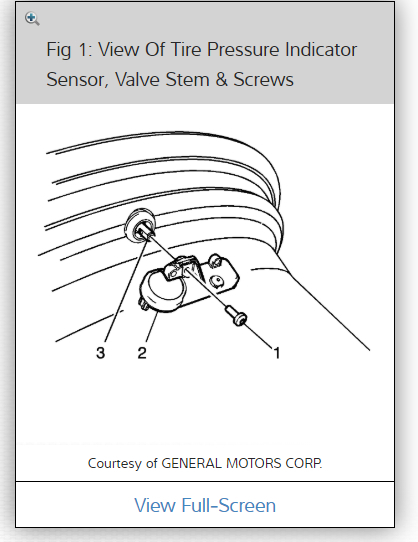
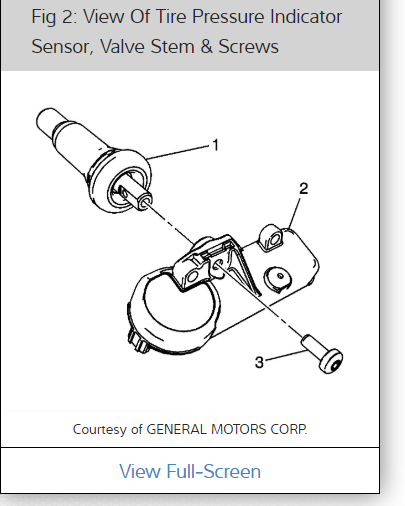
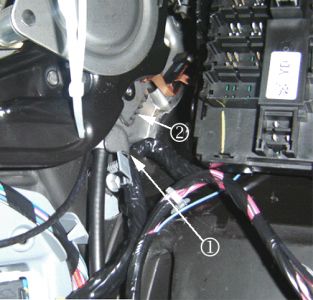
The condition may be caused by one of the wires in the IP harness being chafed or cut on the parking brake pedal assembly. Five areas of potential contact have been identified and are shown below:


https://www.2carpros.com/forum/automotive_pictures/309872_2002643_1.jpg


"Â The IP wiring branch to C202 (IP to body cam lock connection) may have been routed outboard of the junction block (left IP) and the retaining clip (1) off the branch may not have been seated. Possible point of contact (2).


https://www.2carpros.com/forum/automotive_pictures/309872_2002646_1.jpg


"Â The IP wiring branch to C202 may have been pushed up and forward into the park brake assembly and the retaining clip off the branch may not have been seated. Possible points of contact (1, 2).
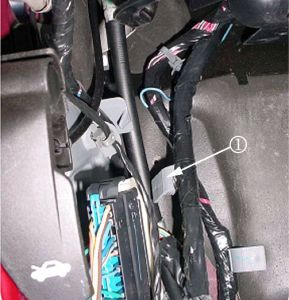

https://www.2carpros.com/forum/automotive_pictures/309872_2002647_1.jpg


"Â The IP wiring branch to C202 may have never been secured into place (gray retaining clip (1) off the branch was never seated).


https://www.2carpros.com/forum/automotive_pictures/309872_2002648_1.jpg


"Â The IP harness may be in hard contact with the top rear edge (1) of the park brake assembly.
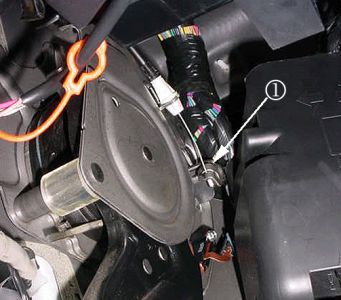
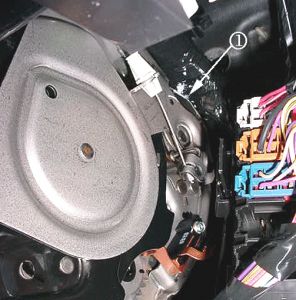

https://www.2carpros.com/forum/automotive_pictures/309872_2002649_1.jpg


"Â When releasing the park brake pedal with the park brake release lever/handle, the moving part (1) at the end of the park brake release cable may be coming into hard contact with the IP harness.

Correction
If the symptoms match those listed above, or if a condition is found with one of the circuits running to C1 or C2 of the junction block or to the inline IP-to-body connector (C202), then remove the front driver side door sill plate, driver side body hinge pillar trim panel, left IP outer trim cover and perform the following steps:

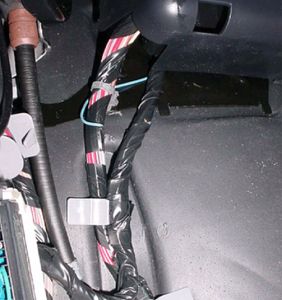
Visually inspect the IP harness for damage at the park brake pedal assembly (refer to potential damage points in photos - at the side and rear of the park brake assembly). Note that damage may be hidden from view (turned away from you, or covered by electrical tape).
Operate the park brake release lever. Is the moving part at the end of the park brake release cable coming into contact and damaging the IP harness? Inspect the IP harness at this point. Note that the damage may be hidden from view (by electrical tape).
If damage is found, repair the wiring.


https://www.2carpros.com/forum/automotive_pictures/309872_2002644_1.jpg


Inspect how the IP branch to C202 is routed. Reroute the wiring as necessary to match the correct routing in the photo above. In order to route the IP harness branch correctly (behind the junction block-left I/P): Remove the cover from the junction block-left I/P, unseat the junction block from the bracket. Disconnect C202. Route the harness such that it lays between the "goalposts" of the junction block bracket. Seat the junction block to the bracket (harness will now be under the junction block). Secure the harness by seating the grey offset retaining clip to the dashmat (or brown "buddy clip" if present - usually on SUV's only). Reconnect C202.
Make sure that the grey offset retaining clip (off of the IP branch going to C202) is seated into the hole in the dashmat or into the brown buddy clip (if present), securing the IP branch to the vehicle.
If the harness is still in contact with a sharp edge or point of the park brake assembly, protect the harness by routing it away from the contact point and holding it there with tie straps, and/or covering the sharp edge with butyl tape.

The shorted wire will be red with a white trace. If you don't find it as desacribed, look for possible shorting under the drivers seat as well.
If after you find a fault, the keyless entry, and tire sensors should have to be relearned. The keyless learn is a function that I believe is available on your info center, and the tire learn is initiated by pressing the keyless lock and unlock buttons simultaneously with the ignition ON, until a double horn chirp is sounded. Then you could use a pressure decrease method at each tire to transmit the sensor ID. It can take about 8-10 psi for a horn chirp confirmation. Start at the LF, then RF, then RR, and Left rear to finish. If you would like printable procedures for the keyless and the tire learn, let me know.
Was this
answer
helpful?
Yes
No
+7
Thursday, July 29th, 2010 AT 11:13 PM
Tiny
SDBENSON
  • MEMBER
  • 5 POSTS
  • 2007 CHEVROLET TAHOE
  • V8
  • 4WD
  • AUTOMATIC
  • 23,000 MILES
I reset the tire pressure monitoring system and it works correctly, reads all the pressures, correct with the tire location, etc. Horn honks as it is suppose to throughout the process. Works great. Then, when I go back to the car the next day, it loses the signal and only reads -- instead of the tire pressure. I reset the system again. All good. Till the next day. Any ideas?
Was this
answer
helpful?
Yes
No
Saturday, August 17th, 2019 AT 12:59 PM (Merged)
Tiny
FACTORYJACK
  • MECHANIC
  • 4,159 POSTS
How does the keyless entry system function after sitting overnight? I would guess that it may be an issue with the remote control door lock receiver, it may be discarding the tire pressure info when it goes to sleep which would be a BCM issue. But lets try a relearn procedure first. I have included the wiring diagrams for the system as well so you can see how it works.

Preferred Scan Tool Learn Enable Method
Using a scan tool, initiate the TPM Learn Mode. A double horn chirp will sound indicating the Learn Mode has been enabled. The left front turn signal will also be illuminated.

Starting with the left front tire, active the sensor by holding the antenna of the EL- 46079/J-46079 aimed upward against the tire sidewall close to the wheel rim at the valve stem location. Press and release the Activate button and wait for a horn chirp. Once the horn chirp has sounded, the sensor information is learned and the turn signal in the next location to be learned will illuminate.
After the horn chirp has sounded and the right front turn signal is illuminated, repeat step 2 for the remaining 3 sensors in the following order:
Right front
Right rear
Left rear

When the left rear sensor has been learned and a double horn chirp has sounded, the learn process is complete and the RCDLR exits the learn mode.
Ignition OFF, adjust all tires to the recommended pressures. Refer to Vehicle Certification, Tire Placard, Anti-Theft, and Service Parts ID Label.
Alternate Keyless Entry Transmitter Or DIC Learn Enable Method
Ignition ON, initiate the TPM Learn Mode using one of the following procedures:
On vehicles equipped with keyless entry, simultaneously press the keyless entry transmitters lock and unlock buttons until a double horn chirp sounds indicating the Learn Mode has been enabled. The left front turn signal will also be illuminated.
On vehicles not equipped with keyless entry, press and release the driver information center (DIC) INFO button until the TIRE LEARN message appears on the DIC display. Press and hold the SET/RESET button until a double horn chirp sounds indicating the Learn Mode has been enabled. The left front turn signal will also be illuminated.
Starting with the left front tire, learn the tire pressure using one of the following methods:

Hold the antenna of the EL-46079/J-46079 aimed upward against the tire sidewall close to the wheel rim at the valve stem location. Press and release the activate button and wait for a horn chirp. Once the horn chirp has sounded, the sensor information is learned and the turn signal in the next location to be learned will illuminate.

Check out the diagrams (Below). Please let us know what you find. We are interested to see what it is.
Was this
answer
helpful?
Yes
No
Saturday, August 17th, 2019 AT 12:59 PM (Merged)
Tiny
SDBENSON
  • MEMBER
  • 5 POSTS
Thanks for responding, the relearn fixed it so far I will get back to you if the problem reoccurs. You guys are the best!
Was this
answer
helpful?
Yes
No
Saturday, August 17th, 2019 AT 12:59 PM (Merged)
Tiny
DEANNARAE66
  • MEMBER
  • 1 POST
  • 2005 CHEVROLET TAHOE
  • V8
  • 2WD
  • AUTOMATIC
  • 43,000 MILES
I have tire pressure reading available. The pressures read correct but not for the right tire position. Do I need to re-set something? When I purchased it less than one year ago, the dealer had just installed new wheels.
Was this
answer
helpful?
Yes
No
Saturday, August 17th, 2019 AT 12:59 PM (Merged)
Tiny
ZACKMAN
  • MECHANIC
  • 4,202 POSTS
You must be talking about the Tire Pressure Monitoring System (TPMS). First off, use a manual tire pressure gauge to make sure that you have the correct pressure in that tire.

AVALANCHE, SILVERADO, SUBURBAN & TAHOE

1. Turn ignition switch to ON position, with engine off. Apply parking brake.
2. Turn headlight switch from OFF to parking lamps 4 times within 4 seconds. A double horn chirp will sound and the low tire pressure indicator will begin to flash to indicate the learn mode has been enabled (the low tire pressure indicator should continue flashing throughout the matching procedure, and "SERVICE TIRE MONITOR" message will be displayed on the DIC).

WARNING:Overinflating tires may cause personal injury or damage to the tires and wheels. When increasing tire pressure, do not exceed the maximum inflation pressure as noted on the tire sidewall.

NOTE: If a horn chirp does not sound after 35 seconds for any of the 4 sensors, turn ignition switch to OFF position to exit the learn mode. Repeat procedure from step 1.
3. Starting with left front tire, increase or decrease the pressure for 8-10 seconds, or until a horn chirp sounds. Horn chirp may occur before the 8-10 second pressure increase/decrease time period has been reached, or up to 30 seconds after the 8-10 second pressure increase/decrease time period has been reached.
4. After horn chirp has sounded, proceed as in step 3 for the next 3 sensors in the following order: right front, right rear and left rear.
5. After left rear sensor has been learned, check to see if the low tire pressure indicator is still flashing. If it is, turn ignition switch to OFF position to exit relearn procedure. Adjust all tire pressures to specification. If the low tire pressure indicator is not flashing, repeat procedure from step 1.
6. On some models, the DIC may list all 4 of the tire pressures at 0 psi after tire pressure sensor relearn procedure has been performed (although PDM/RCDLR reads correct learn value of the tires). To complete the relearn procedure on these models, drive the vehicle at highway speeds for 5 minutes.
Was this
answer
helpful?
Yes
No
+1
Saturday, August 17th, 2019 AT 12:59 PM (Merged)

Please login or register to post a reply.

Sponsored links