1996 Chevy Suburban starter

1996 CHEVROLET SUBURBAN
159,000 MILES • V8 • 4WD • AUTOMATIC
Avatar
WOLDEL
  • MEMBER
  • 12 POSTS
have replaced 5 starters and now crank sensor still getting gringing noise at starter. checked flexplate no cracks a few chipped teeth nothing major.
seems as if timing is advanced due to excess pressure at start up .no codes showing, is it possible that you must reset ecm when changing cps ????
battery was diconnected should'nt that have cleared any codes ????

stumped
Aug 1, 2009 at 12:38 PM
Advertisement
Avatar
MERLIN2021
  • CAR REPAIR CONTRIBUTOR
  • 17,250 POSTS
ANY damage to the flexplate teeth is a major deal..either you have too many shims at the starter, or that flexplate needs to be replaced. Missing and ground up teeth will ruin bendix drives on starters.
Aug 1, 2009 at 4:24 PM
Avatar
WOLDEL
  • MEMBER
  • 12 POSTS
what is causing the excess compression during start up ???? truck runs fine once started!! compression keeps bending starter bolts...
Aug 1, 2009 at 4:30 PM
Avatar
WOLDEL
  • MEMBER
  • 12 POSTS
if i unplug the ckp the starter turns fine no binding but of course no reference signal to get it started...
Aug 1, 2009 at 4:31 PM
Avatar
MERLIN2021
  • CAR REPAIR CONTRIBUTOR
  • 17,250 POSTS
When you say excess compression, do you mean it cranks slow? Or have you done a compression test? May not be a bad idea, valve springs may be weak, but if compression is actually OK, Then timing is too far advanced.
Aug 1, 2009 at 5:07 PM
Avatar
WOLDEL
  • MEMBER
  • 12 POSTS
i noticed that the flex plate was kicking back during initial crank then compression would build up an the starter would start to flex away and down from the flex plate
Aug 1, 2009 at 5:13 PM
Avatar
WOLDEL
  • MEMBER
  • 12 POSTS
i was under the impression that the timing was not adjustable which means that there is to much flex in the timing chain
Aug 1, 2009 at 5:14 PM
Avatar
WOLDEL
  • MEMBER
  • 12 POSTS
when i say pushed away i meanthat is when the alignment gets off and the grinding starts
Aug 1, 2009 at 5:18 PM
Avatar
WOLDEL
  • MEMBER
  • 12 POSTS
what are the chanches that the reluctor ring slipped??
Aug 1, 2009 at 6:17 PM
Avatar
MERLIN2021
  • CAR REPAIR CONTRIBUTOR
  • 17,250 POSTS
Try removing ALL plugs, crank engine and watch the flexplate, if it still has high spot, replace it, it's bent. With all plugs removed, how does it crank? Remove fuel pump relay for this! Ring if damaged or moved should show a code for crank sensor.
Aug 2, 2009 at 7:07 AM
Avatar
WOLDEL
  • MEMBER
  • 12 POSTS
slack in timing chain replaced it. when the marks are at 6 (o'clock cam) and 12 (o'clock crank) the distributor is pointing at coil ( general direction on cap) what is the firing order???
Aug 2, 2009 at 3:11 PM
Avatar
MERLIN2021
  • CAR REPAIR CONTRIBUTOR
  • 17,250 POSTS
Old Style


https://images.2carpros.com/forum/automotive_pictures/62217_old_Style_1.jpg

New Style


https://images.2carpros.com/forum/automotive_pictures/62217_new_Style_1.jpg

Aug 3, 2009 at 2:33 AM
Avatar
WOLDEL
  • MEMBER
  • 12 POSTS
ok i have the firing order now, what is the distributor sequence at TDC... Which cylinder should be firing at TDC.... as previously posted at TDC the rotor is pointing to the #6 wire...
Aug 3, 2009 at 4:32 AM
Avatar
MERLIN2021
  • CAR REPAIR CONTRIBUTOR
  • 17,250 POSTS
Position #1 Cylinder a TDC, then set plug wires starting with #1 wire to #1 plug, and follow the rest of the firing order sequentially. Point the rotor to fire the #1 plug! If you have the old style, it shows you are off by 180 degrees!
Aug 3, 2009 at 3:43 PM
Avatar
WOLDEL
  • MEMBER
  • 12 POSTS
checked TDC opposite of traditional timing setup (12-12) not(12-6) could there be another componet bad ?? chain is new sensor ( crank) new what next ....??????

stund
Aug 3, 2009 at 6:59 PM
Avatar
MERLIN2021
  • CAR REPAIR CONTRIBUTOR
  • 17,250 POSTS


https://images.2carpros.com/forum/automotive_pictures/62217_1_14.jpg


https://images.2carpros.com/forum/automotive_pictures/62217_2_14.jpg

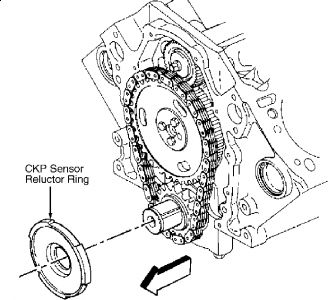
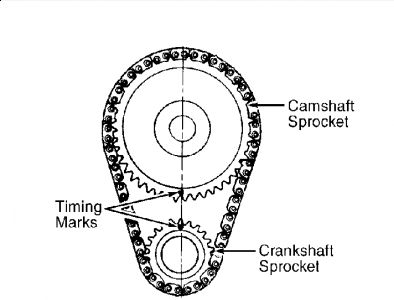
Installation 1. Install Woodruff key in crankshaft (if removed). Using Crankshaft Sprocket Installer (J-5590), install crankshaft sprocket. Install camshaft sprocket and timing chain. Ensure timing marks on sprockets are aligned. See Fig. 5 . 2. Balance shaft drive gear, driven gear and gear bolt are serviced as a set. Install and tighten camshaft sprocket bolts to specification. See TORQUE SPECIFICATIONS table. 3. Install and align CKP sensor reluctor ring. See Fig. 4 . Install NEW front cover and gasket. Tighten front cover bolts to specification. See TORQUE SPECIFICATIONS table. 4. Install CKP sensor. Tighten CKP sensor holddown bolt to specification. See TORQUE SPECIFICATIONS table. 5. Apply RTV sealant to Woodruff keyway in crankshaft balancer. Using Damper Puller/Installer (J-23523-F), install crankshaft balancer. Tighten fasteners to specification. See TORQUE SPECIFICATIONS table. To install remaining components, reverse removal procedure. Fig. 4: Removing/Installing CKP Sensor Reluctor Ring Courtesy of GENERAL MOTORS CORP. Fig. 5: Aligning Timing Marks Courtesy of GENERAL MOTORS CORP. CAUTION: Failure to properly align CKP sensor reluctor ring may result in component damage and could affect system performance. CKP sensor reluctor ring is shaped like a dish. Dished side of CKP sensor reluctor ring must face engine front cover. NOTE: DO NOT reinstall original composite front cover. Always install a NEW front cover. Reinstalling original front cover can lead to oil leaks. CAUTION: Ensure CKP sensor is fully seated and held stationary in bore of front cover upon installation. A CKP sensor that is not fully seated may result in erratic engine operation. Page 1 of 1 8/5/2009 First get engine to top dead center with compression gauge or compression whistle , next rotate harmonic balancer so the slot is matched between the little numbs on the timing cover. Next remove rotor button on the distributor now the number eight will be on top of a square hole under rotor button .You need to move that over to the little pointer on the inside of the outer part of the distributor it has a pointer with a number 6 on it (it should be on the passenger side ). Lift up distributor and move the number 8 on the center part till you are over or just before the little pointer on the outer edge of the plastic distributor. If not all the way down in, the oil pump is not clocked in properly hold down on the distributor and have some one click the starter make sure you unplug the coil though and just a couple clicks holding dowm on the rotor top of distributor that should bring it in place. Put back together and try to start the vehicle and then if it stats do the timing set up for syc through the scanner at 1500 rpm move distributor till you see +- 2degrees . Thn tighten your distributor and test drive .
Aug 5, 2009 at 3:41 PM
Repair Safety Notice: This information is for general instructional purposes only. Vehicle repair can be dangerous. Verify all information, follow manufacturer service procedures, use proper tools and safety equipment, and consult a qualified repair shop when needed.