How to bypass the VATS (PASSKey II) system in a late model GM vehicle
This document pertains to the following vehicles:
Pontiac
1994-1996 Grand Prix
1992-1999 Bonneville
1993-2002 Firebird/Trans Am/Firehawk
Buick
1994-1996 Regal
1992-1999 LeSabre
1991-1996 Park Avenue
1991-1996 Roadmaster
Oldsmobile
1994-1997 Cutlass Supreme
1992-1999 Eighty Eight/LSS/Ninety Eight/Regency
1991-1996 Custom Cruiser Wagon
Chevrolet
1995-1999 Monte Carlo
1995-2001 Lumina
1993-2002 Camaro
1986(?)-1996 Corvette (C4)
Cadillac
1991-1996 Fleetwood
1992-1997(?) Seville/STS/DeVille
Any other GM Vehicles with the VATS or PASSKey II system (If your ignition key looks like the one pictured below.)
Before we begin, here's a question to ponder:
-- When you insert your ignition key and attempt to start the car, will the car not even attempt to crank over? Does the "Security" light flash during any time you're attempting to start the car?
The simple solution is to first clean off the chip on your key or try another key for the same car. If that also doesn't work, then follow my instructions for a fast, simple, and relatively inexpensive repair.
**NOTE** After performing the following procedure, your vehicle's factory starter interrupter (VATS) will be disabled. A thief will be able to steal your car much easier than if the VATS system were enabled.
***Now that being said, I want to stress that I am not an expert on the VATS system, by no means. I simply stumbled across a way to bypass a malfunctioning "reader" in the ignition lock cylinder. On my 92 LeSabre, the wires running from under the dash to the "reader" broke inside the steering column, and I didn't feel like pulling the column apart to fix or replace the lock cylinder. Using a Factory Service Manual, I located the wires in question and created the "resistor pack" to jumper accross them.
Just to reiterate: I am not an expert on this system, and know nothing more than how to bypass the "reader" in the ignition lock cylinder. Please follow the links at the end of this document for further help.
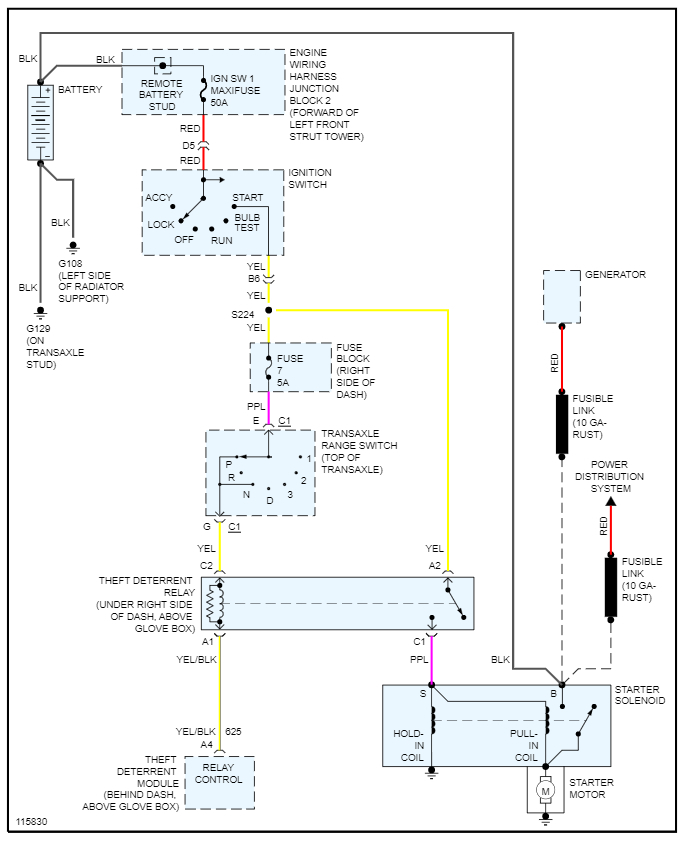
With that out of the way, here's an explanation of the VATS system (which I culled from a locksmith selling VATS blanks on eBay.)
WHAT IS VATS?
Vats stands for Vehicle Anti Theft System. Lots of people refer to this type of key, as a " computer Chip key". This key or "Chip" has nothing to do with a computer, nor is it a chip. But because of the popularity of calling it a computer chip key, so will we. So that we don’t confuse. The black chip on the blade of the key, is actually a resistor. GM first started using the Vats key in 1986 on the Corvetts, then some of the Cadillacs, ect. GM uses 15 different resistors in their VATS keys. Just by looking at the keys you can’t tell the difference.
How does the VATS System work?
Each VATS key has it’s own unique cuts on the key to operate the lock. but the cuts alone will not allow the car to crank. This is called a mechanical key. Each car has a VATS module (Brain) under the dash that communicates to the starter, fuel pump, and the ignition lock. Each VATS module is randomly given a # (value) from the manufacturer. When the proper mechanical keys, along with the proper VATS chip (resistor value) turns the ignition lock, the VATS module reads the chip on the key . If it is the correct chip, the VATS module will tell the starter and the fuel pump to operate. If the wrong chip is read, the VATS module will tell the starter and the fuel pump to shut down.
How to determine the Value of your key:
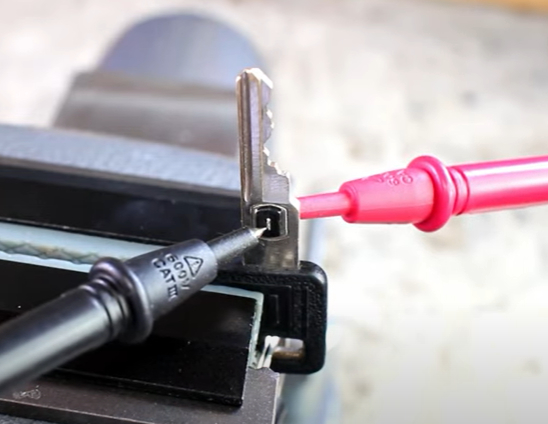
By chance you may know what VATS key you now have. Most people do not. There are basically two ways to determine what VATS key you have. Remember, there are 15 differrent possibilities. First, your key can be "read" in a VATS tester. Most locksmiths have these readers, and don’t change anything to tell you. There is another way for you to read the key value yourself. If you have a Volt Meter you can test the OHMS (resistance value) of the chip yourself. Just set your Volt meter to check OHMS, take each lead and place it on each side of the "chip" on your key. A number will appear. Take that number on your volt meter and apply it to the OHMS chart below. Keep in mind that it may not be exact. Just pick the closest value to your reading.
This chart is for any GM product, Buick, Cadillac, Oldsombile, Chevrolet, and Pontiac that has a VATS key (single or double-sided.)
VATS # (K)OHMS (Set your meter to the 20k ohm setting)
0.402
0.523
0.681
-0.887
-1.130
-1.470
-1.870
-2.370
-3.010
3.740
4.750
6.040
7.500
9.530
11.801
Okay, onward we go!
Tools and supplies needed:
Soldering Iron
Wire Cutters/Strippers/Crimper
Voltmeter/Ohmmeter (DMM)
Approx. 8 inches of 16 ga. wire (speaker wire works great)
"Bullet-Style" solderless connectors
Heat Shrink Tubing
Resistors of varying values (totalling the resistance measured across the key's "pellet")
Alright, let's begin the madness:
1. Take your DMM, set it to measure Ohms (use the 20k setting.) Measure the resistance across the pellet of the ignition key. Place one probe on the silver part of one side of the pellet, and the other probe on the other side. Write this value down.
2. Purchase a resistor or resistors that add up to the value measured in step 1. Radio Shack is a great place to go for the resistors, heat shrink tubing, and the "bullet-style" solderless connectors.
3. Take the 16 ga. wire and cut into 2 four-inch pieces.
4. Strip off approx 1/16" of insulation off each side of both wire pieces.
5. Put your resistors together in series (or if you're lucky and have a chip that has a resistance that matches a single resistor) and solder one wire to one end of the resistor(s) and the other wire to the other side.
Example: You measure 11.72 on the 20k (k meaning kilo or 1,000) scale. The closest match is 11.801 which is a #15 "chip." Always remember that resistors have a tolerance of 2%, meaning the resistance value of the "pellet" can be either 2% higher or 2% lower than 11.801 k ohms (11.72 falls in tolerance range.) You will want to aim for 11,801 ohms. So when you go to Radio Shack you want to pick up a 10,000 ohm (10k,) a 1,000 ohm (1k,) and an 800 ohm resistors to wire together in series to achieve the 11.801k ohm value.
Here's an example of how you'd connect the above mentioned resistors in "series"
wire10k ohmI1k ohmI800 ohmwire
6. Measure the resistance across the 2 wires now that the resistors are soldered to them. Be absolutely sure the value matches that of the resistor pellet in the ignition key (within 2% up or down.)
7. Cut a length of heat-shrink tubing to cover up the resistors, allowing a small bit to hang over onto each of the 2 wires. Use a lighter or heat gun to shrink the tubing.
8. On one of the wires, crimp on a male bullet connector, and on the other wire crimp on a female bullet connector.
9. Now what you have should look like this:
Notice in the above "resistor pack" I lucked out and only needed 1 resistor to match the pellet's resistance. You may not be so lucky...
10. Now move to the car. Remove the under-dash kick panel.
11. Look for an orange wire running down the steering column. This wire should have a "rubbery" feel to it, and it is the only orange wire running from the column.
**WARNING** Do not tamper with any of the wires near the column wrapped in yellow harness tape or any yellow wire. These wires are for the airbag. Tampering with any of these wires could result in the airbag discharging.
12. Cut this wire (there are 2 small wires inside) and strip back the insulation on the wires on the opposite side of the steering column.
13. Install a male bullet connector to one of the 2 wires, and a female on the other.
14. Plug in your "resistor pack" that you made by mating the male and female bullet connectors.
15. Attempt to start the car. If your problem was with the VATS reader in the ignition lock cylinder, this will start the car.
If this won't start the car, then the problem is in the VATS module. If the VATS module is bad, remove the resistor pack. Strip the insulation off the other side of the main wire cut (running from the column) and place a male connector on one wire and a female on the other. Plug the 2 halves back together to restore the function of the VATS reader.
Before signing off, I have received some more info from a fellow W-Body.com forum member.
From WhiteMonteZZZ :
If VATS is disabled (via your site), then additional keys without the VATS pellet are able to be purchased (and used) at most local hardware stores. The keyblank needed would be an ILCO (or equivalent) B62 blank (this has GM's 'A' keyway, no resistor, and typically was used on Cadillac Allante vehicles). The original key can be cut onto this blank, but the head typically needs to be filed down at the part nearest the ignition lock 2-3 mms. The standard B62 blank will hit the face of the igniton lock, so by shortening the head of the blank, you're in turn lengthening the blank.
He also says you can trim the plain-ole ignition key down with a dremel tool. Here is a pic he sent to me showing the new "trimmed" key:
You can plainly see where the key is cut by the outline drawn on the paper beneath the lower key.
Adding to WhiteMonteZZZ's suggestion, I recently received an idea from another W-Body.com member. stockgp recommends using an "AXXESS" brand key, blank #4. The head of the key is longer, and thus can be trimmed to the exact shape of a VATS key:
I've seen these keys sold at Wal-Mart in the past (not sure if they have them anymore) and stockgp says he bought his at "Busy Beaver" (in the Pittsburgh area.) I recall K-Mart having sold these keys as well.
Many thanks to WhiteMonteZZZ and stockgp for their very helpful suggestions!
Now to conclude the document, I have been shown a way to completely bypass the VATS module altogether. The VATS module generates a 30/50hz ground pulsed signal to the ECM/PCM to enable the fuel injectors. There is a way to fool the ECM/PCM into seeing that signal. You will need to build your own signal generator with parts from Radio Shack.
Many thanks to James, a.k.a. "Turbocharged400SBC" on the W-Body and W-Bodysource forums for that info!
Any questions or comments?
Jul 21, 2008 at 10:38 PM