Hi and thanks for using 2CarPros. Com. To remove the fuel tank will require more than on size. However, if you are referring to the fuel tank retaining straps, I believe they are 14mm.
Here are specific directions for replacing the tank in your vehicle. I have also attached pictures to help guide you.
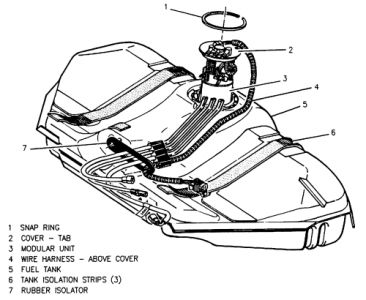
FUEL TANK REPLACEMENT
REMOVAL PROCEDURE
Remove the negative battery cable.
Drain the fuel tank.
Raise the vehicle and suitably support.
Grasp the fuel filter quick-connect fitting. Twist quick-connect fitting 1/4 turn in each direction to loosen any dirt within fitting.
CAUTION: Wear safety glasses when using compressed air in order to prevent eye injury.
Using compressed air, blow out the dirt from the quick-connect fitting at end of fuel filter quick connect.
Remove the quick connect fittings by pulling release tabs back on the fuel line quick connector and pulling apart.
Remove the muffler hanger bolts.
Remove the exhaust rubber hangers. Allow exhaust system to rest on rear axle.
Remove the hoses at the tank from the filler, vent and vapor pipes.
With the aid of an assistant, support the fuel tank and disconnect the two fuel tank retaining straps.
Lower the fuel tank (1).
Remove the fuel tank pressure sensor electrical connector.
Remove the fuel sender electrical connector.
Remove the tank from vehicle.
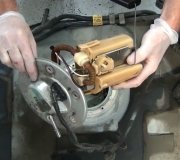
Remove the fuel sender assembly from the tank.
INSTALLATION PROCEDURE
IMPORTANT: Inspect all connectors for dirt and burrs. Clean or replace components/assemblies as required. Fuel line O-rings for cuts, nicks, swelling or distortion. Replace if necessary.
Install the fuel sender assembly to tank.
With aid of an assistant, raise the fuel tank to the body.
Install the fuel tank pressure sensor electrical connector.
Install the fuel tank sender electrical connector.
Install the fuel tank (1).
Install the fuel tank retaining straps. Tighten the bolts to 35 Nm (26 lb ft).
Install the hoses to filler, vent and vapor pipes.
Install the exhaust rubber hangers.
Install the muffler hanger bolts. Tighten the bolts to 15 Nm (11 lb ft).
CAUTION: Always apply a few drops of clean engine oil to the male pipe ends before connecting fuel pipe fittings In order to reduce the risk of fire and personal injury.
This will ensure proper reconnection and prevent a possible fuel leak.
During normal operation, the O-rings located in the female connector will swell and may prevent proper reconnection if not lubricated.
Install the nylon fuel feed and return line quick-connect fittings.
Apply a few drops of clean engine oil to the male connector tube ends.
Push connectors together to cause the retaining tabs/fingers to snap into place.
Once installed, pull on both ends of each connection to make sure they are secure.
Lower the vehicle.
Refill the tank.
Install the negative battery cable.
Inspect for fuel leaks through the following steps:
14.1. Turn the ignition switch to the ON position for 2 seconds.
14.2. Turn the ignition switch to the OFF position for 10 seconds.
14.3. Turn the ignition switch to the ON position.
14.4. Check for fuel leaks.
I hope this helps.
Take care,
Joe
Images (Click to make bigger)
Wednesday, May 12th, 2021 AT 7:03 PM
(Merged)