Hi bobthom,Welcome to 2carpros and TY for the donation-this is what keeps our site going.
**1988 Chevy Truck Astro Van M L4-151 2.5L**
WARNING: To reduce the risk of fire and personal injury when the fuel line is disconnected, cover the fuel line with a shop cloth to collect the fuel, and then place the cloth in an approved container.
REMOVAL:
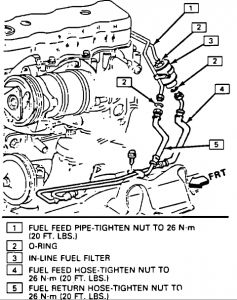
1.Disconnect the fuel lines from the filter (under hood). NOTE: Use a back-up wrench to prevent filter, O-ring, or fuel line damage.
2.Remove the filter from the car.
INSTALLATION:
1.Install the new filter in position loosely.
2.Using new O-rings, install the fuel lines into the filter. NOTE: Use a back-up wrench to prevent filter, O-ring, or fuel line damage.
3.Torque line fittings to 30 Nm (22 lb-ft).
4.Secure the filter in the bracket.
5.START the engine and inspect for leaks.
NOTE: Refer to FUEL PUMP/FUEL GAUGE SENDING UNIT for fuel strainer removal.
**1988 Chevy Truck Astro Van M V6-262 4.3L**

WARNING: To reduce the risk of fire and personal injury when the fuel line is disconnected, cover the fuel line with a shop cloth to collect the fuel, and then place the cloth in an approved container.
REMOVAL:
1.Raise vehicle.
2.Disconnect the fuel lines from the filter. NOTE: Use a back-up wrench to prevent filter, O-ring, or fuel line damage.
3.Remove the filter from the car.
INSTALLATION:
1.Install the new filter in position loosely.
2.Using new O-rings, install the fuel lines into the filter. NOTE: Use a back-up wrench to prevent filter, O-ring, or fuel line damage.
3.Torque line fittings to 30 Nm (22 lb-ft).
4.Secure the filter to the vehicle.
5.Lower the vehicle.
6.START the engine and inspect for leaks.
NOTE: Refer to FUEL PUMP/FUEL GAUGE SENDING UNIT for fuel strainer removal.
Sep 16, 2010 at 9:16 PM