Hello -
I gave you a little more in case you needed it.
FRONT DOOR PANEL REMOVAL/INSTALLATION
Special Tools Required
"¢ KTC trim tool set SOJATP2014*
"¢ Trim pad remover, Snap-on A 177A or equivalent, commercially available
*Available through the American Honda Tool and Equipment Program; call 888-424-6857
NOTE: Use the appropriate tool from the KTC trim tool set to avoid damage when prying components.
1. Lower the glass fully.
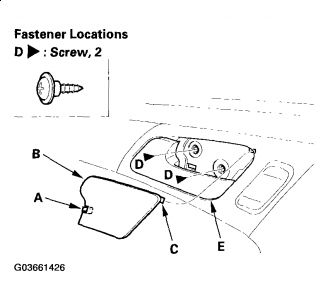
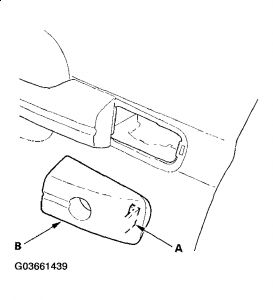
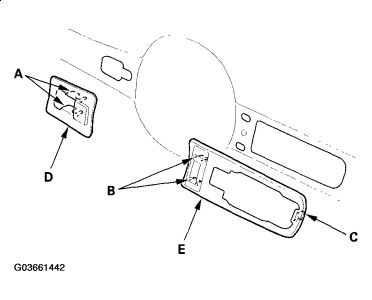
2. Using a trim tool, push on the rear hook (A) and pivot the cover (B) on the front hook (C), then remove the cover and the screws (D) securing the inner handle (E).
Fig. 6: Pushing On Rear Hook And Pivot Cover On Front Hook Using Trim Tool
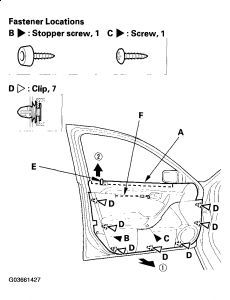
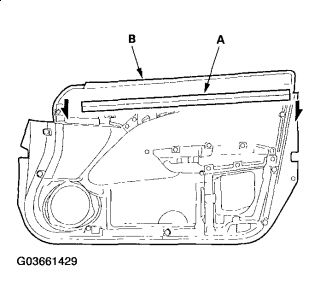
3. Remove the door panel (A) with as little bending as possible to avoid creasing or breaking it.
o -1 Remove the stopper (B) and screw (C) from the door panel.
o -2 Release the clips (D) that hold the door panel with a commercially available trim pad remover.
o -3 Starting at the rear, pull the door panel upward, then release the lock knob (E).
NOTE: The inner handle cable (F) is connected to the door panel. Do not pull the door panel up too far, or the inner handle cable will be damaged.
4. Fig. 7: Removing Door Panel
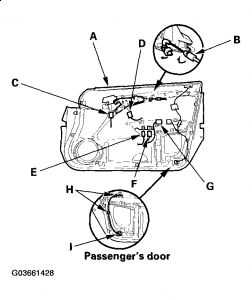
5. While holding the door panel (A) away from the door, disconnect the inner handle cable (B), driving position memory switch connector (C) (driver's door), power door lock switch connector (D), power window switch connector (E, F), harness connector (G) (driver's door), door courtesy light harness clips (H) (passenger's door), and remove the door courtesy light (I) (passenger's door) by turning it counterclockwise one quarter turn.
Fig. 8: Disconnecting Inner Handle Cable
6. If necessary, remove the door glass inner weatherstrip (A) from the door panel (B) by pulling it down.
Fig. 9: Removing Door Glass Inner Weatherstrip From Door Panel
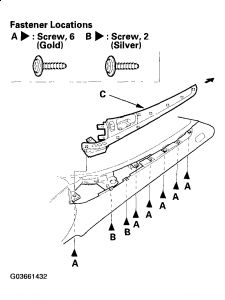
7. Remove the screws (A), then remove the door grip (B).
Fig. 10: Removing Door Grip
8. Remove the power window switch panel (A).
o - Remove the screws (B), then remove the armrest (C).
o - Release the hooks (D) and clip (E), then remove the power window switch panel.
Fig. 11: Removing Power Window Switch Panel
Courtesy of AMERICAN HONDA MOTOR CO., INC.
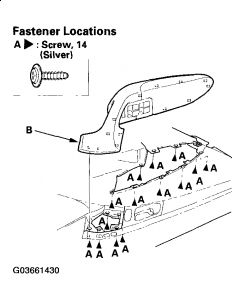
9. Remove the screws (A, B), then remove the door trim (C).
Fig. 12: Removing Door Trim
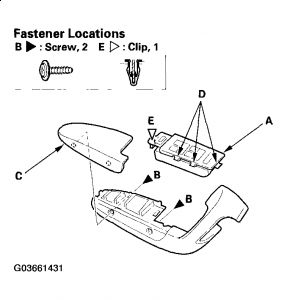
10. Remove the inner handle (A) by releasing the hook (B).
Fig. 13: Removing Inner Handle

11. Install the door panel in the reverse order of removal, and note these items:
"¢ Check for damaged or stress-whitened clips, and replace them with new ones.
"¢ Make sure the connectors are plugged in properly, and the cable is connected properly.
"¢ Make sure the window and power door lock operate properly.
"¢ Reset the power window control unit (see RESETTING THE POWER WINDOW CONTROL UNIT ) on the door that the panel was removed from.
FRONT DOOR OUTER HANDLE REPLACEMENT
NOTE: Put on gloves to protect your hands.
1. Remove these items:
"¢ Door panel (see FRONT DOOR PANEL REMOVAL/INSTALLATION)
"¢ Plastic cover, as necessary (see COMPONENT LOCATION INDEX - FRONT DOOR)
2. Raise the glass fully.
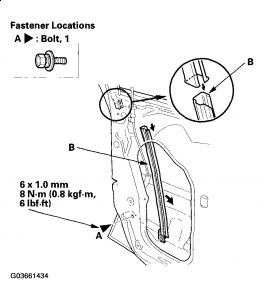
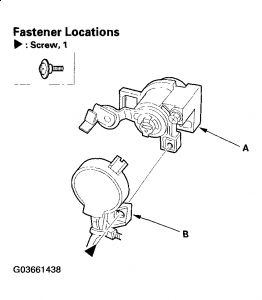
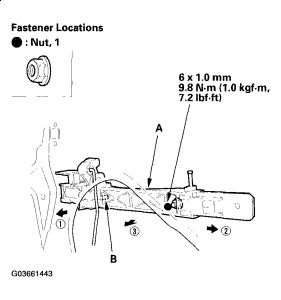
3. Remove the bolt (A), then remove the center lower channel (B) by pulling it downward.
NOTE: Be careful of sharp edges.
4. Fig. 14: Removing Center Lower Channel Pulling Downward
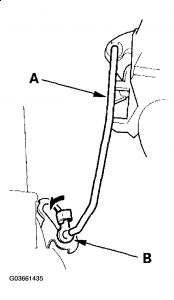
5. Disconnect the outer handle rod (A) from the bushing (B).
NOTE: Check the bushing for damage and replace if necessary.
6. Fig. 15: Disconnecting Outer Handle Rod From Bushing
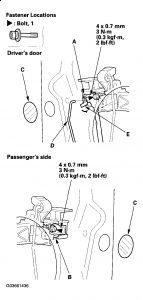
7. Remove the lock cylinder (A) (driver's door) or outer handle cover (B) (passenger's side).
"¢ - Remove the maintenance hole seal (C).
"¢ - Loosen the bolt securing the lock cylinder (driver's door), or outer handle cover (passenger's side).
"¢ - Disconnect the cylinder rod (D) (driver's door) from the bushing (E).
NOTE: "¢ Hold the lock cylinder (driver's door) or outer handle cover (passenger's side) with your hand to prevent it from falling when removing the bolt.
"¢ Check the bushing for damage and replace if necessary.
Fig. 16: Removing Lock Cylinder (Driver's Door) Or Outer Handle Cover (Passenger's Side)
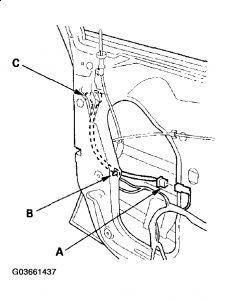
8. Disconnect the cylinder switch connector (A), and detach the harness clip (B), then remove the cylinder switch (C) (driver's door).
Fig. 17: Disconnecting Cylinder Switch Connector
9. Remove the screw, then separate the lock cylinder (A), cylinder switch (B) (driver's door).
NOTE: Keep your hand over the outer handle cover to prevent it from falling during removal.
10. Fig. 18: Separating Lock Cylinder
11. Release the hook (A), and then remove the outer handle cover (B).
Fig. 19: Removing Outer Handle Cover
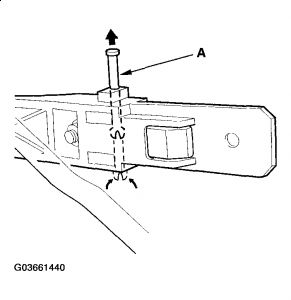
12. Pull the pin (A) up while pinching its lower end.
Fig. 20: Pulling Pin Pinching Lower End
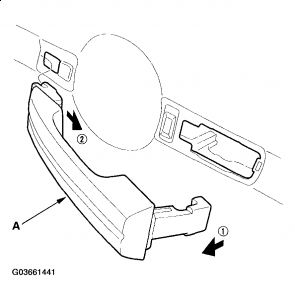
13. Pull the outer handle (A) out, and then back as shown to remove it from the door panel. Take care not to scratch the door.
Fig. 21: Pulling Outer Handle Out
Courtesy of AMERICAN HONDA MOTOR CO., INC.
14. Release the hooks (A, B, C), then remove the outer handle front seat (D) and outer handle rear seat (E).
Fig. 22: Removing Outer Handle Front And Rear Seat
15. Remove the outer handle base (A).
"¢ - Loosen the nut.
"¢ - Release the tab (B) and slide the outer handle base forward.
Fig. 23: Removing Outer Handle Base
16. Disconnect the outer handle rod (A) from outer handle base (B).
Fig. 24: Disconnecting Outer Handle Rod From Outer Handle Base

17. Install the handle in the reverse order of removal, and note these items:
"¢ Reinstall the lock cylinder (driver's door) or the outer handle holder (passenger's door) before installing the outer handle cover.
"¢ Make sure the cylinder switch harness is routed properly (driver's door).
"¢ Make sure the cylinder switch connector is plugged in properly, and each rod is connected securely (driver's door).
"¢ Make sure the door key cylinder/door locks operate properly (driver's door).
"¢ Make sure the door handle works properly.
"¢ When reinstalling the door panel, make sure the plastic cover is installed properly and sealed around its outside perimeter to prevent water leaks.
FRONT DOOR LATCH REPLACEMENT
NOTE: Put on gloves to protect your hands.
1. Raise the glass fully.
2. Remove these items:
"¢ Door panel (see FRONT DOOR PANEL REMOVAL/INSTALLATION)
"¢ Plastic cover, as necessary (see COMPONENT LOCATION INDEX - FRONT DOOR)
"¢ Center lower channel (see step 3. )
3. Disconnect the cylinder rod from the lock cylinder, and disconnect the outer handle rod from the outer handle (see step 5 ).
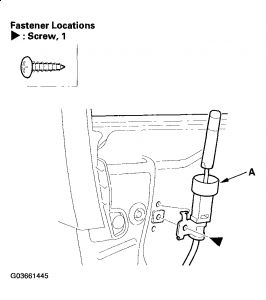
4. Remove the screw securing the lock knob (A).
Fig. 25: Removing Screw Securing Lock Knob
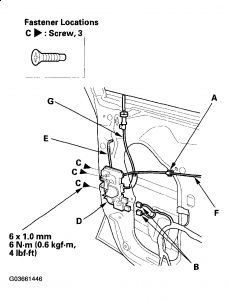
5. Detach the inner handle cable clip (A), and disconnect the actuator connectors (B). Remove the screws (C), then remove the latch (D) through the hole in the door. Take care not to bend the cylinder rod (E), inner handle cable (F), and lock cable (G).
Fig. 26: Detaching Inner Handle Cable Clip
6. Install the latch in the reverse order of removal, and note these items:
"¢ Make sure the actuator connectors are plugged in properly, and each rod is connected securely.
"¢ Make sure the door locks and opens properly.
"¢ When reinstalling the door panel, make sure the plastic cover is installed properly and sealed around its outside perimeter to prevent water leaks.
Mar 31, 2009 at 10:34 PM