Hi,
The actuators aren't too easy to get to. I am going to provide the directions from the manual. You mentioned that you are okay with the blend doors, so I'm not including them. If you need them, let me know.
Here are directions for replacement. First is the mode door actuator. As far as the mode door, the instrument panel needs removed. I will provide those directions as well. All pics correlate with the directions.
________________--
2008 Cadillac STS AWD V6-3.6L
Mode Actuator Replacement
Vehicle Heating and Air Conditioning Air Door Actuator / Motor Service and Repair Removal and Replacement HVAC - Automatic Mode Actuator Replacement
MODE ACTUATOR REPLACEMENT
Mode Actuator Replacement
Removal Procedure
1. Remove the instrument panel (I/P) carrier. Refer to Instrument Panel Carrier Replacement (See: Dashboard / Instrument Panel > Removal and Replacement).
Pic 1
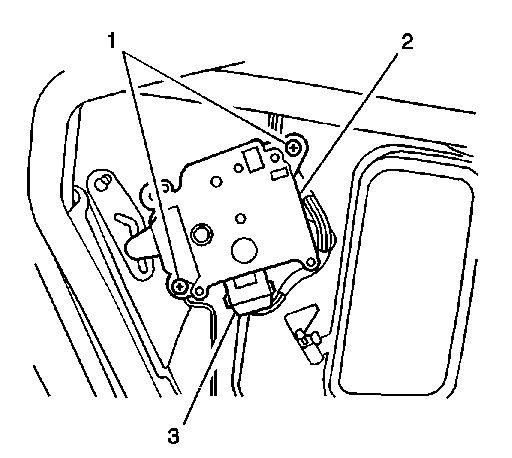
2. Disconnect the mode actuator electrical connector.
Pic 2
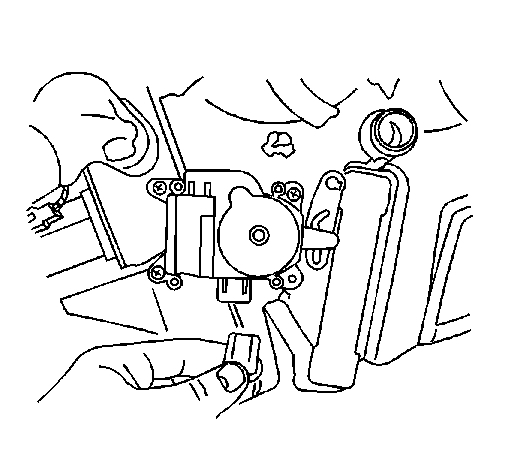
3. Remove the mode actuator screws (3).
Pic 3
4. Remove the mode actuator.
Installation Procedure
pic 4
1. Install the mode actuator.
Pic 5
Notice: Refer to Fastener Notice.
2. Install the mode actuator screws (2).
Tighten the screws to 1 N.M (9 lb in).
Pic 6
3. Connect the electrical connector to the actuator.
4. Install the I/P carrier. Refer to Instrument Panel Carrier Replacement (See: Dashboard / Instrument Panel > Removal and Replacement).
________________________________________
Here are directions for replacement of the IP carrier. You aren't replacing it, but these are the directions I have which include removal and replacement.
_____________________________________
2008 Cadillac STS AWD V6-3.6L
Instrument Panel Carrier Replacement
Vehicle Body and Frame Interior Moulding/Trim Dashboard /Instrument Panel Service and Repair Removal and Replacement Instrument Panel Carrier Replacement
INSTRUMENT PANEL CARRIER REPLACEMENT
Instrument Panel Carrier Replacement
Removal Procedure
1. Remove the front seats. Refer to Bucket Seat Replacement (See: Seats > Removal and Replacement > Bucket Seat Replacement).
2. Remove the instrument panel retainer. Refer to Instrument Panel Retainer Replacement (See: Dashboard / Instrument Panel > Removal and Replacement).
3. Lower the steering column. Refer to Steering Column Replacement (without JL7) (See: Steering Column > Removal and Replacement > Steering Column Replacement (without JL7))Steering Column Replacement (with JL7) (See: Steering Column > Removal and Replacement > Steering Column Replacement (with JL7)).
Pic 7
Important: Note the position of the wire harness.
4. Disconnect the wire harness connector and clips on the drivers side of the vehicle.
Pic 8
5. Remove the wire harness clips in the center of the instrument panel.
Pic 9
6. Disconnect the wire harness connectors and the harness clips on the passenger side of the instrument panel.
Pic 10
7. Loosen the nuts securing the instrument panel carrier brackets to the pedal assembly.
The nuts do not have to be removed.
Pic 11
8. Remove the fasteners securing the carrier to the cowl.
9. Remove the bolt securing the carrier to the HVAC housing.
Pic 12
10. Move the carrier back away from the cowl far enough to disconnect the wire harness retaining clips off of the carrier.
Pic 13
11. Remove the carrier from the vehicle.
Installation Procedure
pic 14
1. Connect the wire harness retaining clips to the rear of the carrier.
Pic 15
2. Locate the carrier on to the pedal assembly brackets.
Tighten the nuts securing the instrument panel carrier brackets to the pedal assembly to 25 N.M (18 lb ft)
pic 16
3. Install the carrier to the vehicle.
4. Install the wire harness back into noted position.
Pic 17
Notice: Refer to Fastener Notice (See: Vehicle > Vehicle Damage Warnings > Fastener Notice).
5. Install the fasteners securing the carrier to the cowl.
Tighten the bolts to 9 N.M (80 lb in).
6. Install the bolt securing the carrier to the HVAC housing.
Tighten the bolt to 9 N.M (80 lb in).
Pic 18
7. Connect the wire harness connectors and the harness clips on the passenger side of the instrument panel.
Pic 19
8. Install the wire harness clips in the center of the instrument panel.
Pic 20
9. Connect the wire harness connector and clips on the drivers side of the vehicle.
10. Install the steering column. Refer to Steering Column Replacement (without JL7) (See: Steering Column > Removal and Replacement > Steering Column Replacement (without JL7))Steering Column Replacement (with JL7) (See: Steering Column > Removal and Replacement > Steering Column Replacement (with JL7)).
11. Install the instrument panel retainer. Refer to Instrument Panel Retainer Replacement (See: Dashboard / Instrument Panel > Removal and Replacement).
12. Install the front seats. Refer to Bucket Seat Replacement (See: Seats > Removal and Replacement > Bucket Seat Replacement).
________________________________________
The one above you identified as the air adjustment control motor I believe to be the fresh air door actuator. There is nothing listed as you mentioned.
Here are directions for that.
2008 Cadillac STS AWD V6-3.6L
Re-circulation Actuator Replacement
Vehicle Heating and Air Conditioning Air Door Actuator / Motor Service and Repair Removal and Replacement HVAC - Automatic Re-circulation Actuator Replacement
RE-CIRCULATION ACTUATOR REPLACEMENT
Re-circulation Actuator Replacement
Removal Procedure
1. Remove the air inlet assembly. Refer to Air Inlet Assembly Replacement (See: Air Duct > Removal and Replacement > Air Inlet Assembly Replacement).
Pic 21
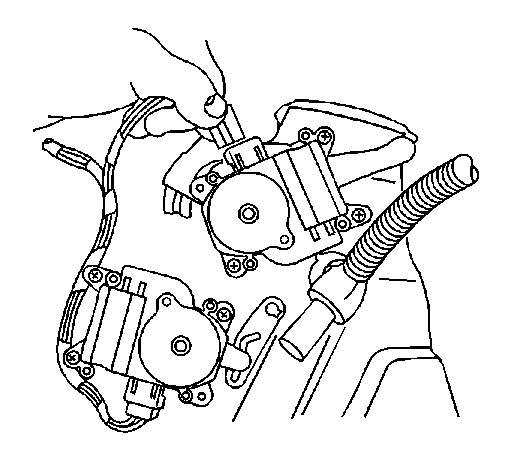
2. Disconnect the electrical connector from the re-circulation actuator.
Pic 22
3. Remove the re-circulation actuator screws (1).
4. Remove the re-circulation actuator.
Installation Procedure
pic 23
1. Install the re-circulation actuator.
Notice: Refer to Fastener Notice.
2. Install the re-circulation actuator screws (1).
Tighten the screws to 1 N.M (9 lb in).
Pic 24
3. Connect the electrical connector to the re-circulation actuator.
4. Install the air inlet assembly. Refer to Air Inlet Assembly Replacement (See: Air Duct > Removal and Replacement > Air Inlet Assembly Replacement).
___________________________________________
Here are the directions for the air inlet replacement.
2008 Cadillac STS AWD V6-3.6L
Air Inlet Assembly Replacement
Vehicle Heating and Air Conditioning Air Duct Service and Repair Removal and Replacement Air Inlet Assembly Replacement
AIR INLET ASSEMBLY REPLACEMENT
Air Inlet Assembly Replacement
Removal Procedure
1. Remove the instrument panel (I/P) compartment. Refer to Instrument Panel Compartment Replacement (See: Glove Compartment > Removal and Replacement).
2. Remove the closeout panel. Refer to Instrument Panel Insulator Panel Replacement - Right Side (See: Dashboard / Instrument Panel > Removal and Replacement) or Instrument Panel Insulator Panel Replacement - Left Side (See: Dashboard / Instrument Panel > Removal and Replacement).
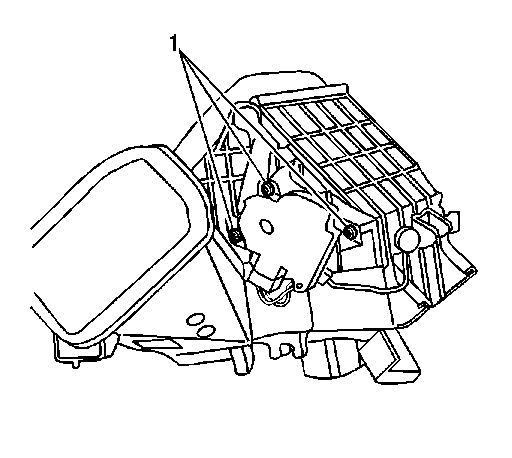
Pic 25
3. Remove the upper air inlet assembly bolts (1).
Pic 26
4. Remove the lower right air inlet assembly bolt (1).
5. Slide the assembly to the right and then lower.
Pic 27
6. Disconnect the air inlet assembly electrical connector (1).
Pic 28
7. Rotate the air inlet assembly (1) and remove.
Installation Procedure
pic 29
1. Connect the air inlet assembly electrical connector (1).
Pic 30
2. Install the air inlet assembly (1) to the locator pin.
Pic 30
Notice: Refer to Fastener Notice (See: Vehicle > Vehicle Damage Warnings > Fastener Notice).
3. Install the upper air inlet assembly bolts (1).
Tighten the bolt to 9 N.M (80 lb in).
Pic 31
4. Install the lower right air inlet assembly bolt (1).
Tighten the bolt to 9 N.M (80 lb in).
5. Install the I/P compartment. Refer to Instrument Panel Compartment Replacement (See: Glove Compartment > Removal and Replacement).
6. Install the closeout panel. Refer to Instrument Panel Insulator Panel Replacement - Right Side (See: Dashboard / Instrument Panel > Removal and Replacement) or Instrument Panel Insulator Panel Replacement - Left Side (See: Dashboard / Instrument Panel > Removal and Replacement).
____________________________________________
Images (Click to make bigger)
SPONSORED LINKS
Sunday, August 23rd, 2020 AT 9:03 PM