2003 Chevrolet Cavalier Timing Belt Replacment

Tiny
CRBCRB
  • MEMBER
  • 2003 CHEVROLET CAVALIER
  • 2.2L
  • 4 CYL
  • FWD
  • AUTOMATIC
  • 241,000 MILES
First off thank you for any information given. I have a 2003 Chevy Cavalier with 242,000 miles, many of them freeway. It sounds as if the valves need adjustment but when I made that suggestion to my father he made much sense when he said its probably your timing belt. Now I got a dilemma, do I replace it by self, have a repair shop do it or does my engine have so many miles it wouldn't make sense to replace it either way? We have a shop but its without a car lift. The only thing I got is a jack, stands and ramps. Do you have to remove the engine which would create a need for removing my engine or can I do it without removing the engine? Any help would be appreciated. Corey
Saturday, February 8th, 2014 AT 5:31 AM

6 Replies

Tiny
HMAC300
  • MECHANIC
  • 48,601 POSTS
If you aren't familiar with this then have a pro do it as you can bend valves if not done correctly. Have the pro look at it to make sure nothing else is wrong prior to doing this the noise may be cam/lifter wear.
Was this
answer
helpful?
Yes
No
Saturday, February 8th, 2014 AT 6:16 AM
Tiny
CRBCRB
  • MEMBER
  • 4 POSTS
I feel very comfortable with my mechanical ability, I'm a past diesel tech now servicing jets or aircraft for the military. I just don't want to start and find out I had to remove the engine to accomplish my goal. Is a car lift or removing the engine necessary to accomplish my goal? Thanks Corey
Was this
answer
helpful?
Yes
No
+1
Saturday, February 8th, 2014 AT 6:24 AM
Tiny
CRBCRB
  • MEMBER
  • 4 POSTS
I feel I must add that understand and will line up the timing marks on the timing pulleys. Corey
Was this
answer
helpful?
Yes
No
Saturday, February 8th, 2014 AT 6:25 AM
Tiny
HMAC300
  • MECHANIC
  • 48,601 POSTS
We dont' know anyone's mechanical capapbility the engine wil have to be jacked up a little and supported as the front motor mount hs to come off. This car has a chain and you shold either rent a book or get one because it is is pretty complicated. I am sending tips that a pro has posted to help with this though. There are picture with this however I can't send all of them. There is a lot left out of this procedure, and some things need clarification or more emphasis.

Some pointers and better pictures.

First, read through all the procedures and note the recommendation for new cam bolts, and crank bolt.

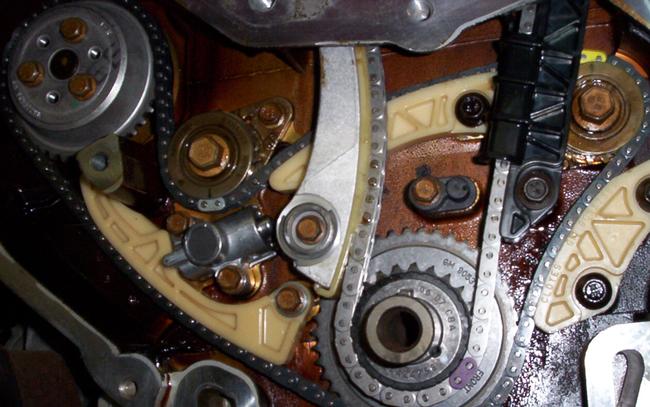
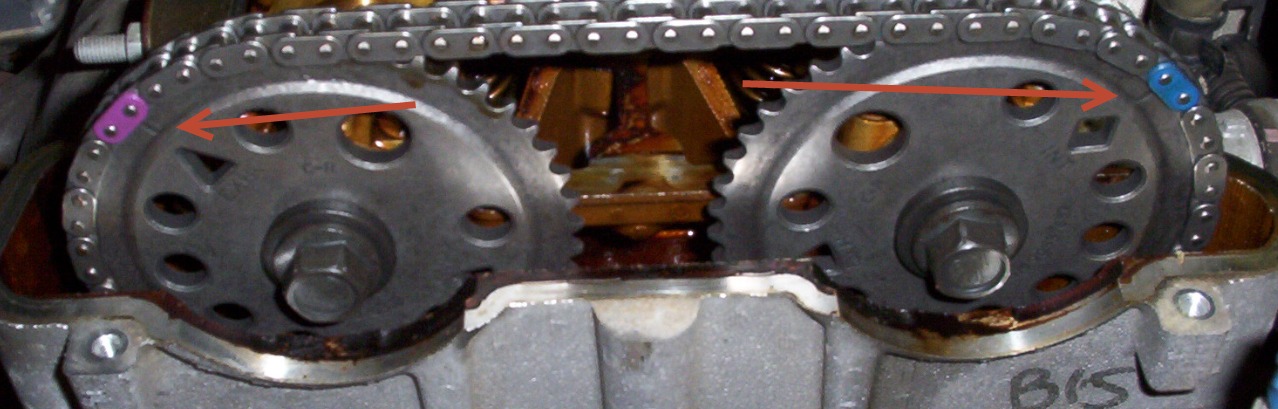
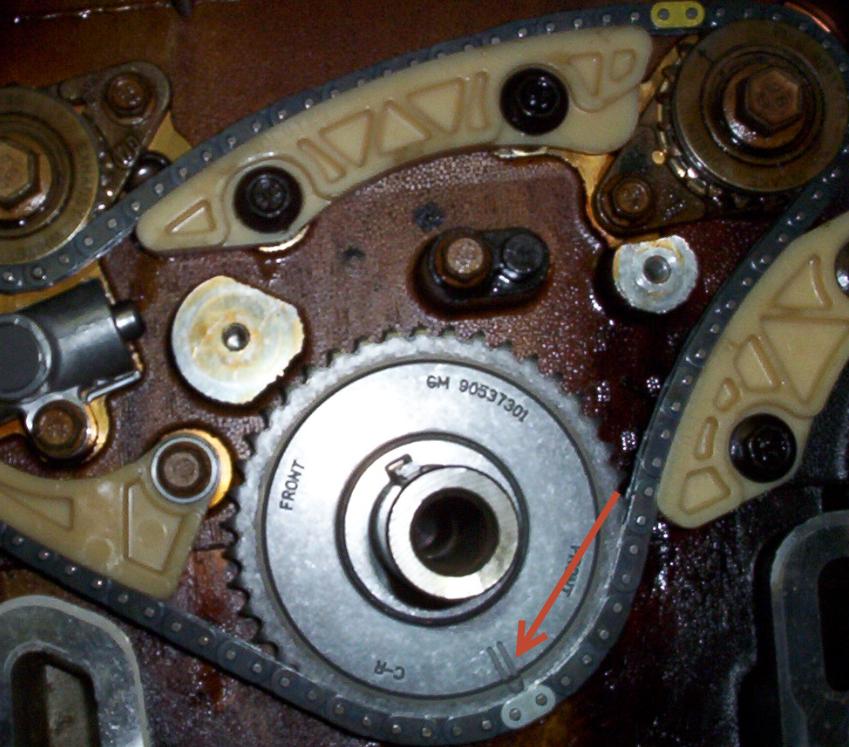
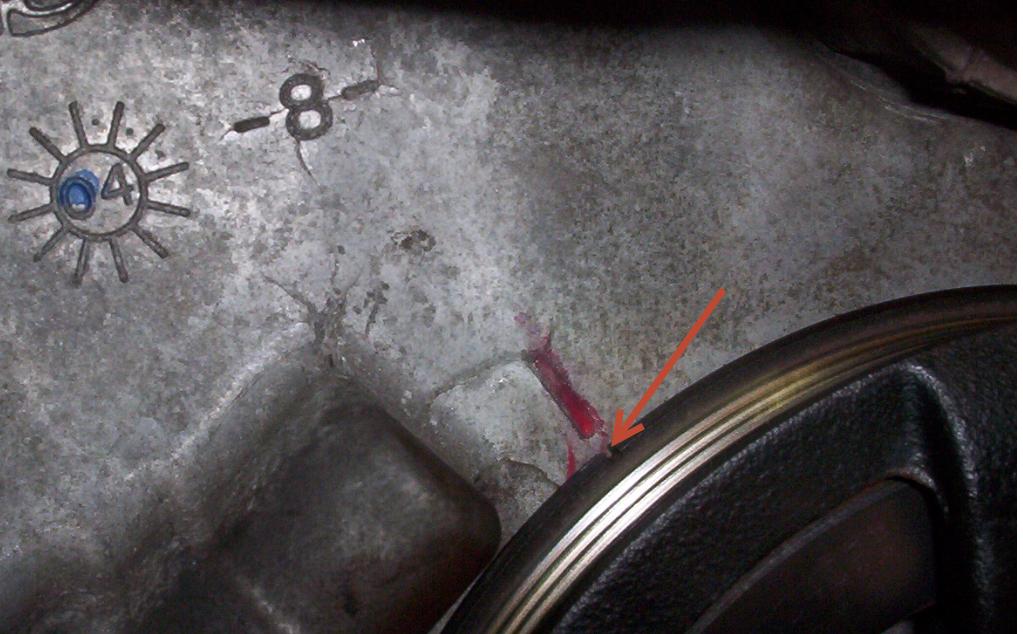
Second, Timing mark information isnt clear, there is no mention of the TDC mark, its there on the damper and timing cover, about 10 O-Clock position. (See pics). The cam marks have no reference other than the colored links on the chain. You could turn the engine over a hundred revolutions and still be trying to find the colored links, if you can still see them at all. The description is that they should be at 10 and 2 O-Clock. Well thats just dandy but.

I found that when correct they were at three full chain links above the head surface each way. (Again, see pics).

Another thing, there is a step recommending disassembly while at about 60 degrees BTDC, with the intake cam mark at about 12 O-Clock. This should be clarified that it is because the valves will hit the pistons at TDC. Be carefull. Also beware that upon disassembly, both cams are likely to jump around with some velocity. This also makes set-up fun. Reassembly instructions show setting it up at TDC, That is risky and doesnt work too well either. I set it up in about the 60 deg BTDC postion, and if I had it to do over I would attempt to immobilize the cams in that position by whatever means I could
Also unclear is the color coding of the chain links and referencing them for set-up. The odd colored link of each chain goes on the timing mark for the intake balance shaft or camshaft respectively.

The pictures should help clarify some things as well. Fair warning, cam chain set up takes patience.

Clearance is a bit tight. I got the serp belt tensioner out by removing the motor mount and dropping the end of the motor down, lowering the right side of the subframe down and prying the engine a little further down for access. Then removal of the motor mount bracket was done by jacking the engine way up on the end for access. Upon reassembly dont forget to put the new timing cover gasket in place before the motor mount bracket.
Replace any worn rubbing blocks and tensioners as well. This is only a partial as a lot was left out. And make sure to replace the bolts that were mentioned good luck
Was this
answer
helpful?
Yes
No
+3
Saturday, February 8th, 2014 AT 6:42 AM
Tiny
HMAC300
  • MECHANIC
  • 48,601 POSTS
This one didn't come through
Was this
answer
helpful?
Yes
No
Saturday, February 8th, 2014 AT 6:44 AM
Tiny
CRBCRB
  • MEMBER
  • 4 POSTS
Ok, my car still runs fairly good it just would probably run a lot better with a new timing chain but I will more than likely let it fail and then its either time for a new engine or a new car. I will mention that I also had to replace the belt tensioner but I went about it in different way. It broke because pieces of my vibration dampener flew apart at high RPM cause I beat somebody to the freeway entrance from a stop light at full bore. It flew apart and something hit the dampener and broke it. Your car may not have it but mine has a part of the fender well which unbolts allowing access to the front of the engine. I didn't use a new bolt either but so far it hasn't failed, Praise God. Thank you for the info and I will probably let it be for now. Corey
Was this
answer
helpful?
Yes
No
Saturday, February 8th, 2014 AT 6:54 AM

Please login or register to post a reply.

Sponsored links