Fuel sending unit

Tiny
TOMLEAHY
  • MEMBER
  • 2002 PONTIAC GRAND PRIX
  • 6 CYL
  • FWD
  • AUTOMATIC
  • 180,000 MILES
Can you provide detailed instructions to replacing the fuel sending unit in a 2002 grand prix se?
Thursday, July 14th, 2011 AT 4:37 PM

7 Replies

Tiny
WRENCHTECH
  • MECHANIC
  • 20,758 POSTS
That would be in the image below let me know if you need anything else. Here is how to change the fuel pump and fuel level sender out. Check out the images (Below). Please let us know if you need anything else to get the problem fixed.
Was this
answer
helpful?
Yes
No
-1
Thursday, July 14th, 2011 AT 4:58 PM
Tiny
TOMLEAHY
  • MEMBER
  • 4 POSTS
Umm. Even I know you don't have to remove the tank. Could you please refund my money or get someone who actually knows this vehicle?
Was this
answer
helpful?
Yes
No
+4
Friday, July 15th, 2011 AT 9:43 PM
Tiny
WRENCHTECH
  • MECHANIC
  • 20,758 POSTS
I see now that you are correct. This one has an access panel. That is not the case with 95% of them.

FUEL SENDER ASSEMBLY REPLACEMENT

REMOVAL PROCEDURE

CAUTION: Fuel Vapors can collect while servicing fuel system parts in enclosed areas such as a trunk. To reduce the risk of fire and increased exposure to vapors:

* Use forced air ventilation such as a fan set outside of the trunk.
* Plug or cap any fuel system openings in order to reduce fuel vapor formation.
* Clean up any spilled fuel immediately.
* Avoid sparks and any source of ignition.
* Use signs to alert others in the work area that fuel system work is in process.

NOTE: Clean all of the following areas before performing any disconnections in order to avoid possible contamination in the system:

* The fuel pipe connections
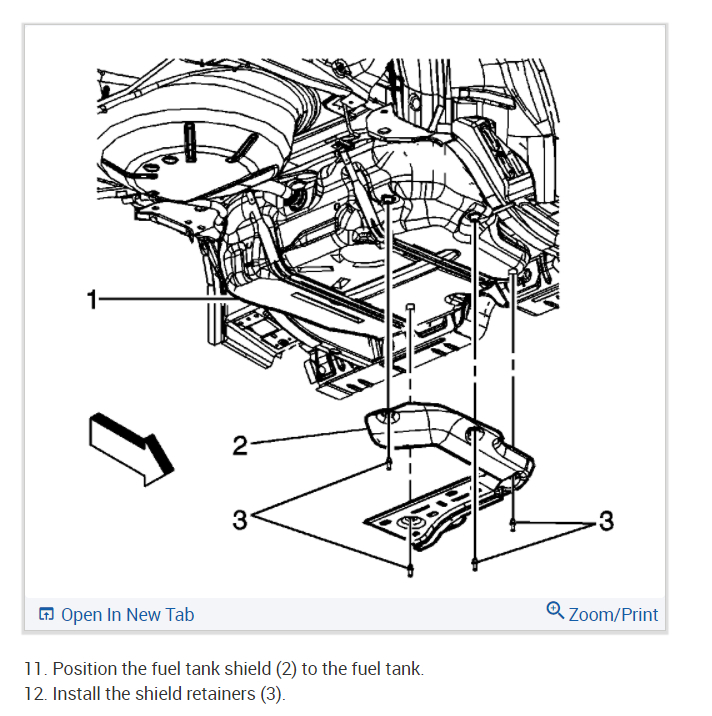
* The hose connections
* The areas surrounding the connections

IMPORTANT: Always maintain cleanliness when servicing fuel system components.

1. Relieve the fuel system fuel pressure.
2. Remove the rear compartment trim panel.
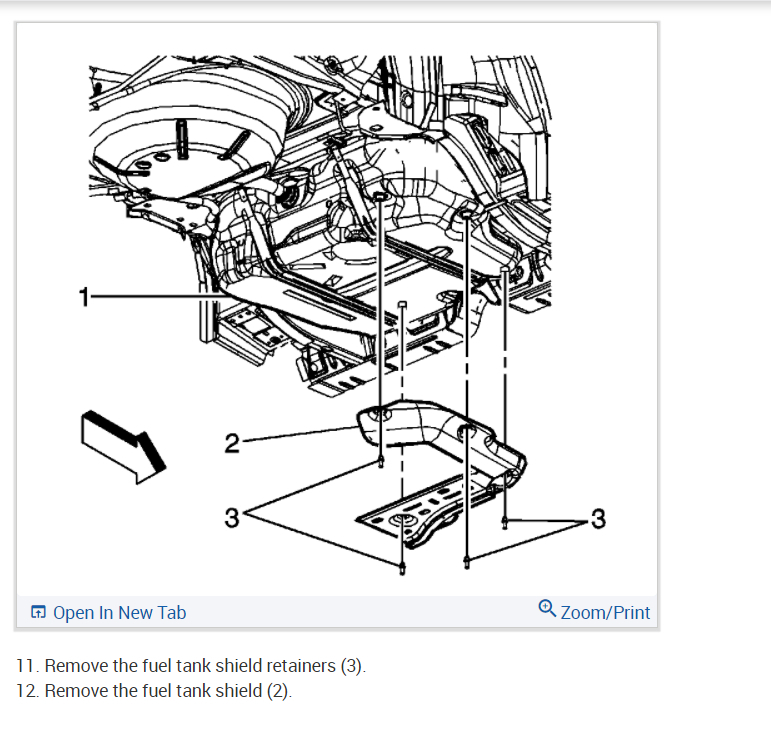
3. Remove the fuel sender access panel nuts.
4. Remove the fuel sender access panel.
5. Disconnect the fuel tank pressure (FTP) sensor electrical connector.
6. Remove the fuel tank pressure sensor.
7. Disconnect the fuel sender electrical connector.
8. Clean the fuel pipes, and fuel sender assembly to prevent possible fuel contamination during removal.
9. Disconnect the quick-connect fittings at the fuel sender assembly.

IMPORTANT: The retaining fuel sender assembly will spring-up when the ring is removed.

10. Hold down the fuel sender and remove the fuel sender retaining ring.
11. Remove the fuel sender assembly.
12. Clean the fuel sender assembly sealing surfaces.
13. Inspect the fuel sender assembly sealing surfaces.

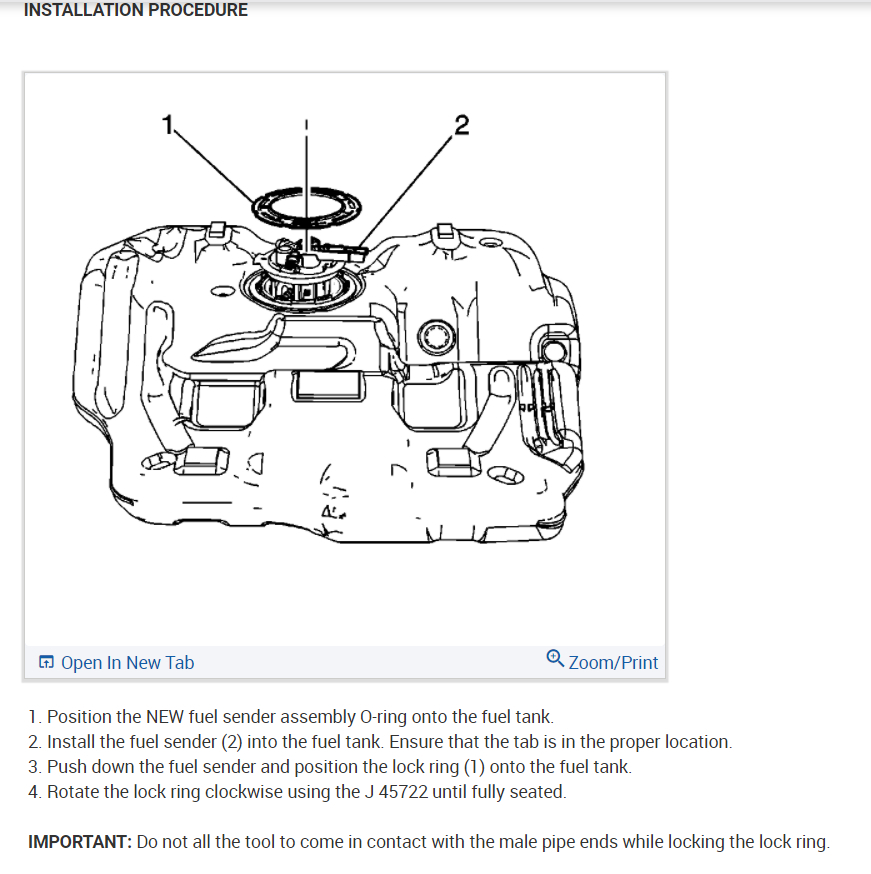
INSTALLATION PROCEDURE

IMPORTANT:

* Care should be taken not to fold over or twist the fuel pump strainer when installing the fuel sender assembly, as this will restrict fuel flow. Also, assure that the fuel pump strainer does not block full travel of float arm.
* Ensure that the fuel sender assembly retaining ring is fully seated within the tab slots on the fuel tank.
* Always replace the fuel sender seal when reinstalling the fuel sender assembly.

1. Position the new fuel sender assembly seal on the fuel tank.
2. Place the fuel sender assembly into the fuel tank.
3. Install the fuel sender assembly retaining ring.
4. Connect the fuel sender electrical connector.
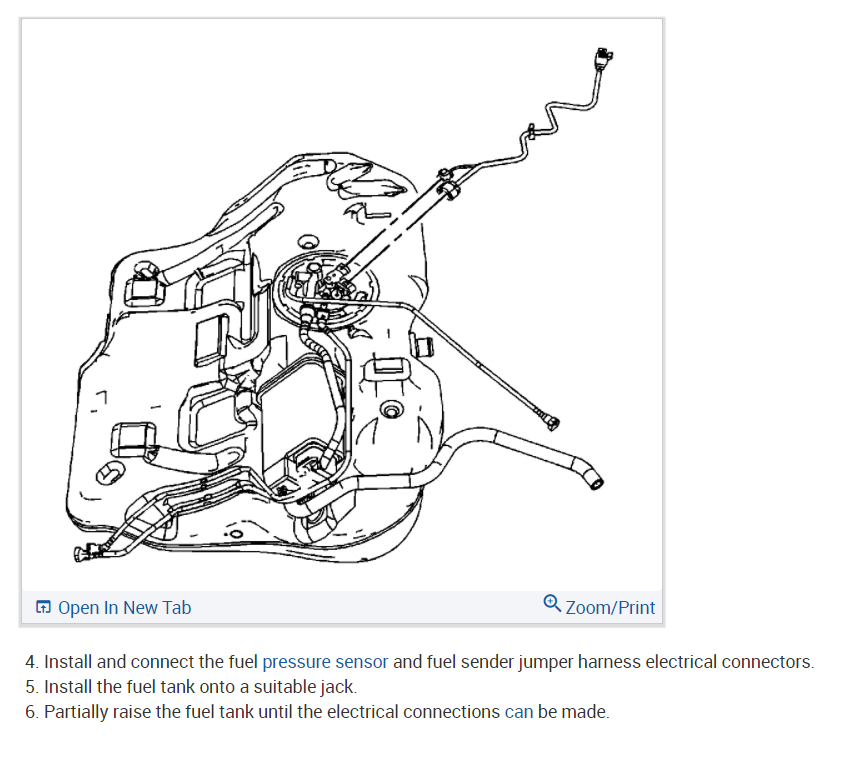
5. Install the fuel tank pressure sensor.
6. Connect the fuel tank pressure sensor electrical connector.
7. Connect the quick-connect fittings at the fuel sender assembly.
8. Connect the negative battery cable.
9. Inspect the fuel system for leaks by performing the following steps:

9.1. Turn ON the ignition for 2 seconds.
9.2. Turn OFF the ignition for 10 seconds.
9.3. Turn ON the ignition.
9.4. Inspect for fuel leaks.

10. Install the fuel sender access panel.

NOTE: Refer to Fastener Notice in Service Precautions.

11. Install the fuel sender access panel nuts.

Tighten
Tighten the nuts to 10 N.M (89 lb in ).

12. Install the rear compartment trim panel.
Was this
answer
helpful?
Yes
No
-1
Friday, July 15th, 2011 AT 9:53 PM
Tiny
RASMATAZ
  • MECHANIC
  • 75,992 POSTS
FUEL PUMP
Removal & Installation
The fuel pump is attached to the fuel sender assembly inside the fuel tank. See FUEL SENDER ASSEMBLY for removal and installation.

FUEL SENDER ACCESS PANEL
Removal (Century, Grand Prix & Regal)
Open the rear compartment lid. Remove the rear compartment convenience net. Remove the lower rear compartment convenience net retainers. Disconnect the cellular antenna cable from the communication interface module by pulling outward on the square plastic housing. See Fig. 51.
Disconnect the two lower connectors from the module. Disconnect the GPS antenna cable from the module by pulling outward on the circular metal sleeve. Remove the nuts from the module bracket. Remove the module and the bracket from the rear compartment. Remove the rear compartment mat from the rear compartment.
Remove the spare tire cover from the rear compartment. Remove the spare tire. Remove the retainers by the rear compartment lock striker. Fold the rear section of the rear compartment trim panel foreword. Fold each side of the trim panel toward the center of the car.
Remove the rear compartment trim panel from the rear compartment. See Fig. 52. Remove the fuel sender access panel nuts. Remove the fuel sender access panel.

FUEL SENDER ASSEMBLY
Removal
Release fuel system pressure. See FUEL SYSTEM PRESSURE RELEASE. Remove the fuel sender access panel. See FUEL SENDER ACCESS PANEL.
Disconnect the Fuel Tank Pressure (FTP) sensor electrical connector. Remove the FTP sensor. Disconnect the fuel sender electrical connector. Clean the fuel pipes, and fuel sender assembly to prevent possible fuel contamination during removal.
NOTE:The retaining fuel sender assembly will spring-up when the retaining ring is removed.

Disconnect the quick-connect fittings at the fuel sender assembly. See FUEL LINE DISCONNECT FITTINGS. Hold down the fuel sender and remove the fuel sender retaining ring. Remove the fuel sender assembly. See Fig. 44. Clean the fuel sender assembly sealing surfaces. Inspect the fuel sender assembly sealing surfaces.
CAUTION:Do not handle the fuel sender assembly by the fuel pipes. The amount of leverage generated by handling the fuel pipes could damage the joints.

Remove the fuel sender assembly and seal from the fuel tank. Discard the fuel sender assembly seal. Clean and inspect the fuel sender sealing surfaces.
Was this
answer
helpful?
Yes
No
Friday, July 15th, 2011 AT 10:13 PM
Tiny
TOMLEAHY
  • MEMBER
  • 4 POSTS
Wrenchtech, even with little bit of research I've done, there is an access panel on 100% of them, so I'll discard all of your ramblings.

Razmataz, you seem to know what you are talking about. So how do you remove the ring? Can you provide anything specific?

Thanks for you expertise.

Tom
Was this
answer
helpful?
Yes
No
Friday, July 15th, 2011 AT 10:55 PM
Tiny
WRENCHTECH
  • MECHANIC
  • 20,758 POSTS
[quote]there is an access panel on 100% of them[/quote]
That's just completely incorrect, especially on Domestic vehicles. It's a little more common in imports but still rare.
Was this
answer
helpful?
Yes
No
Friday, July 15th, 2011 AT 10:58 PM
Tiny
TOMLEAHY
  • MEMBER
  • 4 POSTS
I'm speaking of precisely the 2002 Grand Prix.
Was this
answer
helpful?
Yes
No
+1
Friday, July 15th, 2011 AT 11:01 PM

Please login or register to post a reply.

Sponsored links