Power window motor

Tiny
DEADFISHDALE
  • MEMBER
  • 1999 CHEVROLET MONTE CARLO
  • 3.8L
  • 6 CYL
  • 2WD
  • AUTOMATIC
  • 75,000 MILES
Do I have to take the whole regulator off, just to replace the motor itself?
I have already know it is the motor that needs to be replaced.

This is on the drivers side.
Do you
have the same problem?
Yes
No
Saturday, May 31st, 2014 AT 6:49 PM

26 Replies

Tiny
SATURNTECH9
  • MECHANIC
  • 30,870 POSTS
Yes your going to have to remove the regulator to replace the motor all the gm ones like that I have had to.

Check out the guide below, it will help

https://www.2carpros.com/articles/how-to-check-and-replace-a-electric-power-window-motor
Was this
answer
helpful?
Yes
No
Saturday, May 31st, 2014 AT 10:16 PM
Tiny
MAXIMILIAM
  • ADMIN
  • 436 POSTS
Hey Sarurtech9,

Thanks for responding to my question about the replacement of the power window motor on my Moms Old Monte.

I know you said we had to take the whole regulator out, but I went against your advice and I wanted to share the results with you.

I am not mechanically inclined and I knew the more I took everything apart, the less chance it would all work right when I got done, so I put a little c clamp on the gears near the motor on the inside of the door.

Took the old motor out, put the new one in.

The only problems I came scross was dropping the nuts into the door, and I had to plug the switch in to jog gears on the new motor for correct orientation.
Was this
answer
helpful?
Yes
No
+1
Monday, June 16th, 2014 AT 1:30 AM
Tiny
SATURNTECH9
  • MECHANIC
  • 30,870 POSTS
It actually takes less time to just remove the whole regulator also I wouldnt do it in the door for safety reasons. There is the spring loaded arm you mentioned that you held with a clamp. While its in the door its harder to see and keep your fingers out of and being caught in there. So it maybe be possible I wouldnt recommend doing it in the door because it actually makes it harder to do and take longer plus for safety reasons.
Was this
answer
helpful?
Yes
No
Monday, June 16th, 2014 AT 6:11 AM
Tiny
WILLIAMSTRELOW
  • MEMBER
  • 2 POSTS
  • 1999 CHEVROLET MONTE CARLO
  • 6 CYL
  • FWD
  • AUTOMATIC
  • 150,000 MILES
How do I replace the driver's side power window motor on a 1999 Chevrolt Monte Carlo LS? I already have the door panel off and new replacement motor, but I need instructions from this point forward so I don't damage the door or window, or the window spring. Thank You.
Was this
answer
helpful?
Yes
No
-1
Wednesday, January 23rd, 2019 AT 6:04 PM (Merged)
Tiny
KHLOW2008
  • MECHANIC
  • 41,815 POSTS
Here are the procedures.

WINDOW REGULATOR
Removal (Front)

1. Remove the front door trim panel.
2. Remove the water deflector.
3. Remove the inner energy absorber pad.
4. Remove the window. See SIDE DOOR WINDOW.
5. Disconnect the electrical connector.
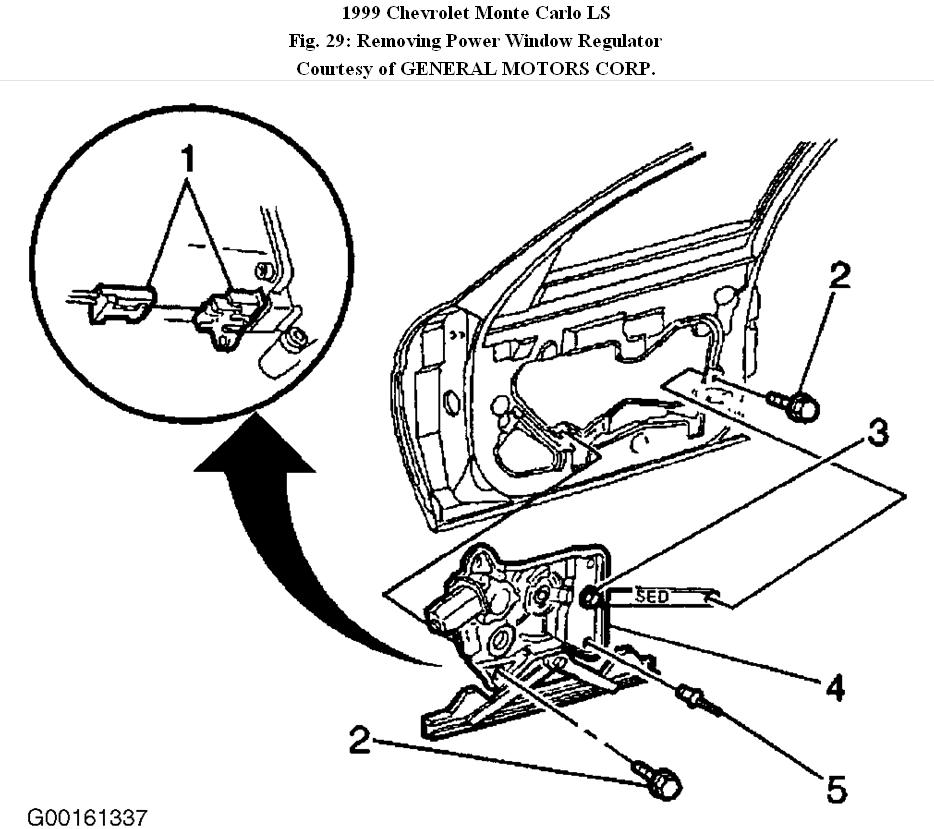
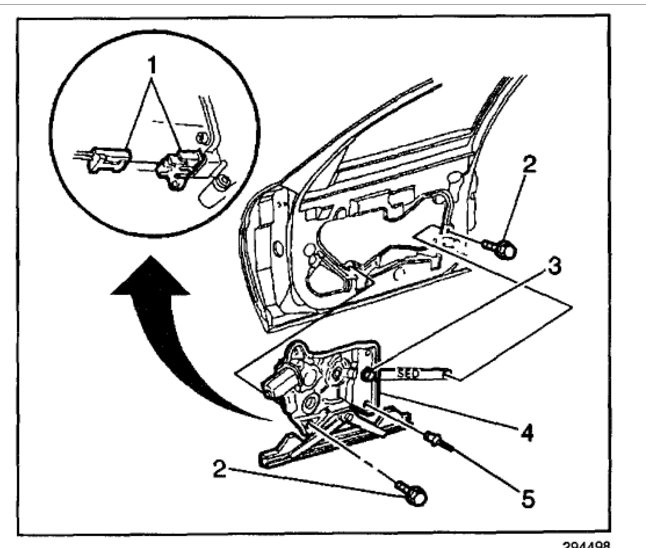
6. Remove the window regulator bolts (2). See Fig. 29.
7. Remove the window regulator cam nut.
8. Remove the rivets (2).
9. Remove the window regulator cam bolt.
10. Remove the regulator (1).

Installation (Front)
1. Position the regulator (4) by inserting the bottom through the access opening.
2. Rotate the top through the opening while lowering the regulator in order to clear the top of the access opening.
3. Align the holes in the door inner panel.
4. Install the door window regulator bolts (2). Tighten the bolts to 89 INCH Lbs. (10 N.M). See Fig. 29.
5. Install the upper left rivet.
6. Install the lower right rivet.
7. Install the door window regulator cam bolt. Tighten the nut to 89 INCH Lbs. (10 N.M).
8. Connect the electrical connector, if equipped.
9. Install the window. See SIDE DOOR WINDOW.
10. Install the water deflector.
11. Install the energy absorber pad (coupe only).
12. Install the trim panel.

WINDOW REGULATOR MOTOR
NOTE: Use the correct fastener in the correct location. Replacement
fasteners must be the correct part number for that application. Fasteners requiring replacement or fasteners requiring the use of
thread locking compound or sealant are identified in the service procedure. Do not use paints, lubricants, or corrosion inhibitors on
fasteners or fastener joint surfaces unless specified. These coatings affect fastener torque and joint clamping force and may damage the
fastener.

NOTE: The window regulator motor may be installed with the regulator in any position.

Removal

1. Remove the window regulator. See WINDOW REGULATOR.
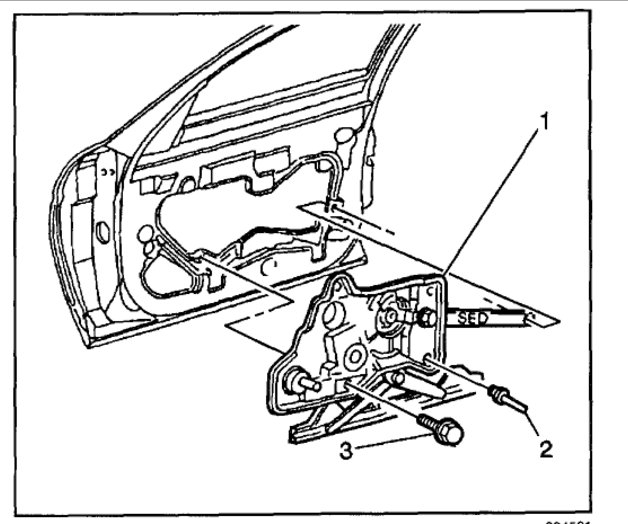
2. Remove the window regulator motor bolts.
3. Remove the window regulator motor from regulator.

Installation
1. Install the window regulator motor to the regulator.
2. Install the window regulator motor bolts. Tighten the window regulator motor bolts to 89 INCH Lbs. (10 N.M).
3. Install the window regulator. See WINDOW REGULATOR.

SIDE DOOR WINDOW
Removal (Front)

1. Remove the trim panel.
2. Remove the energy absorber pad (coupe only).
3. Remove the water deflector.
4. Remove the inner belt sealing strip.
5. Remove the outer belt sealing strip.
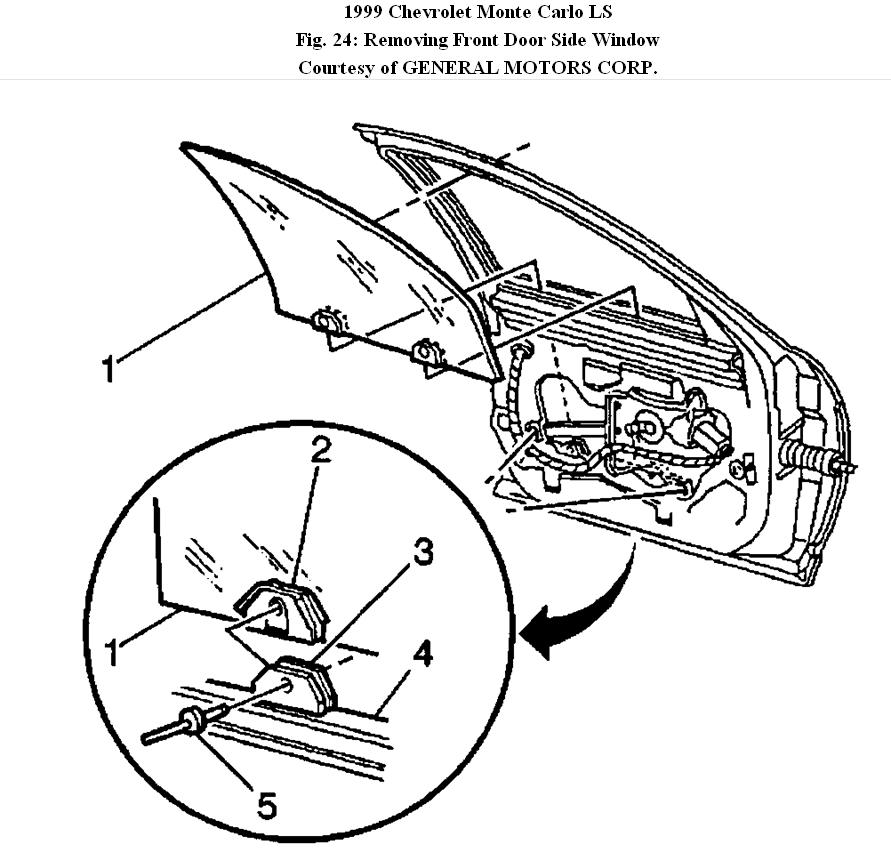
6. Remove the window (1) from the regulator. See Fig. 24.
7. Remove the window.
8. Remove the window weatherstrip bolts.
9. Remove the rivets (5).
10. Remove the clip insulators (2), as needed.

Installation (Front)

1. Position the window (1) between the inner and the outer panels. See
Fig. 24.
2. Point the lower front corner of the window down.
3. Pass the window through the belt opening. Aligning the edges with the door window channel.
4. Turn the window to the horizontal position. Align the holes in the window with the holes in the regulator clip. Install the rivets (5).
5. Install front door opening weatherstrip.
6. Install the outer belt sealing strip.
7. Install the inner belt sealing strip.
8. Install the water deflector.
9. Install the energy absorber pad (coupe only).
10. Install the trim panel.
Was this
answer
helpful?
Yes
No
Wednesday, January 23rd, 2019 AT 6:04 PM (Merged)
Tiny
NICKYBOOM
  • MEMBER
  • 1 POST
  • 1998 CHEVROLET MONTE CARLO
  • 6 CYL
  • 2WD
  • AUTOMATIC
  • 130,000 MILES
How to remove the motor without moving gear and track arm
Was this
answer
helpful?
Yes
No
Wednesday, January 23rd, 2019 AT 6:04 PM (Merged)
Tiny
JACOBANDNICKOLAS
  • MECHANIC
  • 108,005 POSTS
Hi:
The motor is rivited in from the factory and needs to be drilled out and replaced with bolts. As far as the gear, which one are you refering to?

Joe
Was this
answer
helpful?
Yes
No
Wednesday, January 23rd, 2019 AT 6:04 PM (Merged)
Tiny
CONCRETMOMWITH3
  • MEMBER
  • 1 POST
I have the sam problem on my 98 montI carlo driver side motor I have the new one n door panel off can see were gana have to drill out rivits but if I take it all out how do you secure the unit to replace just the motor?
Was this
answer
helpful?
Yes
No
Wednesday, January 23rd, 2019 AT 6:04 PM (Merged)
Tiny
KEN L
  • MASTER CERTIFIED MECHANIC
  • 42,554 POSTS
Hello,

Here are a couple of guides and some diagrams so you can get the job done.

https://www.2carpros.com/articles/door-panel-removal

and

https://www.2carpros.com/articles/how-to-check-and-replace-a-electric-power-window-motor

Remove the Door trim panel.
Remove the water deflector.
Remove the energy absorber pad (coupe only).
Remove the door window.
Disconnect the electrical connector, if equipped.
Remove the window regulator bolts (2).
Remove the window regulator cam nut.
Remove the rivets (2).
Remove the window regulator cam bolt.
Remove the regulator (1).

Please let me know if you need anything else to get the problem fixed.

Best, Ken

Was this
answer
helpful?
Yes
No
Wednesday, January 23rd, 2019 AT 6:04 PM (Merged)
Tiny
BADASSCHEVYLUVR
  • MEMBER
  • 1 POST
  • 1997 CHEVROLET MONTE CARLO
  • 6 CYL
  • FWD
  • AUTOMATIC
  • 148,000 MILES
My 97 monte carlo, passanger window wont go up the button on the drivers side, for the passanger window wont work for up or down. The passanger button only rolls the window down but not up. How can I manually pull the window up? I pulled the panel off but the window seems to be stuck. Its raining and I need a temporary fix till I can get to the shop to find the problem.
Was this
answer
helpful?
Yes
No
Wednesday, January 23rd, 2019 AT 6:04 PM (Merged)
Tiny
DOCFIXIT
  • MECHANIC
  • 18,828 POSTS
Remove motor then regulator will freeup then wedge a piece of wood to hold window up.
Was this
answer
helpful?
Yes
No
Wednesday, January 23rd, 2019 AT 6:04 PM (Merged)
Tiny
MONTE717
  • MEMBER
  • 2 POSTS
  • 1996 CHEVROLET MONTE CARLO
  • 6 CYL
  • FWD
  • AUTOMATIC
  • 118,000 MILES
1996 monte carlo windows will not go down or up from drivers side master switch and pass side will only go down. I know both switches are good, I pulled them and put in 1995 monte and they work fine in all postions. Pulled the cover off pass door and tested motor directly works fine up and down. Checked the continuity of each wire between pass door and drive door all fine. Its seems like I have a ground problem.
Does anyone know where the ground is being pulled from for the motors?
Is it from the door itself or from the wiring?
Or any ideas for more advanced testing?
Was this
answer
helpful?
Yes
No
Wednesday, January 23rd, 2019 AT 6:04 PM (Merged)
Tiny
MERLIN2021
  • MECHANIC
  • 17,250 POSTS
TESTING WINDOWS DO NOT OPERATE 1. Turn ignition switch to RUN position. Using a test light, backprobe between ground and Brown wire terminal at master switch connector. If test light is on, go to next step. If test light is off, check for poor connection at master switch. If connection is okay, repair open in Brown wire between power window 20-amp breaker and master switch. 2. Backprobe between Brown wire and Black wire terminals (ground) of master switch connector. If test light is on, check for poor connection at master switch. If connection is okay, replace master switch. If test light is off, check for poor connection at ground connection. If connection is okay, repair open in Black wire between master switch and ground connection. LEFT FRONT WINDOW DOES NOT OPERATE 1. Turn ignition switch to RUN position. Using a test light, backprobe between Dark Blue wire and Brown wire terminals at master switch connector. While observing test light, press left window switch at master switch to up and down positions. If test light is on, go to next step. If test light is off, check for poor connection at master switch. If connection is okay, replace master switch. 2. Backprobe between Dark Blue wire and Brown wire terminals at left window motor connector. While observing test light, press left window switch at master switch to up and down positions. If test light is on, check for poor connection at left window motor. If connection is okay, replace left window motor. If test light is off, repair open in Dark Blue wire or Brown wire between left window switch and motor. RIGHT FRONT, LEFT REAR OR RIGHT REAR WINDOW IS INOPERATIVE AT INDIVIDUAL SWITCH, OPERATES AT MASTER SWITCH 1. Turn ignition switch to RUN position. Press window lock-out switch to off position (if equipped). Using a test light, backprobe between ground and Brown wire terminal (2-door) or between ground and Light Blue wire terminal (4-door) at inoperative window switch connector. If test light is on, go to next step. If test light is off, repair open in Light Blue wire or Brown wire between master switch and inoperative window switch. If wires are okay, replace master switch. 2. Backprobe between Dark Blue wire and Brown wire terminals at inoperative window switch connector. While observing test light, press inoperative window switch to up and down position. If test light is on, repair open in Dark Blue wire or Brown wire between inoperative window switch and motor. If wires are okay, replace motor. If test light is off, check for poor connection at inoperative window switch. If connection is okay, replace inoperative window switch. NOTE: Left front window switch is referred to as master switch. For circuit identification, see WIRING DIAGRAMS . ONE WINDOW (EXCEPT LEFT FRONT) INOPERATIVE FROM MASTER & INDIVIDUAL SWITCH, ALL OTHERS OPERATE 1. Turn ignition switch to RUN position. Using a test light, backprobe between Dark Blue wire and Brown wire terminals at inoperative window motor connector. While observing test light, press inoperative window switch to up and down positions. If test light is off, go to next step. If test light is on, check for poor connection at inoperative window motor. If connection is okay, replace inoperative window motor. 2. Disconnect inoperative window switch connector. Connect test light to inoperative window switch between Light Blue wire and Tan wire terminals at right window switch connector, Light Green wire and Purple wire terminals at right rear window switch connector and Dark Green wire and Purple wire terminals at left rear window switch connector. 3. While observing test light, press inoperative window switch at master switch to up and down position. If test light is on at all specified wire terminals, go to next step. If test light is off at any wire terminal, check for poor connection at inoperative window switch. If connection is okay, repair open in appropriate wire(s) to inoperative window switch. If wire(s) are okay, replace master switch. 4. Backprobe between Dark Blue wire and Brown wire terminals at inoperative window switch connector. While observing test light, press inoperative window switch at master switch to up and down position. If test light is on, check for poor connection at inoperative window motor, or repair open in Dark Blue wire or Brown wire between inoperative window switch and motor. If wire is okay, replace motor. If test light is off, check for poor connection at inoperative window switch. If connection is okay, replace inoperative window switch.
Diagram is 2 door model.


https://www.2carpros.com/forum/automotive_pictures/62217_wd1_1.jpg


https://www.2carpros.com/forum/automotive_pictures/62217_wd2_1.jpg

Was this
answer
helpful?
Yes
No
Wednesday, January 23rd, 2019 AT 6:04 PM (Merged)
Tiny
MONTE717
  • MEMBER
  • 2 POSTS
Thanks alot for your speedy reply
Was this
answer
helpful?
Yes
No
Wednesday, January 23rd, 2019 AT 6:04 PM (Merged)
Tiny
MERLIN2021
  • MECHANIC
  • 17,250 POSTS
Your welcome. Check email too!
Was this
answer
helpful?
Yes
No
Wednesday, January 23rd, 2019 AT 6:04 PM (Merged)
Tiny
2CP-ARCHIVES
  • MEMBER
  • 4,544 POSTS
  • 2002 CHEVROLET MONTE CARLO
Driver side window won't go up or down but window motor works
Was this
answer
helpful?
Yes
No
Wednesday, January 23rd, 2019 AT 6:04 PM (Merged)
Tiny
ASEMASTER6371
  • MECHANIC
  • 52,797 POSTS
Regulator has failed. You need to replace the motor/regulator assembly

Roy
Was this
answer
helpful?
Yes
No
Wednesday, January 23rd, 2019 AT 6:04 PM (Merged)
Tiny
STEVENLEHMANN
  • MEMBER
  • 4 POSTS
Get a new window switch.
Was this
answer
helpful?
Yes
No
Wednesday, January 23rd, 2019 AT 6:04 PM (Merged)
Tiny
LIONELL8732
  • MEMBER
  • 132 POSTS
  • 1996 CHEVROLET MONTE CARLO
  • 6 CYL
  • FWD
  • AUTOMATIC
  • 212,000 MILES
I GOT A 1996 MONTE CARLO Z34 AND THE POWER WINDOWS WOULD LET DOWN BUT WHEN I TRY TO LET THEM BACK UP THEY GET STUCK. MY SUNROOF WORKS FINE THO AND ALSO WHEN I TRY TO CHANGE MY FUSES TO THE POWER WINDOWS THEY BLEW REALLY QUICKLY EVERYTIME, I JUST WANNA KNO WHATS CAUSING THIS TO HAPPEN?
Was this
answer
helpful?
Yes
No
Wednesday, January 23rd, 2019 AT 6:05 PM (Merged)
Tiny
BLUELIGHTNIN6
  • MECHANIC
  • 16,542 POSTS
If fuse blows quickly then there must be a short on the power window circuit. You will need to remove the door panels and inspect the wiring at each power window motor and switch
Was this
answer
helpful?
Yes
No
Wednesday, January 23rd, 2019 AT 6:05 PM (Merged)

Please login or register to post a reply.

Sponsored links