How much would it cost to get my timing belt changed and where are the marks?

Tiny
STORMY1109
  • MEMBER
  • 1999 HYUNDAI SONATA
  • 175,000 MILES
I want to get my timing belt changed by a professional because it's to much of a pain for me to do it myself and I just wanted to know how much it would cost.
Thursday, October 6th, 2011 AT 11:46 AM

10 Replies

Tiny
JACOBANDNICKOLAS
  • MECHANIC
  • 108,133 POSTS
Aprox 400.00 but can differ based on where you live here are the marks if you want to do the job yourself

https://www.2carpros.com/diagrams/hyundai/sonata/1999

Please let us know what happens.

Was this
answer
helpful?
Yes
No
Monday, February 11th, 2019 AT 5:50 PM
Tiny
ARGEY
  • MEMBER
  • 1 POST
  • 1998 HYUNDAI SONATA
I need help urgently
Was this
answer
helpful?
Yes
No
Tuesday, October 27th, 2020 AT 4:12 PM (Merged)
Tiny
HMAC300
  • MECHANIC
  • 48,601 POSTS
Removal

1. Remove all drive belts. Remove crankshaft pulley and water pump pulley. Remove upper and lower timing belt covers,  noting bolt lengths and locations.
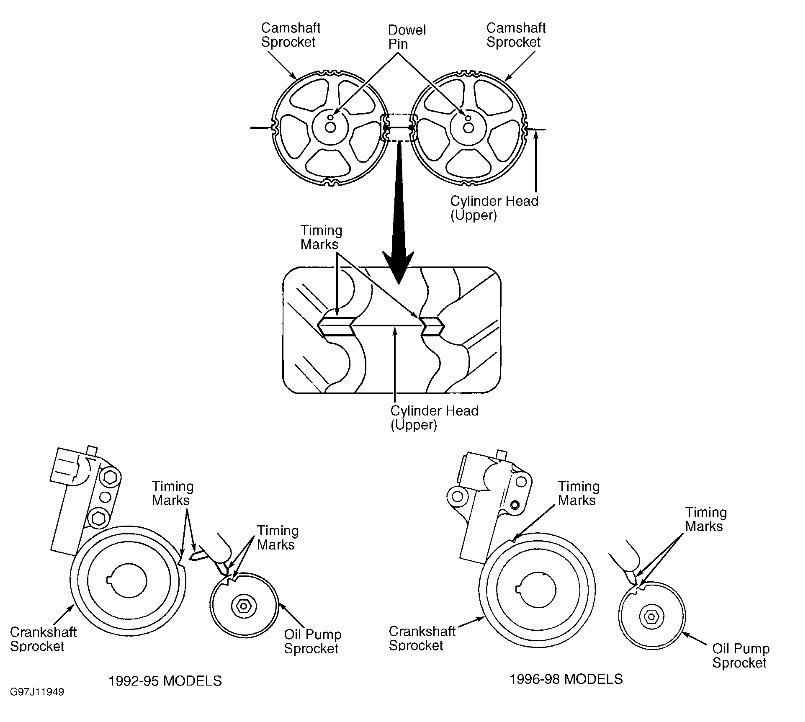
2. Turn crankshaft clockwise and align timing marks so No. 1 cylinder is at TDC. Timing marks on camshaft sprockets should be aligned at upper surface of cylinder head. See Fig. 1Â. Camshaft sprocket dowel pins
should face upward.

CAUTION: DO NOT rotate crankshaft counterclockwise (as viewed from timing belt end of engine). If reusing timing belt,  mark direction of belt rotation before
removing.

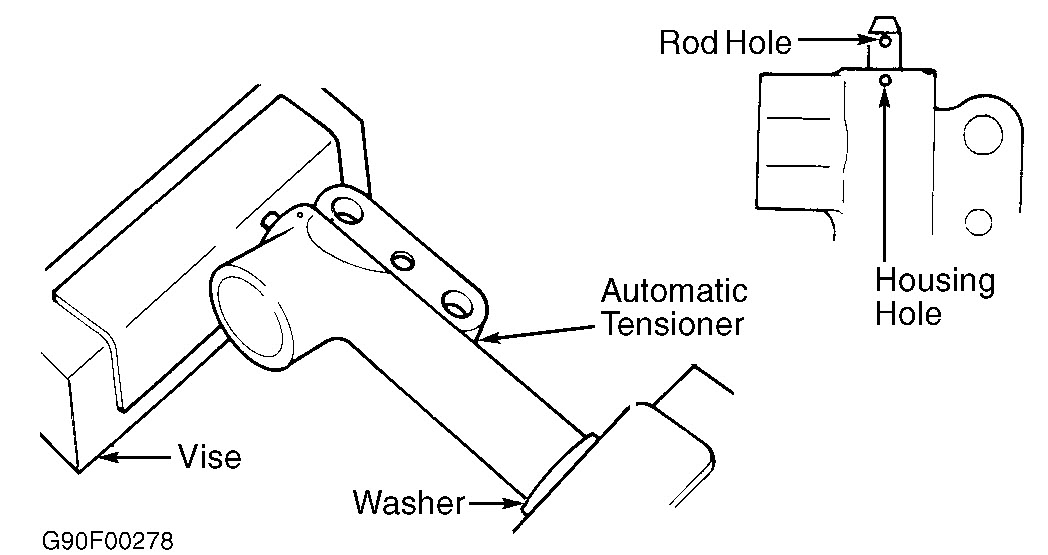
3. Remove timing belt automatic tensioner. See Fig. 2Â. Mark timing belt to indicate original direction of rotation. Remove timing belt.
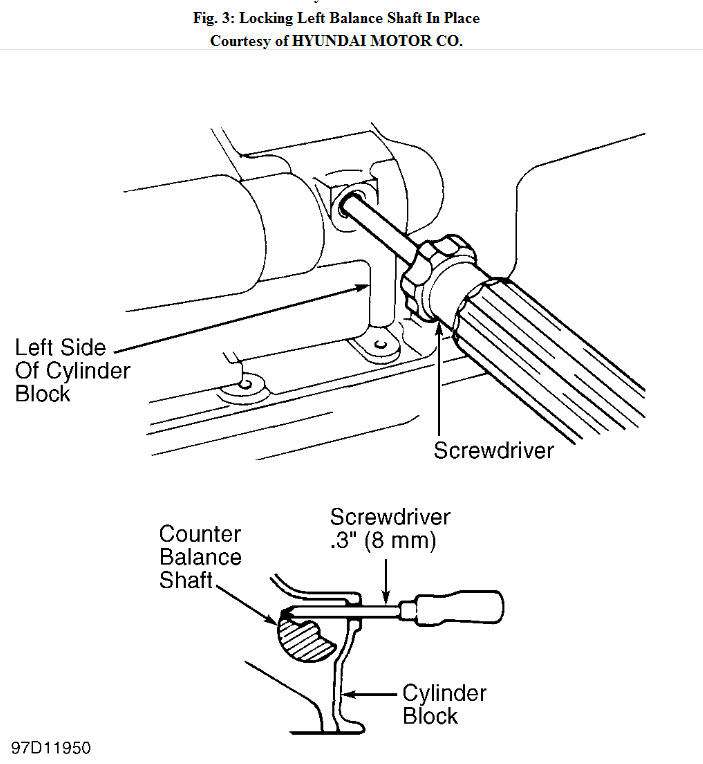
4. Remove balance shaft access plug from cylinder block. Insert Phillips screwdriver to block left balance shaft. See Fig. 3Â. Balance shaft is correctly locked in place if screwdriver can be inserted at least 2.36" (60
mm). If not,  rotate oil pump sprocket so screwdriver can be inserted to correct depth.
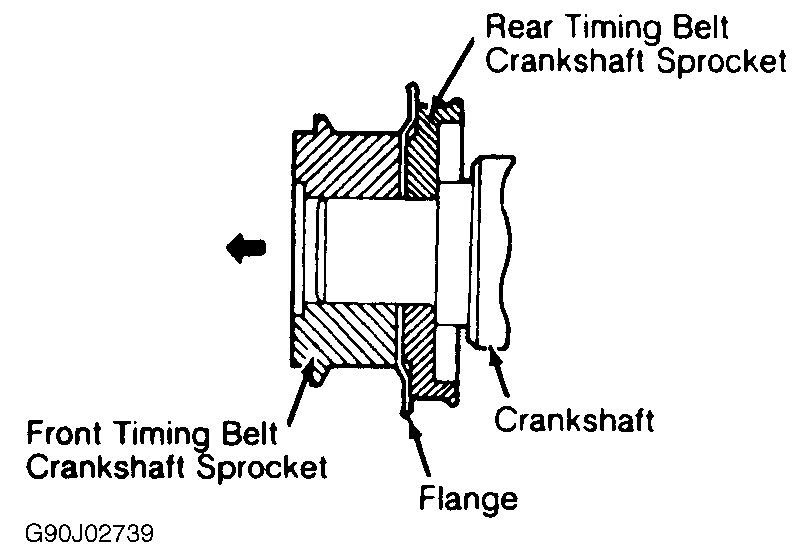
5. Loosen balance shaft belt tensioner bolt. Remove front crankshaft sprocket and flange. Remove balance shaft timing belt.

Fig. 1: Aligning Timing Marks
Courtesy of HYUNDAI MOTOR CO.

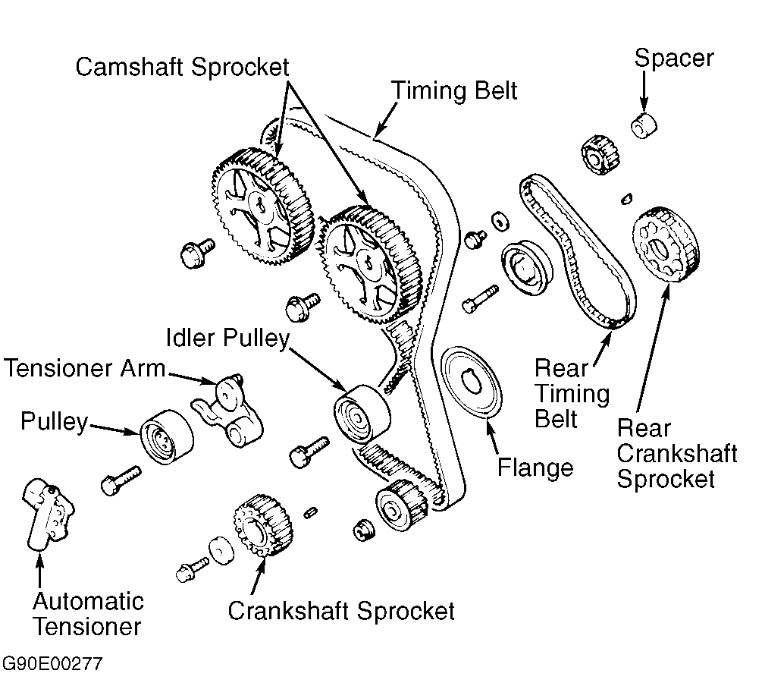
Fig. 2: Exploded View Of Timing Belt & Related Components
Courtesy of HYUNDAI MOTOR CO.

Fig. 3: Locking Left Balance Shaft In Place
Courtesy of HYUNDAI MOTOR CO.
Install:
1. Align timing marks on balance shaft sprockets with timing marks on engine case. Install balance shaft timing belt and crankshaft flange. Install crankshaft flange in correct direction. See Fig. 5Â.
2. Position balance shaft tensioner so that the center of the pulley is to the left and above the tensioner bolt. Hold tensioner tightly against belt. Tighten tensioner pulley bolt without letting tensioner rotate.
3. To check balance shaft belt tension,  depress belt with finger midway between sprockets (opposite tensioner pulley). Deflection should be betweenÂ.20 .29" (57 mm). If not,  readjust belt tension.
4. Place crankshaft sprocket on crankshaft. Tighten bolt to specification. See TORQUE SPECIFICATIONSÂ.
5. Ensure screwdriver is still installed through left side of cylinder block to hold balance shaft in place. Install automatic tensioner on engine block with rod locked in place.
6. Rotate camshaft sprockets so dowel pins face upward and timing marks on sprockets align. See Fig. 1Â. Outer marks on sprockets should be aligned with cylinder head surface.

NOTE: The same camshaft sprockets are installed on intake and exhaust camshafts. Timing marks are correctly aligned when dowel pin holes are facing straight
up.

7. Align crankshaft sprocket timing marks and oil pump sprocket timing marks. See Fig. 1Â. Install timing belt around tensioner pulley and crankshaft sprocket. Hold timing belt on tensioner pulley using left hand.
Pulling belt with right hand,  install belt around oil pump sprocket.
8. Install belt around idler pulley. Align timing mark on exhaust camshaft sprocket with top of cylinder head. Pulling belt with both hands,  install it around exhaust camshaft sprocket.
9. Gently raise tensioner pulley so belt does not sag. Position timing belt tensioner pin holes so that they face up. Temporarily tighten center bolt. See Fig. 6Â.
0. To adjust belt tension,  rotate crankshaft 1/4 turn counterclockwise,  and then rotate clockwise until No. 1 cylinder is at TDC. Ensure all timing marks are aligned.
1. Loosen center bolt on tensioner pulley. Note location of pin holes in tensioner pulley.
2. Using INCH lb. Torque wrench and Socket Wrench (09224 28100),  apply a torque of 22 24 INCH lbs. (2.6 2.8 N.M) on tensioner pulley. With torque applied to tensioner pulley,  tighten tensioner pulley center
bolt to specification. See Fig. 7Â. See TORQUE SPECIFICATIONSÂ.
3. Install Set Screw (09244 28000),  or equivalent,  in left engine support bracket until set screw end contacts tensioner arm. Rotate set screw further until locking pin can be removed from automatic tensioner. See
Fig. 6Â. Remove set screw.
4. Rotate crankshaft clockwise 2 complete revolutions. Allow engine to sit in this position for about 15 minutes. Measure distance between tensioner arm and automatic tensioner body. Distance should beÂ.15
.18" (3.8 4.5 mm). See Fig. 8Â,  Dimension "A". If distance is incorrect,  repeat timing belt tensioning procedure. If distance is okay,  go to step 17Â.
5. If distance between automatic tensioner and tensioner arm cannot be measured easily,  use this alternate method. Install Set Screw (09244 28000) until it contacts tensioner arm.
6. Rotate set screw inward while counting number of turns until tensioner arm contacts automatic tensioner housing. Turn set screw 2 1/2 3 turns to correctly tension belt. Remove set screw.
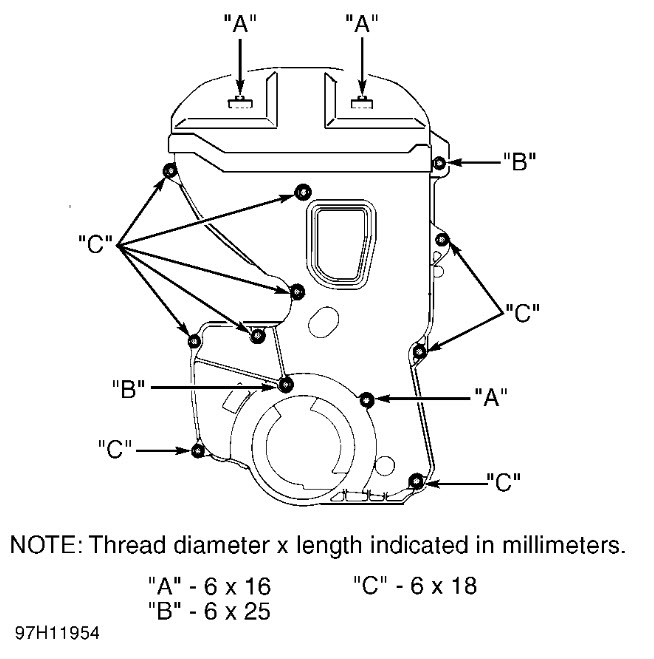
7. Install rubber plug in rear timing belt cover. Install timing belt covers. Install timing belt cover bolts in correct locations. See Fig. 9Â.
8. To complete installation,  reverse removal procedure. Apply sealant to contact areas on semi circular packing and rocker cover before installing. Ensure correct bolts are installed in proper location in timing belt
covers. Adjust drive belts to proper tension. Pay attention to timing marks. And if your belt broke you have more than likely bent valves as this is not a fre spin engine. Alot of pics enclosed.
Was this
answer
helpful?
Yes
No
+4
Tuesday, October 27th, 2020 AT 4:12 PM (Merged)
Tiny
2CP-ARCHIVES
  • MEMBER
  • 4,542 POSTS
  • 1996 HYUNDAI SONATA
  • 265,000 MILES
Do you have a diagram of timeing marks for the above car
Was this
answer
helpful?
Yes
No
Tuesday, October 27th, 2020 AT 4:12 PM (Merged)
Tiny
FREEMBA
  • MECHANIC
  • 1,152 POSTS
I'll need your engine size.
However, here are a couple of timing mark diagrams.
The first diagram is for th3 1.5, 1.8 and 2.0L engines.
The second diagram is for the 3.0L engine.

Please let me know if these diagrams help. If they do not, once I get the engine size I can post more accurate diagrams.
Was this
answer
helpful?
Yes
No
Tuesday, October 27th, 2020 AT 4:12 PM (Merged)
Tiny
EMILYDA
  • MEMBER
  • 1 POST
  • 1995 HYUNDAI SONATA
  • 4 CYL
  • FWD
  • AUTOMATIC
  • 449,528 MILES
I have attempted to do some timing belt work on my car after a loud knocking had developed. This knocking was heard at first when the engine warmed up and at idle in park, neutral and drive. It then a few days later could be heard will driving without foot on gas. The timing belt ordeal started because I took it to a local mechanic who decided it was the belt hitting the cover.

I have to also add that my car has had a horrible idle/ misfire for about 4 years. I have not been able to fix it myself and mechanics have not wanted to dig into it on my car.

I now have my car apart, I was in the process of lining up my timing marks, when I nothing would fit. DOHC motor-interference.
My camshafts can be lined to a tee with dowl pins up and marls on side are so even a ruler sits flush with the marks. But down on my crank shaft and oil pump they were sitting in opposite directions about 90 degrees off from the mark. I then tried lining my crankshaft to the mark where the oil pump lined up as well. From there I turned the crankshaft in four 360 degree turns. After each turn checking my camshaft timing marks. In the end my camshaft and oil pump stayed right on mark where my camshaft dowel pins both faced to the right 90 degrees on each side away from their timing mark. So from there I stopped working on the car altogether, and stepped away questioning everything.
At this point the timing seems to be 180 degrees out, and as far as I knew no car could run with timing that far out! I can't distingusih if the belt has jumped, or if it was put on incorrectly.
Can I attempt to fix the timing marks at this point?

I wasn't even 100% certain the belt was the number one issue to the knocking, but I thought I would start somewhere before I dug in further.

Advice?
Was this
answer
helpful?
Yes
No
Tuesday, October 27th, 2020 AT 4:12 PM (Merged)
Tiny
LEGITIMATE007
  • MECHANIC
  • 5,121 POSTS
Oh yes, the belt must have jumped. You have to take the belt off re alighn the timing marks. Then put a new belt on, but damage may have already been done if it jumped that far. Once you put it together you'll have to do a compression check to see if any damage has been done
Was this
answer
helpful?
Yes
No
Tuesday, October 27th, 2020 AT 4:12 PM (Merged)
Tiny
AIRSOFTSOLDRECN9
  • MEMBER
  • 348 POSTS
The car wouldnt start if you were even 5 degrees off. At 180 degrees if you turned the engine over, one it wouldn't start, two you would kiss that engine goodbye since a valve would most likely hit a piston. (One of the reasons why I think the engineers who designed that are absolute idiots. If the belt slips then you are screwed since they are tensioned by friction only it is about as good as a serpentine belt. The probability of skipping a timing chain tooth is slim and if it happens it is because you are doing something stupid.) If you want to align it properly you need to rotate the crank until the number 1 piston is TDC. Take off the valve cover and look at the camshaft and valves. Like you said you have two possibilities 0 or 180 degrees out since there is 2 rotations of the crank per rotation of the cams. Line up the marks and see if the valves on the number 1 piston are both closed. The camshaft lobes should not be pushing down on the valve stems of the exhaust or intake valves. The only thing I can't remember is if the drivers side cam is for intake and the passenger for exhaust or if both intake valves are in pairs followed by exhaust in pairs. If the camshafts are identical then it is the latter. Either way it dosent matter all four of those valves should be completely closed at TDC. So line up the camshafts accordingly.
Was this
answer
helpful?
Yes
No
Tuesday, October 27th, 2020 AT 4:12 PM (Merged)
Tiny
JAEDAE
  • MEMBER
  • 1 POST
  • 1993 HYUNDAI SONATA
  • 6 CYL
  • FWD
  • MANUAL
  • 15,000 MILES
Timing belt broke replacing it having trouble resetting valve gears on top of engine
Was this
answer
helpful?
Yes
No
Tuesday, October 27th, 2020 AT 4:13 PM (Merged)
Tiny
JACOBANDNICKOLAS
  • MECHANIC
  • 108,133 POSTS
Here is the link to the camshaft timing marks

https://www.2carpros.com/diagrams/hyundai/sonata/1993

Please let us know what happens.
Was this
answer
helpful?
Yes
No
Tuesday, October 27th, 2020 AT 4:13 PM (Merged)

Please login or register to post a reply.

Sponsored links