1998 Saturn fuel pump

Tiny
KRANNLIN
  • MEMBER
  • 1998 SATURN STATION WAGON
How do you drop a fuel tank on a 1998 Saturn station wagon to replace the fuel pump?
Monday, December 27th, 2010 AT 2:42 PM

4 Replies

Tiny
SATURNTECH9
  • MECHANIC
  • 30,869 POSTS
REMOVAL

1. Assure that fuel level in tank is not greater than hall If necessary, drain fuel tank to at least this level (refer to "Fuel Tank Draining").
2. Position on hoist.
3. Disconnect negative battery cable.

NOTICE: Fuel supply lines will remain pressurized for long periods of time after the engine is shutdown. This pressure must be relieved before servicing the fuel system.

4. Relieve pressure in fuel system at fuel pressure test port (refer to "Fuel Pressure Release Procedure").

5. Remove fuel filler cap and rubber closeout grommet around fuel filler pipe neck (inside fuel filler door).
6. Remove attachment screw (T-30) at upper end of filler pipe.
7. Raise vehicle to a comfortable working position.
8. Remove wheel house inner liner.
9. Disconnect wiring harness connector from EVAP canister vent solenoid.
10. Remove fuel filler pipe lower bracket attachment screw (10 mm hex) at underbody left hand side rail.

11. Disconnect EVAP canister vent pipe at 5/8 in. Quick connect to canister vent hose.
12. Loosen fuel filler pipe hose clamp (7 mm hex) closest to the fuel tank.

CAUTION: SEVERAL OUNCES OF GASOLINE MAY REMAIN IN THE FUEL FILLER PIPE DUE TO THE DESIGN OF THE INLET CHECK VALVE. BE AWARE OF THIS WHEN HANDLING THE FILLER PIPE DURING REMOVAL FROM THE FUEL TANK. SURROUND THE CHECK VALVE BODY WITH A SHOP CLOTH HELD IN PLACE WITH YOUR HAND. HAVE A SUITABLE CONTAINER AVAILABLE AND DRAIN ANY FUEL BY UNSEATING THE CHECK VALVE.

NOTICE: To provide space to remove filler pipe, guide top of filler pipe into quarter panel opening while removing fuel filler pipe.

13. Disengage filler pipe hose from fuel tank and remove fuel filler pipe.

NOTICE:

* Keep fuel filler pipe as straight and level as possible when removing it from the tank. Fuel fill check valve clamp may drag on the inlet neck of the tank and care should be used in removing it. If valve is dislodged from filler pipe it may remain in the tank
* If there is more than three gallons of fuel in the tank, insert a suitable siphon hose into tank filler neck and remove remaining fuel into a certified fuel handling cart.

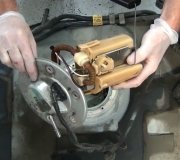
14. Remove (2) screws (10 mm hex) that attach fuel filter/pressure regulator bracket to vehicle underbody.

CAUTION: WHENEVER FUEL LINE FITTINGS ARE LOOSENED OR REMOVED, WRAP A SHOP CLOTH AROUND THE FITTING AND HAVE AN APPROVED CONTAINER AVAILABLE TO COLLECT ANY FUEL.

15. Disconnect fuel feed line (90 degree quick-connect) from outlet of filter/pressure regulator.
16. Disconnect fuel vapor/canister purge line at 90 degree quick-connect adjacent to fuel filter/pressure regulator.
17. Slide filter/regulator bracket out from under brake lines.

18. With aid of an assistant, remove two tank retaining strap bolts (15 mm hex) and lower tank enough to disconnect the two electrical connectors to the fuel pump and tank pressure sensor.
19. Remove fuel tank from vehicle.
Was this
answer
helpful?
Yes
No
+1
Monday, December 27th, 2010 AT 3:36 PM
Tiny
SATURNTECH9
  • MECHANIC
  • 30,869 POSTS
WARNING: Do not allow smoking or the use of open flames in the area where work on the fuel system is taking place. Anytime the fuel system is being worked on, disconnect the negative battery cable, except for those tests where battery voltage is required.

WARNING: Anytime the fuel system is being worked on, disconnect the negative battery cable, except for those tests where battery voltage is required.

NOTE: Clean all fuel pipe and hose connections and surrounding areas before disassembling to avoid possible contamination of the fuel system. Spray the fuel pump module cam-lock ring tang with penetrating oil prior to attempting removal.

FUEL PUMP MODULE REMOVAL

1. Remove fuel tank.

Fuel Pump Module Cam Lock Ring

2. Use the lock ring service tool (Saturn Tool) SA9156E and remove the fuel pump module cam-lock ring. A 1/2 in. Breaker bar (approximately 18 inches long) will easily loosen and remove the lock ring. To prevent lock ring damage, do not attempt to remove the ring with a 12 in. Or shorter ratchet/breaker bar.

NOTE: Care must be taken not to bend or twist the fuel pump filter or sending unit during removal or installation of fuel pump module assembly. A damaged fuel pump filter restricts fuel flow to the pump and a bent sending unit arm will not provide accurate readings. Care must be taken to assure pump module is not dropped. A dropped pump can dislodge internal parts creating a noisy condition.

Removing Fuel Pump Module

3. Carefully lift the fuel pump module with sending unit assembly from the fuel tank at a 45 degree angle to prevent, filter sending unit and float arm damage.

NOTE: Always replace the fuel pump module to tank O-ring whenever the assembly is removed.

4. Discard the large fuel pump module to tank O-ring.

NOTE: Inspect the fuel tank for metal chips/debris. Remove all contaminants and replace the in-line fuel filter before installing a new fuel pump assembly when debris are present.

Installing Fuel Pump Module

INSTALLATION

1. Inspect fuel tank and clean the fuel tank O-ring groove of any foreign debris and install a new O-ring.
2. Carefully install the fuel pump module with sending unit assembly in the fuel tank at a 45 degree angle to prevent sending unit and float damage. The fuel filter and sending unit float arm must be directed toward the front of the tank. The fuel pump locator tabs must be aligned with the slots in the tank.

NOTE: The fuel pump lock ring cannot be properly installed if the pump flange locator tabs are not aligned with the slots in the tank.

3. Install the cam-lock ring using lock ring service tool (Saturn Tool) SA9156E.
4. Install the fuel tank.
Was this
answer
helpful?
Yes
No
+2
Monday, December 27th, 2010 AT 3:42 PM
Tiny
KRANNLIN
  • MEMBER
  • 2 POSTS
Thanks so much. We'll give it a try.
Was this
answer
helpful?
Yes
No
Monday, December 27th, 2010 AT 3:50 PM
Tiny
SATURNTECH9
  • MECHANIC
  • 30,869 POSTS
Your welcome that's what were here for.
Was this
answer
helpful?
Yes
No
Monday, December 27th, 2010 AT 5:08 PM

Please login or register to post a reply.

Sponsored links