Need process for changing Rear brakes

Tiny
AKAMARATHONMAN
  • MEMBER
  • 1997 FORD ESCORT
  • 185,000 MILES
How do I change rear brakes on 1997 for escort
Do you
have the same problem?
Yes
No
Wednesday, February 9th, 2011 AT 6:19 PM

7 Replies

Tiny
SATURNTECH9
  • MECHANIC
  • 30,870 POSTS
Instead of measuring the shoes and drum to set the rear brake adjustment you can also adjust them out slowly until a light scraping sounding is heard when the drum is on and spinning it by hand.
REMOVAL

1. Raise and support the vehicle
2. Remove the lug nuts and the wheel and tire assembly.
3. Remove the two brake drum screws and remove the brake drum.
4. Use Brake/Clutch/Service Vacuum 164-R36OO or equivalent to remove brake dust and dirt from the brake assemblies.

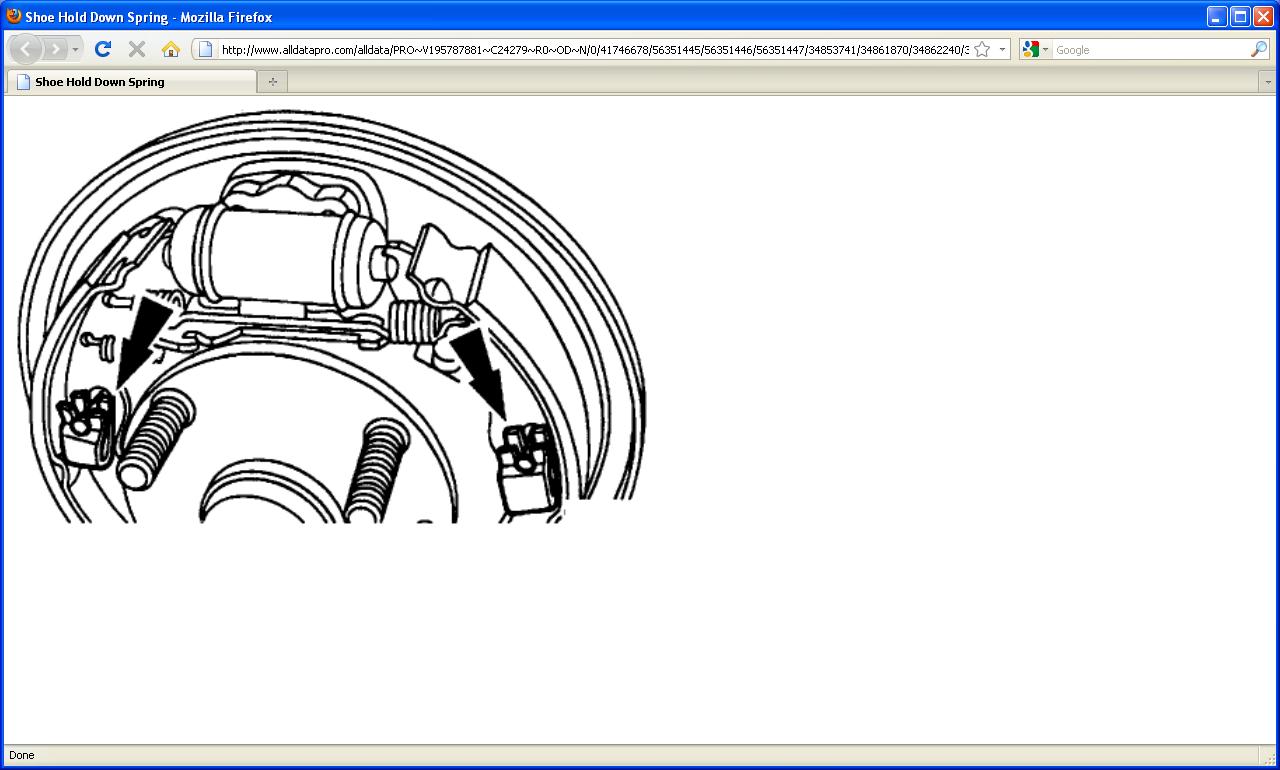
Shoe Hold Down Spring

5. Push, turn, and remove the brake shoe hold-down springs.

6. Remove the (A) brake shoe retracting spring and the (B) anti-rattle spring and remove the brake shoes and linings.

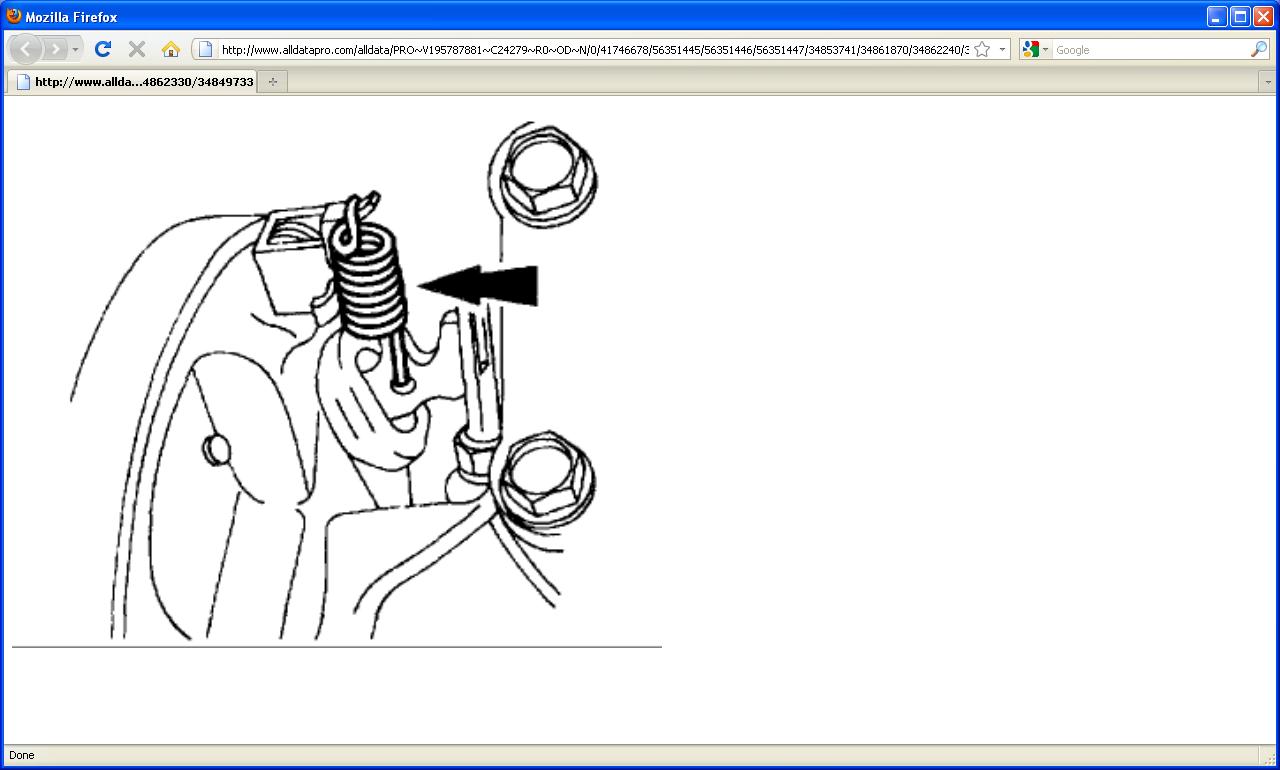
7. Remove the parking brake link spring.
8. Pull the parking brake actuation lever through the slot in the brake backing plate.

INSPECTION
NOTE: If new rear brake shoes and linings are being installed, resurface the brake drums to remove glazing and to ensure an equal friction surface from side-to-side. Resurfacing will also correct out-of-round and bell conditions.

Using Brake Drum Micrometer

1. Use a brake drum micrometer to measure the braking surface diameter. If it has worn more than the maximum diameter, shown on the outside of the brake drum, replace the brake drum

2. If the rear shoes and linings are to be reused, inspect and measure the thickness. If the shoes are worn beyond the minimum thickness specification, replace them.

INSTALLATION

1. To install, reverse the removal procedure.

2. Measure the brake drum with Brake Adjustment Gauge.

Measuring Brake Shoe Adjustment

3. Put the Brake Adjustment Gauge on the brake shoes and adjust the brake shoes.

NOTE: Tighten the drum retaining screws to 10-14 Nm (89-123 inch lbs.).
NOTE: Tighten the lug nuts in the specified sequence to 89-117 Nm (66 - 86.7 ft. Lbs.).
Was this
answer
helpful?
Yes
No
Wednesday, February 9th, 2011 AT 6:56 PM
Tiny
AKAMARATHONMAN
  • MEMBER
  • 4 POSTS
Thank you! I have a very nice walkthrough now. I have one problem though. I went to do it and after taking out the set screws I went to unseat the drum and there's only one hole for a screw to go into. I got that side to unseat, but the other side of the drum won't budge. Do you know what could be causing that to bind? Thanks for your help.
Was this
answer
helpful?
Yes
No
+2
Thursday, February 10th, 2011 AT 4:35 PM
Tiny
SATURNTECH9
  • MECHANIC
  • 30,870 POSTS
Get some liquid wrench spray it on the center hub area let it soak in at least 20 mins. Remove the forcing *********r using to get the drum off. Then get a soft face hammer like a dead blow and smack the face of the drum around the edge's some good smack's then try to take it off a again. It's probably just rusted on. Let me know how it goes.
Was this
answer
helpful?
Yes
No
+1
Thursday, February 10th, 2011 AT 6:31 PM
Tiny
AKAMARATHONMAN
  • MEMBER
  • 4 POSTS
Thanks for the advice. The problem was that I had the emergency break on. After I got past that your instructions worked great.

Now I have to replace the rear coil springs. The struts are fine but both springs are broken. Do you know a procedure for replacing just the springs? I have the tool to compress it when putting it on.

Thanks
Was this
answer
helpful?
Yes
No
Friday, February 11th, 2011 AT 10:08 PM
Tiny
SATURNTECH9
  • MECHANIC
  • 30,870 POSTS
This is for the rear strut mount replacement the rubber mount at the top of the coil spring it will give you the instructions you need to replace the spring's.
REMOVAL

1. For the sedan, remove the rear seat trim and the package tray trim panel. For the wagon, remove the quarter trim panel.

2. Remove the two upper shock absorber nuts.
3. Raise and support the vehicle.

4. Slide the brake hose clip off.

5. Remove the anti-lock brake system (ABS) sensor bracket bolt, if equipped.

6. Remove the two lower shock absorber nuts and bolts and the spring and shock assembly.

7. Secure the spring and shock assembly in a bench vise and use Spring Compressor 164-R3556 or equivalent to compress the rear spring to relieve the tension on the piston rod nut.

8. Remove the rear shock absorber insulator.

1. Remove the rear shock absorber top mounting cover (1).
2. Remove the piston rod nut (2).
3. Remove the retainer (3).
4. Remove the rear shock absorber insulator (4).

9. Separate the rear shock absorber and the rear spring.

1. Remove the rear shock absorber dust boot (1).
2. Remove the stopper seat (2).
3. Remove the rear spring (3).
4. Remove the rear spring insulator (4).

INSTALLATION
To install, reverse the removal procedure.
Was this
answer
helpful?
Yes
No
Saturday, February 12th, 2011 AT 1:20 AM
Tiny
AKAMARATHONMAN
  • MEMBER
  • 4 POSTS
Thank you for the instructions. I did it with no problems. I appreciate all your help.
Was this
answer
helpful?
Yes
No
Monday, February 14th, 2011 AT 4:22 PM
Tiny
SATURNTECH9
  • MECHANIC
  • 30,870 POSTS
Your very welcome that's what were here for tell all your friend's about our website.
Was this
answer
helpful?
Yes
No
Monday, February 14th, 2011 AT 7:11 PM

Please login or register to post a reply.

Sponsored links