Hello
Your vehicle has two different types of axles. 8.25 F4WD Axle and 8.25 S4WD and 9.25 Axles.
Based off of what you said about a spring, I am could assume you know you have the 8.25 S4WD and 9.25 Axles, but I don't want to provide you with the wrong information and you have the other type. So I have attached information for both. Please make sure you verify before you take things apart so you are doing the correct one.
I also included axle shaft removal. Suggestion: If it were me and I had it apart anyway and you have to get the front end aligned anyway, then I would replace the axle shafts or boots while it is all tore apart.
Also, I have included a Technical Service Bulletin on the LH Front Axle Seal leaking.
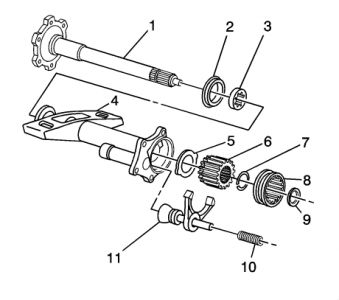
In answer to your question about the spring, as you see item 10 in the one figure is the spring but all of these goodies can fall out so it tells you to be careful on how you hold it. This also answers your question about things falling out. As for the clip to hold in, doesn't appear to be as it looks like it bolts up.
FRONT DRIVE AXLE REPLACEMENT
Repair Instructions
Tools Required
J 45859 Axle Remover
Removal Procedure
Raise the vehicle. Refer to Vehicle Lifting.
Remove the wheel and tire assembly.
Remove the drive axle center cap, if equipped,
Insert a drift or a large screwdriver through the brake caliper into 1 of the brake rotor vanes in order to prevent the drive axle wheel drive shaft from turning.
Remove the nut and the washer from the hub. Do not reuse the nut. A new nut must be used when installing the wheel drive shaft.
Using the J 45859 or equivalent, press the wheel drive shaft from the hub.

Remove the 6 bolts (1) securing the wheel drive shaft inboard flange to the output shaft flange.
Remove the drift from the rotor.
Remove the stabilizer shaft link from the lower control arm.
Wrap shop towels around both the inner and the outer wheel drive shaft boots in order to avoid damage to the boots during removal and installation.
Pull the wheel drive shaft through the lower control arm opening.
Installation Procedure
Wrap shop towels around both the inner and the outer wheel drive shaft boots in order to avoid damage to the boots during removal and installation. Important: Clean the steering knuckle and the wheel drive shaft splines and threads. These areas must be dry and free of grease, dirt, and contamination.
Insert the wheel drive shaft splined shank into the knuckle hub. Notice: Use only a genuine GM front wheel drive shaft nut. Installation of anything but an OEM front wheel drive shaft nut could cause damage to the vehicle.
Install the washer (3) and the new hub nut (2) to the wheel drive shaft. Do not tighten the new hub nut at this time.
Attach the wheel drive shaft inboard flange to the output shaft flange using the inboard flange bolts (1). Notice: Refer to Fastener Notice in Service Precautions.
Insert a drift or a large screwdriver through the brake caliper into 1 of the brake rotor vanes in order to prevent the wheel drive shaft from turning.
Tighten the inboard flange bolts to 79 Nm (58 ft. lbs.) .
Tighten the hub nut to 210 Nm (155 ft. lbs.) .
Remove the drift from the rotor.
Install the drive axle center cap, it equipped.
Install the stabilizer shaft link.
Install the wheel and tire assembly.
Lower the vehicle.
Inner Shaft and/or Housing Replacement - Front Drive Axle (8.25 F4WD Axle)
Removal Procedure
Raise the vehicle. Refer to Vehicle Lifting.
Drain the differential carrier assembly.
Remove the stabilizer shaft link assembly.

Remove the wheel drive shaft inboard flange bolts from the inner axle shaft.
Disconnect the wheel drive shaft from the inner axle shaft.
Disconnect the inner axle shaft from the differential case side gear using a hammer and brass drift.
Remove the inner axle shaft housing nuts from the bracket.
Remove the inner axle shaft housing bolts from the differential carrier assembly.
Remove the inner axle shaft and inner axle shaft housing from the vehicle.
Remove the inner axle shaft from the inner axle shaft housing.
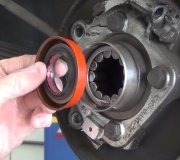
Remove the inner axle shaft seal and the bearing from the inner axle shaft housing.
Installation Procedure
Install the new inner axle shaft bearing and the new seal to the inner axle shaft housing.
Install the inner axle shaft into the inner axle shaft housing.Do not install the inner axle shaft completely into the inner axle shaft housing at this time.
Apply sealant to the inner axle housing to differential carrier sealing surface. Use the correct sealant.
Install the inner axle shaft and the inner axle shaft housing to the differential carrier assembly.

Install the inner axle shaft housing bolts.
Tighten the inner axle shaft housing bolts to 40 Nm (30 ft. lbs.) .
Notice: Refer to Fastener Notice in Service Precautions.

Install the inner axle shaft housing nuts to the bracket.
Tighten the inner axle shaft housing nuts to 100 Nm (75 ft. lbs.) .
Install the inner axle shaft into the differential case side gear by doing the following:
Turn the inner axle shaft and align the splines of the inner axle shaft with the splines on the differential side gear.
Install the inner axle shaft into the differential case side gear using a soft-faced mallet until the retaining ring on the inner axle shaft is fully seated within the groove in the differential case side gear.
Pull back on the inner axle shaft to ensure that the inner axle shaft is properly retained in the differential case side gear.
Install the wheel drive shaft inboard flange to the inner axle shaft.
Install the wheel drive shaft inboard flange to inner axle shaft bolts.
Tighten the wheel drive shaft inboard flange to inner axle shaft bolts to 79 Nm (58 ft. lbs.) .
Install the stabilizer shaft link assembly.
Fill the differential carrier assembly with axle lubricant. Use the correct fluid.
Lower the vehicle.
Inner Shaft and/or Housing Replacement - Front Drive Axle (8.25 S4WD and 9.25 Axles)
Removal Procedure

Raise the vehicle. Refer to Vehicle Lifting.
Drain the differential carrier assembly.
Disconnect the electrical connector from the electric motor actuator.
Disconnect the wire harness from the inner axle shaft housing.
Remove the stabilizer shaft link assembly.

Remove the wheel drive shaft inboard flange bolts from the inner axle shaft. Disconnect the wheel drive shaft from the inner axle shaft.

Remove the inner axle shaft housing nuts from the bracket.
For 25/35 series vehicles, perform the following steps in order to provide additional clearance so the inner axle housing can be removed from the vehicle:
Remove the front axle mounting bracket to frame nuts.
Slide the front axle mounting bracket towards the engine. It may be necessary to pull down on the inner axle housing and/or push up on the mounting bracket in order to gain clearance.

Remove the inner axle shaft housing bolts from the differential carrier case.

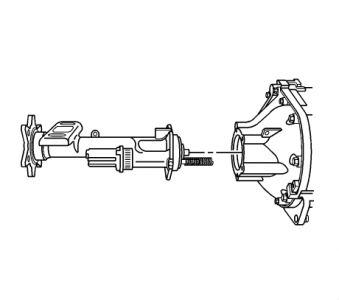
Carefully remove the inner axle shaft housing assembly from the differential carrier assembly. Important: Keep the open end of the inner axle shaft housing up.

For the 8.25 inch axle, remove the following components from the inner axle shaft housing:
The clutch fork inner spring (10)
The clutch fork assembly (11)
The clutch shaft shim (9)
The clutch sleeve 8
The clutch gear (6) by doing the following:
Clamp the inner axle shaft housing (4) in a vise. Clamp only on the mounting flange.
Strike the inside surface of the shaft (1) flange with a hammer and a brass drift in order to dislodge the front drive axle clutch gear (6) from the inner axle shaft (1).
The thrust washer (5)

The clutch fork inner spring (10)
The clutch fork assembly (11)
The clutch shaft shim (9)
The clutch sleeve 8
The retainer ring (7)
The thrust washers (5, 6)
Remove the inner axle shaft (2). Tap out the inner axle shaft with a soft-faced mallet, if necessary.
Remove the inner axle seal and the bearing from the axle housing.
Installation Procedure
Install the new inner axle shaft bearing and the seal to the axle housing.

Install the inner axle shaft (2) into the inner axle shaft housing (1). Carefully tap the inner axle shaft into place with a soft-faced mallet.
Place the inner axle shaft housing on end so that the splines of the inner axle shaft is facing up.
For the 8.25 inch axle, install the following components into the inner axle shaft housing:
The thrust washer (5) Ensure the tabs on the thrust washer are aligned with the slots in the inner axle shaft housing (4). Important: Use chassis grease in order to hold the thrust washer in place.
The retainer ring (7) into the clutch gear (6).
The clutch gear (6) onto the inner axle shaft (1). Drive the clutch gear into place with a plastic hammer.
Determine the clutch gear shim thickness.
The clutch gear shim (9)
The clutch sleeve 8
The clutch fork assembly (11)
The clutch fork inner spring (10)

For the 9.25 inch axle, install the following components into the inner axle shaft housing:
The thrust washer (5) Ensure the tabs on the thrust washer are aligned with the slots in the inner axle shaft housing (4). Important: Use chassis grease in order to hold the thrust washer in place.
The second thrust washer (6)
The retainer ring (7) onto the inner axle shaft (1).
Determine the clutch gear shim thickness.
The clutch gear shim (9)
The clutch sleeve 8
The clutch fork assembly (11)
The clutch fork inner spring (10)
Apply sealant to the inner axle housing to differential carrier sealing surface. Use the correct sealant.
Install the inner axle shaft housing assembly to the differential carrier assembly.
Install the inner axle shaft housing bolts.
Tighten the inner axle shaft housing bolts to 40 Nm (30 ft. lbs.) .
Notice: Refer to Fastener Notice in Service Precautions.

For 25/35 series vehicles, perform the following steps in order to install the front axle mounting bracket to the inner axle shaft housing:
Slide the front axle mounting bracket towards the frame. Install the front axle mounting bracket studs into the inner shaft housing mounting flange.It may be necessary to push up on the front axle mounting bracket and/or pull down on the inner axle housing in order to gain enough clearance to install the mounting bracket studs into the inner shaft housing.
Install the front axle mounting bracket to frame nuts.
Tighten the inner axle shaft housing mounting bracket to frame nuts to 90 Nm (67 ft. lbs.) .
Install the inner axle shaft housing washers and nuts to the bracket.
Tighten the inner axle shaft housing nuts to 100 Nm (75 ft. lbs.) .
Connect the wheel drive shaft inboard flange to the inner axle shaft.

Install the wheel drive shaft inboard flange to the inner axle shaft bolts.
Tighten the wheel drive shaft inboard flange to inner axle shaft bolts to 79 Nm (58 ft. lbs.) .
Install the stabilizer shaft link assembly.

Connect the wire harness to the inner axle shaft housing.
Connect the electrical connector to the front axle actuator.
Fill the differential carrier assembly with axle lubricant. Use the correct fluid.
Lower the vehicle.
TECHNICAL
Bulletin No.: 08-07-30-009A
Date: March 12, 2008
Subject:
HYDRA-MATIC(R) Front Wheel Drive 4T80-E (MH1) Left Front Axle Seal Leak, Transmission Slips in Gear (Replace Third Clutch Housing with Revised Service Part)
Models:
2001-2008 GM Passenger Cars
with HYDRA-MATIC(R) Front Wheel Drive 4T80-E Automatic Transmission (RPO - MH1)
Supercede:
This bulletin is being revised to change the location of the transmission fluid leak from the right front axle to the left front axle. Please discard Corporate Bulletin Number 08-07-30-009 (Section 07 - Transmission/Transaxle).
Condition
Some customers may comment on a transmission oil leak and/or that the transmission slips in gear.
Cause
An oil leak may be caused by bushing wear in the third clutch housing causing excessive fluid build-up at axle seal.
Correction
Important: DO NOT replace the transmission for above concerns.
Replace the third clutch housing with service P/N 8682114 which has revised bushing material to extend life and reduce left front axle seal leaks. Refer to Automatic/Transaxle - 4T80-E Transmission Off-Vehicle Repair Instructions for the replacement of the third clutch housing in SI.

Parts Information
Warranty Information

For vehicles repaired under warranty, use the table.
SPONSORED LINKS
Saturday, October 18th, 2008 AT 6:36 PM