Hello,
Here are the instructions for doing the engine timing belt, don't forget to check out he engine diagrams below!
Engine removal is not required for this procedure.
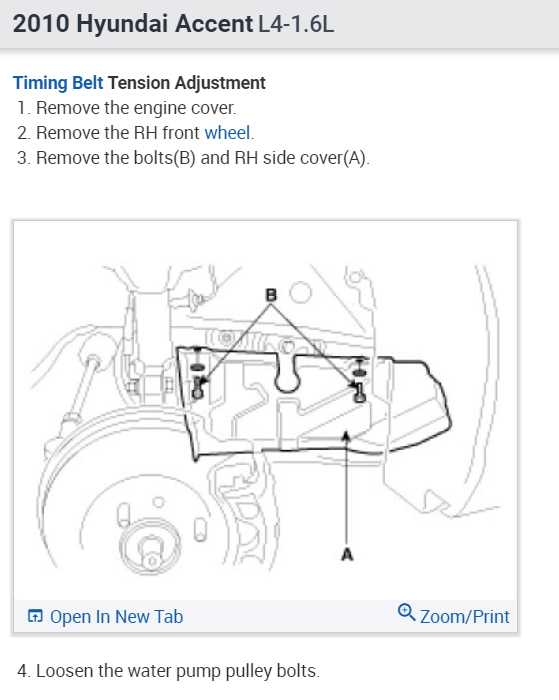
Remove the engine cover.
Remove the RH front wheel.
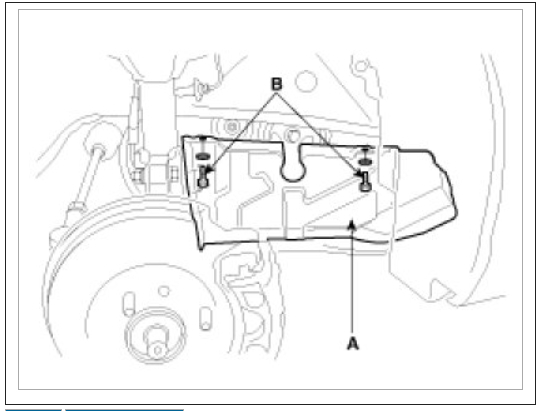
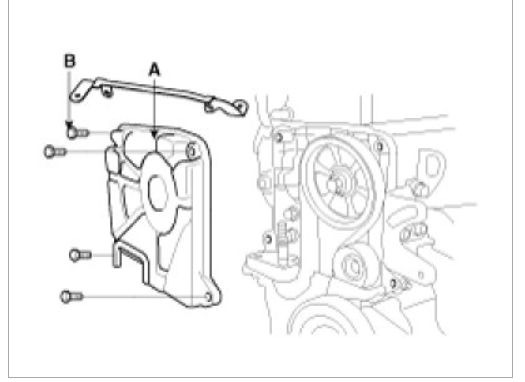
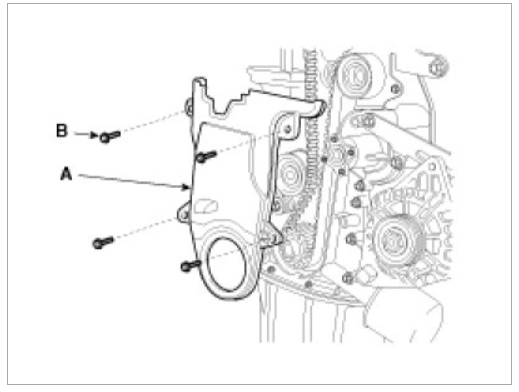
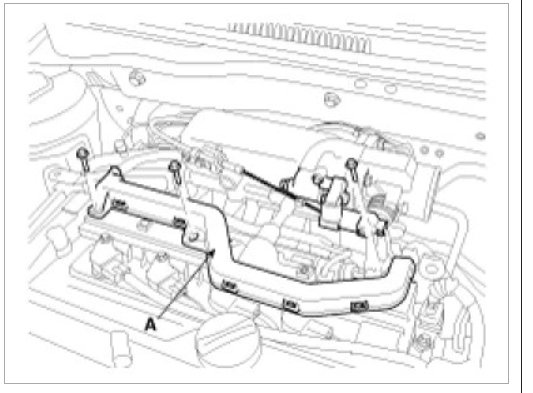
Remove the 2 bolts(B) and RH side cover(A).
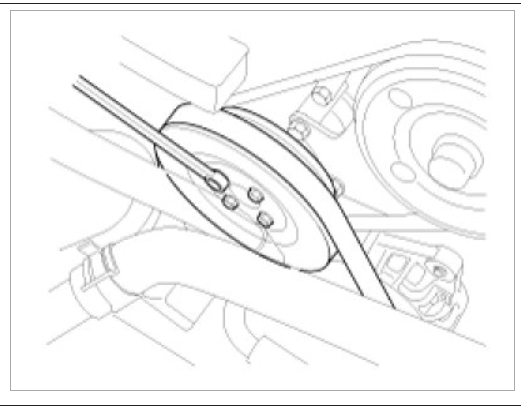
Temporarily loosen the water pump pulley bolts.
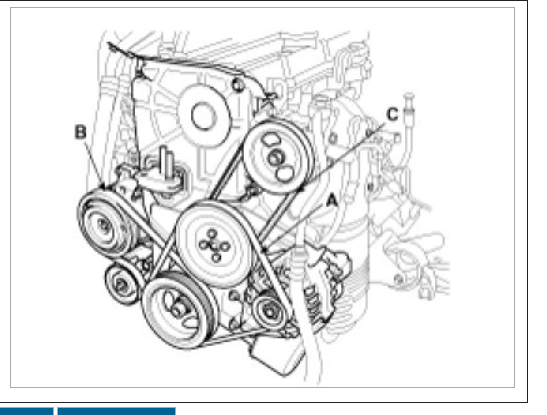
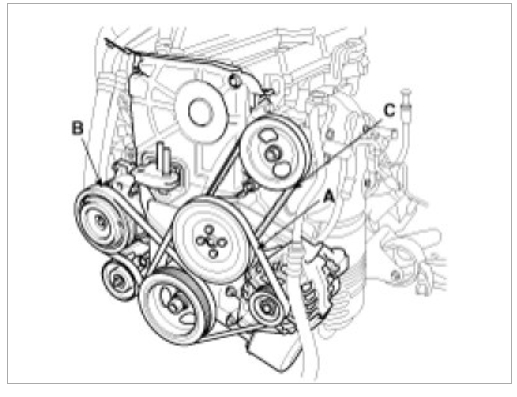
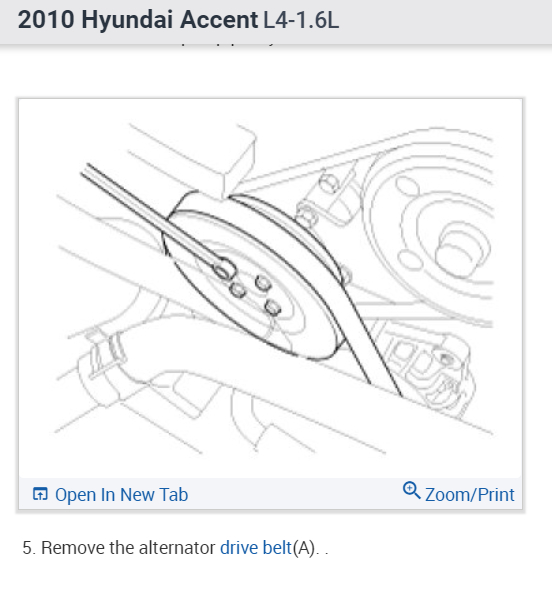
Remove the alternator drive belt(A)..
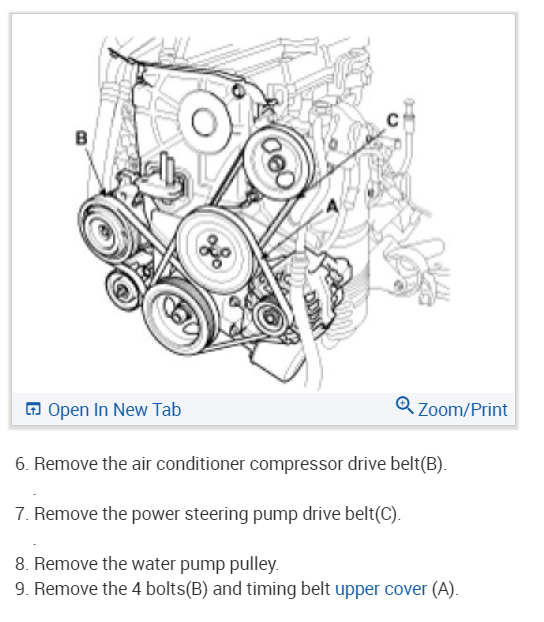
Remove the air conditioner compressor drive belt(B)..
Remove the power steering pump drive belt(C)..
Remove the 4 bolts and water pump pulley.
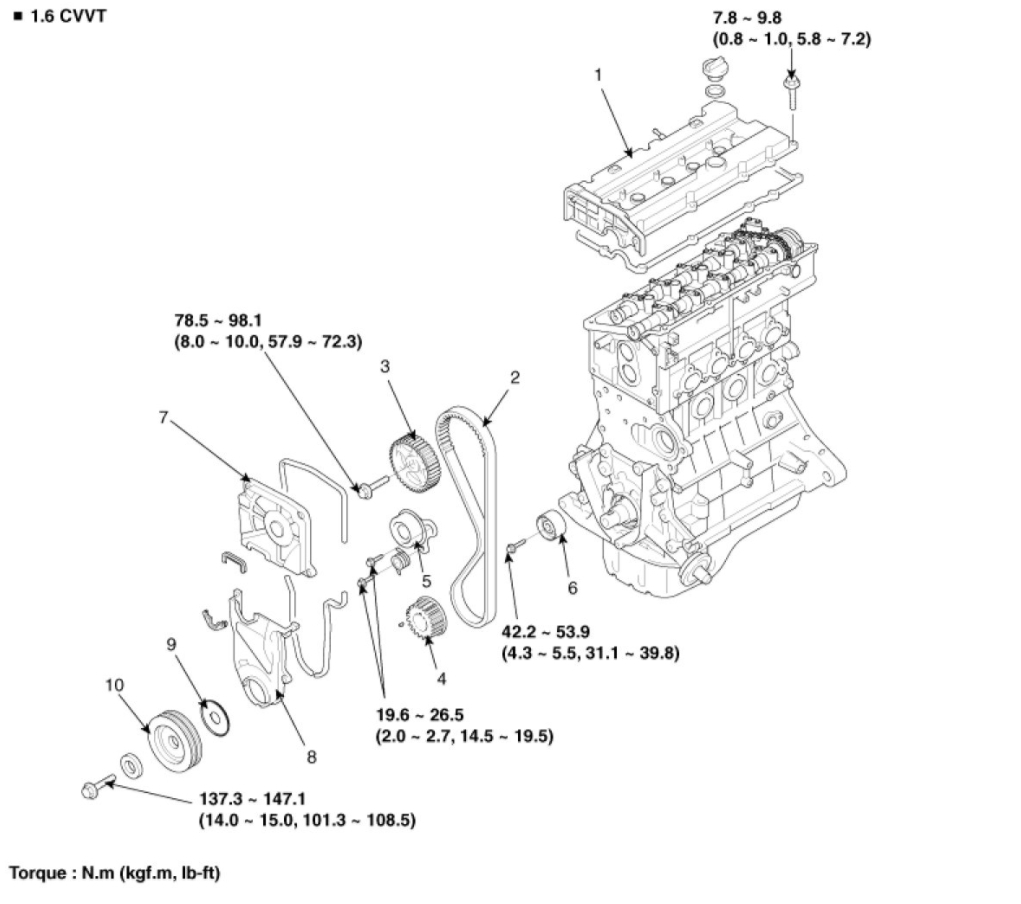
Remove the 4 bolts(B) and timing belt upper cover(A).
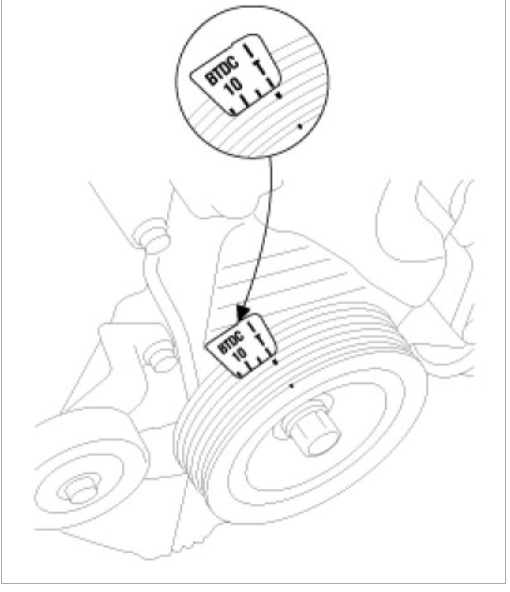
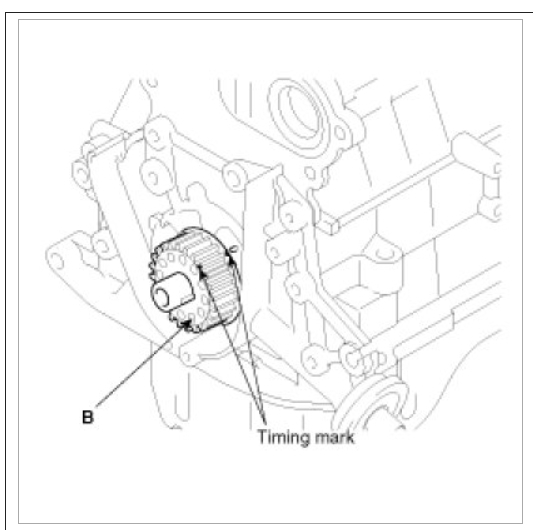
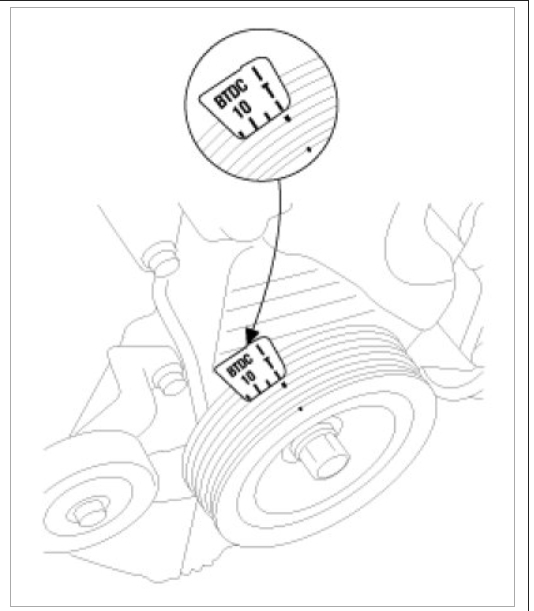
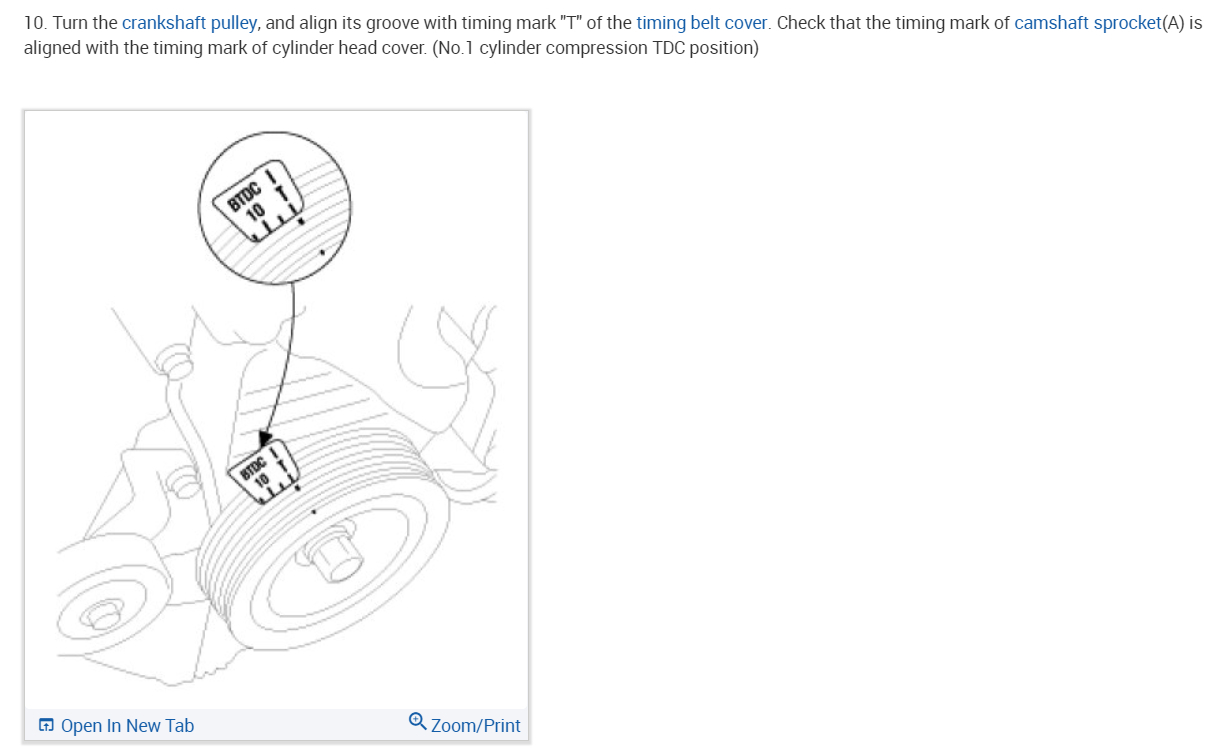
Turn the crankshaft pulley, and align its groove with timing mark "T" of the timing belt cover. Check that the timing mark of camshaft sprocket is aligned with the timing mark of cylinder head cover. (No.1 cylinder compression TDC position)
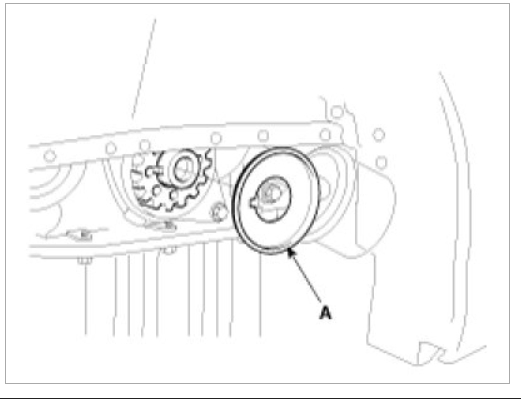
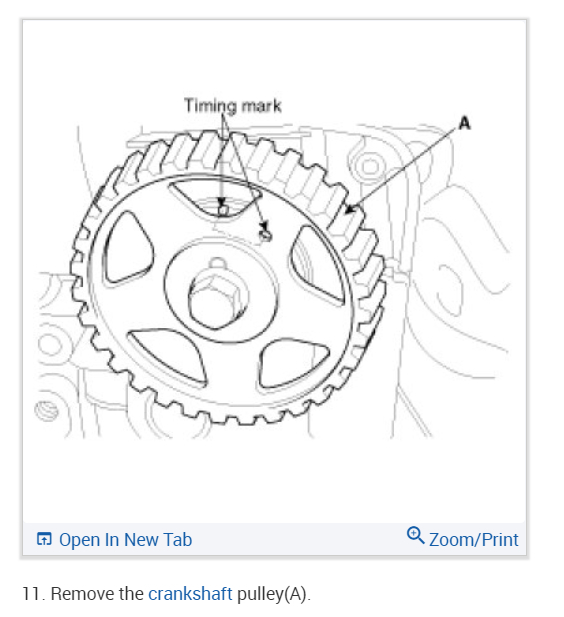
Remove the crankshaft pulley bolt and crankshaft pulley(A).
Remove the crankshaft flange(A).
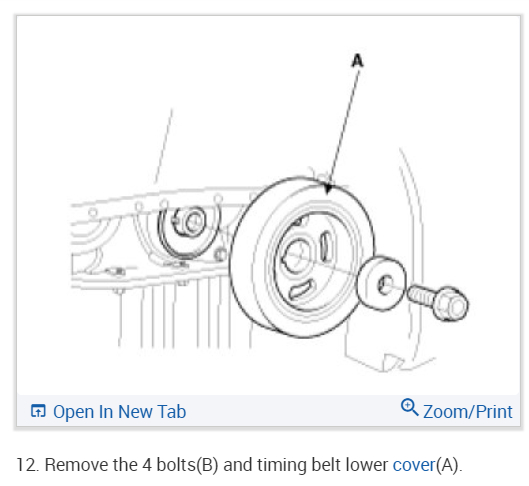
Remove the 4 bolts(B) and timing belt lower cover(A).
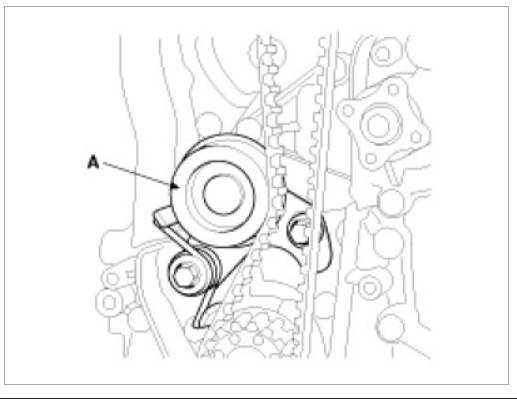
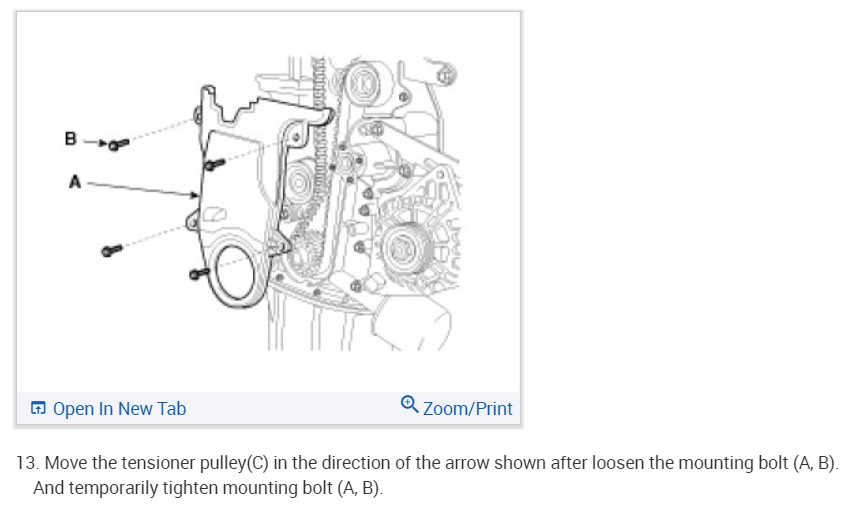
Remove the timing belt tensioner(A) and timing belt.
NOTE: If the timing belt reused, make an arrow indicating the turning direction to make sure that the belt is reinstalled in the same direction as before.
Remove the bolt(B) and timing belt idler(A).
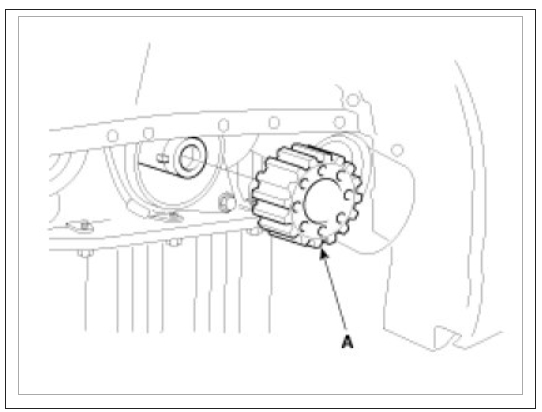
Remove the crankshaft sprocket(A).
Remove the cylinder head cover.
(1) Remove the wire harness bracket(A).
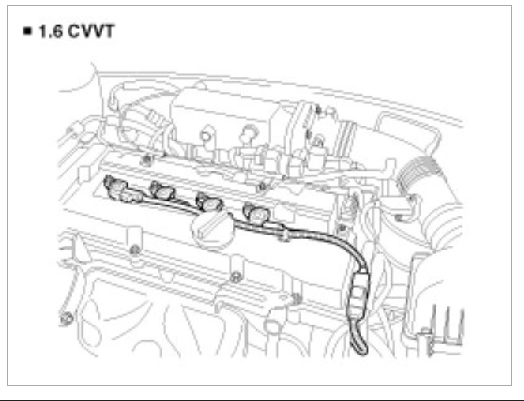
(2) Remove the ignition coil.
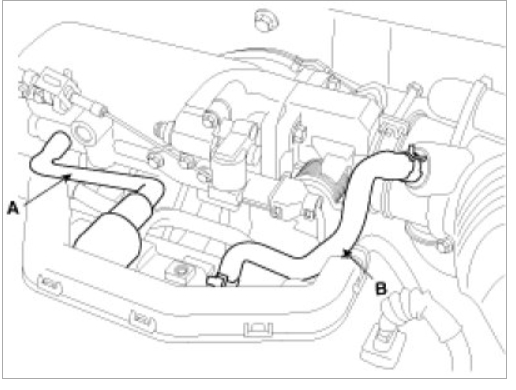
(3) Remove the PCV (Positive Crankcase Ventilation) hose(A) and the breather hose(B) from the cylinder head cover.
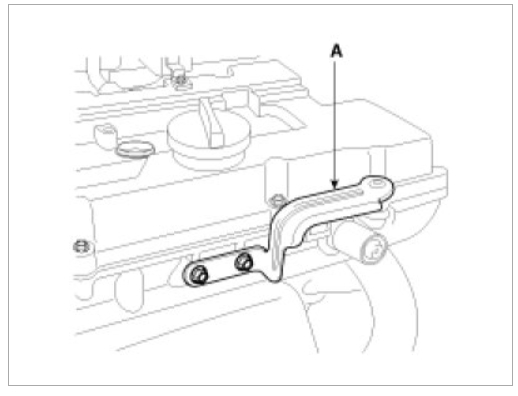
(4) Remove the engine cover bracket(A).
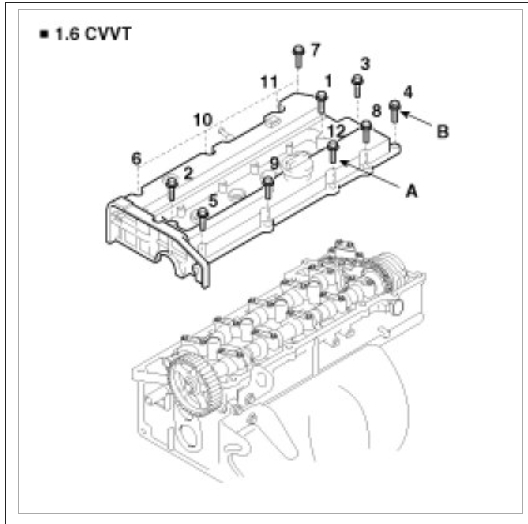
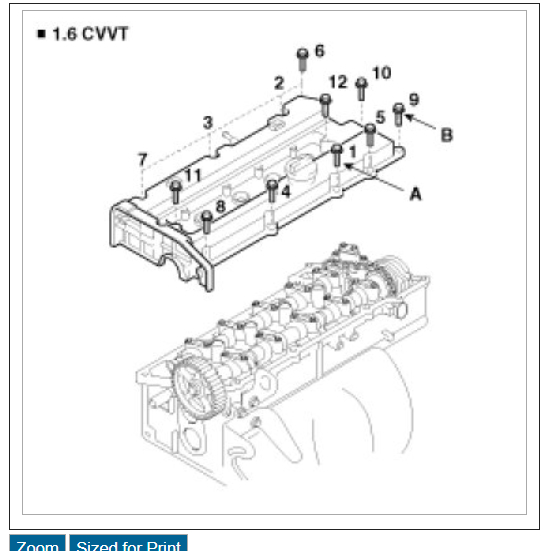
(5) Loosen the cylinder head cover bolts(B) and then remove the cover(A) and gasket.
Remove the camshaft sprocket.
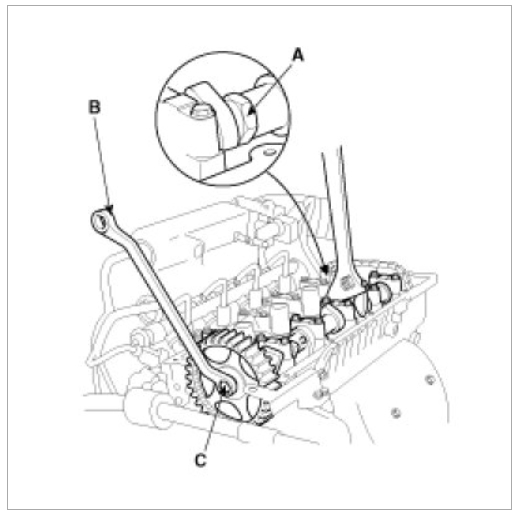
(1) Hold the portion(A) of the camshaft with a hexagonal wrench, and remove the bolt(C) with a wrench(B) and remove the camshaft sprocket.
CAUTION:
Be careful not to damage the cylinder head and valve lifter with the wrench.
Installation
Install the camshaft sprocket and tighten the bolt to the specified torque.
(1) Temporarily install the camshaft sprocket bolt(C).
(2) Hold the portion(A) of the camshaft with a hexagonal wrench, and tighten the bolt(C) with a wrench(B).
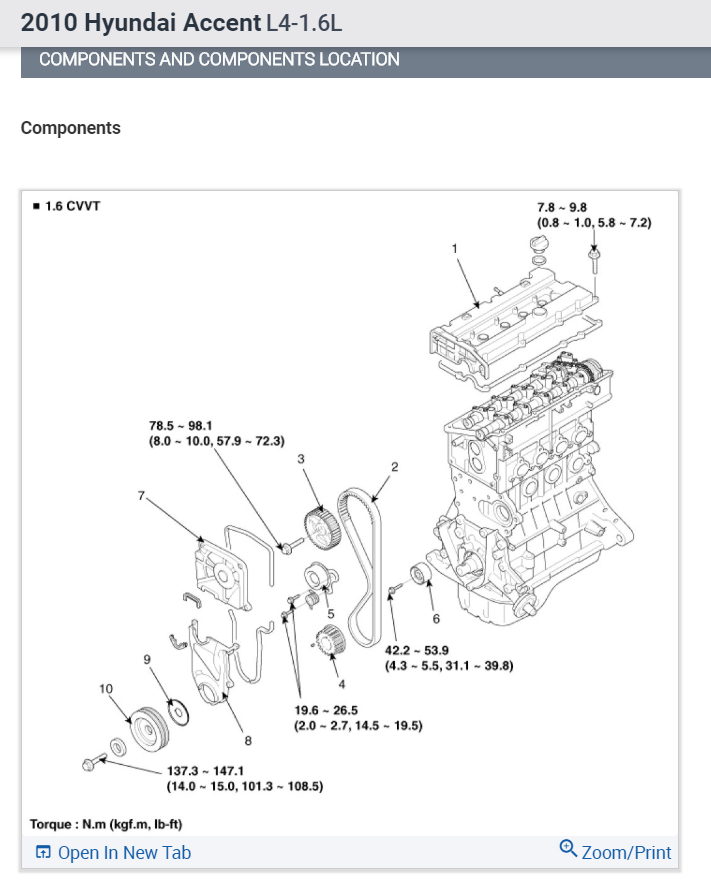
Tightening torque :
78.5 - 98.1N.M (8.0 - 10.0kgf.M, 57.9 - 72.3lb-ft)
Install the cylinder head cover.
(1) Install the cylinder head cover(A) and bolts(B).
Tightening torque :
7.8 - 9.8N.M (0.8 - 1.0kgf.M, 5.8 - 7.2lb-ft)
NOTE:
Tighten the cylinder head cover bolts as following method.
(2) Install the engine cover bracket(A).
(3) Install the PCV(Positive Crankcase Ventilation) hose(A) and breather hose(B) to the cylinder head cover.
(4) Install the ignition coil.
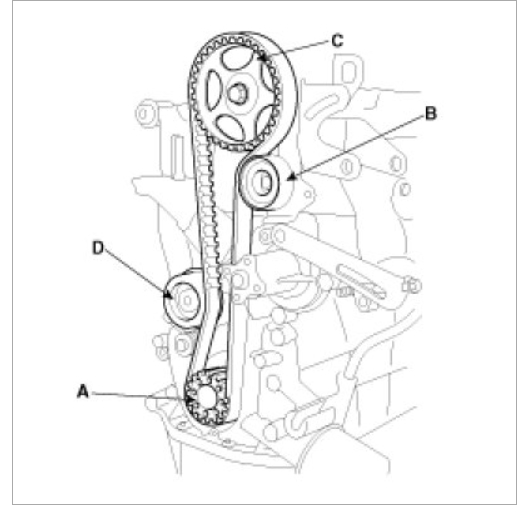
Install the crankshaft sprocket(A).
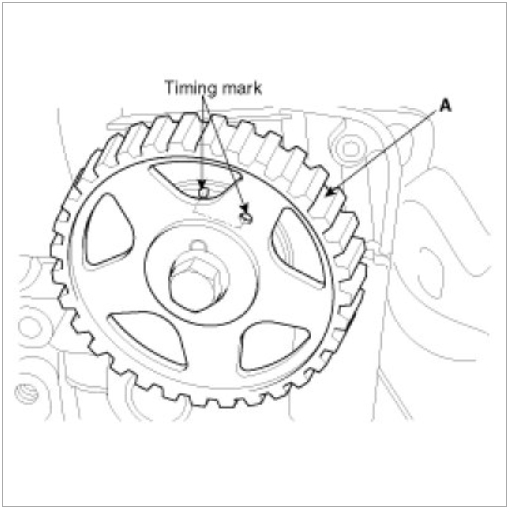
Align the timing marks of the camshaft sprocket(A) and crankshaft sprocket(B) with the No.1 piston placed at top dead center and its compression stroke.
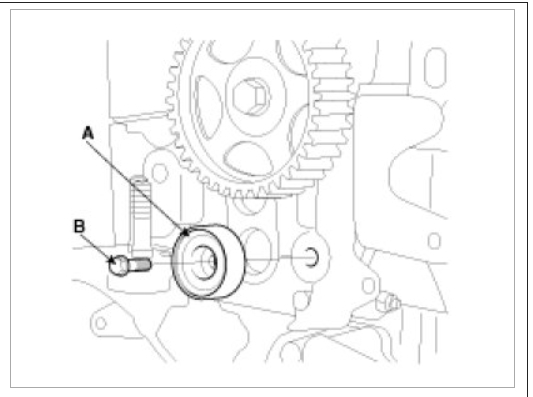
Install the idler pulley(A) and tighten the bolt(B) to the specified torque.
Tightening torque :
42.2 - 53.9N.M (4.3 - 5.5kgf.M, 31.1 - 39.8lb-ft)
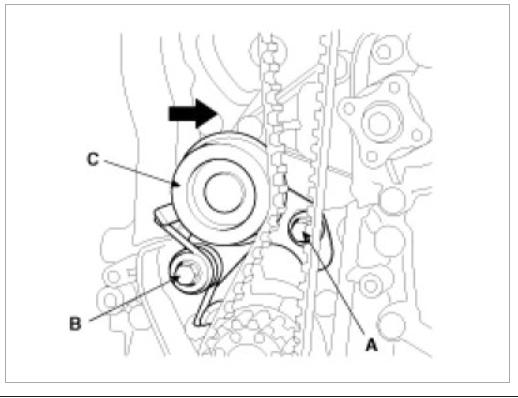
Temporarily install the timing belt tensioner(A).
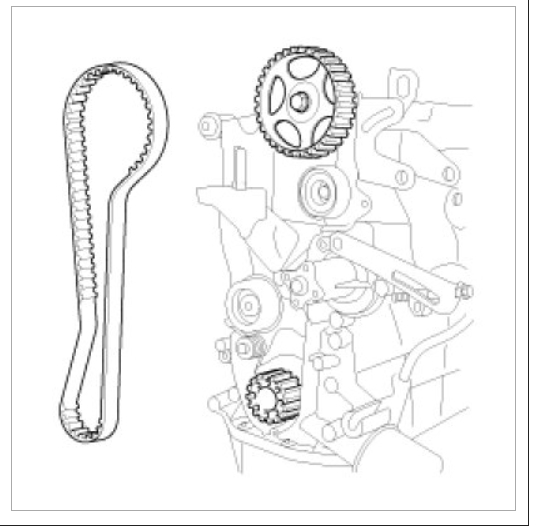
Install the belt so as not give slack at each center of shaft. Use the following order when installing timing belt. Crankshaft sprocket(A) ->idler pulley(B) ->camshaft sprocket(C) ->timing belt tensioner(D).
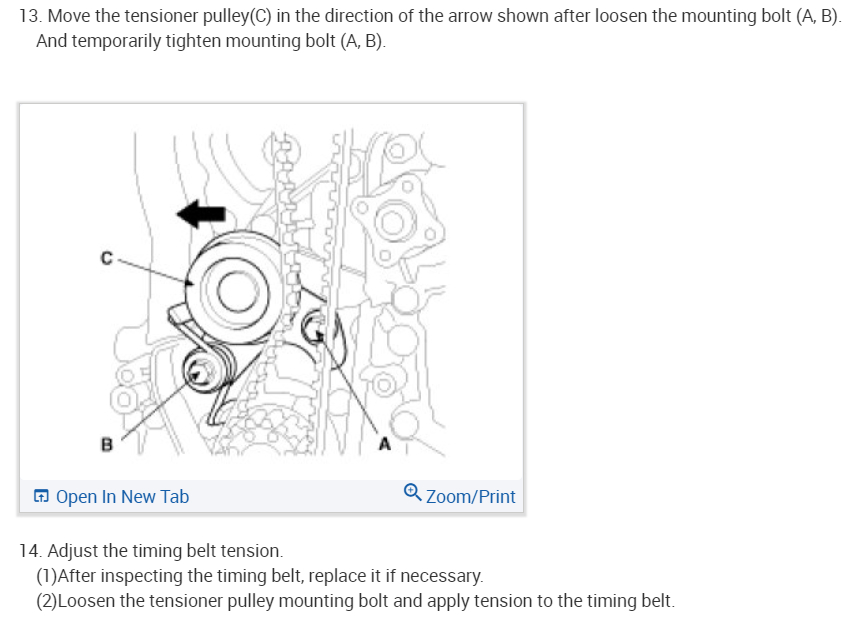
Adjust the timing belt tension.
(1) Loosen the tensioner pulley mounting bolt and apply tension to the timing belt.
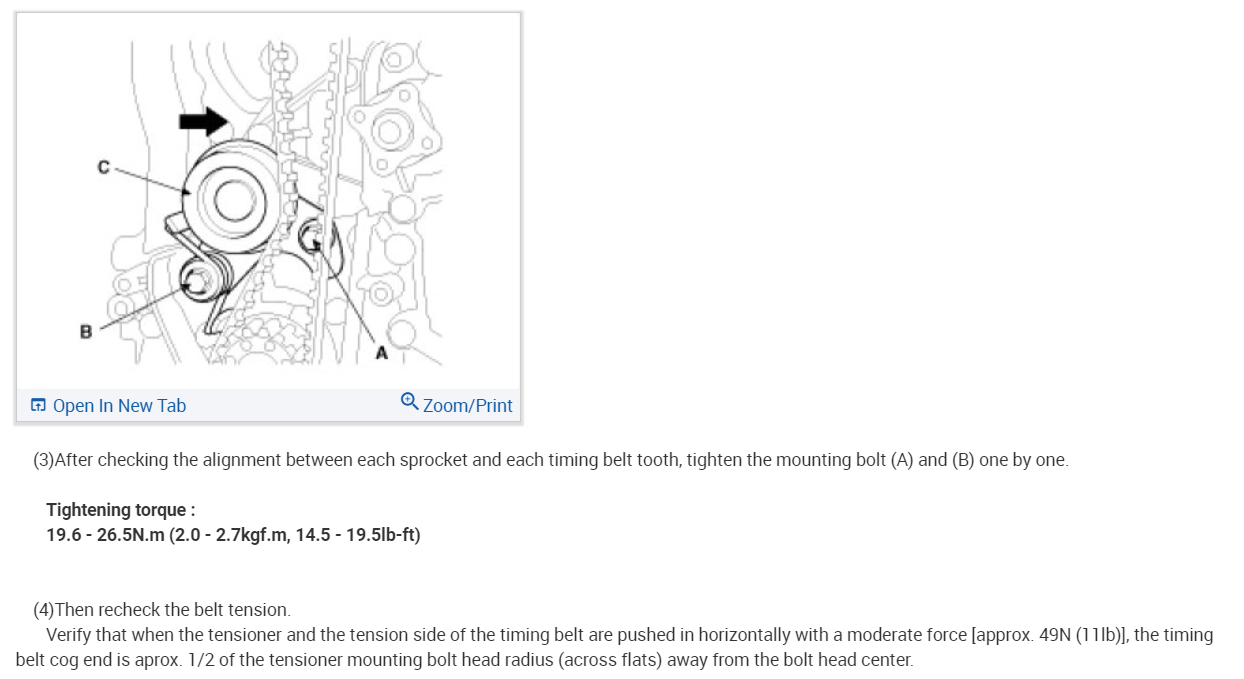
(2) After checking the alignment between each sprocket and each timing belt tooth, tighten the mounting bolt (A) and (B) one by one.
Tightening torque :
19.6 - 26.5N.M (2.0 - 2.7kgf.M, 14.5 - 19.5lb-ft)
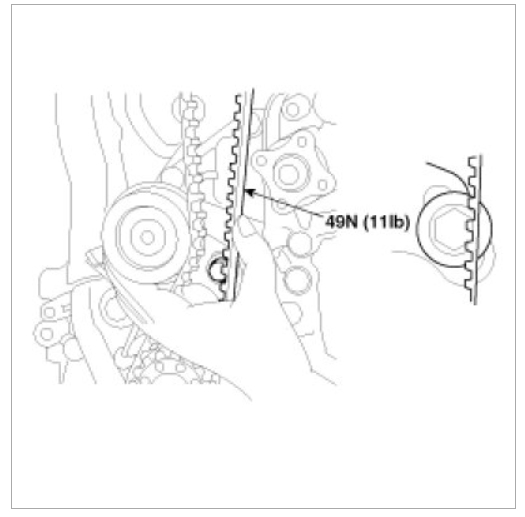
(3) Then recheck the belt tension.
Verify that when the tensioner and the tension side of the timing belt are pushed in horizontally with a moderate force [approx. 49N (11lb)], the timing belt cog end is aprox. 1/2 of the tensioner mounting bolt head radius (across flats) away from the bolt head center.
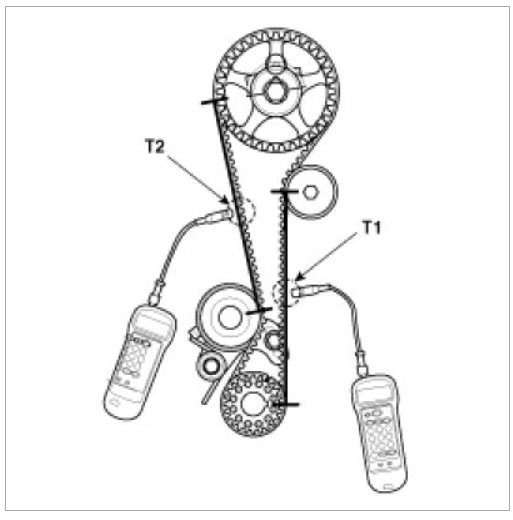
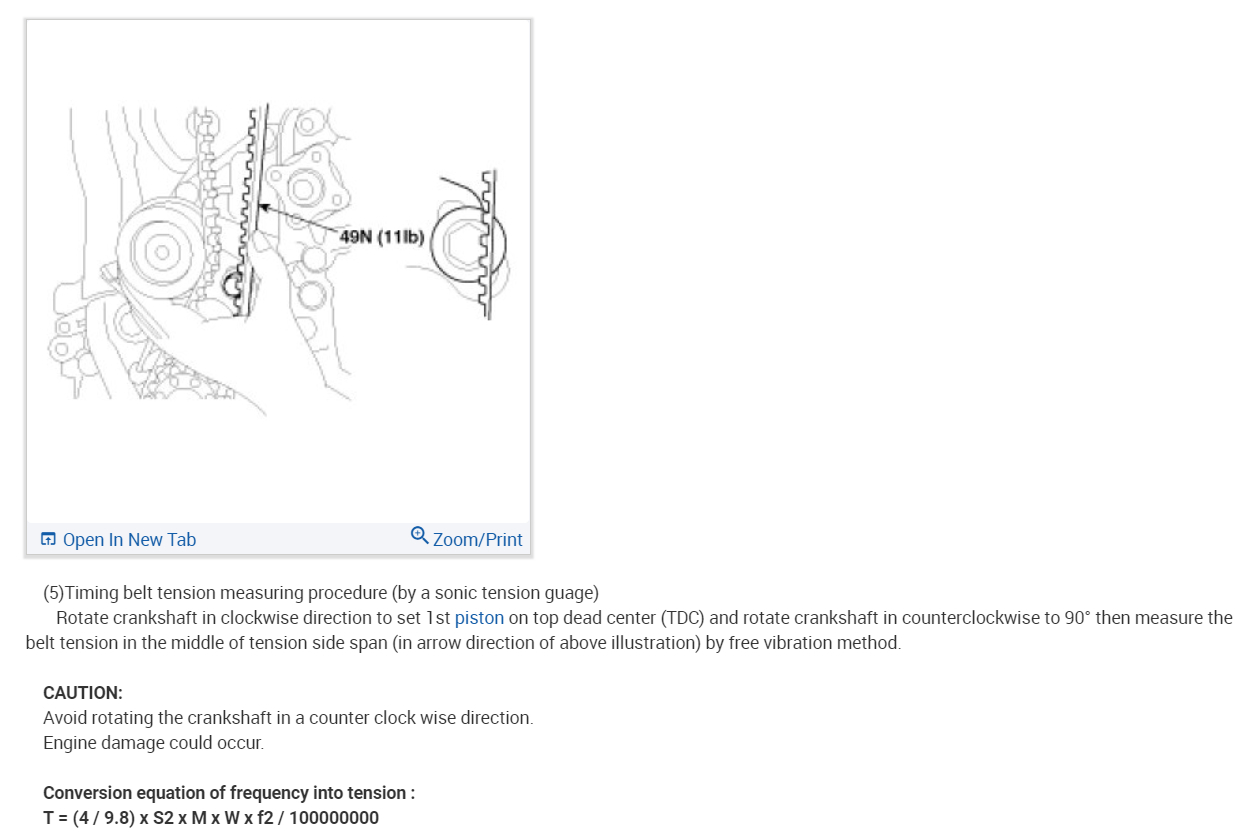
(4) Timing belt tension measuring procedure [Using a mechanical tension gauge (BT-33-73F, BTG-2 type)]
Rotate crankshaft in clockwise direction to set 1st piston on top dead center (TDC) and rotate crankshaft in counterclockwise to 90°then measure the belt tension in the middle of tension side span (in both arrow direction of above illustration ) by free vibration method.
CAUTION:
When rotating the crankshaft counter-clockwise, be sure to rotate the crankshaft at a time.
Input the belt specifications into the tension meter.
Locate the micro phone close to the center of belt span (T1, T2) and bounce the belt by finger 2 - 3 times. Read a value on the display.
Measure both T1 and T2 at the A and B points respectively and then calculate the average
Average Belt Tension (T)
Without CVVT(1.4L/1.6L): 20±3.5 kgf
With CVVT(1.6L): 18±3.5 kgf
Turn the crankshaft two turns in the operating direction (clockwise) and realign crankshaft sprocket and camshaft sprocket timing mark.
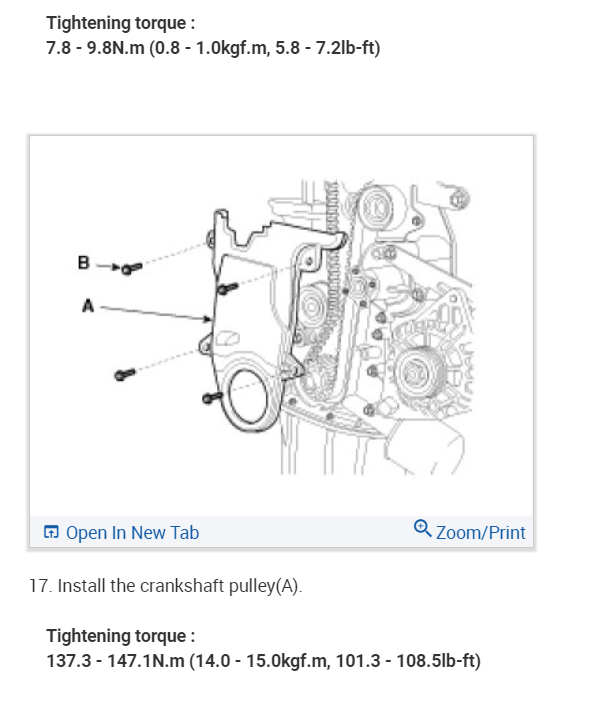
Install the timing belt lower cover(A) with 5bolts(B).
Tightening torque :
7.8 - 9.8N.M (0.8 - 1.0kgf.M, 5.8 - 7.2lb-ft)
Install the flange and crankshaft pulley(A), and then tighten crankshaft pulley bolt. Make sure that crankshaft sprocket pin fits the small hole in the pulley.
Tightening torque :
137.3 - 147.1N.M (14.0 - 15.0kgf.M, 101.3 - 108.5lb-ft)
Install the timing belt upper cover(A) with 4 bolts(B).
Tightening torque :
7.8 - 9.8N.M (0.8 - 1.0kgf.M, 5.8 - 7.2lb-ft)
Install the water pump pulley and 4 bolts.
Install the power steering pump drive belt(C)..
Install the air conditioner compressor drive belt(B)..
Install the alternator drive belt(A)..
Install the RH side cover(A) with 2 bolts(B).
Install the RH front wheel.
Tightening torque :
88.3 - 98.1N.M (9.0 - 10.0kgf.M, 65.1 - 72.3lb-ft)
Install the engine cover with bolts.
Tightening torque :
7.8 - 11.8N.M (0.8 - 1.2kgf.M, 5.8 - 8.7lb-ft)+
Here are the diagrams to help you do the job (below) You line up the hole and the timing gear camshaft hole. Then have the engine on TDC
Images (Click to make bigger)
SPONSORED LINKS
Wednesday, November 8th, 2017 AT 6:53 PM