Tail lights stay on?

Tiny
TRIVETTE
  • MEMBER
  • 2002 DODGE RAM
  • 6 CYL
  • 2WD
  • AUTOMATIC
  • 135,000 MILES
The tail lights stay on, causing the battery to drain. Is this a fuse issue? Or something deeper.
Thursday, February 4th, 2010 AT 9:30 AM

12 Replies

Tiny
JDL
  • MECHANIC
  • 16,098 POSTS
Welcome to the forum. Have all trouble codes checked. Some of the national brand autostores used to check PO codes, not sure about manufacturer specific.

The tali lamps get voltage from the park lamps relay, located in the integrated power module. It's probably a long shot to suspect the relay, while possible. Ground for the coil side of relay is controlled by integrated power module. The integrated power module needs a request to ground the relay. The request would come from headlamp switch to instrument cluster, from there to the integrated power module. The problem could be anywhere along that circuit. A code might help locate.
Was this
answer
helpful?
Yes
No
Wednesday, November 7th, 2018 AT 5:21 PM
Tiny
DODGETRUCKS02
  • MEMBER
  • 5 POSTS
  • 2002 DODGE RAM
  • 4.7L
  • V8
  • 4WD
  • AUTOMATIC
  • 250,000 MILES
I have a dead ground in the taillight relay, I can hotwire it but then taillights won't shut off. Which color of wire is the ground to that relay? Which one should I splice into? I need to know the colors, how to make them shut off.
Was this
answer
helpful?
Yes
No
Monday, March 1st, 2021 AT 12:34 PM (Merged)
Tiny
ASEMASTER6371
  • MECHANIC
  • 52,797 POSTS
Good afternoon,

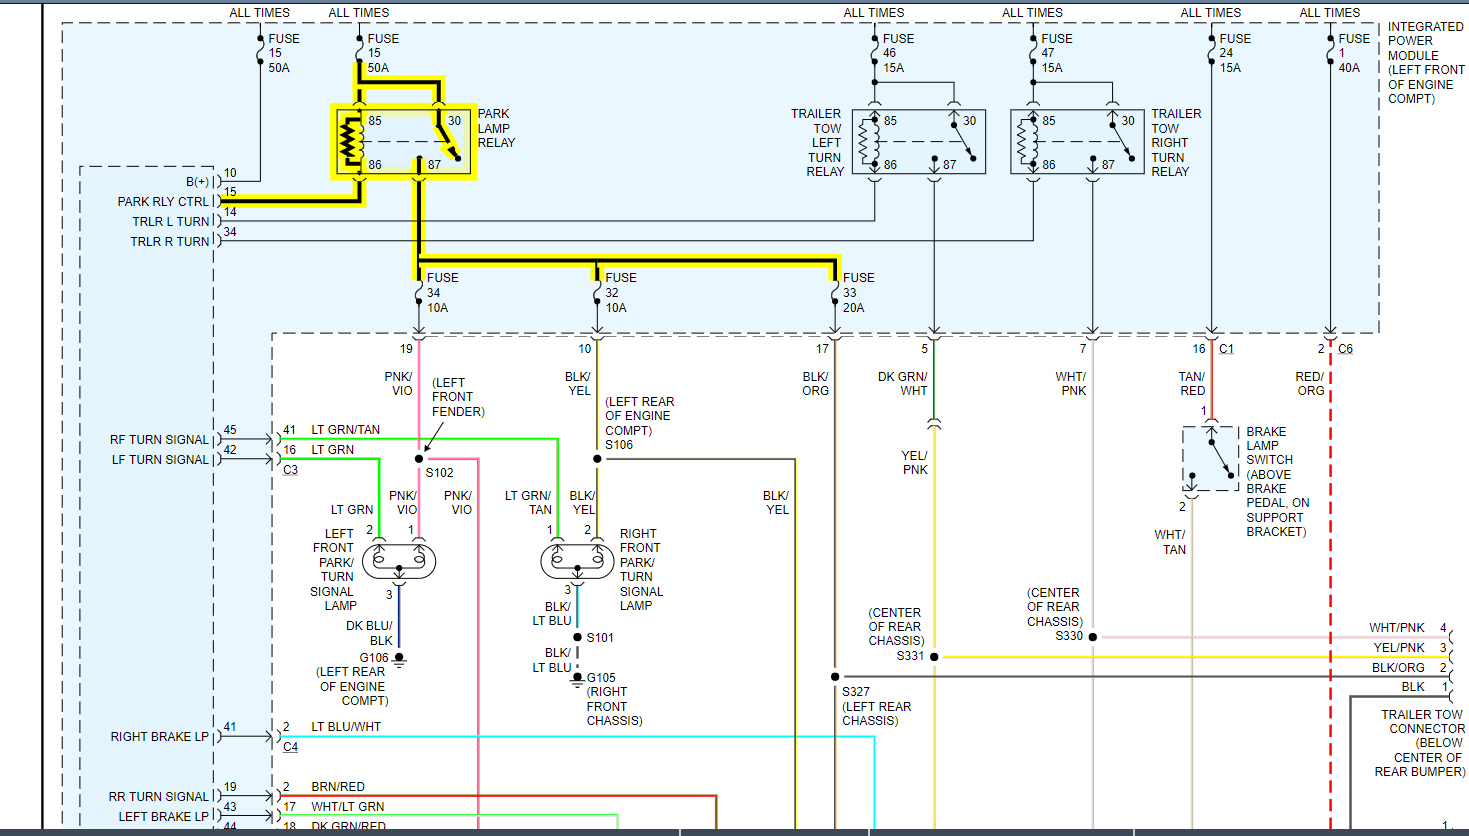
The pin 86 of the relay in the diagram I posted is the ground. The TIPM or the fuse block is what controls this ground based on the input from the switch.

https://www.2carpros.com/articles/how-to-check-wiring

https://www.2carpros.com/articles/how-to-check-an-electrical-relay-and-wiring-control-circuit

Toy TIPM is a very common failure. This module is like a body control module.

Roy

INTEGRATED POWER MODULE

REMOVAL
1. Disconnect the negative and positive battery cables.
2. Unsnap cover and remove the B+ terminal nut from the integrated power module B+ terminal. Remove the B+ cable from the integrated power module.
3. Disconnect the gray connector from the integrated power module.

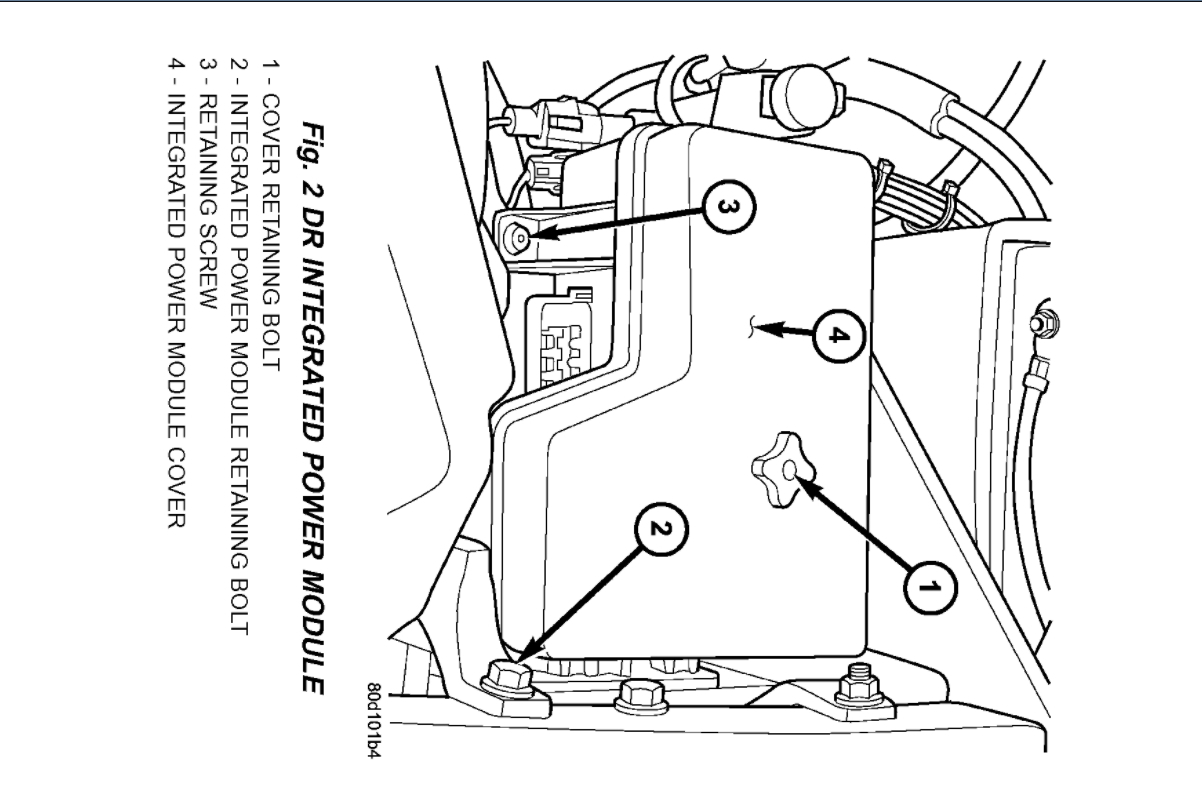
Fig. 2 DR Integrated Power Module
imageOpen In New TabZoom/Print

4. Remove the integrated power module retaining bolt and screw (Fig. 2).

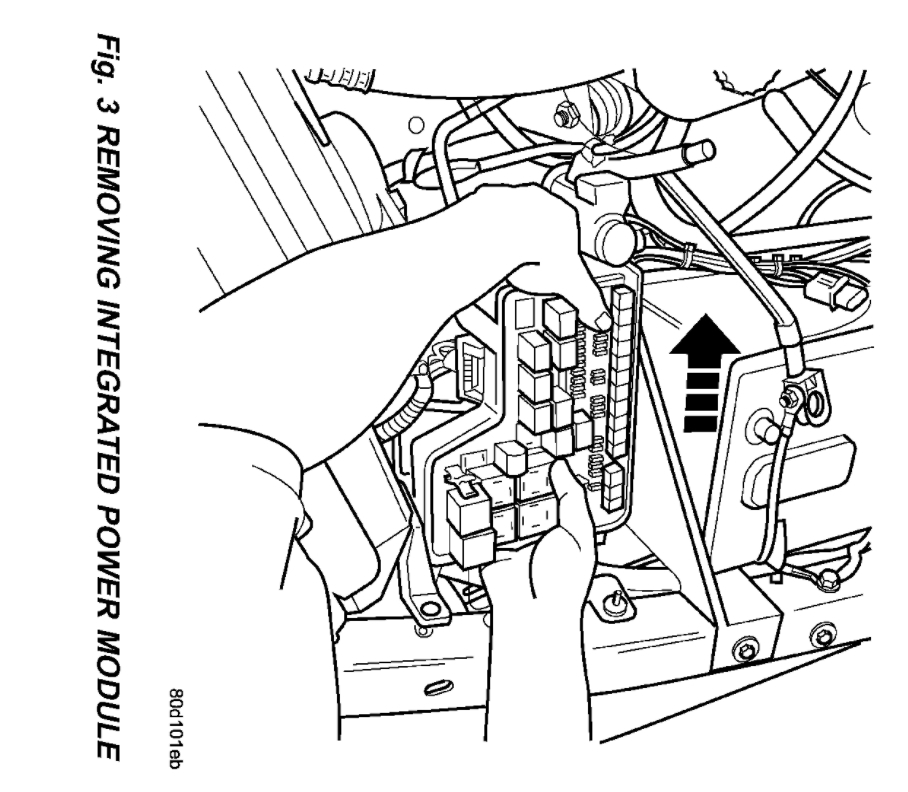
Fig. 3 Removing Integrated Power Module
imageOpen In New TabZoom/Print

5. Grasp the integrated power module with two hands and slide the assembly in the direction shown (Fig. 3) to free the module from its mounting bracket. Position the assembly upside down to access the electrical connectors located on the bottom of the unit.
6. Disconnect the electrical connectors by depressing the locking tab and rotating the connector arm outboard, until the connector is free from the module assembly. Be certain to pull the connectors straight off.
7. Position the integrated power module on a bench and remove the four front control module retaining screws.
8. Disconnect the front control module by pulling it straight off the integrated power module.

INSTALLATION
1. Connect the front control module by pushing it straight on the integrated power module electrical receptacle.
2. Install the four front control module retaining screws. Torque to 30 in. lbs. +/- 5.

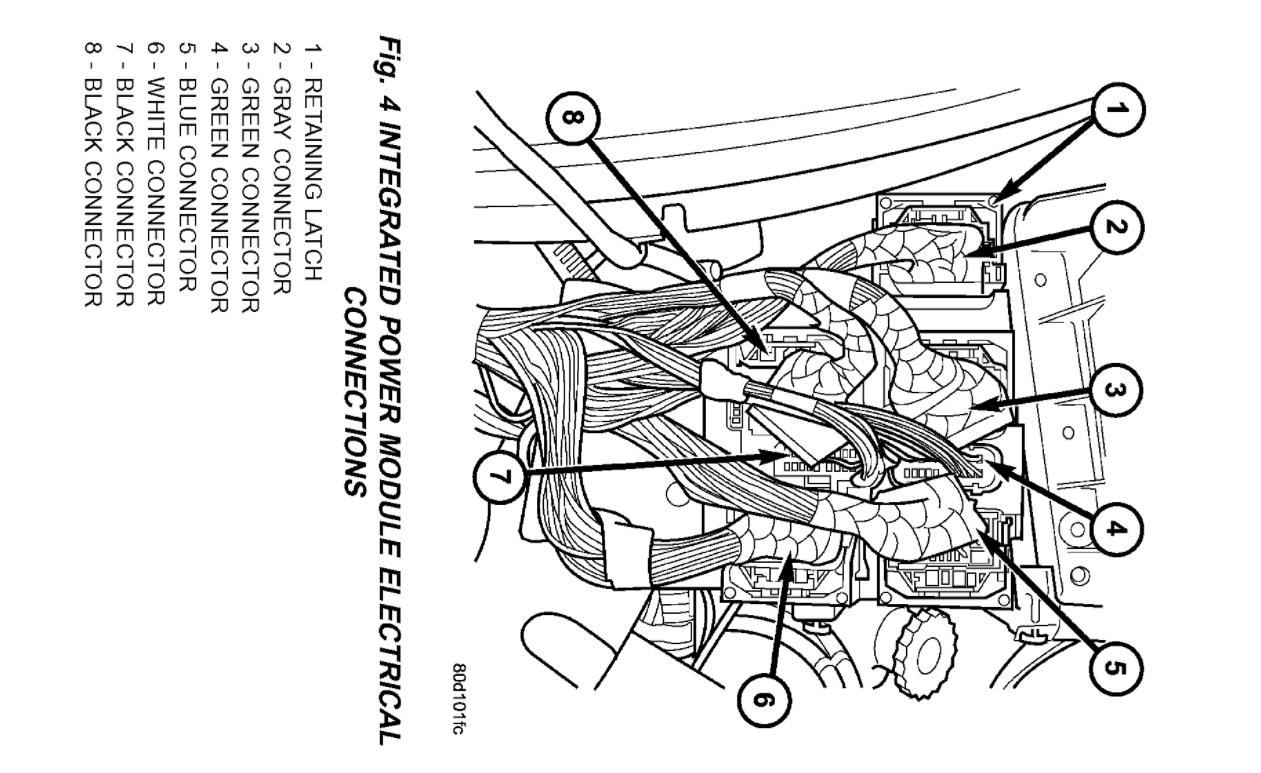
Fig. 4 Integrated Power Module Electrical Connections
imageOpen In New TabZoom/Print

NOTE: Integrated power module electrical connectors are color coded to ease location reference (Fig.4).

3. Connect the electrical connectors by pushing straight on and rotating the connector arm inboard, until the connector is firmly locked in place on the module assembly

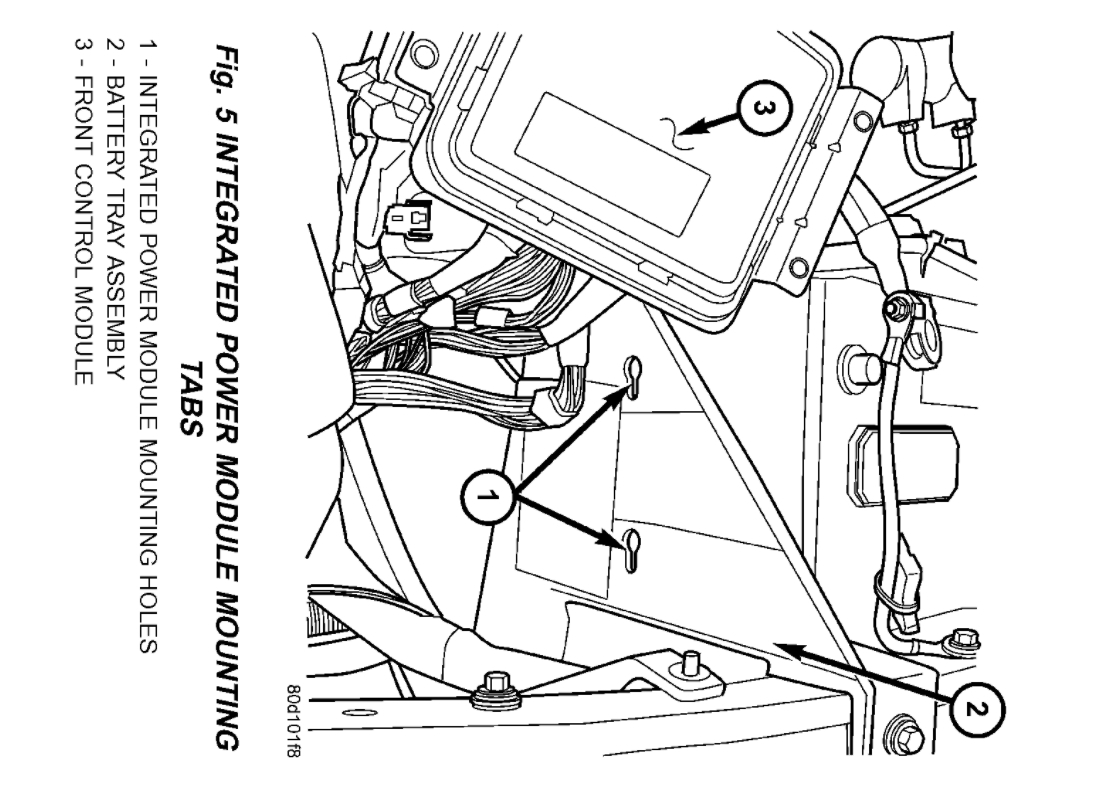
Fig. 5 Integrated Power Module Mounting Tabs
imageOpen In New TabZoom/Print

4. Grasp the integrated power module with two hands and install the assembly on the battery tray (Fig. 5).
5. Install the integrated power module retaining bolt and screw.
6. Connect the gray connector on the integrated power module housing.
7. Install the B+ terminal cable and nut on the integrated power module B+ terminal. Snap the cover in place
8. Connect the negative and positive battery cables.
Was this
answer
helpful?
Yes
No
Monday, March 1st, 2021 AT 12:34 PM (Merged)
Tiny
DODGETRUCKS02
  • MEMBER
  • 5 POSTS
Is there any other way to repair that ground in the relay circuit without replacing the IPM?
Was this
answer
helpful?
Yes
No
Monday, March 1st, 2021 AT 12:34 PM (Merged)
Tiny
ASEMASTER6371
  • MECHANIC
  • 52,797 POSTS
No, it is internal in the circuitry for the TIPM.

The module will have to be replaced.

Roy
Was this
answer
helpful?
Yes
No
Monday, March 1st, 2021 AT 12:34 PM (Merged)
Tiny
DODGETRUCKS02
  • MEMBER
  • 5 POSTS
Okay, thank you very much. I had read the answers to another 2002 owner, it said forget the FCM, fix the ground wire between the switch in dash, the module. A black wire g106? Is it possible I just have a broken wire outside of that module? We don't know which wire connects to that module, feeds the ground to that relay. Says he needs to know which color the ground wire is in order to try to check the wire before buying a new box.
He stuck a wire into that relay spot as a ground, connected it to bolt and the taillights and work but I can't turn them off without unhooking the wire. Any better cheap, easy fix ideas?
Was this
answer
helpful?
Yes
No
Monday, March 1st, 2021 AT 12:34 PM (Merged)
Tiny
ASEMASTER6371
  • MECHANIC
  • 52,797 POSTS
No, there is nothing external to repair it as the issue is inside the TIPM.

The TIPM is the only solution. You can add a ground but you will be back to your original issue of them not turning off.

I would just do the repair correctly and replace the TIPM.

Roy
Was this
answer
helpful?
Yes
No
Monday, March 1st, 2021 AT 12:34 PM (Merged)
Tiny
BSNIDER001
  • MEMBER
  • 1 POST
  • 1999 DODGE RAM
  • 5.9L
  • V8
  • 4WD
  • AUTOMATIC
  • 175,000 MILES
When my headlights are on right rear taillamp flashes fast and backup lights come on when I hit the brakes. When headlights are off everything works fine
Was this
answer
helpful?
Yes
No
Monday, March 1st, 2021 AT 12:34 PM (Merged)
Tiny
JDL
  • MECHANIC
  • 16,098 POSTS
Just my opinion, it sounds like a faulty ground at the rear. A faulty ground can cause some weird things to happen.
Was this
answer
helpful?
Yes
No
Monday, March 1st, 2021 AT 12:34 PM (Merged)
Tiny
JDL
  • MECHANIC
  • 16,098 POSTS
Just to add diagram. G100, black wire is ground. Check and clean the ground connection. Go from there.
Was this
answer
helpful?
Yes
No
Monday, March 1st, 2021 AT 12:34 PM (Merged)
Tiny
BILL3535
  • MEMBER
  • 1 POST
  • 1996 DODGE RAM
Electrical problem
1996 Dodge Ram Four Wheel Drive Automatic 40,000 miles

My plow shut down. The plow repair guys replaced a solenoid and told me the battery won't hold a charge. I took the truck to a mechanic and he replaced the battery. After that, the rear running lights would not turn off. Now I have to manually detach the battery every time I get out of the truck to get the rear lights to turn off. Lastly, when I attach the plow the rear running lights dim and then increase lighting capacity over and over again. The plow and the rear lights are supposed to be completly independent of each other. That is why people are having a tough time figuring it out.
Was this
answer
helpful?
Yes
No
Monday, March 1st, 2021 AT 12:34 PM (Merged)
Tiny
JACOBANDNICKOLAS
  • MECHANIC
  • 108,133 POSTS
The light can't be independent because the headlights and tail lights get power from the same source, the switch. What type of set up do you have? Has anyone checked the switch itself?
Was this
answer
helpful?
Yes
No
Monday, March 1st, 2021 AT 12:35 PM (Merged)

Please login or register to post a reply.

Sponsored links