The fluid in it should be blue, under the GM trade name auto trak 2. Any other fluid may cause crow hop issues that you are describing. There can also be a condition where the encoder as fully applied. There are 2 bulletins that fit your concern, chances of it being as simple as a poor connection are possible, but not probable. Gross differences in tire wear front to rear, can also cause a concern. Here are the bulletins.
#02-04-21-008A: Shudder, Rocking Motion, Binding, Feels Like Vehicle is Stuck in 4WD (Crow Hop) When Turning at Low Speeds (Replace Transfer Case Encoder Sensor and Reprogram TCCM) - (Feb 13, 2003)
Subject:
Shudder, Rocking Motion, Binding, Feels Like Vehicle is Stuck in 4WD (Crow Hop) When Turning at Low Speeds (Replace Transfer Case Encoder Sensor and Reprogram TCCM)
Models:
2002-2003 Chevrolet TrailBlazer
2002-2003 GMC Envoy
2002-2003 Oldsmobile Bravada
This bulletin is being revised to update the service procedure and incorporate the fluid exchange. Please discard Corporate Bulletin Number 02-04-21-008 (Section 04 -- Driveline Axle).
Condition
Some customers may comment that when turning, the vehicle feels like it is binding, or the vehicle feels like it is stuck in 4WD (crow hop), or that the 4WD system is not working correctly. A shudder type sensation is felt.
Technician Diagnosis
This intermittent condition may be difficult to duplicate. The potential is there at all times for the Bravada. The potential is only present in the Auto Mode of the transfer case with the TrailBlazer or Envoy.
Correction
Important: It is extremely important to check all of the tires before repairs are attempted for these types of customer concerns. Mismatched tires may cause these type of customer concerns. Inspect the tires in the following areas:
�
Ensure that the tires are inflated to the recommended tire pressure as listed on the tire placard on the driver's door.
�
Use a tire tread depth gauge to determine the tread depth. The tire tread depth must be nearly equal on all four corners of the vehicle.
�
Ensure that the tires are all the same brand, size, and tread design.
Important: Pay particular attention so that the proper parts are replaced. The parts terminology is somewhat confusing. You will be replacing the encoder (sensor) and gasket not the complete motor assembly.
Currently, the General Motors Parts Catalog lists the following names:
�
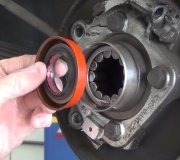
Motor Asm, Trfer Case Encoder (This is the Encoder (Sensor). It looks like a donut with three (3) contacts on one side).
�
Gasket.
�
Actuator Asm, Trfer Case Four Whl Drv (This is the complete motor assembly consisting of the Motor and housing, the Motor Asm, the Trfer Case Encoder (Sensor), and the gasket).
Use the following procedure to replace the Motor Asm, Trfer Case Encoder (Sensor) and Gasket.
� If the vehicle is a TrailBlazer or Envoy, place the 4WD selector switch in the 2 HI position.
� Raise the vehicle.
� Disconnect the wiring harness connector at the top of the transfer case.
� Remove the Actuator Asm, Trfer Case Four Whl Drv. (Motor) mounting bolts.
� Remove the motor from the transfer case and set aside.
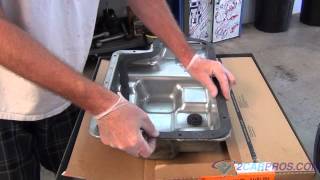
� Position an oil drain container into position under the transfer case drain plug. Remove the drain plug and allow the transfer case to drain.
� Position the motor on a work bench and you will see four retaining tabs that retain the gasket to the motor. Release the tabs to allow removal and discard the gasket.
Important: Gently lift and tilt the sensor toward the wiring connector wiring to disconnect it. You will notice the two wires to the motor. The red and black wires go to an internal connector within the motor housing. The black plastic connector for these wires does not have a locking tab and is easily disturbed.
� Lift/pry the sensor from the motor shaft. Disconnect the sensor from the wiring harness.
Important: Look at the motor where you just removed the sensor. You will notice the "Hex" in the casting where the new sensor will seat when properly installed.
� Connect the wiring harness to the sensor.
� Gently insert a suitable tool along side the red and black wires and press down on the black plastic connector to ensure the connector is in the proper position.
� Properly align the key way of the sensor on the shaft and install the sensor. Ensure that the hex on the sensor fits in the hex of the casting.
� Install the new gasket assembly.
� Inspect the positioning of the gasket and the motor shaft. If necessary to align them as shown, perform the following steps.
�
Connect a fused jumper to the transfer case encoder motor connector red wire and the other end to a positive battery terminal.
�
Connect another jumper to the transfer case encoder motor connector black wire and momentarily touch the other end of this wire to the ground terminal of a battery. This will cause the motor shaft to turn to allow alignment as shown.
Important: Inspect the encoder motor attachment face for the presence of the two (2) locating sleeves. If missing from the encoder motor, they need to be retrieved from the transfer case and reinstalled into the encoder motor before installation.
� Position the motor to the transfer case and install the retainers.
Tighten
Tighten the bolts to 16 N� m (12 lb ft).
� Apply pipe sealant, P/N 12346004 (Canadian P/N 10953480), or equivalent, to the drain plug threads. Install the transfer case drain plug.
Tighten
Tighten the plug to 27 N� m (20 lb ft).
� Refill the transfer case with 1.8 L (2 qts) of Auto Trac II Transfer case lubricant, P/N 12378508 (Canadian P/N 10953626).
� Apply pipe sealant, P/N 12346004 (Canadian P/N 10953480), or equivalent, to the fill plug threads. Install the fill plug.
Tighten
Tighten the plug to 27 N� m (20 lb ft).
� Lower the vehicle.
� Connect the Tech 2� and use SPS reprogramming to reprogram the transfer case control module (TCCM) with TIS software version 11, released October 2002 or newer.
#PIP3928B: Bind Or Shudder On Turns (Crow Hop) - keywords auto awd chatter vibration - (Oct 9, 2008)
Subject:
Bind or Shudder on Turns (Crow Hop)
Models:
2004-2007 Buick Rainier
2002-2009 Chevrolet Trailblazer
2002-2009 GMC Envoy
2002-2004 Oldsmobile Bravada
2005-2009 Saab 9-7X
This PI was superseded to update model years. Please discard PIP3928A.
The following diagnosis might be helpful if the vehicle exhibits the symptom(s) described in this PI.
Condition/Concern:
Bind/shudder (crow hop) on turns or feels like vehicle is stuck in 4 wheel drive. This concern can affect Buick Rainier Oldsmobile Bravada and Saab 9-7X or Chevrolet Trailblazer and GMC Envoy when in auto 4x4 mode.
Recommendation/Instructions:
For the 2002-2003 Bravada or the Envoy and Trailblazer (in auto mode only) please reference the latest version of tsb 02-04-21-008. If the tsb has already been performed or the vehicle falls after the tsb use the below diagnostics to isolate an electrical or mechanical concern. For all other model years and vehicles listed follow the diagnostics below.
� Disconnect the encoder motor electrical connector. If the condition is gone, then proceed to step 2. If the condition is unchanged, then skip to step 4.
� Reconnect the encoder motor connector and swap the wheels and tires from an identically built vehicle that does not exhibit the concern and re-evaluate the condition.
� If disconnecting the encoder motor connector corrects the condition and swapping tires from another identically built vehicle does not improve the concern, snap shot the TCCM data and monitor the prop shaft speed sensors for spikes or dropping out.
� For Bravada Rainier and 9-7X remove the encoder motor and evaluate if the concern is gone replace the encoder motor.
For the Trailblazer and Envoy remove the encoder motor and with the tech 2 in powertrain, select "Special Functions", next select "ATC Output Controls", next select "Engage Front Axle". From this screen lock the front axle and evaluate. If the concern is gone replace the encoder motor.
� If none of the above change the condition, remove the front prop shaft and evaluate. If the concern is gone suspect a possible internal transfer case concern. If the concern is still present with the prop shaft removed suspect either a locking differential or steering related concern.
Please follow this diagnostic or repair process thoroughly and complete each step. If the condition exhibited is resolved without completing every step, the remaining steps do not need to be performed.
SPONSORED LINKS
Thursday, August 25th, 2011 AT 4:46 PM