3.1L and 3.4L Engines
NOTE
The oil pump is located in the oil pan.
REMOVAL:
Remove the oil pan using the procedure found in this section.
Some engines, such as the may have a crankshaft oil deflector (also called a "windage tray"). Remove the retaining nuts and remove the oil deflector.
Remove the bolt attaching the oil pump to the rear crankshaft bearing cap.
Remove the oil pump and driveshaft.
INSTALLATION:
Clean all parts well. Inspect the driveshaft at both ends for rounding of the corners. Replace, if necessary. If the original pump is being considered for reuse, inspect the pump body and the pump cover for cracks, scoring, casting imperfections, or any obvious damage.
Rotate the pump driveshaft as necessary to engage the with the oil pump. Make sure it turns smoothly. Some technicians will fill the oil pump through the opening next to the driveshaft to shorten the time it take the engine to buildup oil pressure on initial startup after an oil pump replacement. Turning the driveshaft as oil is being added fills the pump cavity.
Install the pump and driveshaft assembly to the engine. Install the retaining bolt and tighten to:
3.1L engines: 30 ft. Lbs. (41 Nm)
3.4L engines: 40 ft. Lbs. (54 Nm)
Install the oil pan using the procedure found in this section.
3.5L Engine
WARNING
As with many procedures on the 3.5L (VIN H) DOHC engine, oil pump removal is a long and complicated task The oil pump is located behind the engine front cover. The engine front cover must be removed. Part of the procedure is lowering the powertrain cradle, or subframe, requiring special lifting and support equipment. The steering shaft must be separated so the vehicle subframe can be loosened and lowered. Careful work is required for reassembly. This is not a job for the inexperienced or ill-equipped. Be very sure of your diagnosis before attempting to remove the oil pump on this engine, especially with the engine still in the vehicle. In addition, a pair of special tools, GM #J 42042 Camshaft Timing Clamps, is required to hold the camshafts in place once the timing chain is removed. This tool, when properly installed, will be fully seated on the camshaft ends with the camshaft flats parallel to the cam cover sealing surfaces. This tool prevents unexpected camshaft rotation caused by valve spring pressure. This tool must be installed immediately after cam cover removal. This engine has no valve timing marks. Once lost, there are no pins or keys to help you re-establish valve timing. If valve timing is lost, it is very difficult to restore.
NOTE
This engine is constructed primarily of aluminum. Use care when working with light alloy parts.
REMOVAL:
Remove the engine front cover using the procedures found in this section.
Remove both camshaft covers. Immediately install Camshaft Holding Fixtures J 42038, or equivalent onto the ends of the camshafts. Rotate the engine to align the camshafts with the tool using the hex on the camshaft and an open end wrench. When installed properly, tool J 42038 will be fully seated on the camshaft ends with the camshaft flats parallel to the cam cover sealing surface.
Remove the oil pan using the procedures found in this section.
Remove the oil pump pipe and screen.
Remove the camshaft drive chain tensioner in order to remove the primary camshaft drive chain from the drive sprocket.
Remove the four oil pump assembly retaining bolts identified by the larger head size.
Slide the oil pump off the nose of the crankshaft with the drive sprocket in place.
Remove the crankshaft sprocket from the oil pump assembly.
Clean all parts well. Please note that the internal parts of this oil pump are not serviced separately. If wear or damage is noted, replace the entire oil pump assembly. To disassemble the pump, use the following procedure:
Remove the eight screws holding the pump housing halves together.
Remove the inner (drive) and the outer (driven) rotors from the housing. Note the orientation of the pump rotors. The outer rotor has a dimple identifying its outer surface. The dimpled side of the outer rotor must always be facing outward.
Remove the threaded pressure relief valve cap and slide the pressure relief spring and valve piston out of the bore.
Clean all pump components with a suitable non-corrosive solvent such as Safety-Kleen, or equivalent.
Dry the oil pump components with compressed air.
Inspect the housing and the cover for nicks, scoring, casting imperfections and damaged threads. Inspect the gerotor gears for chipping, galling or excessive wear. Inspect the pressure relief valve components for embedded particles and/or wear.
Assemble the pump by installing the inner and outer rotors in the pump cover in the same orientation as removed. The outer rotor and a dimple to indicate the outer surface. The dimpled surface must be face-up in the pump body.
Install the pressure relief valve piston first, followed by the spring, in the pump housing bore. Install the valve cap and torque to 97 inch lbs. (11 Nm).
Lubricate the gears with petroleum jelly, packing all the spaces around the gears, filling the pump cavity. This is important. The petroleum jelly seals the pump cavity to help "prime" the pump. The reduces the time the engine will run with little oil pressure on initial start up after oil pump installation. DO NOT use chassis grease because it will clog the oil system passages. Petroleum jelly, after it has accomplished its job of acting as a seal so the pump can prime and draw oil, melts at a low temperature and will "go away" as the engine warms.
Assemble the housing and the cover. Install the bolts and torque to 124 inch lbs. (14 Nm).
INSTALLATION:
Align the crankshaft sprocket splines with the oil pump gerotor and install the sprocket in the oil pump.
Place the pump and sprocket assembly in position by rotating the crankshaft sprocket until the machined slot is indexed with the drive pin in the crankshaft.
Slide the pump and sprocket onto the crankshaft until a positive stop is felt. Make sure the crankshaft sprocket is aligned with the drive pin in the crankshaft. When properly installed, the crankshaft sprocket will protrude from the oil pump but the face of the sprocket will be located behind the machined step in the crankshaft. Align the pump body with the mounting holes in the cylinder block, install the bolts and tighten evenly to 18 ft. Lbs. (25 Nm).
Install the primary camshaft drive chain over the drive sprocket, using the procedures found in this section.
Install the remaining components in the reverse order of removal.
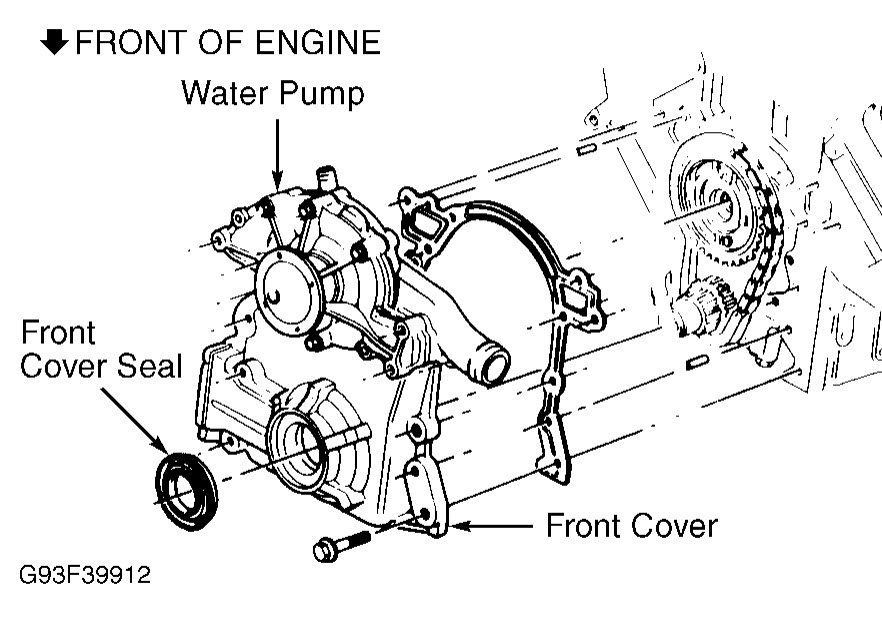
3.8L Engines
NOTE
The oil pump is located inside the engine front cover.
WARNING
When troubleshooting a low oil pressure complaint, another possibility is a clogged screen on the oil pickup pipe, damaged pipe or gasket. The oil pan will have to be removed to check this. Running the engine without measurable oil pressure will cause extensive and expensive damage.
REMOVAL:
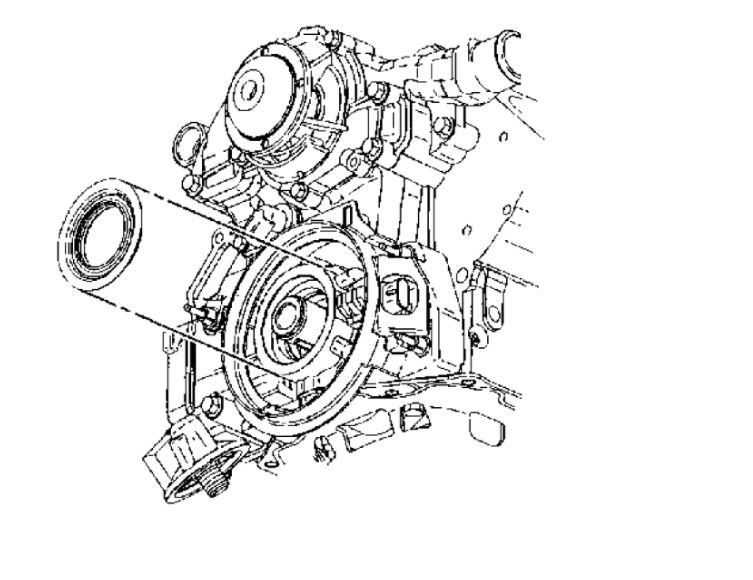
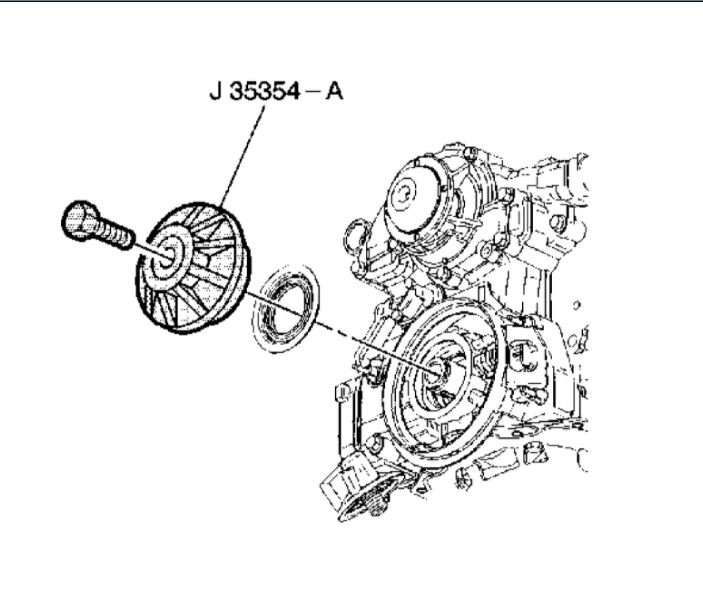
Remove the engine front cover using the procedure found in this section.
Remove the oil pump cover attaching screws and remove the cover.
Remove the oil pump gears.
If desired, remove the oil filter adapter and remove the pressure regulator valve and the spring for cleaning.
INSTALLATION:
Clean all parts well.
Lubricate the gears with petroleum jelly, packing all the spaces around the gears, filling the pump cavity. This is important. The petroleum jelly seals the pump cavity to help "prime" the pump. The reduces the time the engine will run with little oil pressure on initial start up after oil pump installation. DO NOT use chassis grease. Petroleum jelly melts at a low temperature and will "go away" as the engine warms.
If the oil pressure relief valve was removed, inspect the valve and bore for burrs. Check the spring for loss of tension. Replace the spring if in doubt.
Install the pump cover and tighten the screws evenly to 98 inch lbs. (11 Nm).
If removed, thoroughly clean the oil pressure relief valve of all varnish and install the spring first, the valve. Use a new oil filter adapter gasket. Install the adapter. Tighten the oil filter adapter bolts evenly to 22 ft. Lbs. (30 Nm).
Install the engine front cover using the procedures found in this section.
Thanks for using 2CarPros. Com!
Monday, April 26th, 2021 AT 7:43 PM
(Merged)