Correct timing chain marks and procedure needed?

Tiny
BARNESBIL
  • MEMBER
  • 2012 FORD F-150
  • 5.0L
  • V8
  • 4WD
  • AUTOMATIC
  • 139,000 MILES
I need the correct timing procedure for both sides on this engine. Camshaft phasers.
Tuesday, June 4th, 2019 AT 3:59 AM

21 Replies

Tiny
KASEKENNY
  • MECHANIC
  • 18,907 POSTS
Hi Barnesbil,

I attached the process for reinstalling the cams for both sides. It includes all your timing marks to align everything. Let me know if you need something else.
Was this
answer
helpful?
Yes
No
+4
Tuesday, June 4th, 2019 AT 6:17 PM
Tiny
FOGUIE MCKINNIE
  • MEMBER
  • 50 POSTS
  • 2005 FORD F-150
  • 160,690 MILES
Want to replace timing chain, I need to know the timing chain diagram and where is the timing mark for a 2005 F- 150 with 5.4
Was this
answer
helpful?
Yes
No
-2
Saturday, September 19th, 2020 AT 1:51 PM (Merged)
Tiny
WRENCHTECH
  • MECHANIC
  • 20,757 POSTS
Hello,

Here is the instructions on how to replace the timing chain in the diagrams below. Check out the diagrams (Below). Please let us know if you need anything else to get the problem fixed.
Was this
answer
helpful?
Yes
No
+3
Saturday, September 19th, 2020 AT 1:51 PM (Merged)
Tiny
FOGUIE MCKINNIE
  • MEMBER
  • 50 POSTS
Thanks :)
Was this
answer
helpful?
Yes
No
Saturday, September 19th, 2020 AT 1:51 PM (Merged)
Tiny
WRENCHTECH
  • MECHANIC
  • 20,757 POSTS
Use 2CarPros anytime, we are here to help. Please tell a friend.
Was this
answer
helpful?
Yes
No
Saturday, September 19th, 2020 AT 1:51 PM (Merged)
Tiny
NEVER2FAST8704
  • MEMBER
  • 3 POSTS
  • 2004 FORD F-150
The vehicle cam in with a bad engine knock, engine was replaced with a jasper reman. Truck started and drove fine until you put it under a hard load. Check engine light cam on with po22 cam 2 overretarded. Replaced solenoid and was told phaser is new, we also checked oil pressure and is within specs. We changed the oil with synthetic and problem still exists.
Was this
answer
helpful?
Yes
No
Saturday, September 19th, 2020 AT 1:51 PM (Merged)
Tiny
MERLIN2021
  • MECHANIC
  • 17,250 POSTS
What engine does this one have? Also can you confirm this code? Bost are Pxxxx not Pxxx...?
HK15 KOER DTCS P0011, P1381, P0012, P1383, P0021, P1386, P0022 AND P1388: Ã Â Â CHECK the vehicle oil filter identification to make sure it is the proper type. Ã Â Â Engine at normal operating temperature. Ã Â Â Clear fault codes. Ã Â Â KOER Self Test. Ã Â Â CHECK KOER DTCs: Are DTCs P0011, P1381, P0012, P1383, P0021, P1386, P0022 or P1388 present? NOTE: Oil contamination in VCT systems can cause positioning errors. NOTE: VCT systems require an oil filter specific to the application. NOTE: CHECK the operation of the VCT solenoid and check for a stuck or sticking solenoid valve caused by contamination. If the valve is stuck, check the spider bracket for contamination prior to solenoid replacement.


https://www.2carpros.com/forum/automotive_pictures/62217_VCT_1.jpg

Was this
answer
helpful?
Yes
No
-2
Saturday, September 19th, 2020 AT 1:51 PM (Merged)
Tiny
NEVER2FAST8704
  • MEMBER
  • 3 POSTS
Yes the code is poo22, We changed the oil 2 times with mobil 1. The code will set with koer test. We removed the vct solenoid to inspect it and the screens were clean, we replaced it any way. Oil filter is a motorcraft for this app. The engine is a 3valve 5.4l sohc. I have seen ones that had vct problems due to sludge but this is a reman engine with no miles on it. I also grounded the solnoid and it appears to be working fine. I pulled valve cover and inspected the phaser and appears to be in time. Not sure where to go next with this.
Was this
answer
helpful?
Yes
No
+1
Saturday, September 19th, 2020 AT 1:51 PM (Merged)
Tiny
MERLIN2021
  • MECHANIC
  • 17,250 POSTS
Did youi check the oil filter itself? It needs a specific type.
I am going to email you some testing info, let me know how you make out.
Was this
answer
helpful?
Yes
No
Saturday, September 19th, 2020 AT 1:51 PM (Merged)
Tiny
NEVER2FAST8704
  • MEMBER
  • 3 POSTS
It turned out to be a bad cam actuator, they said it was new, but upon inspecting found it was indeed a used one
Was this
answer
helpful?
Yes
No
+1
Saturday, September 19th, 2020 AT 1:51 PM (Merged)
Tiny
MERLIN2021
  • MECHANIC
  • 17,250 POSTS
OK good deal.
Was this
answer
helpful?
Yes
No
Saturday, September 19th, 2020 AT 1:51 PM (Merged)
Tiny
CSANCHEZ71
  • MEMBER
  • 2 POSTS
  • 2003 FORD F-150
  • V8
  • 2WD
  • AUTOMATIC
  • 200,000 MILES
I removed the driverside head and had a machine shop retap the second spark plug, cause it had blown out. When I removed the head I made marks with nailpolish on the chains and gears. I'm working with a 4.6L wep. I never removed the passengerside head, gear or chain at anytime, when I put the head back on I just realigned the chain with the mark on the gear. I reassembled the entire engine and the truck started back up but with knocking noise under the valvecover of the replaced head. Aside from the noise the truck runs perfect, but the noise will not go away and i've tried everything. I finally removed the valvecover and put the engine at tdc. My question is where should the mark on that gear be tdc, cause I can't seem to get a straight answer from a manual I look at. The 4.6L rep says to use a square and the mark should be at a 90 degree from the valve cover plane but nothing for the windsor plant.
Was this
answer
helpful?
Yes
No
Saturday, September 19th, 2020 AT 1:52 PM (Merged)
Tiny
JACOBANDNICKOLAS
  • MECHANIC
  • 108,117 POSTS
Are you sure the noise isn't coming from a tensionier? Here are the pictures I was able to find regarding the timing:

Driver's side


https://www.2carpros.com/forum/automotive_pictures/249084_4_2.jpg


Crank


https://www.2carpros.com/forum/automotive_pictures/249084_6_10.jpg


Passanger side


https://www.2carpros.com/forum/automotive_pictures/249084_1_7.jpg


Let me know if this helps.

Joe
Was this
answer
helpful?
Yes
No
+1
Saturday, September 19th, 2020 AT 1:52 PM (Merged)
Tiny
CSANCHEZ71
  • MEMBER
  • 2 POSTS
After waking up the next day and I reread the chapter on timing and figured out what I did wrong. The book I bought at autozone, was refering to the engine as left and right. But after reading it again I figured out that the driverside was the left and passengerside was the right. I removed the cover and moved the cam gear counterclockwise one tooth and wala it started up with no knocking and thank god no damage. Thank you again for all your help and effort, and for being here for us need a little help. May your car be a classic one day.
Was this
answer
helpful?
Yes
No
+1
Saturday, September 19th, 2020 AT 1:52 PM (Merged)
Tiny
JACOBANDNICKOLAS
  • MECHANIC
  • 108,117 POSTS
That is a very easy mistake. Left and right is determined as if you are in the vehicle looking out the windshield.

I'm glad you got it fixed. Take care and let us know if you have questions in the future.

Joe
Was this
answer
helpful?
Yes
No
Saturday, September 19th, 2020 AT 1:52 PM (Merged)
Tiny
ZOP262
  • MEMBER
  • 3 POSTS
  • 2002 FORD F-150
  • V8
  • 2WD
  • AUTOMATIC
  • 106,000 MILES
I can not find the copper link on my timing chain. Is there anything else I should be looking for. This is my first time trying to set my own timing. Didn't have a choice was layed off. I'm very worried that I'm not going to do this right.

Please help
Was this
answer
helpful?
Yes
No
Saturday, September 19th, 2020 AT 1:52 PM (Merged)
Tiny
DAVE H
  • MECHANIC
  • 13,383 POSTS
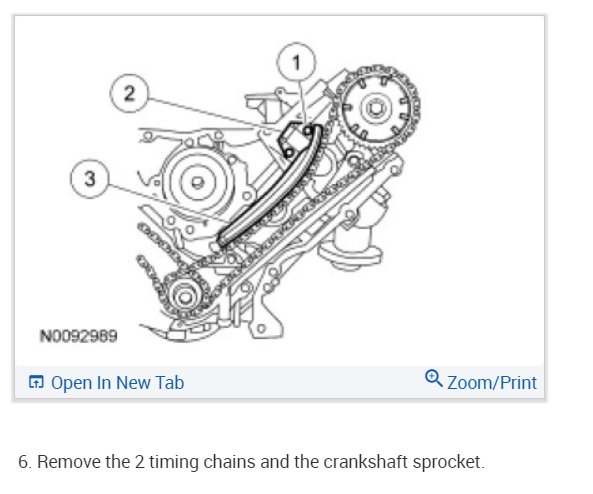
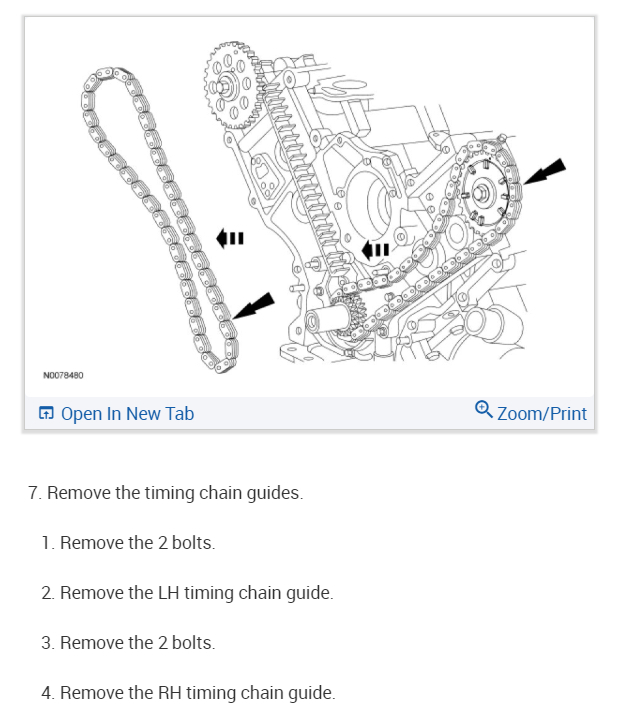
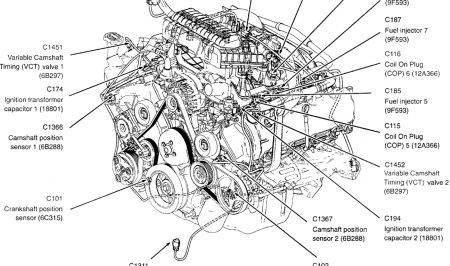
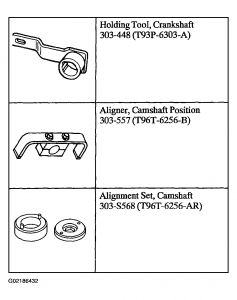
There are too many diagrams for me to show them all .. please re-post with any diagrams you require to see ? this is a very big job ... double check every step of the way ... let me know if ya need more assistance ..
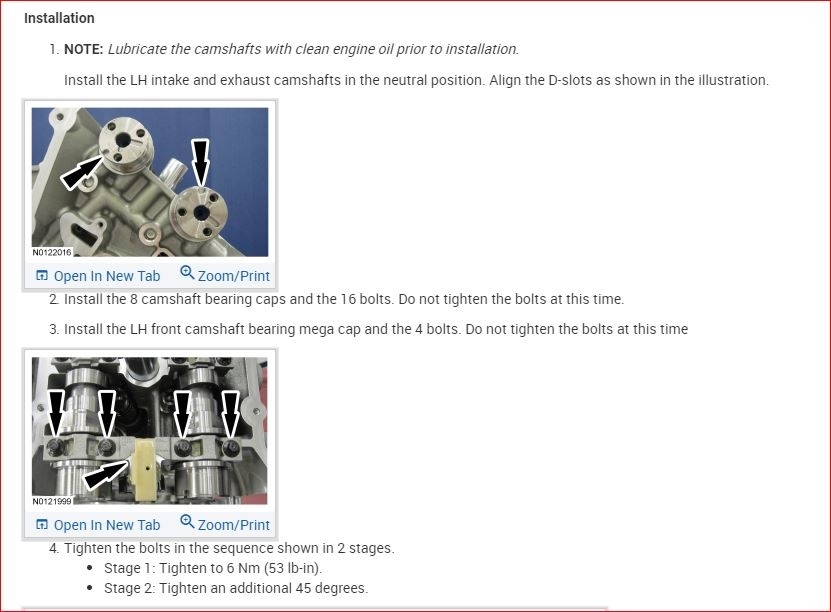
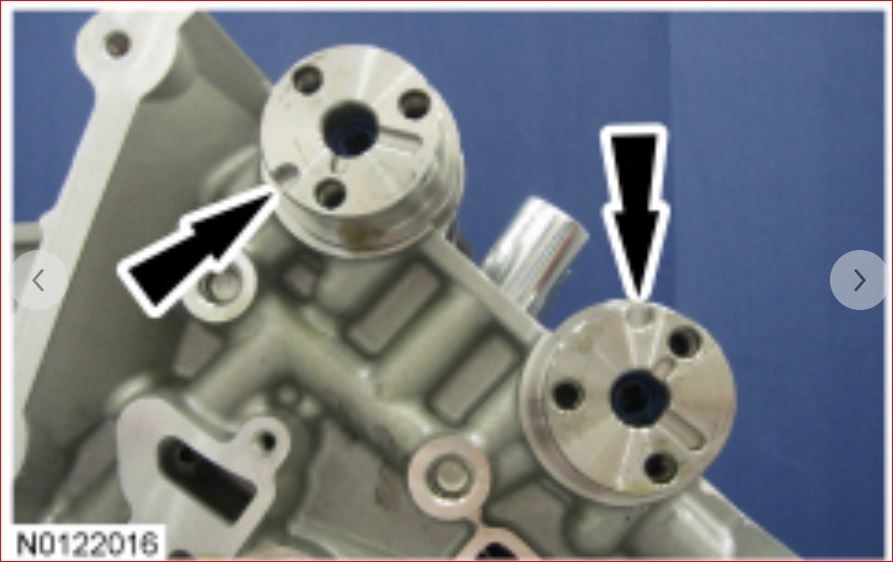
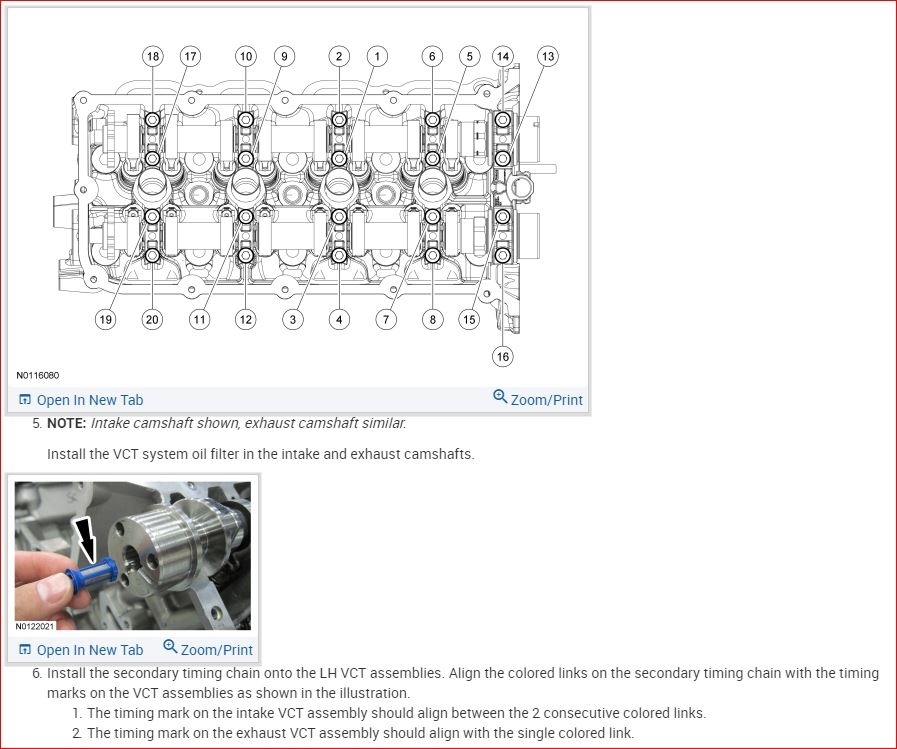
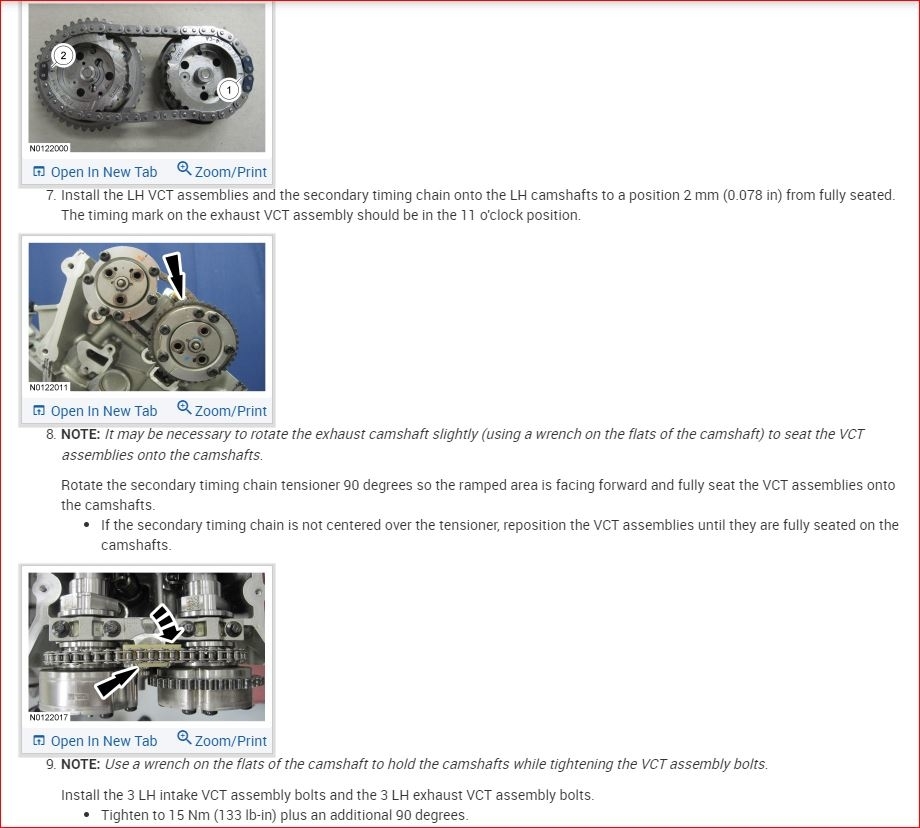
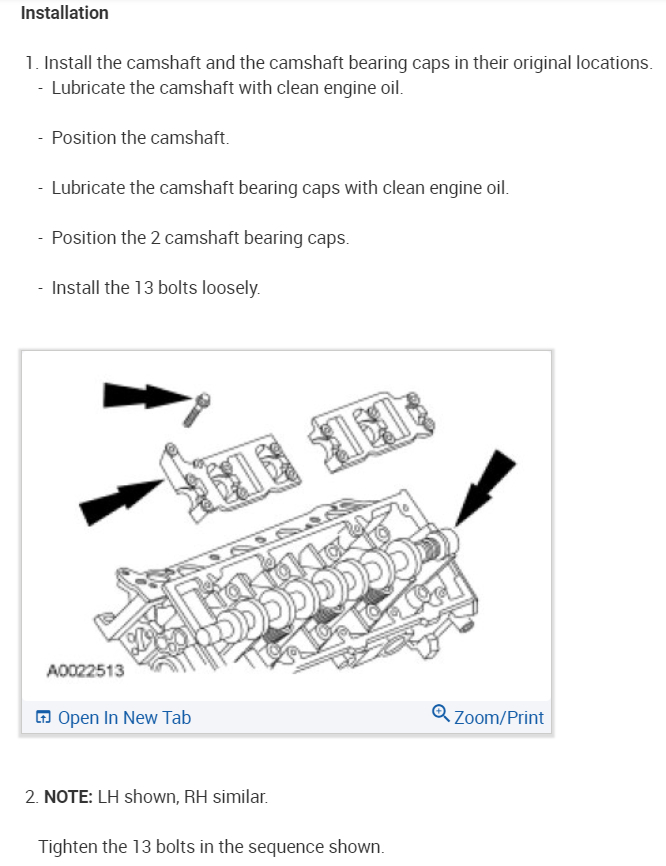
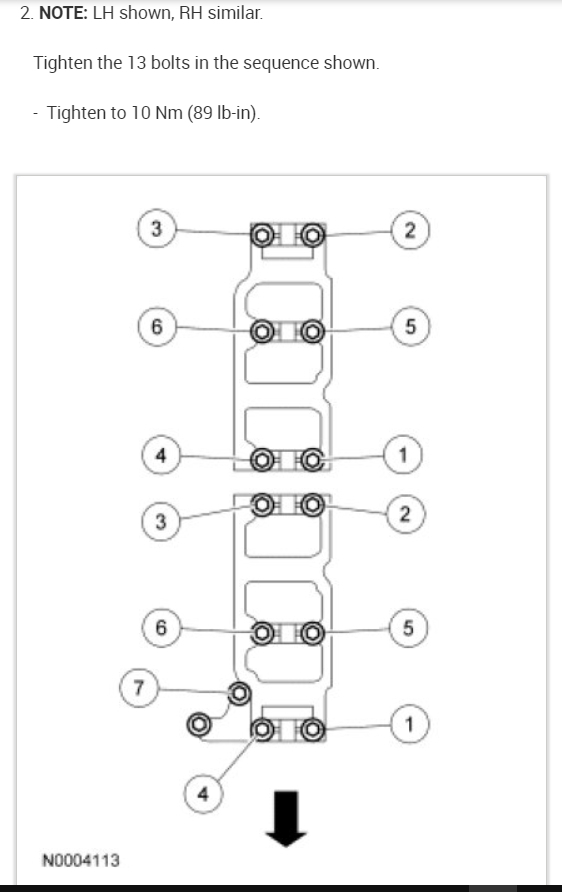
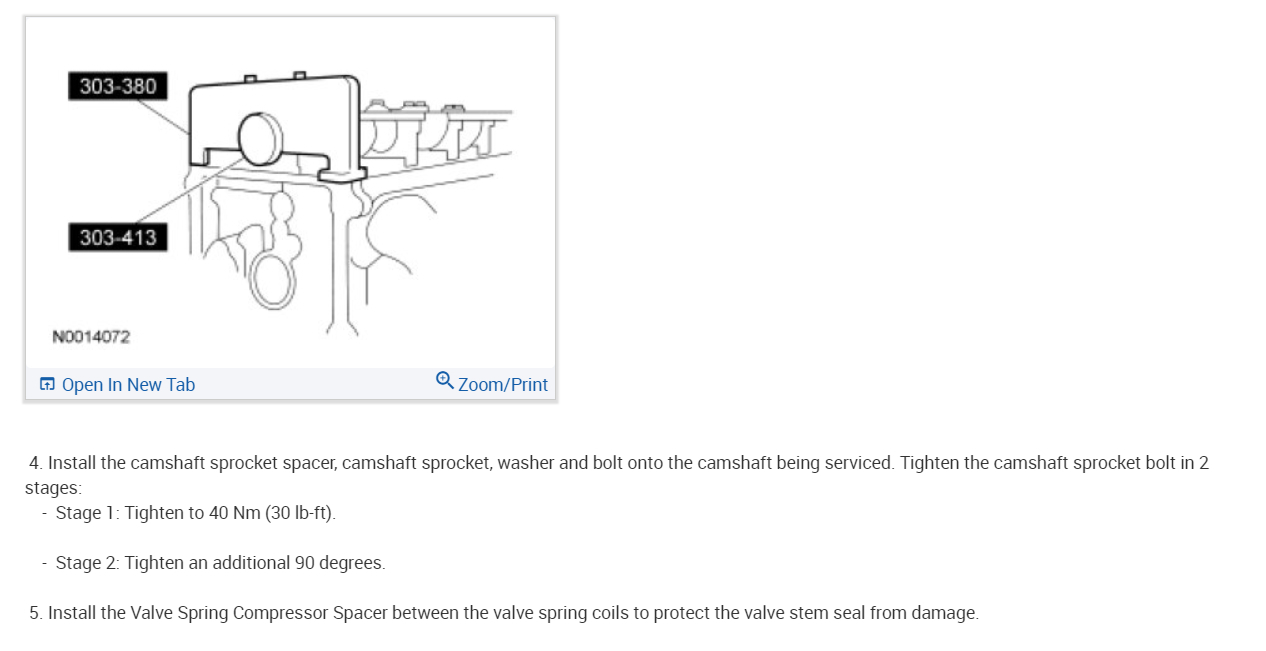
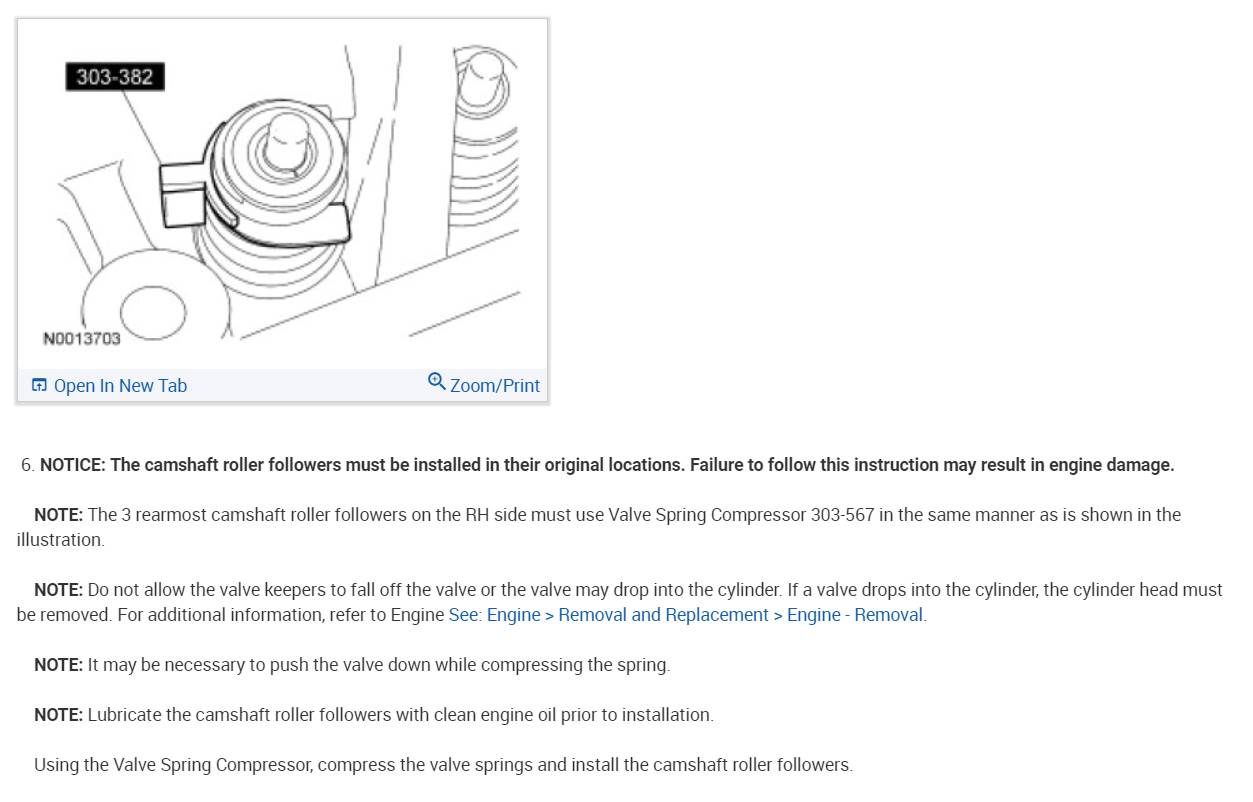
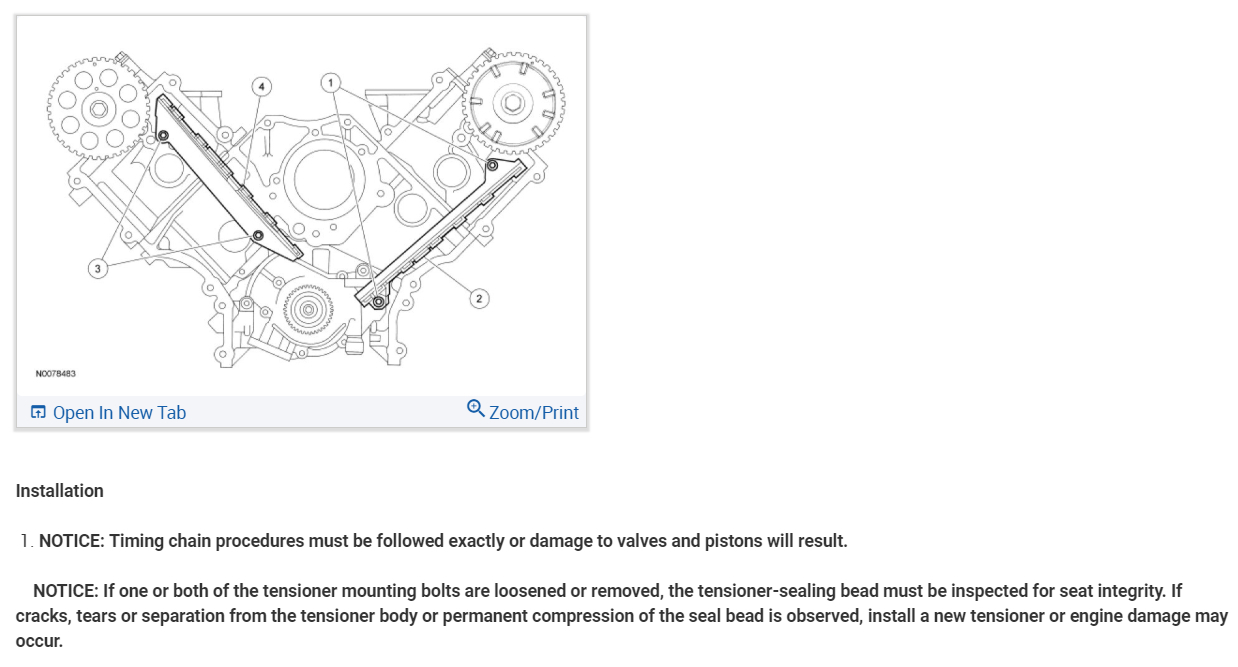

https://www.2carpros.com/forum/automotive_pictures/266999_tools_2.jpg


Installation
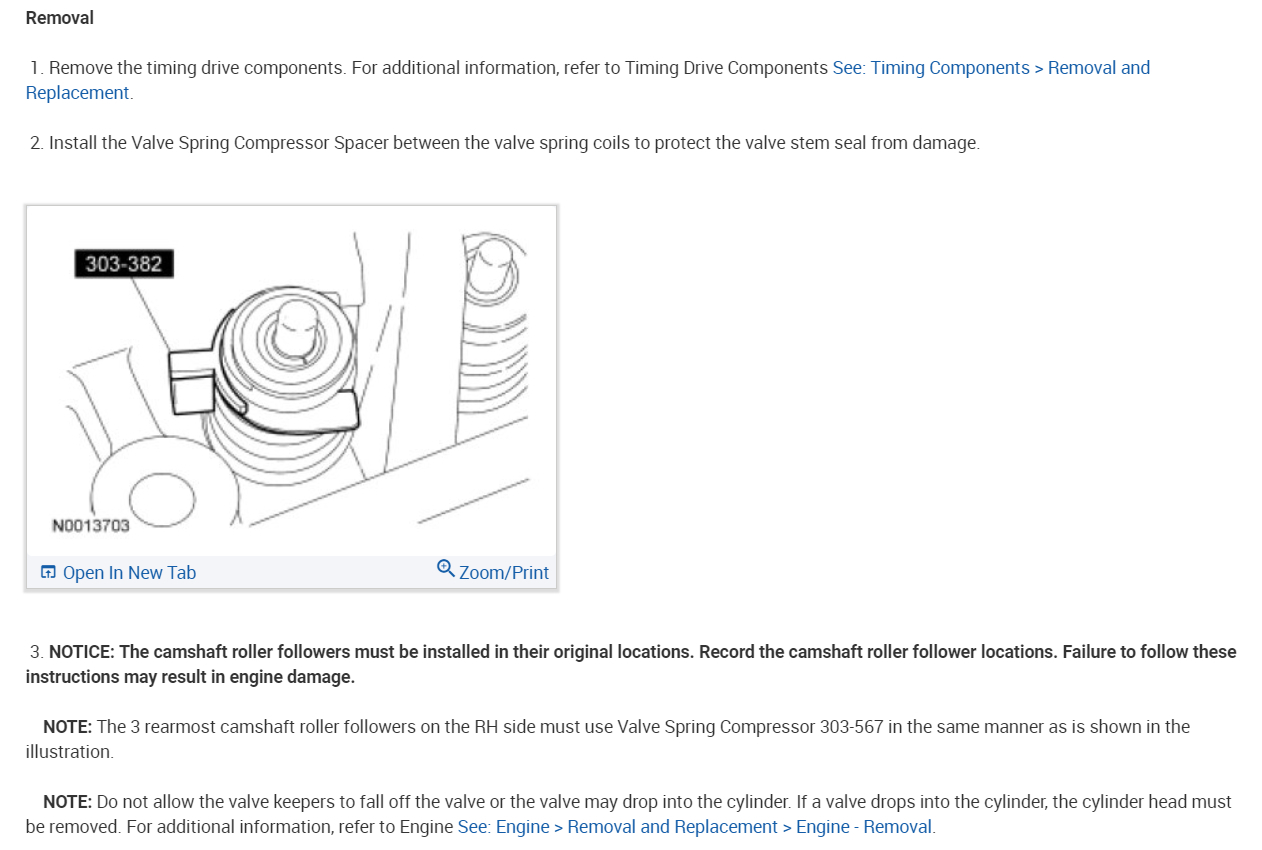
CAUTION:Timing chain procedures must be followed exactly or damage to valves and pistons will result.

Fig. 282: Compressing Tensioner Plunger, Using A Vise
Courtesy of FORD MOTOR CO.
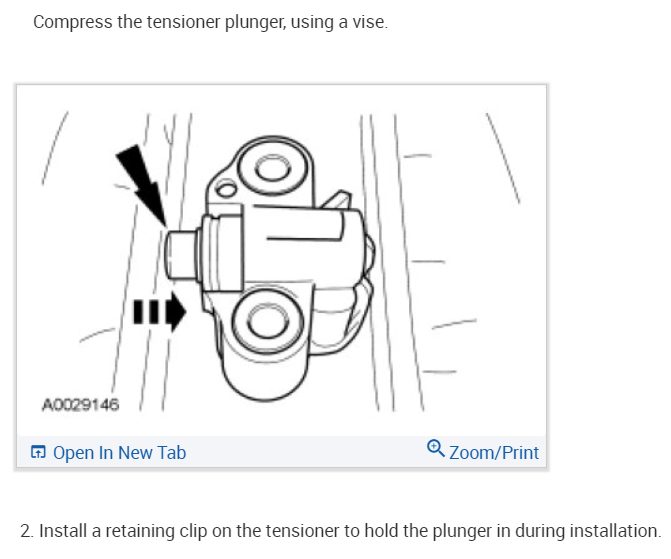
Compress the tensioner plunger, using a vise.
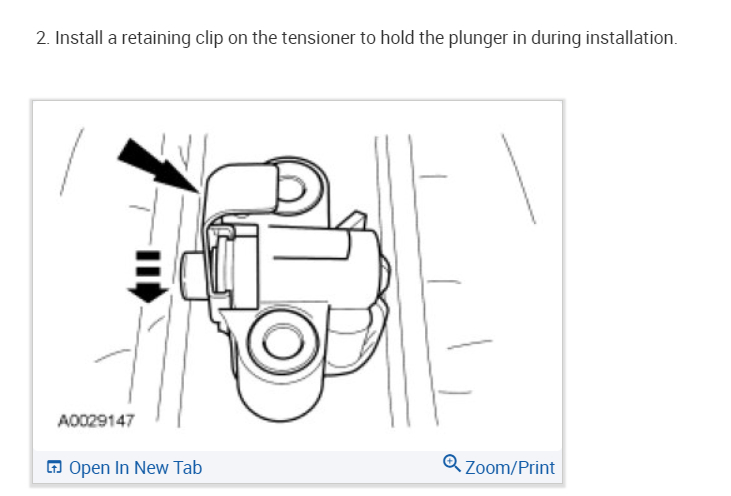
Install a retaining clip on the tensioner to hold the plunger in during installation.
Fig. 283: Installing Retaining Clip On Tensioner To Hold Plunger In During Installation
Courtesy of FORD MOTOR CO.
Remove the tensioner from the vise.
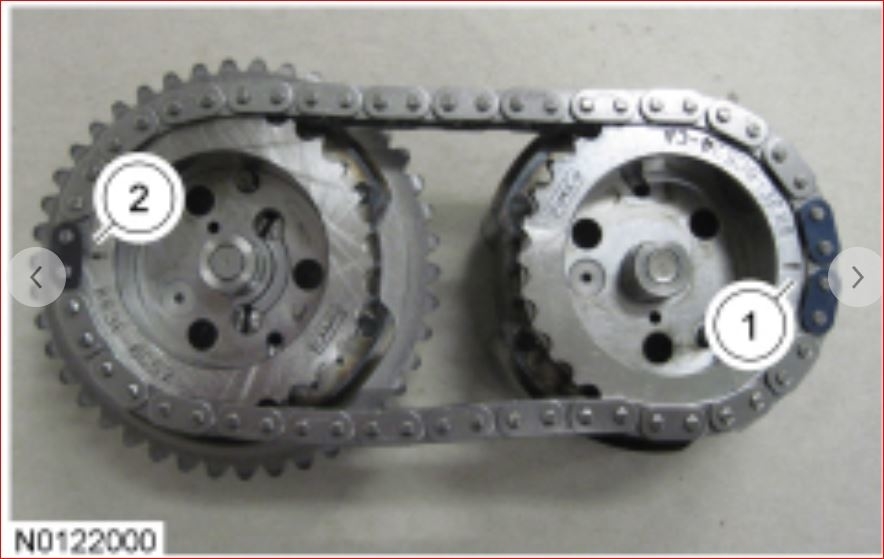
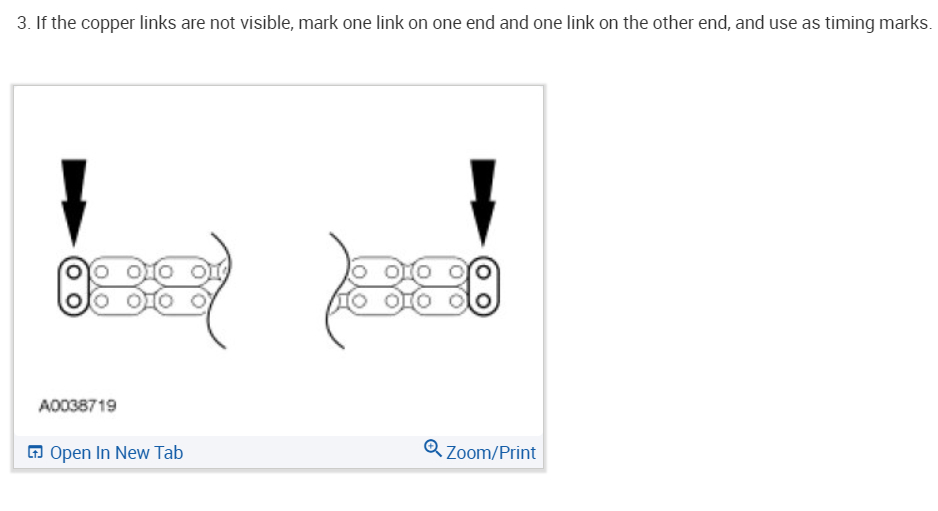
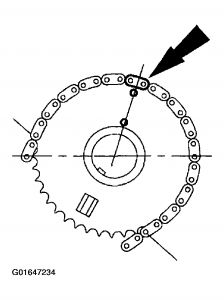
If the copper links are not visible, mark two links on one end and one link on the other end, and use as timing marks.
Fig. 284: Identifying Timing Marks On Timing Chain
Courtesy of FORD MOTOR CO.


https://www.2carpros.com/forum/automotive_pictures/266999_tim_1.jpg


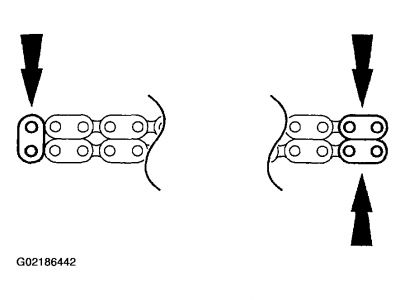
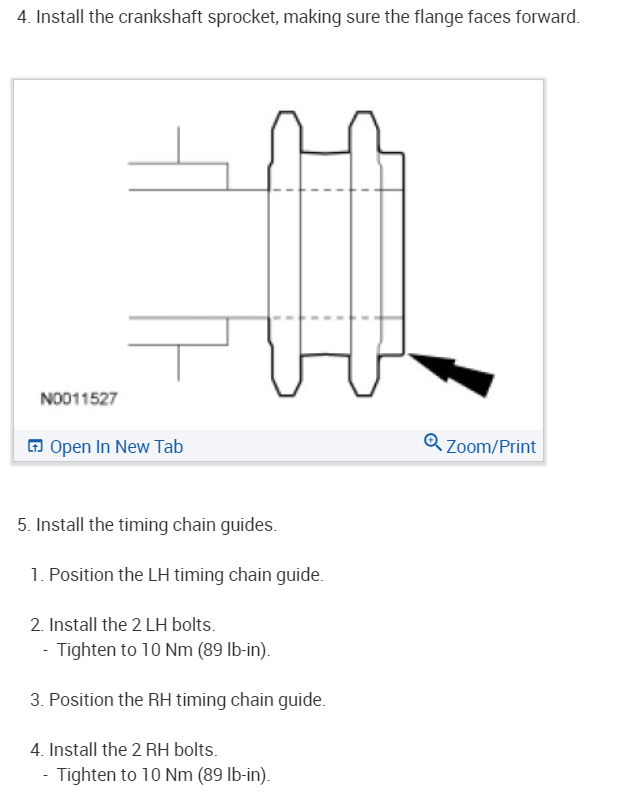
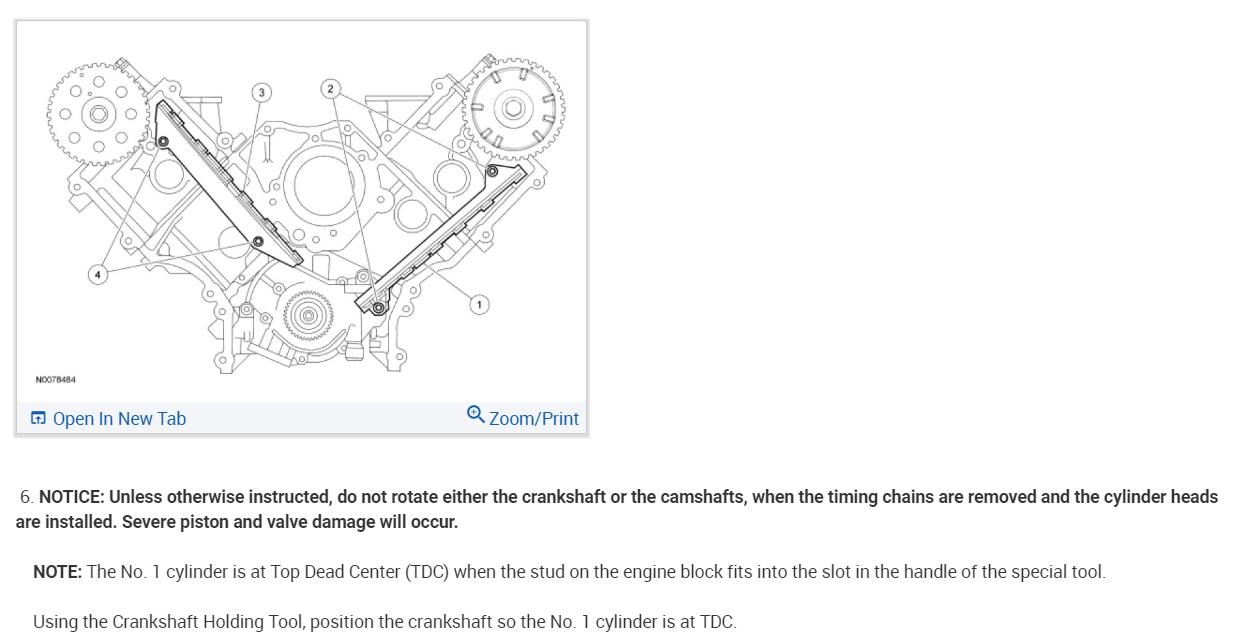
Fig. 285: Installing Timing Chain Guides
Courtesy of FORD MOTOR CO.
Install the timing chain guides.
CAUTION:Do not turn the engine over with the camshaft positioning tool or damage to the camshaft sprocket or the bolt can occur.

Fig. 286: Installing Camshaft Positioning Tool
Courtesy of FORD MOTOR CO.
Fig. 287: Positioning Camshaft
Courtesy of FORD MOTOR CO.
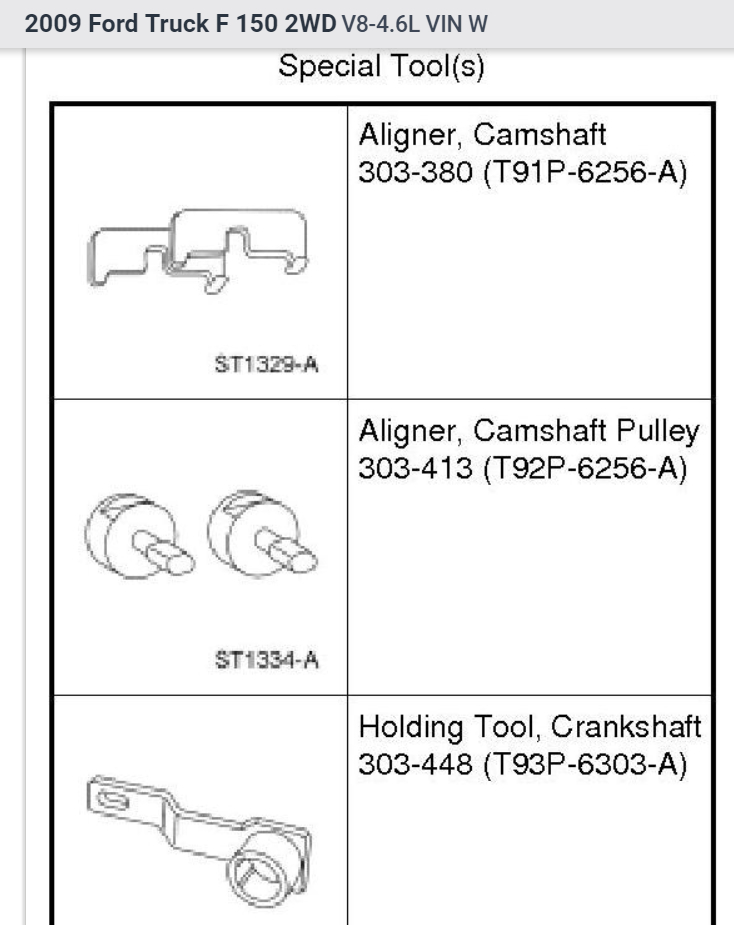
Install the Camshaft Positioning Tool.
NOTE:Slightly loosen the camshaft holding tools to allow slight camshaft movement.

Pre-position the camshafts.
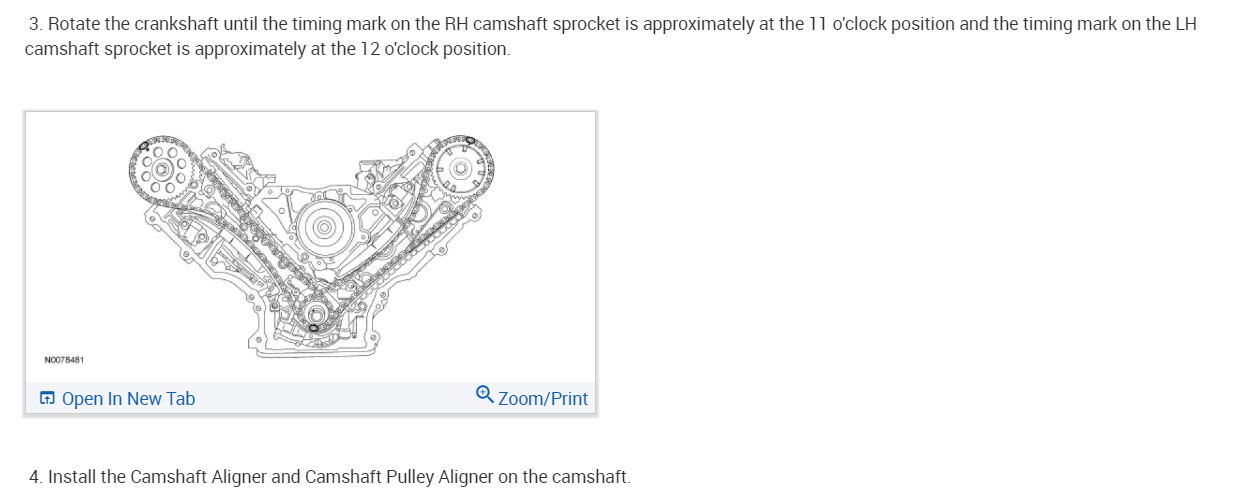
Rotate the LH camshaft with the Camshaft Positioning Tool until the timing mark is approximately at 12 o'clock.
Rotate the RH camshaft with the Camshaft Positioning Tool until the timing mark is approximately at 11 o'clock.
Tighten the Camshaft Holding Tools to maintain camshaft pre-positioning.
CAUTION:Unless otherwise instructed, at no time when the timing chains are removed and the cylinder heads are installed is the crankshaft or camshaft to be rotated. Severe piston and valve damage will occur.

CAUTION:Rotate the crankshaft counterclockwise only. Do not rotate past position shown or severe piston and valve damage can occur.

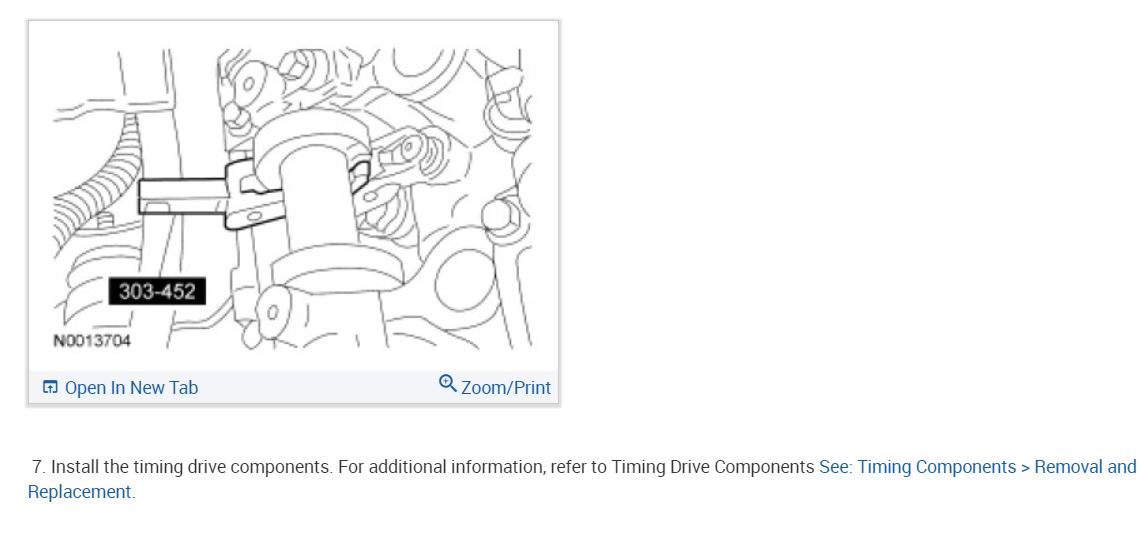
NOTE:The number one cylinder is at top dead center (TDC) when the stud on the engine block fits into the slot in the handle of the special tool.

Fig. 288: Rotating Crankshaft Counterclockwise
Courtesy of FORD MOTOR CO.
Position the crankshaft so the number one cylinder is at TDC with the special tool.
Remove the Crankshaft Holding Tool.
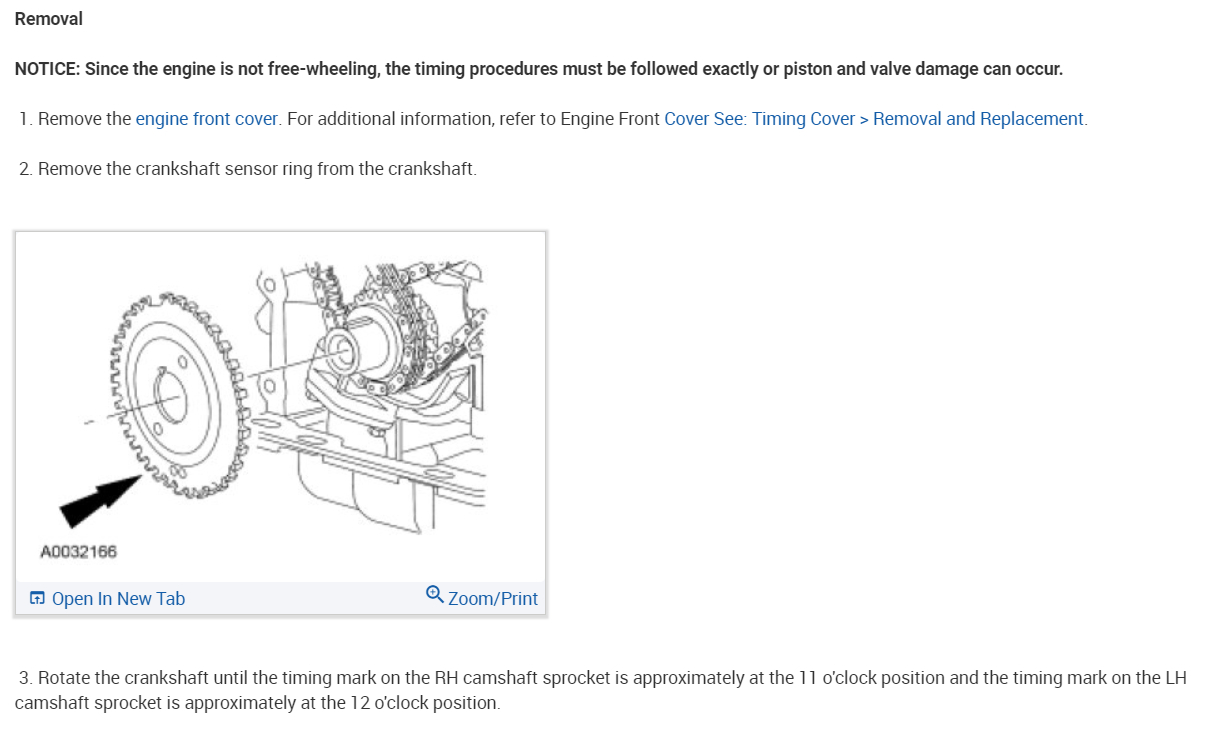
Install the crankshaft sprocket, make sure the flange faces forward.
Fig. 289: Identifying Direction Of Flange For Installing Crankshaft Sprocket
Courtesy of FORD MOTOR CO.
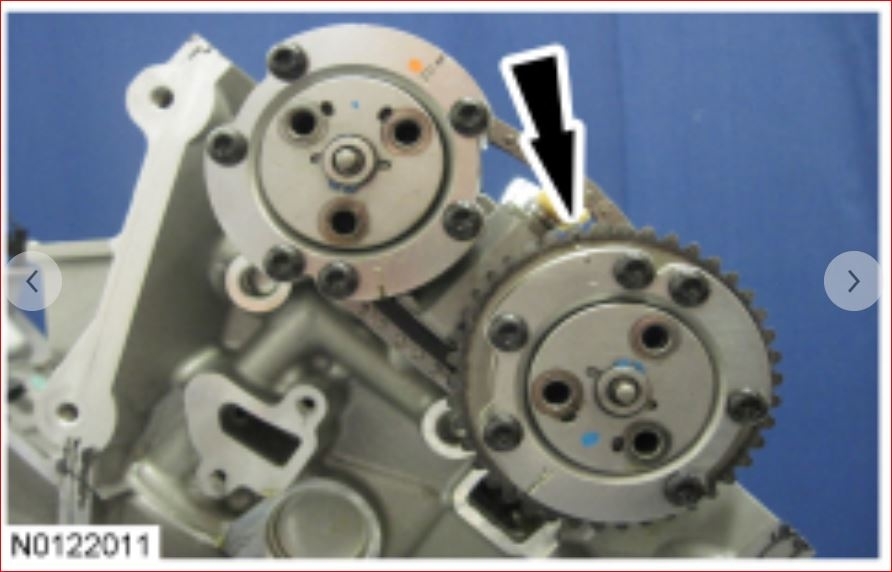
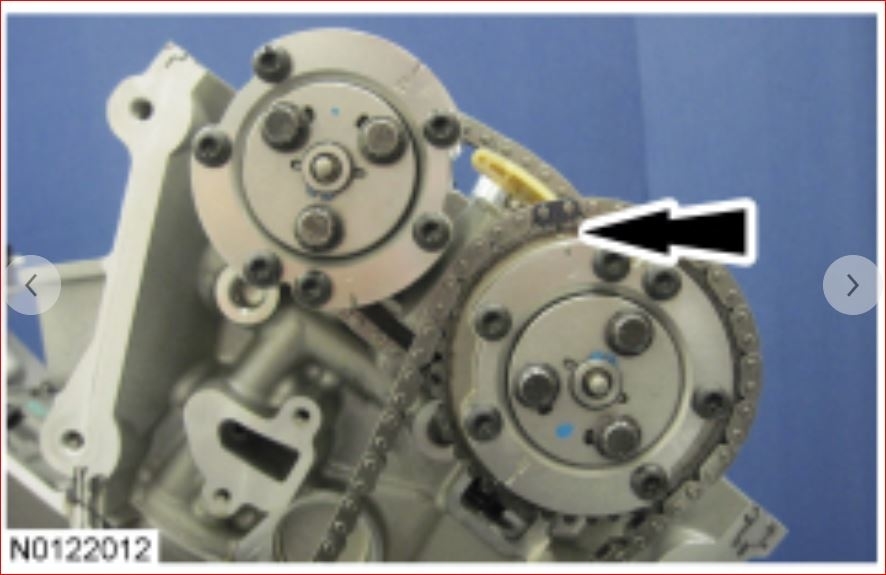
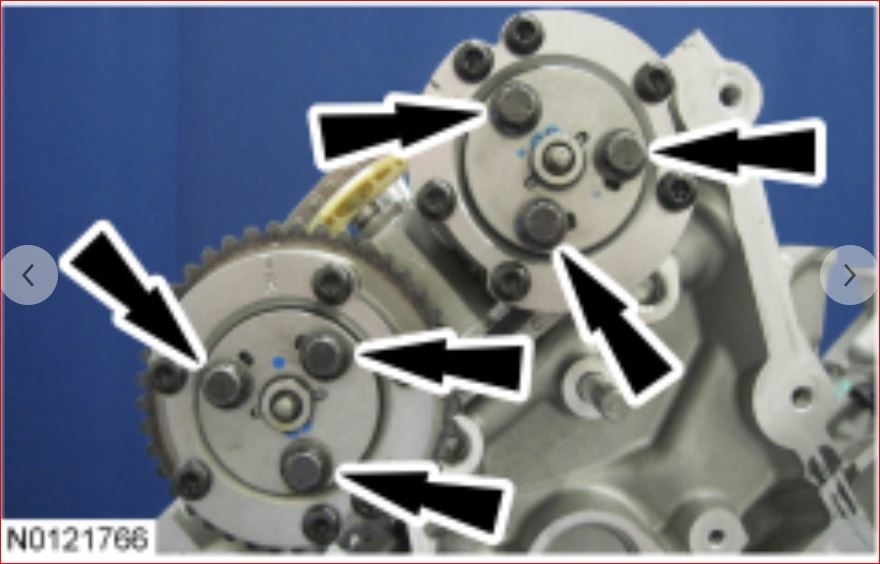
Position the lower end of the LH (inner) timing chain on the crankshaft sprocket, aligning the timing mark on the outer flange of the crankshaft sprocket with the single copper (marked) link on the chain.
Fig. 290: Aligning Timing Mark On Outer Flange Of Crankshaft Sprocket With Single Copper (Marked) Link On Chain
Courtesy of FORD MOTOR CO.
NOTE:Make sure the upper half of the timing chain is below the tensioner arm dowel.

NOTE:If necessary, use the Camshaft Positioning Tool to adjust the camshaft sprocket slightly to obtain timing mark alignment.

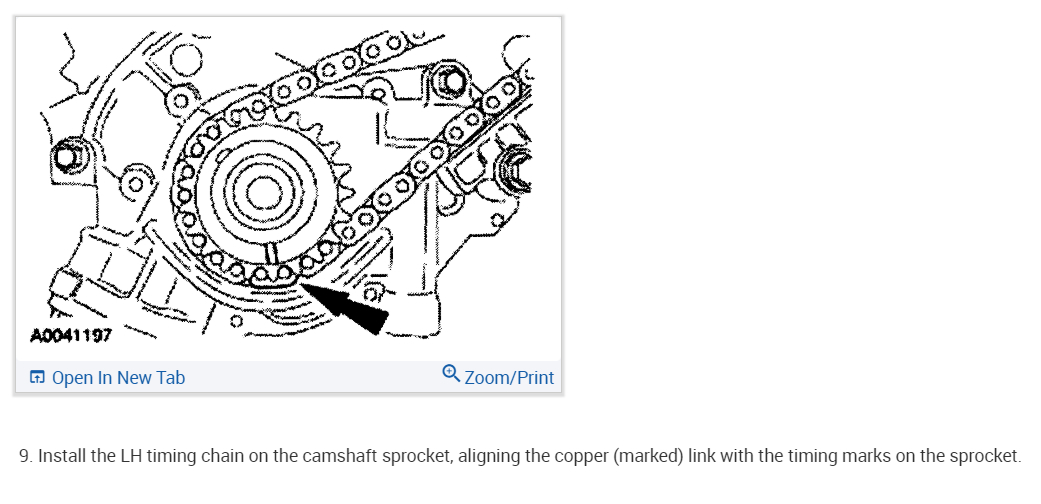
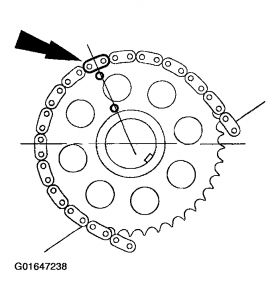
Fig. 291: Positioning Timing Chain On Camshaft Sprocket With Camshaft Sprocket Timing Mark Positioned Between Copper (Marked) Chain Links
Courtesy of FORD MOTOR CO.
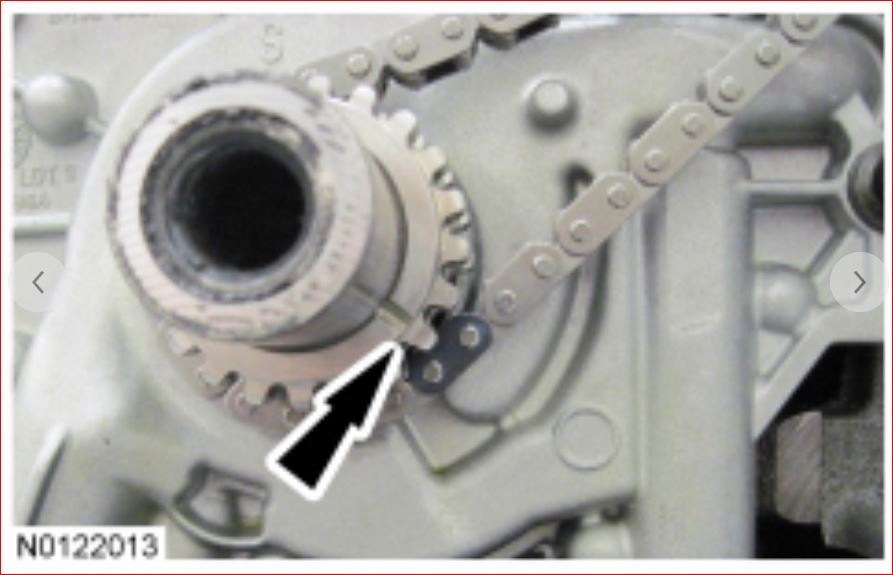
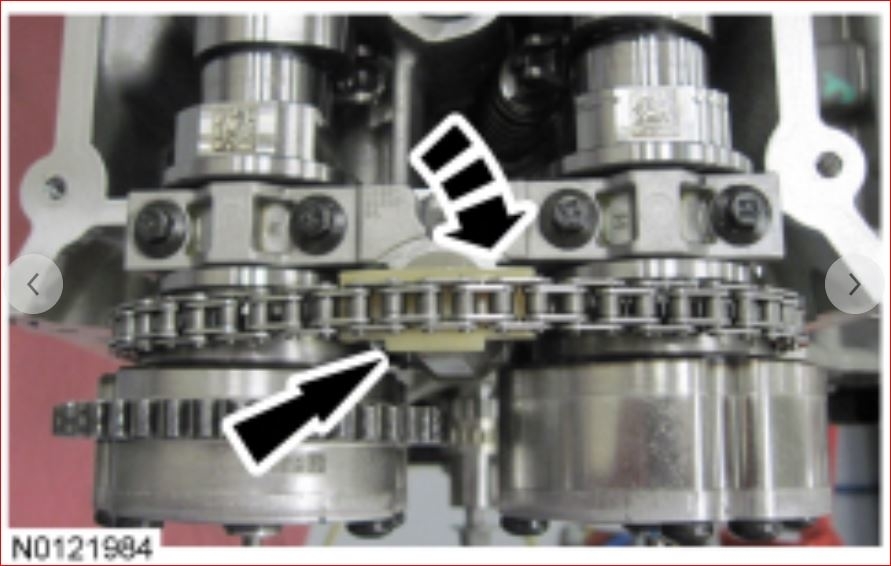
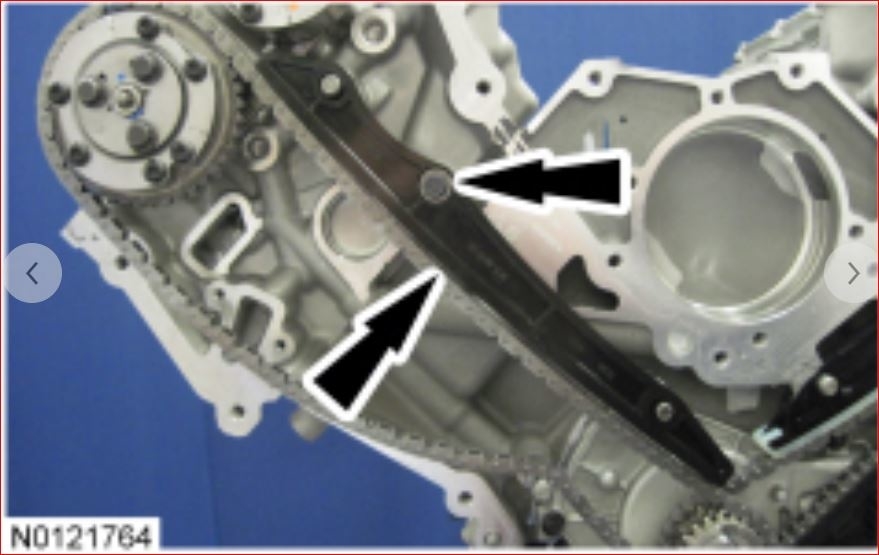
Position the timing chain on the camshaft sprocket with the camshaft sprocket timing mark positioned between the two copper (marked) chain links.
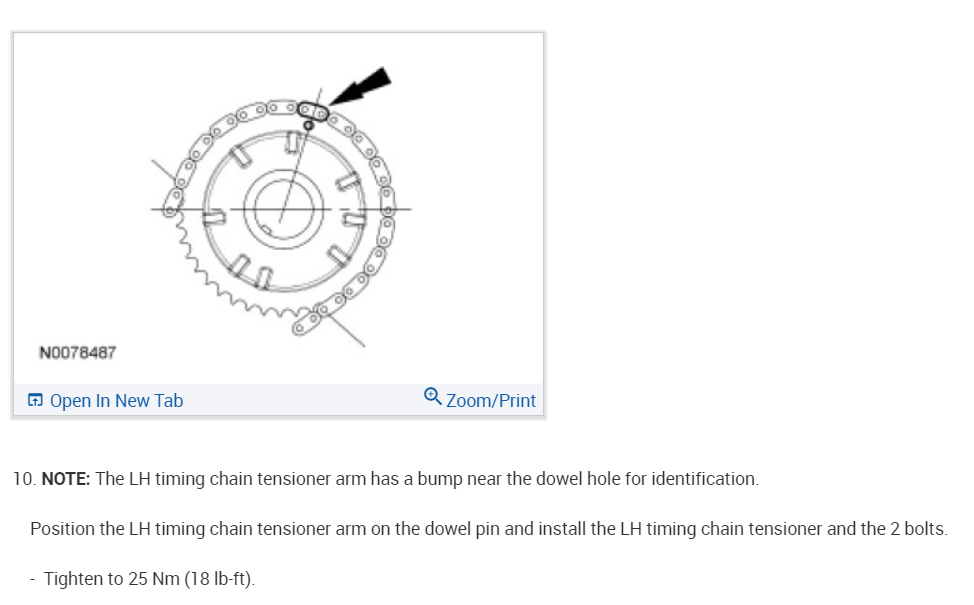
NOTE:The LH timing chain tensioner arm has a bump near the dowel hole, for identification.

Fig. 292: Identifying Tightening Torque Of LH Timing Chain Tensioner Bolts
Courtesy of FORD MOTOR CO.
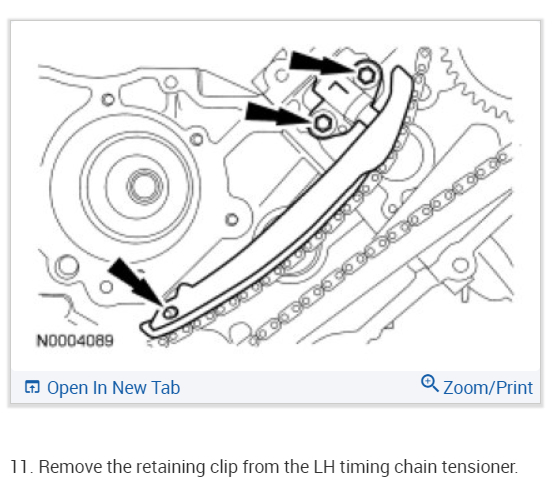
Position the LH timing chain tensioner arm on the dowel pin and install the LH timing chain tensioner.
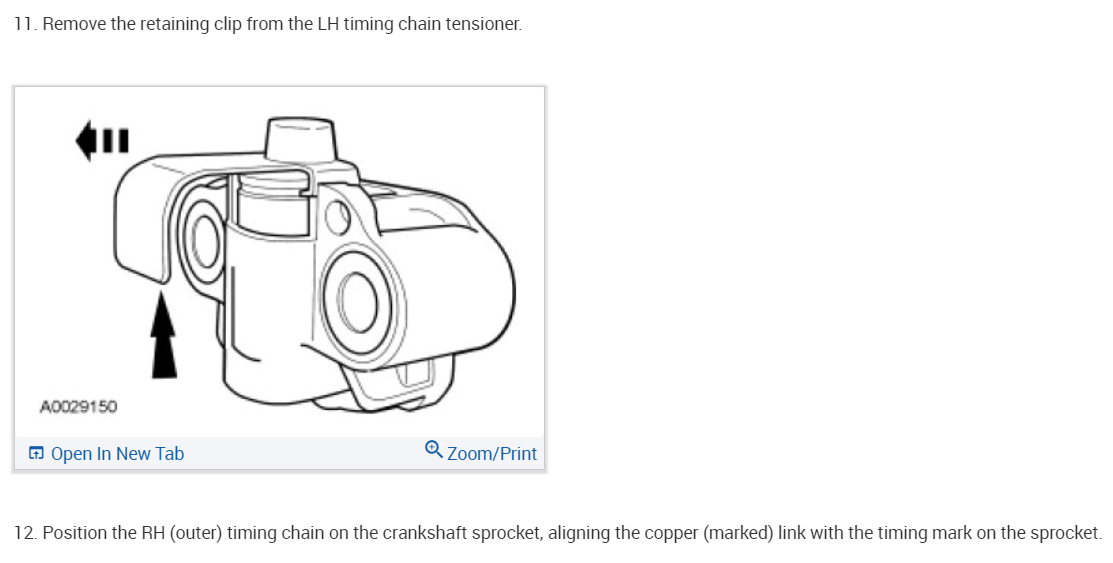
Remove the retaining clip from the LH timing chain tensioner.
Fig. 293: Removing Retaining Clip From LH Timing Chain Tensioner
Courtesy of FORD MOTOR CO.
NOTE:The lower half of the timing chain must be positioned above the tensioner arm dowel.

Fig. 294: Aligning Timing Mark On Sprocket With Single Copper (Marked) Link On Timing Chain
Courtesy of FORD MOTOR CO.
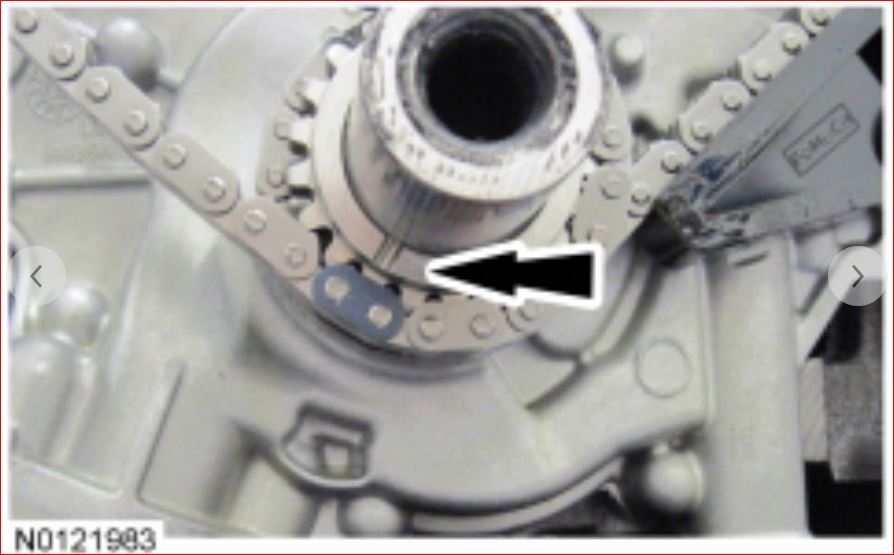
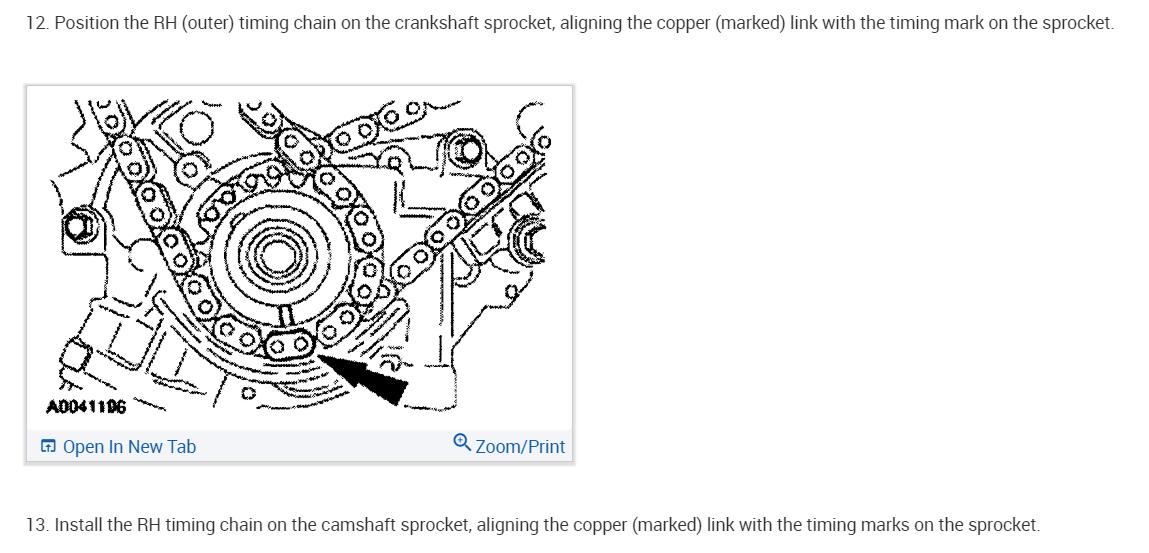
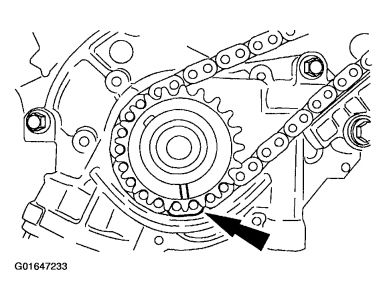
Position the lower end of the RH (outer) timing chain on the crankshaft sprocket, aligning the timing mark on the sprocket with the single copper (marked) link on the timing chain.
NOTE:If necessary, use the Camshaft Positioning Tool to adjust the camshaft sprocket slightly to obtain timing mark alignment.

Fig. 295: Identifying Position Of Camshaft Sprocket Timing Mark
Courtesy of FORD MOTOR CO.
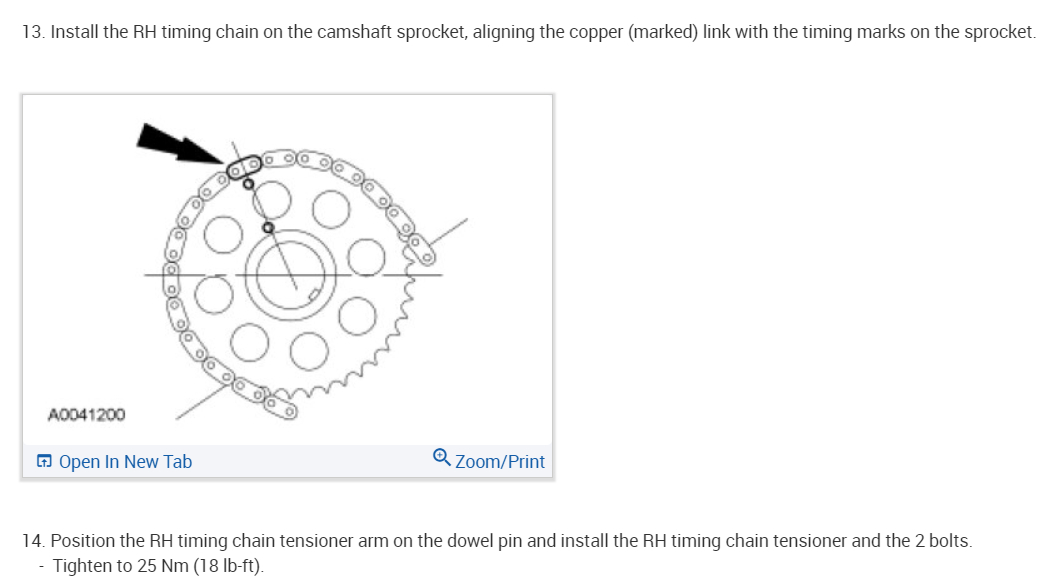
Position the RH timing chain on the camshaft sprocket. Make sure the camshaft sprocket timing mark is positioned between the two copper (marked) chain links.
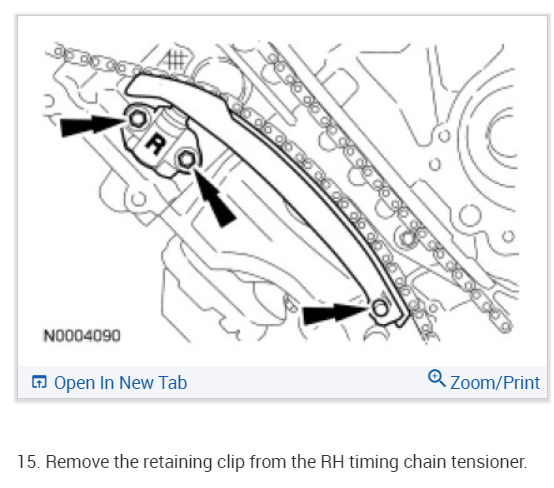
Position the RH timing chain tensioner arm on the dowel pin and install the RH timing chain tensioner.
Fig. 296: Identifying Tightening Torque Of RH Timing Chain Tensioner Bolts
Courtesy of FORD MOTOR CO.
Remove the retaining clip from the RH timing chain tensioner.
Fig. 297: Removing Retaining Clip From RH Timing Chain Tensioner
Courtesy of FORD MOTOR CO.
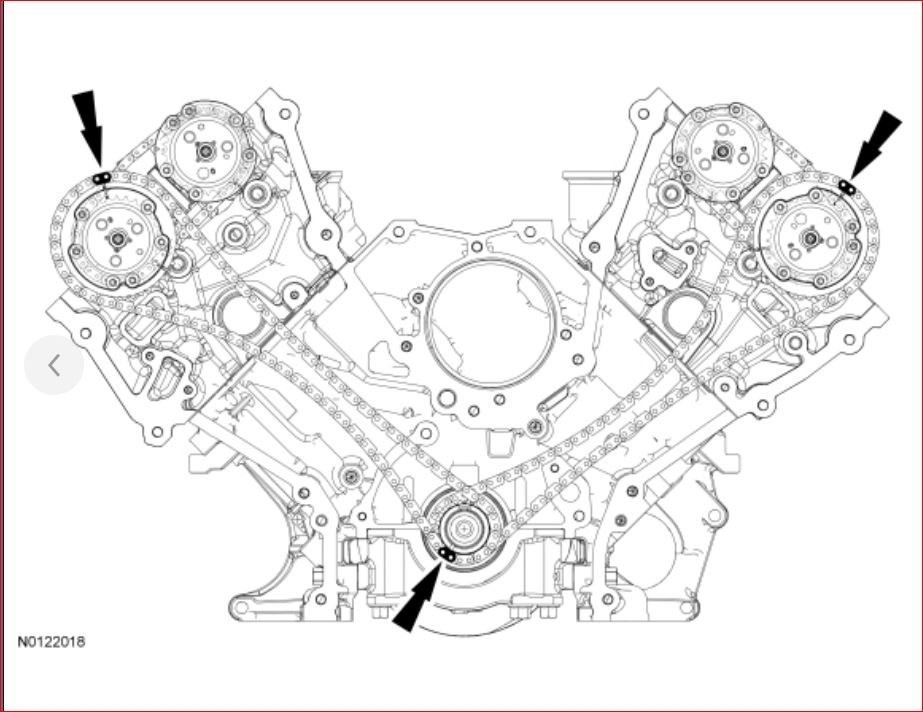
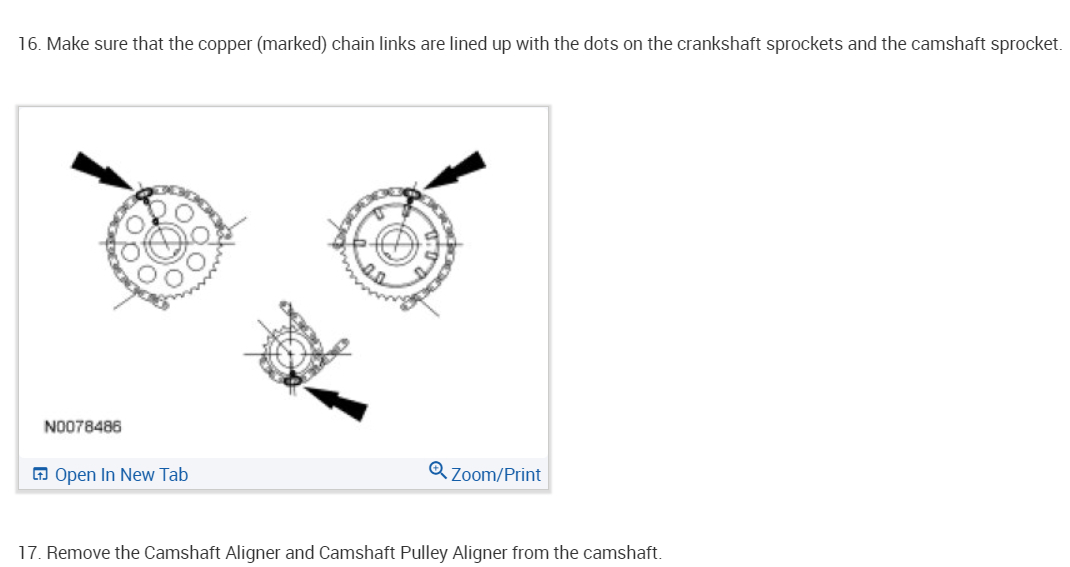
As a post-check, verify correct alignment of all timing marks.
Fig. 298: Verifying Correct Alignment Of Timing Marks
Courtesy of FORD MOTOR CO.
Remove the special tool.
Fig. 299: Removing Special Tool
Courtesy of FORD MOTOR CO.
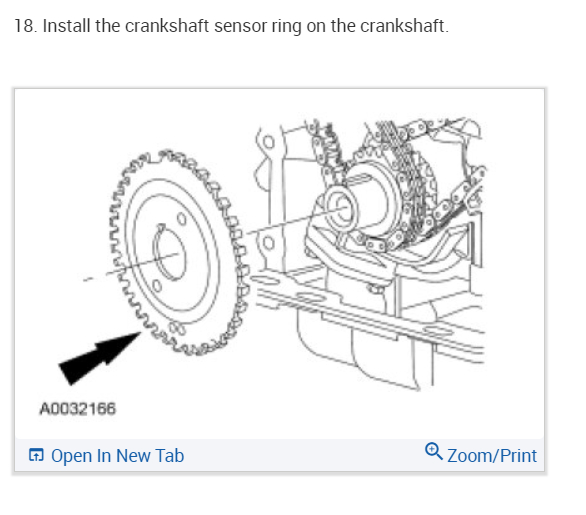
Position the crankshaft sensor ring on the crankshaft.
Fig. 300: Positioning Crankshaft Sensor Ring On Crankshaft
Courtesy of FORD MOTOR CO.
Install the engine front cover. Refer to ENGINE FRONT COVER .
Was this
answer
helpful?
Yes
No
Saturday, September 19th, 2020 AT 1:52 PM (Merged)
Tiny
MAKAWELI2
  • MEMBER
  • 1 POST
  • 2002 FORD F-150
  • V8
  • 2WD
  • AUTOMATIC
  • 54,000 MILES
My 2002 Ford F-150 extended cab is one clean truck! I take very good care of my truck. With only 54,000 plus miles, isn't it way too soon for the timing chain to be going bad? I had a mechanic friend of mine take a look at my truck. He thought the belt and the pulley were loose that was making the noise. He took the belt & pulley off and started the truck up again and the noise was still there. He then drove my truck over to another mechanic and as soon as he heard the noise he knew right away what the problem was. Timing chain/tension/guide problem.
My question is. Will Ford fix the problem at their cost even though I did not renew my extended warranty? Everyone I had talked to says the timing chain should not be going out this soon with only 54,000 miles on the engine. I should get at least 200,000 miles on my truck before anything like this would happen.
Feedback would be greatly appreciated.
Sincerely, 2002 F-150 owner
Was this
answer
helpful?
Yes
No
Saturday, September 19th, 2020 AT 1:52 PM (Merged)
Tiny
JACOBANDNICKOLAS
  • MECHANIC
  • 108,117 POSTS
Hi:
It is unusual for it to go bad this soon, but things go bad (bearing in the tensionier). If two mechanics identified that as your problem, and you still hear the noise with the serp belt off, I would guess they are right.

As far as warranty, the truck is 7 years old and factory warranty has expired. You could try calling owner relations, but it's going to be a fight. I would recommend starting at a Ford dealer. If they say the same thing, then contact owner relations (phone number in the owner's manual) and discuss the problem. Maybe you can talk them into replacing the parts and you pay labor or something like that.

Let me know how it goes for you.

Joe
Was this
answer
helpful?
Yes
No
Saturday, September 19th, 2020 AT 1:52 PM (Merged)
Tiny
CHRISG31
  • MEMBER
  • 1 POST
  • 2000 FORD F-150
V8 four wheel drive automatic 193,000 miles.

I need a picture of timing chain diagram for a 5.4 Triton engine.
Was this
answer
helpful?
Yes
No
Saturday, September 19th, 2020 AT 1:52 PM (Merged)

Please login or register to post a reply.

Sponsored links