P0463 code

Tiny
JALANICK
  • MEMBER
  • 2005 FORD EXPLORER
  • 6 CYL
  • 2WD
  • AUTOMATIC
  • 28,000 MILES
6/26/09-gas gauge on instrument panel started registering "below empty" even though the tank was 3/4 full. The "check engine soon light" also came on. Stopped and put a little gas in and gauge still went to below empty after showing correct amount on gauge. Any solutions?
Sunday, June 28th, 2009 AT 5:26 AM

24 Replies

Tiny
MERLIN2021
  • MECHANIC
  • 17,250 POSTS
Scan it for codes if P0463 pops up, this is for you! It's a tech bulliten on erratic fuel gauge operation, and here's what you need done!
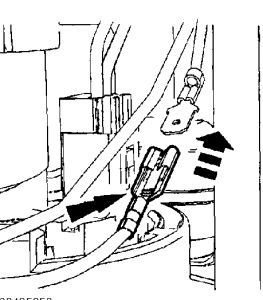
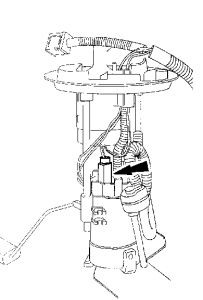
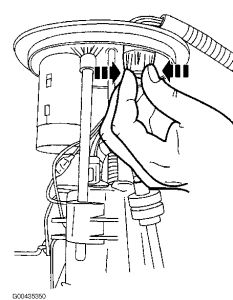
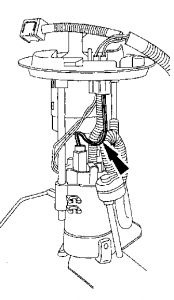
MIL ON WITH DTC P0463 OR ERRATIC FUEL GAUGE OPERATION TECHNICAL SERVICE BULLETIN Reference Number(s): 06-17-10, Â Date of Issue: Â September 4, 2006 Superceded Bulletin(s): 06-16-7, Â Date of Issue: Â August 21, 2006 Related Ref Number(s): 06-16-7, 06-17-10 ARTICLE BEGINNING ISSUE Some 2004-2007 Explorer 4dr/Mountaineer vehicles may exhibit the malfunction indicator lamp (MIL) on with diagnostic trouble code (DTC) P0463 or an erratic fuel gauge concern. This could be from sulphur contamination in the fuel, causing an open or high resistance on the fuel sender card. ACTION Follow the Service Procedure steps to correct the condition. SERVICE PROCEDURE 1. For vehicles with customer symptom of erratic fuel gauge operation (with no MIL on), proceed to Step 1a. For vehicles with a customer symptom including the MIL on, proceed to Step 1b. If unable to verify the concern, do not continue with this TSB. a. Follow the appropriate pinpoint test (PPT) for "Fuel Gauge Inaccurate" in Workshop Manual (WSM), Section 413-01. If PPT test results lead to fuel pump module replacement, proceed to Step 2. If PPT test results isolate any problem other than fuel pump module replacement, repair as indicated and do not continue with this TSB. b. Install diagnostic scan tool to retrieve DTCs. If DTC P0463 is retrieved, proceed to Step 2. If DTC P0463 is not retrieved, this TSB does not apply, follow normal WSM diagnostics. 2. Remove fuel tank per WSM, Section 310-01. 3. Remove fuel pump assembly from fuel tank per WSM, Section 310-01. See Figure 1 (Chart) to determine if a kit (contains a fuel level sensor assembly, a wire harness and heat shrink tube) or fuel pump assembly is required for repair. For vehicles that can be serviced with a kit go to Step 4. For vehicles that require fuel pump assembly replacement, go to Step 12. Fig. 1: Fuel Sender Repair Kit/Pump Application Chart 4. Remove the fuel level sensor assembly (sender card/float rod assembly) from the fuel pump assembly per WSM, Section 310-01. FORD: 2004-2007 Explorer MERCURY: 2004-2007 Mountaineer NOTE: This article supersedes TSB 06-16-7 to update the Service Procedure. Page 1 of 3 MIL ON WITH DTC P0463 OR ERRATIC FUEL GAUGE OPERATION -2005 Ford Ex...5. Detach electrical connector from fuel pump housing (Fig. 2 ). Fig. 2: Electrical Connector On Fuel Pump Housing 6. Remove wiring harness from the fuel pump assembly flange by depressing the retaining fingers on the harness connector at bottom of flange and pushing upward out of flange (Fig. 3 ). Fig. 3: Removing Wiring Harness From Fuel Pump 7. Install new wiring harness by feeding wires through flange hole and inserting harness connector into flange until an audible click is heard. Check for proper retention. 8. Reattach electrical connector harness to fuel pump housing. Prior to making the connection, place one loop in the pump wires away from the convoluted feed tube (Fig. 4 ). Fig. 4: Reattaching Electrical Connector Harness To Fuel Pump Housing 9. Reattach the signal wire (yellow) on the harness to the signal wire (yellow) on the replacement fuel level sensor assembly per WSM, Section 310-01 (Fig. 5 ). Fig. 5: Reattaching Signal Wire 10. Wrap the ground wire one time around the signal wire and attach the ground wire terminal to the terminal on the fuel level sensor assembly. Check for proper retention. 11. Reattach the fuel level sensor assembly to the fuel pump housing, making sure that both the signal wire and the ground wire are routed through the gap between the fuel level sensor assembly and fuel pump bracket. Torque the fastener at the bottom of the fuel level sensor assembly to 1 N.m (9 lb-in). 12. Reinstall fuel pump assembly into fuel tank per WSM, Section 310-01. 13. Reinstall fuel tank per WSM, Section 310-01. PARTS INFORMATION
NOTE: THE GROUND WIRE MUST BE WRAPPED AROUND THE SIGNAL WIRE, AS DESCRIBED IN STEP 10, TO PREVENT POTENTIAL INTERFERENCE WITH THE FLOAT ROD ARM. NOTE: TAKE CARE NOT TO DAMAGE/BEND FLOAT ROD OR SENDER CARD DURING INSTALLATION OF FUEL PUMP ASSEMBLY.
https://www.2carpros.com/forum/automotive_pictures/62217_1_11.jpg


https://www.2carpros.com/forum/automotive_pictures/62217_2_11.jpg


https://www.2carpros.com/forum/automotive_pictures/62217_3_15.jpg


https://www.2carpros.com/forum/automotive_pictures/62217_4_8.jpg

Was this
answer
helpful?
Yes
No
Sunday, June 28th, 2009 AT 9:36 AM
Tiny
TONY02
  • MEMBER
  • 63 POSTS
  • 2004 FORD EXPLORER
  • 170,000 MILES
So I replaced my headliner today and put a new one in then when I started the car up my gas gauge was on E and I get a code of p0463. I’m not sure if it’s just a coincidence and was bound to happen or if I maybe ripped a wire when putting the headliner back in and didn’t notice. Before I do go and take everything back apart I would like to know maybe if that code relates to something with a wire inside the car or if that wire is outside the car. (Before doing the headliner I didn’t have this problem)
Was this
answer
helpful?
Yes
No
Monday, December 21st, 2020 AT 11:34 AM (Merged)
Tiny
TONY02
  • MEMBER
  • 63 POSTS
Also, the power windows, radio, and sun visor lights quit working the same time this happened.
Was this
answer
helpful?
Yes
No
Monday, December 21st, 2020 AT 11:34 AM (Merged)
Tiny
AL514
  • MECHANIC
  • 4,103 POSTS
Hello, sorry to hear about your issue. Can I please have the VIN number so we can look up the correct wiring diagram?
Was this
answer
helpful?
Yes
No
+1
Monday, December 21st, 2020 AT 11:34 AM (Merged)
Tiny
TONY02
  • MEMBER
  • 63 POSTS
1FMZU63K44UA64273.
Was this
answer
helpful?
Yes
No
Monday, December 21st, 2020 AT 11:34 AM (Merged)
Tiny
AL514
  • MECHANIC
  • 4,103 POSTS
Okay, is it 2 or 4 wheel drive? And it says it's flex fuel? Correct?
Was this
answer
helpful?
Yes
No
Monday, December 21st, 2020 AT 11:34 AM (Merged)
Tiny
TONY02
  • MEMBER
  • 63 POSTS
Yes, it’s rear wheel drive and it’s flex fuel.
Was this
answer
helpful?
Yes
No
Monday, December 21st, 2020 AT 11:34 AM (Merged)
Tiny
AL514
  • MECHANIC
  • 4,103 POSTS
Okay, so the p0463 is "Fuel Level sensor circuit high input". Usually with a high input code, the sensor has lost a ground to it. I'm going through the diagrams, trying to tie all this faults together. Did you have to disconnect any wiring while replacing the headliner?
Was this
answer
helpful?
Yes
No
Monday, December 21st, 2020 AT 11:34 AM (Merged)
Tiny
TONY02
  • MEMBER
  • 63 POSTS
Yes I did and also there was a black wire that ripped on the driver side on the very back when I was taking a panel off, but I put it back temporary to see if that would solve it and I still get nothing.
Was this
answer
helpful?
Yes
No
Monday, December 21st, 2020 AT 11:34 AM (Merged)
Tiny
TONY02
  • MEMBER
  • 63 POSTS
The wire I disconnected was one by the A pillar and one by the B pillar.
Was this
answer
helpful?
Yes
No
Monday, December 21st, 2020 AT 11:34 AM (Merged)
Tiny
AL514
  • MECHANIC
  • 4,103 POSTS
Okay, in the 2nd diagram here you'll see 2 ground wires, ones black/light blue and the other is just black. I would start by checking these ground wires, that they're tight and the connection is clean. I will keep adding things as I find them here. But it sounds like you may be missing one of these grounds.
Was this
answer
helpful?
Yes
No
Monday, December 21st, 2020 AT 11:34 AM (Merged)
Tiny
TONY02
  • MEMBER
  • 63 POSTS
Okay and the wires that I disconnected was by the C pillar and D pillar not by the B pillar I messed up, but I’ll look at the wiring see what I can find.
Was this
answer
helpful?
Yes
No
Monday, December 21st, 2020 AT 11:34 AM (Merged)
Tiny
AL514
  • MECHANIC
  • 4,103 POSTS
Do you remember what color they were by chance? And do the interior lights come on when you open the drivers side door?
Was this
answer
helpful?
Yes
No
Monday, December 21st, 2020 AT 11:34 AM (Merged)
Tiny
TONY02
  • MEMBER
  • 63 POSTS
I don’t but they were a couple of mixed colors but I do remember see the one that was ripped was black.
Was this
answer
helpful?
Yes
No
Monday, December 21st, 2020 AT 11:34 AM (Merged)
Tiny
AL514
  • MECHANIC
  • 4,103 POSTS
I think this is definitely going to be a disconnected ground wire, probably near the pillars you were working around. Because the power wiring for the radio, windows, instrument cluster and interior lights all come from different fuses and locations. The truck has a lot of ground wires for sure. So make sure any connectors you unplugged are fitting correctly, sometimes the pins can get bent on not make good contact inside a connector. We call it Pin fitment. I cant find much on pillar C though. Is there anything else not working? Do the interior lights come on when you open the drivers side door? And did you fix the black wire that was ripped? Edit: I would take a real good look at this Joint Connector at pillar D. It has a ton of black ground wires running through it. There may be a couple lose pins in there. (Pic 2) Edit: You mentioned the black wire that ripped was on the driver side rear, was it this connector (pic 3 red arrow)?
Was this
answer
helpful?
Yes
No
Monday, December 21st, 2020 AT 11:34 AM (Merged)
Tiny
TONY02
  • MEMBER
  • 63 POSTS
Okay, so I check the wire connectors that I took off by A, C, and D pillar and they do have ground and are getting power as for the wire that was ripped I thought it was black but as I got more access to it, the wire was actually a brown and white color but I fixed it. I still have the same problem.
Was this
answer
helpful?
Yes
No
Monday, December 21st, 2020 AT 11:34 AM (Merged)
Tiny
TONY02
  • MEMBER
  • 63 POSTS
I’m going to go head and now take the headliner back off and see what I can find there.
Was this
answer
helpful?
Yes
No
Monday, December 21st, 2020 AT 11:34 AM (Merged)
Tiny
TONY02
  • MEMBER
  • 63 POSTS
I’m uploading a couple pictures to show the connectors that I have check that have good ground that I ended up disconnecting when I took the headliner off.
Was this
answer
helpful?
Yes
No
Monday, December 21st, 2020 AT 11:34 AM (Merged)
Tiny
AL514
  • MECHANIC
  • 4,103 POSTS
Okay, did you happen to unbolt any wires going to the chassis anywhere? I wouldn't think you would have to take the whole headliner out again. It looks like all the connections are behind the pillars, and run along to edge of the liner. In that picture of the liner there's seems to be only those 2 main areas where there's connectors. Unless you remember undoing some towards the middle of it. It's strange that you only lost the gas gauge, radio and windows. Since everything seems to run through bulk connectors. I'd pull the pillars off first, even the A and B pillars, just to be sure. Something may have gotten pulled on without you noticing. Looks like a lot of work taking that liner down. Does the truck start and run okay? There's a ground that black/light blue that's one of the grounds for the instrument cluster, the rest all seem to be black wires. Edit: if you end up really not finding any loose grounds, it wouldn't hurt to check some fuses and batter connections, but I don't see how that could happen unless a power wire hit a ground in the process. The only other thing I can think of is that something is messing with the CAN bus data network. But you'd have other symptoms if that was the case.
Was this
answer
helpful?
Yes
No
Monday, December 21st, 2020 AT 11:34 AM (Merged)
Tiny
TONY02
  • MEMBER
  • 63 POSTS
Yes, I did end up taking the head liner off again but didn’t see anything. Everything I tested had a good ground I was using a test light to verify it. Then I figured if everything had good ground then it’s not getting any power, and it turns out it was a fuse inside the car, under the driver side dash. Put a new one in and everything is working fine now. My guess was that it blew because I ended up cutting some wires because the previous owner had a TV inside but took it out and those were left over wires and I’m guessing it ended up touching medal and shorting out.
Was this
answer
helpful?
Yes
No
Monday, December 21st, 2020 AT 11:34 AM (Merged)

Please login or register to post a reply.

Sponsored links