ABS light on?

Tiny
BAT KID
  • MEMBER
  • 2005 CHEVROLET CAVALIER
  • 2.2L
  • 4 CYL
  • FWD
  • AUTOMATIC
  • 122,800 MILES
To make a long story short, a little more than a week ago I installed rear shims on both sides because the toe was off and I aligned it and it straightened out the rear (note: there were shims already installed but were removed and installed with the corrected ones) a week later my ABS, trac off, service wrench and brake light all come on. Its very random timing as well. Usually first the ABS, trac off and brake light will come on, then randomly the ABS and brake light will go out and the service wrench will come on but the trac off just stays on. Then randomly the ABS and brake light will come on.
Monday, September 12th, 2016 AT 8:11 PM

23 Replies

Tiny
HMAC300
  • MECHANIC
  • 48,601 POSTS
See picture for causes. these wires are very fine and may be broken or getting wet when it rains. your voltage is too high. ABS light on

These guides can help us find the problem or code and fix it

https://youtu.be/Pb6nXV-iamI

and

https://youtu.be/rTtAnsOlZU4

and

https://youtu.be/ANWVTh2RQoQ

Please run down these guides and report back.
Was this
answer
helpful?
Yes
No
+1
Tuesday, September 13th, 2016 AT 9:36 AM
Tiny
BAT KID
  • MEMBER
  • 40 POSTS
Thanks for your help its much appreciated, today I was able to replace the ABS module that fix it thanks for the videos and guides they helped me find it.
Was this
answer
helpful?
Yes
No
Tuesday, September 13th, 2016 AT 6:48 PM
Tiny
HMAC300
  • MECHANIC
  • 48,601 POSTS
Glad you could get it fixed, that kind of problem can be tough. Please use 2CarPros anytime we are here to help.
Was this
answer
helpful?
Yes
No
Wednesday, September 14th, 2016 AT 6:37 AM
Tiny
PAZ9000ZX
  • MEMBER
  • 1 POST
  • 2003 CHEVROLET CAVALIER
  • 4 CYL
  • 2WD
  • AUTOMATIC
  • 144,000 MILES
Service, abs, and track off light comes on my chevy cavalier 03
Was this
answer
helpful?
Yes
No
Thursday, February 25th, 2021 AT 9:33 AM (Merged)
Tiny
WRENCHTECH
  • MECHANIC
  • 20,757 POSTS
That means the ABS computer has detected a malfunction and shut the system down. You will need someone with a professional scan tool to retrieve the stored trouble codes to have a starting point. A generic code reader won't work here.
Was this
answer
helpful?
Yes
No
Thursday, February 25th, 2021 AT 9:33 AM (Merged)
Tiny
MRS JANSSEN
  • MEMBER
  • 1 POST
  • 2002 CHEVROLET CAVALIER
Brakes problem
2002 Chevy Cavalier 4 cyl Wheel Drive Type unknown Automatic 69500 miles

My abs light and trac off light keeps coming on. What could be the problem? I just recently had my car worked on for this and the light went off for over a week and now its back on
Was this
answer
helpful?
Yes
No
Thursday, February 25th, 2021 AT 9:33 AM (Merged)
Tiny
MERLIN2021
  • MECHANIC
  • 17,250 POSTS
You will need to get the ABS codes read by a scanner that can read GM ABS or "C" codes, this will give you the starting point. If ABS malfunctions, the trac light comes on too.
Was this
answer
helpful?
Yes
No
+1
Thursday, February 25th, 2021 AT 9:33 AM (Merged)
Tiny
JLAPOINT
  • MEMBER
  • 2 POSTS
  • 2001 CHEVROLET CAVALIER
  • 4 CYL
  • FWD
  • MANUAL
  • 104,000 MILES
The abs signal is always lit on the driver panel why is-it so.
Was this
answer
helpful?
Yes
No
Thursday, February 25th, 2021 AT 9:33 AM (Merged)
Tiny
SERVICE WRITER
  • MECHANIC
  • 9,123 POSTS
I think it is a big mistake and would not call it safe. This is my personal opinion and say that from the abs system saving my life. Without it I clearly would have slid underneath a truck that probably would have decapitated me.

The anti-lock brake system (abs), allows you to have a much better chance of maintaining control should you go into a slide. If it detects a problem within the system, the light comes on and is no longer working.
The abs system will pulse the brakes in a rapid fashion that allows you to slow down when in a skid, it pulses faster than the emotional driver that is going into a skid that does not have a working abs system.

IT should be diagnosed.
There will be codes that will set in the system that are retrieved from the computer. OFten it turns out to be a wheel speed sensor that is the underlying cause.

My advice, is get it fixed before you need it.
Was this
answer
helpful?
Yes
No
Thursday, February 25th, 2021 AT 9:33 AM (Merged)
Tiny
SWEET_CHICK303
  • MEMBER
  • 1 POST
  • 2000 CHEVROLET CAVALIER
  • 4 CYL
  • 2WD
  • AUTOMATIC
When I push the brake pedal in the rain or snow (not when its dry) any harder then lightly (even just normal pressure)will make it "humm" and vibrate and kinda feel like locked up but not stopping anymore then normal. I have a 2000 chevy cavalier. I just wanted to know if anyone would have any idea what it could be so I can get it fixed
Was this
answer
helpful?
Yes
No
Thursday, February 25th, 2021 AT 9:34 AM (Merged)
Tiny
CARADIODOC
  • MECHANIC
  • 33,741 POSTS
It's supposed to do that. That's the anti-lock brakes kicking in when any one wheel slows down faster than the others.

GM has a huge problem with the wheel speed sensors built into the front wheel bearings. When the signals start to drop out, usually at lower speeds, the system will kick in too easily, when it shouldn't. Eventually the yellow warming light will come on and the system will be deactivated when a wheel speed sensor quits working completely. That will leave you with standard brakes.

Caradiodoc
Was this
answer
helpful?
Yes
No
Thursday, February 25th, 2021 AT 9:34 AM (Merged)
Tiny
CHARLIE59
  • MEMBER
  • 1 POST
  • 2000 CHEVROLET CAVALIER
  • 4 CYL
  • FWD
  • AUTOMATIC
  • 118,000 MILES
My abs light and trac off light keeps coming on when I get down the road and my car warms up. Why is that?
Was this
answer
helpful?
Yes
No
Thursday, February 25th, 2021 AT 9:34 AM (Merged)
Tiny
MMPRINCE4000
  • MECHANIC
  • 8,549 POSTS
Have the car scanned with an ABS scanner, this will have to be done at a shop, since autoparts stores only scan for "P" (powertrain) codes. ABS codes would be "C" codes.

It could be as simple as a wheel sensor electrical connection has worked loose, or the ABS/Traction control module.
Was this
answer
helpful?
Yes
No
Thursday, February 25th, 2021 AT 9:34 AM (Merged)
Tiny
JSTNSGURL89
  • MEMBER
  • 1 POST
  • 1998 CHEVROLET CAVALIER
  • 4 CYL
  • FWD
  • AUTOMATIC
  • 230,000 MILES
Many months ago, my abs light was on consistantly. After replacing the brake drums and pads, the light went out. Only to return two weeks later. At that time a new symptom appeared. When the car is first started, the first and second stops are unstable (for lack of a better word). The car shudders and slides forward while the brake is pressed. It feels like riding on gravel. Can anyone help?
Was this
answer
helpful?
Yes
No
Thursday, February 25th, 2021 AT 9:35 AM (Merged)
Tiny
BLUELIGHTNIN6
  • MECHANIC
  • 16,542 POSTS
Check to ensure that your rotors are not warped. Rub your fingers across the surface of the rotors (while cool) to fill for any grooves. If you feel grooves then they need to be replaced or "turned". "Turning" rotors is not recommended as it decreases the thickness of the rotor.
Was this
answer
helpful?
Yes
No
+1
Thursday, February 25th, 2021 AT 9:35 AM (Merged)
Tiny
ORTICA
  • MEMBER
  • 5 POSTS
  • 1998 CHEVROLET CAVALIER
Sometimes when I come to a stop my brakes dont work and make a sort of spinning/grinding sound but only for a moment. And then the brakes will work again. It happens mostly when I am going at slow speeds and happens every mroning when I back oout of my driveway. Whats happening. Can I disable the abs brakes. I know disabling brakes is not recommended because its added safety but is it possible?
Was this
answer
helpful?
Yes
No
Thursday, February 25th, 2021 AT 9:35 AM (Merged)
Tiny
JDL
  • MECHANIC
  • 16,098 POSTS
Sorry for the late reply.

I wouldn't disable anything. Check your brake fluid. Check all your brake pads. Check abs trouble codes. Some of the national brand autostores used to check trouble codes for free. I'm just not sure if they would check abs codes?

Your brakes aren't something to fool around with. Like you said, safety issues.
Was this
answer
helpful?
Yes
No
Thursday, February 25th, 2021 AT 9:35 AM (Merged)
Tiny
RAIL BUGGY
  • MEMBER
  • 3 POSTS
  • 1993 CHEVROLET CAVALIER
  • 4 CYL
  • 2WD
  • AUTOMATIC
  • 150 MILES
I need to know how to remove the ABS module.
Was this
answer
helpful?
Yes
No
-1
Thursday, February 25th, 2021 AT 9:37 AM (Merged)
Tiny
JACOBANDNICKOLAS
  • MECHANIC
  • 108,179 POSTS
Hi,

Here are the directions for removal and replacement of the module. The attached pics correlate with the directions.

____________________________________________________________

1993 Chevrolet Cavalier/Z24 L4-134 2.2L
Master Cylinder and Hydraulic Modulator Assembly (with ABS)
Vehicle Brakes and Traction Control Hydraulic System Brake Master Cylinder Service and Repair Procedures Master Cylinder and Hydraulic Modulator Assembly (with ABS)
MASTER CYLINDER AND HYDRAULIC MODULATOR ASSEMBLY (WITH ABS)
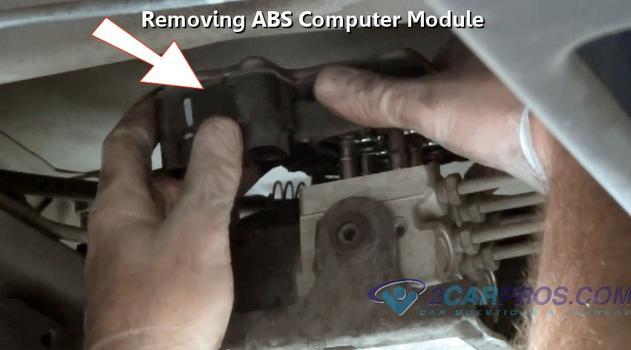
ABS Hydraulic Modulator Assembly Removal
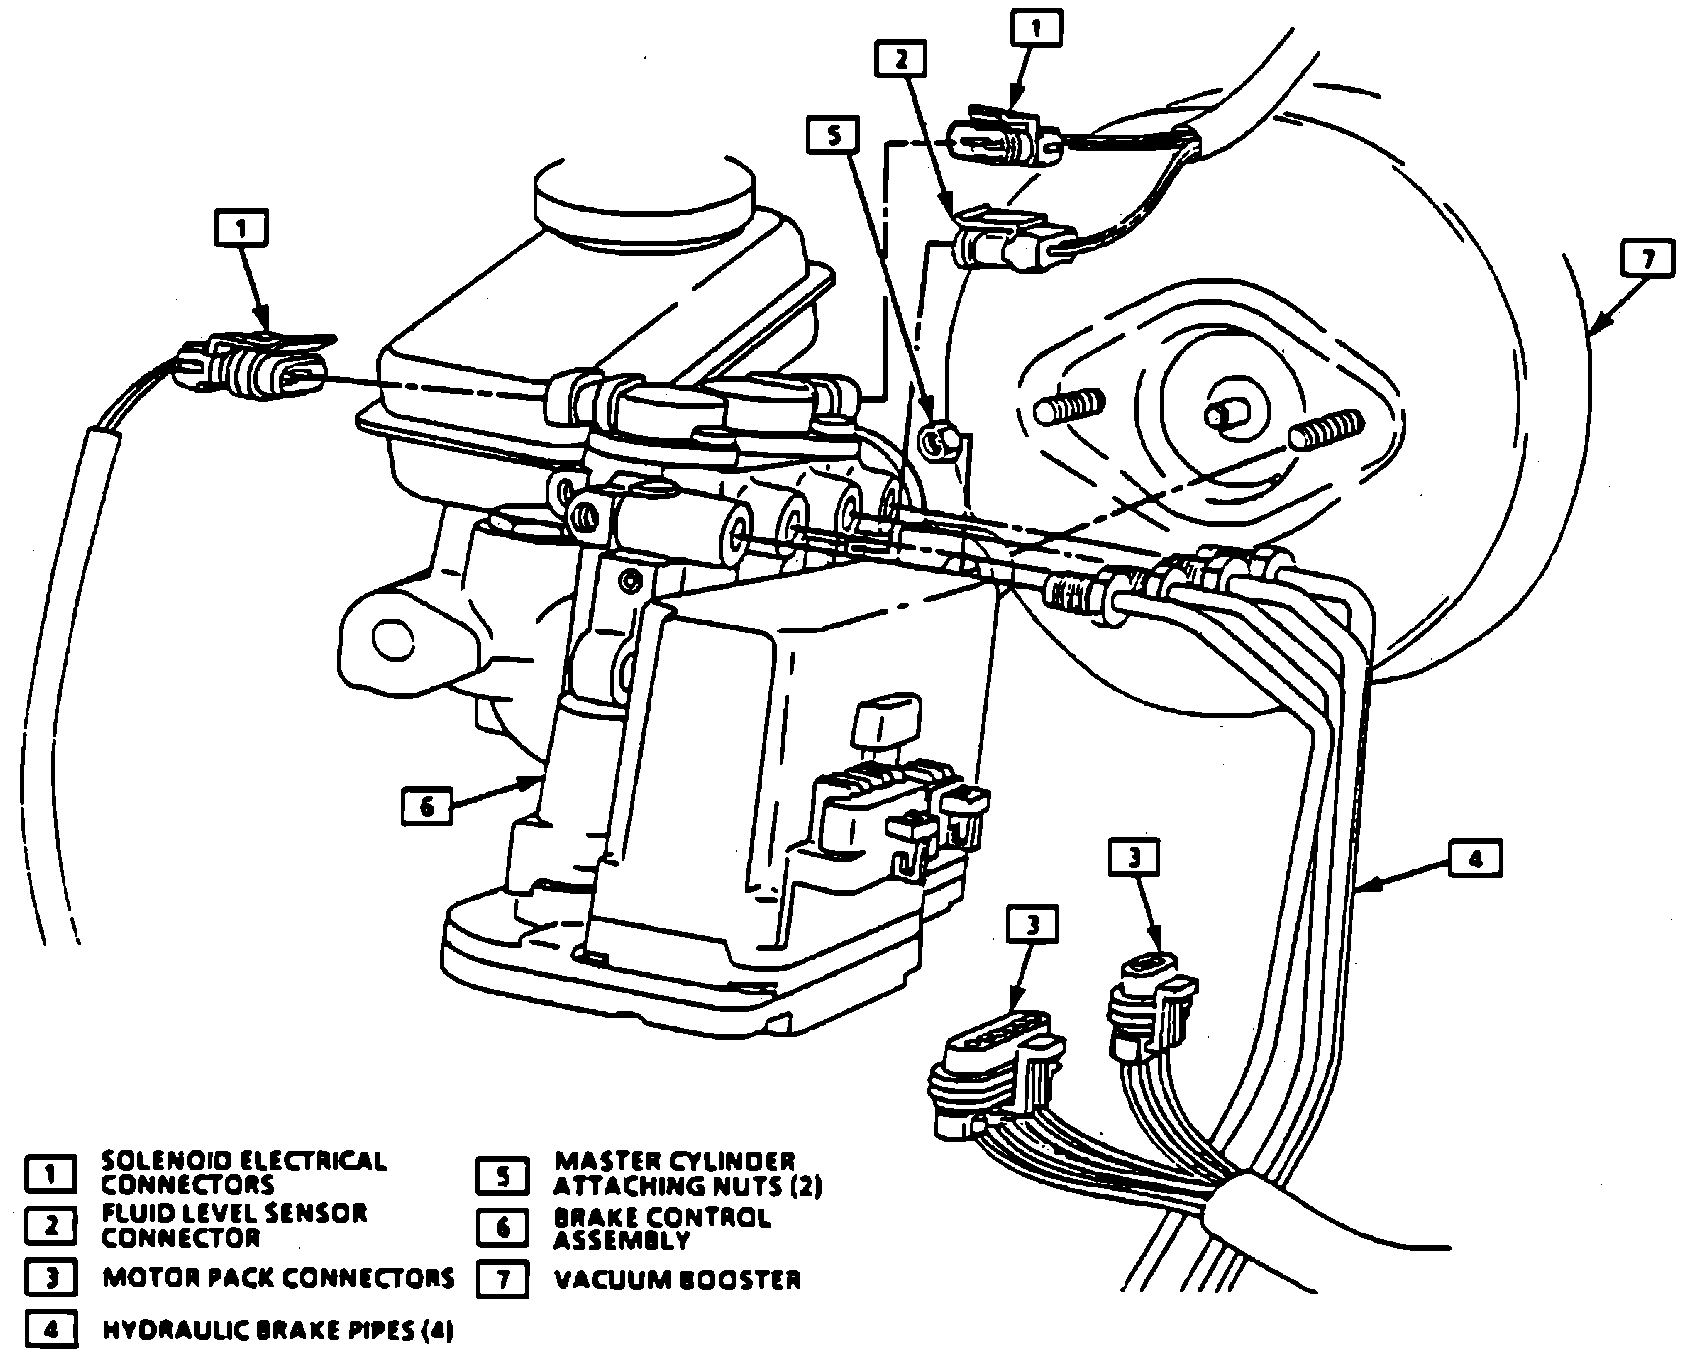
Pic 1

Brake Pipe Connections

pic 2

WARNING: To avoid personal injury, due to a retained load on the modulator assembly, the "Gear Tension Relief" function of the TECH 1 scan tool must be performed prior to removal of the brake control and motor assembly.

Remove or Disconnect
1. Using Tech 1, performing "Gear Tension Relief Sequence".

2. Two solenoid electrical connectors.

3. Fluid level sensor electrical connector.

4. 6-Pin and 3-Pin motor pack electrical connectors.

5. Move air cleaner cover and/or intake duct assembly aside.

6. Four brake pipes.

Place shop cloth on top of motor pack to catch any dripping fluid. Take care not to allow brake fluid to enter the bottom of the motor pack or the electrical connectors. Plug open lines to prevent fluid loss and contamination.

7. Two nuts attaching hydraulic modulator/master cylinder assembly to vacuum booster.

It may be necessary to remove vacuum check valve from vacuum booster to gain access to the nut closest to the check valve.

8. Hydraulic modulator/master cylinder assembly From vehicle.

Install or Connect

Hydraulic modulator/master cylinder assembly in vehicle.

It may be necessary to remove vacuum check valve From vacuum booster to gain access to the nut closest to the check valve.

2. Two nuts attaching hydraulic modulator/master cylinder assembly to vacuum booster.

Tighten

Nuts to 27 Nm (20 lb. Ft.).

3. Four brake pipes to hydraulic modulator/master cylinder assembly.

Tighten

Tube nuts to 24 Nm (18 lb. Ft.).

4. Motor pack 6-Pin and 3-Pin electrical connectors.

5. Fluid level sensor electrical connector.

6. Two solenoid electrical connectors.

Bleed system, refer to Brake Bleeding / Service and Repair.

__________________________________________________

Here are the directions for manual bleeding of the abs module.

_________________________________________________

1993 Chevrolet Cavalier/Z24 L4-134 2.2L
Manual Bleeding
Vehicle Brakes and Traction Control Hydraulic System Brake Bleeding Service and Repair Procedures Hydraulic System Bleeding ABS System Bleed Procedures Manual Bleeding
MANUAL BLEEDING
Manual Bleeding

Note: Use only DOT 3 brake fluid from a clean, sealed container. Do not use fluid from an open container that may be contaminated with water. Do not use DOT 5 brake fluid.

Note: In the following steps, use a suitable container and/or shop cloths to catch fluid and prevent it from contacting any painted surfaces. Clean fluid reservoir cover and surrounding area.

1. Remove fluid reservoir cover.
2. Inspect fluid level in reservoir and add to the correct level if necessary.
3. Install fluid reservoir cover.

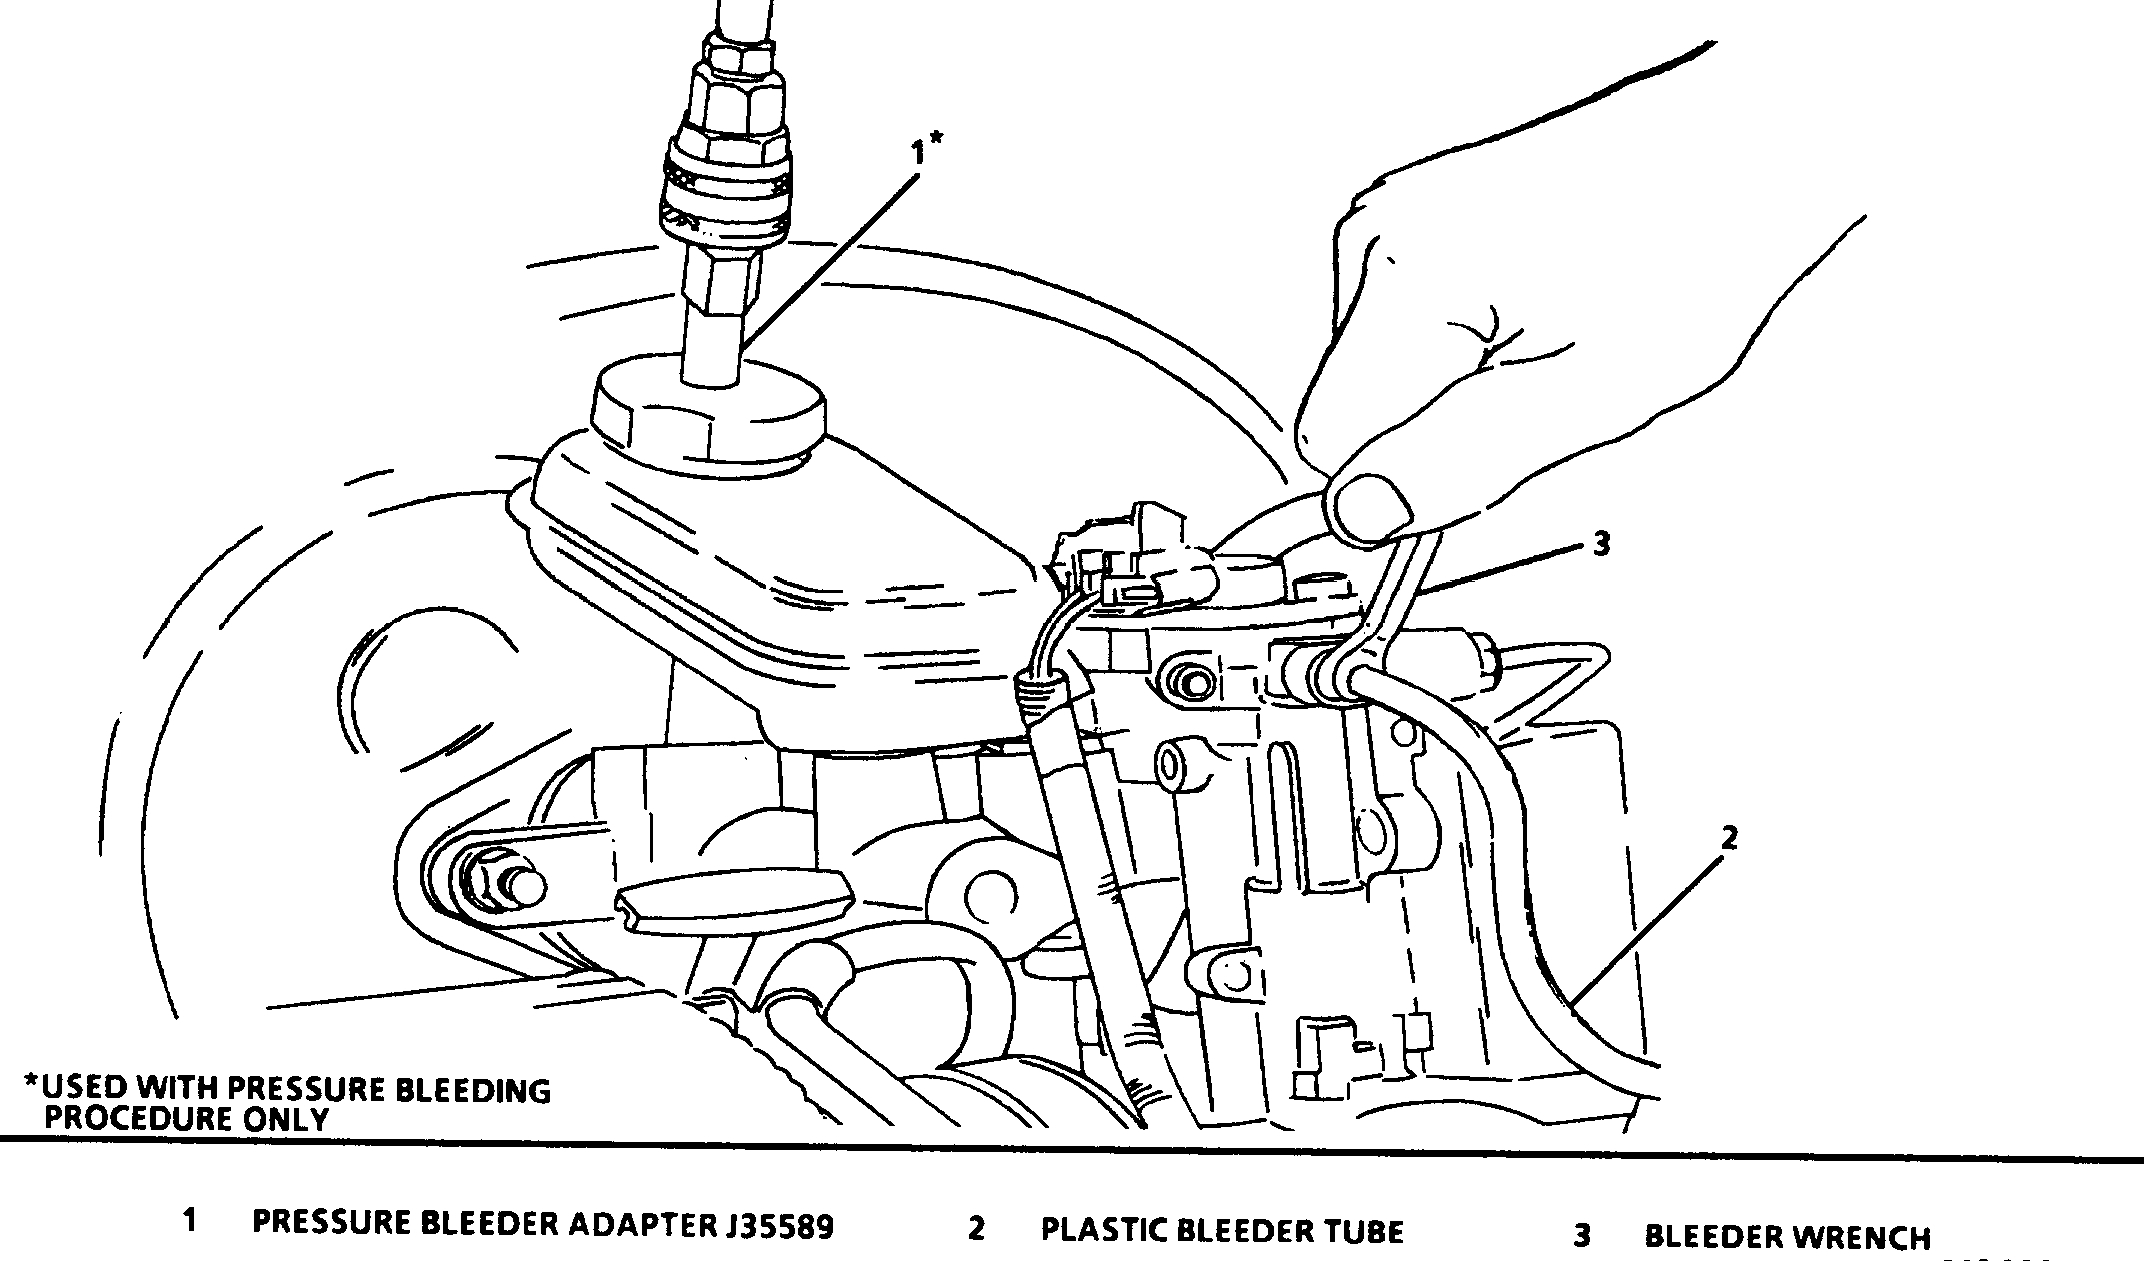
Hydraulic Modulator/Master Cylinder Assembly

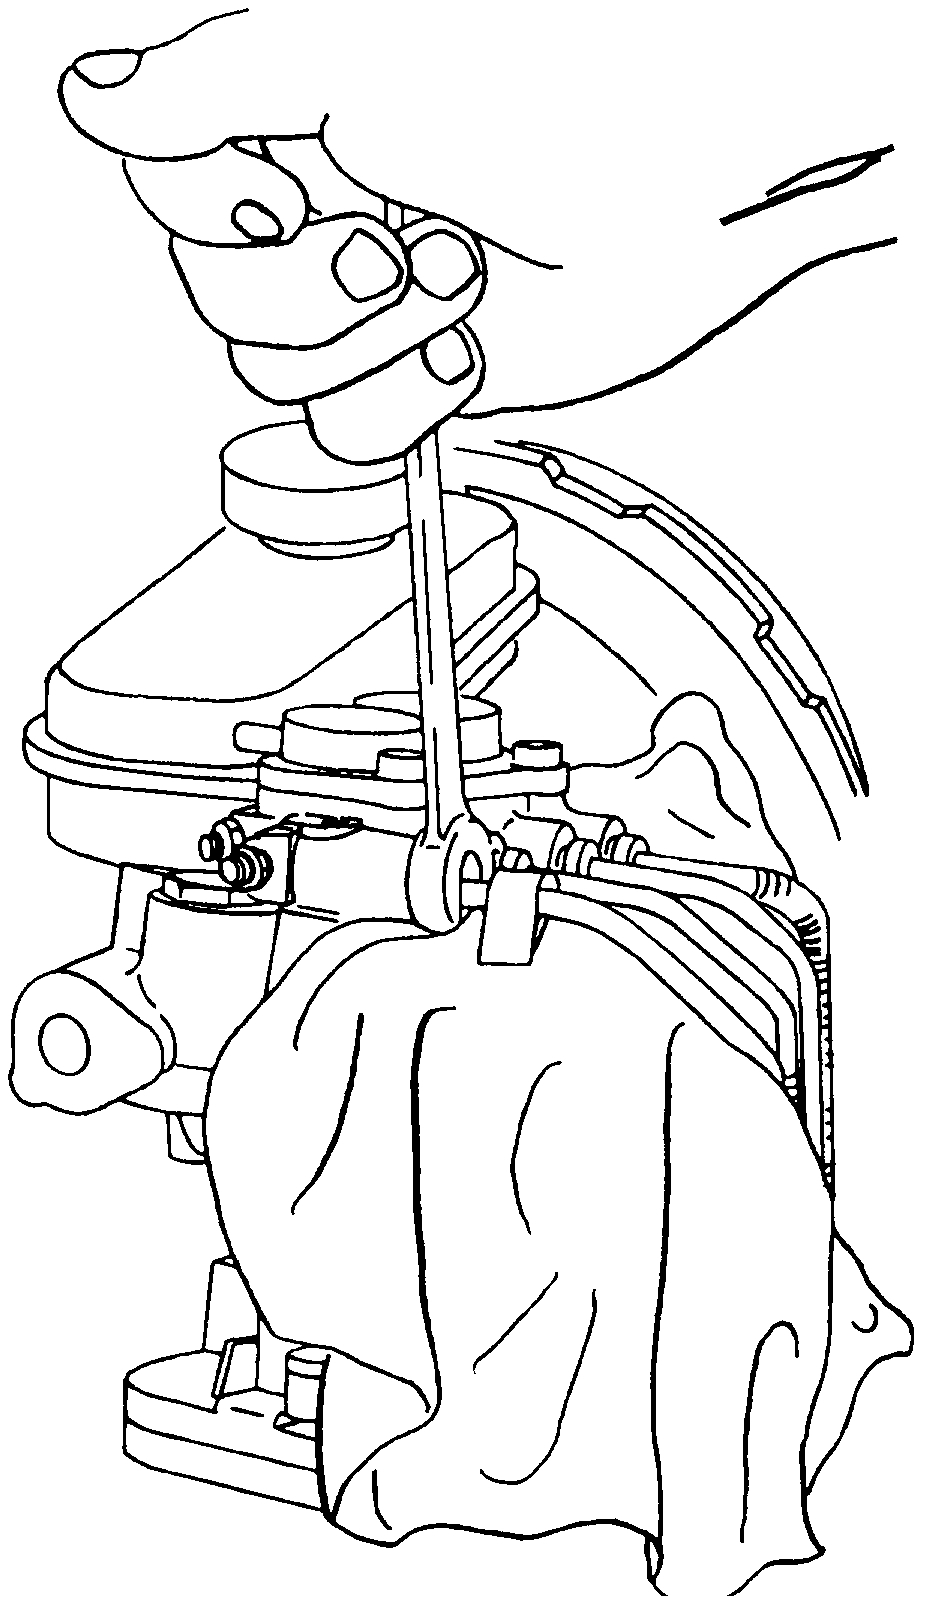
Attaching Bleeder Tube

pic 3

1. Prime hydraulic modulator/master cylinder assembly.
2. Attach bleeder hose to rearward bleeder valve and submerge opposite hose end in clean container partially filled with brake fluid.
3. Slowly open rearward bleeder valve 1/2 to 3/4 turns.
4. Depress brake pedal and hold until fluid begins to flow.
5. Close valve and release brake pedal. Repeat procedure until no air bubbles are present.
6. Repeat procedure for forward bleeder valve until fluids begins to flow.

Note: Once fluid is seen to flow from both modulator bleeder valves, the hydraulic modulator/master cylinder assembly is sufficiently full of fluid. However, it may not be completely purged of air. At this point move to the wheel brakes and bleed them. This ensures that the lowest points in the system are completely free of air and then the hydraulic modulator/master cylinder assembly can be purged of any remaining air.

1. Remove fluid reservoir cover.
2. Inspect fluid level in reservoir and add to the correct level if necessary.
3. Install fluid reservoir cover.
4. Raise vehicle and suitably support.

Bleed sequence: Right rear. Left rear. Right front. Left front.

5. Bleed wheel brakes in sequence shown above. Attach bleeder hose to bleeder valve and submerge opposite hose in clean container partially filled with brake fluid. Open bleeder valve. Slowly depress brake pedal. Close valve and slowly release brake pedal. Wait 5 seconds.
6. Repeat Step 5, including the five seconds wait until brake pedal feels firm at half travel and no air bubbles are observed in the bleeder hose.
7. Repeat Steps 5 and 6 on left rear wheel brake.
8. Repeat Steps 5 and 6 on front wheel brakes.

Note: To assist in freeing entrapped air, tap lightly on caliper casting with a rubber mallet

9. Lower vehicle.
10. Remove fluid reservoir cover.
11. Inspect fluid level in reservoir and fill to the correct level if necessary.
12. Install fluid reservoir cover.
13. Bleed the ABS hydraulic modulator/master cylinder assembly.
14. Attach bleeder hose to rearward bleeder valve and submerge opposite end in clean container partially filled with brake fluid.
15. Depress brake pedal with moderate force. Slowly open rearward bleeder valve 1/2 to 3/4 turns and allow fluid to flow.
16. Close valve and release brake pedal. Wait five seconds.
17. Repeat above steps, including the five second wait, until all the air is purged from the system.
18. Repeat procedure for forward bleeder valve until all air is purged from the system.
19. Remove fluid reservoir cover.
20. Inspect fluid level in reservoir and fill to the correct level if necessary.
21. Install fluid reservoir cover.
22. With ignition "on" apply brake pedal with moderate force and hold. Note pedal travel and feel. If pedal feels firm and constant and pedal travel is not excessive, start the engine. With the engine running, recheck the pedal travel. If it's still firm and constant and pedal travel is not excessive, go to Step 23. If pedal feels soft or has excessive travel either initially or after engine start, use the Tech 1, "Release" then "Apply" the motors 2 to 3 times and cycle the solenoids 5 to 10 times. Be sure to "Apply" the front and rear motors to ensure the pistons are in the upmost position. Now repeat the procedure and start at Step 1.
23. Road test the vehicle. Make several normal (non-ABS) stops from a moderate speed to ensure proper brake system function.

______________________________

Let me know if this helps or if you have other questions.

Take care,
Joe
Was this
answer
helpful?
Yes
No
-1
Thursday, February 25th, 2021 AT 9:37 AM (Merged)
Tiny
RAIL BUGGY
  • MEMBER
  • 3 POSTS
I need to know how to separate the module and master cylinder.
Was this
answer
helpful?
Yes
No
Thursday, February 25th, 2021 AT 9:37 AM (Merged)

Please login or register to post a reply.

Sponsored links