Very important to have it at least inspected if not replaced
losing a timing belt will for sure ruin the engine and big $$$$$ to fix
I am not sure of your mechanical ability so these are the steps to check and remove the belt
Raise and support vehicle. Remove engine undercover. Drain cooling system. Remove radiator assembly. Remove throttle body cover. Remove intake air connector assembly.
Loosen 4 bolts holding fluid coupling to cooling fan bracket. Remove serpentine drive belt, cooling fan fluid coupling assembly, and fan pulley.
Remove power steering pump from engine with hoses attached, and secure out of way. Remove serpentine drive belt idler pulley. Remove No. 3 timing belt cover from front of passenger's side camshaft.
Disconnect engine wiring harness clamps for access to No. 3 timing belt cover at front of driver's side camshaft. Disconnect electrical connectors from camshaft position sensor on No. 3 timing belt cover. Remove No. 3 timing belt cover.
Remove oil cooler pipe. Remove No. 2 timing belt cover. Remove A/C compressor with hoses attached, and set aside. Remove cooling fan bracket.
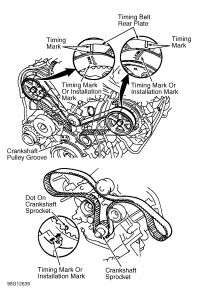
CAUTION:If reusing timing belt, ensure installation marks exist at crankshaft and camshaft sprockets on timing belt. If installation marks do not exist, place matching marks on timing belt before removing timing belt. Also, place arrow on belt indicating direction of rotation.
Using Pulley Holder (09213-70011) and Handle (09330-00021), hold crankshaft pulley. Loosen crankshaft pulley bolt.
Rotate crankshaft CLOCKWISE (viewed from front of engine) so crankshaft pulley groove aligns with "0" timing mark on No. 1 (lower) timing belt cover.
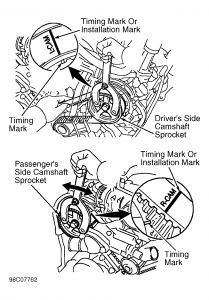
Ensure timing marks on camshaft sprockets align with marks on the timing belt rear plates. If timing marks are not aligned, rotate crankshaft CLOCKWISE one full revolution. Realign crankshaft pulley groove with "0" timing mark on No. 1 (lower) timing belt cover). Remove crankshaft pulley bolt.
NOTE:When re-using timing belt: If the installation marks have disappeared, before removal of the timing belt, place 2 new installation marks on the timing belt to match the timing marks of the camshaft timing pulleys.
NOTE:When replacing timing belt tensioner only: To maintain meshing of the timing pulley and timing belt, secure one of them with string. Place matchmarks on the timing belt and passenger's side camshaft timing pulley.
Remove generator. Alternately loosen bolts, and remove timing belt tensioner and dust boot. Using spanner wrench in holes in camshaft sprocket, slightly rotate passenger's side camshaft sprocket CLOCKWISE to release timing belt tension. Remove timing belt from camshaft sprockets.
Remove serpentine drive belt tensioner. Without letting crankshaft rotate, use puller to remove crankshaft pulley. Remove No. 1 timing belt cover. Noting direction of timing belt guide for installation reference, remove timing belt guide (crankshaft position sensor plate) and timing belt cover spacer. Remove timing belt.
CAUTION:DO NOT use solvent to clean crankshaft or camshaft sprockets. Wipe clean only.
SPONSORED LINKS
Sunday, May 2nd, 2010 AT 7:57 AM


